How to Build a DIY Trellis: Easy Ideas for Any Garden
A tomato plant won’t wait.
One week, it looks fine. Next, it folds flat under its own weight. Stems snap, fruit drops to wet soil, and the harvest you spent a season on is gone before it starts.
Buying a pre-made trellis isn’t the fix it sounds like. Most are too short, too flimsy, or cost more than the plants they’re supposed to hold up.
Building your own DIY trellis is one of the simplest projects in the garden. No workshop. No special tools. A stick-and-twine build takes a few hours and costs nothing if you have yard materials. A sturdier wood-and-wire frame takes a Sunday and runs about $15–30. Done right, it lasts for years.
This post covers practical DIY garden trellis ideas across every budget, walks through complete step-by-step builds, and shows how to match the right structure to what you’re growing.
What Is a DIY Garden Trellis and What Does It Actually Do?
A trellis is a frame or structure that gives climbing plants somewhere to grip as they grow upward.
Without one, vines spread across the ground. Stems crack under fruit weight. Produce rots where it touches wet soil. Rows become a tangle, making harvesting more work than it should be.
Growing plants vertically fixes most of that. Better airflow between stems and leaves reduces fungal disease. Fruit hangs dry and is easy to reach. Rows stay open and accessible throughout the season.
Not every plant needs a trellis. Bush tomatoes, root vegetables, and low-spreading squash do well without support. But pole beans, cucumbers, peas, climbing roses, clematis, and most vining vegetables grow better with a frame to climb.
Seed Savers Exchange recommends installing plant support at or before planting time. Setting it up after roots develop risks snapping fragile anchors and setting the whole plant back by weeks.
What You Need to Build a DIY Trellis
Gather materials before you build. Many of these are already in the garage or around the yard, and most of what you need from a hardware store costs very little.
Core materials:
- Cedar or pine lumber (cedar resists rot without sealing; pine needs a wood sealant before any ground contact)
- Bamboo canes, 4 to 6 feet tall
- Wire mesh or chicken wire for a climbing grip
- Galvanized wire and eye hooks for wall or fence mounting
- Rebar stakes or wooden posts for anchoring in open ground
- Garden twine, zip ties, or exterior screws
- Cattle panels, heavy-gauge steel grid fencing sold at farm supply stores
Here is what different builds cost:
| Build Type | Estimated Cost |
|---|---|
| Branch-and-twine obelisk | $0 (using yard materials) |
| Bamboo teepee | $8–15 |
| Stick and wire garden fence | $15–25 |
| Cattle panel arch | $25–40 |
| Large wood panel privacy trellis | $100–350 |
Store-bought trellises often run $50–$250. They rarely fit the exact dimensions of your bed or fence. Most use materials that don’t last more than a season or two.
How to Build a DIY Garden Trellis: Three Beginner-Friendly Methods
These three builds cover different budgets and plant types. Start with what you already have on hand.
Method 1: Stick Obelisk Trellis (Free)
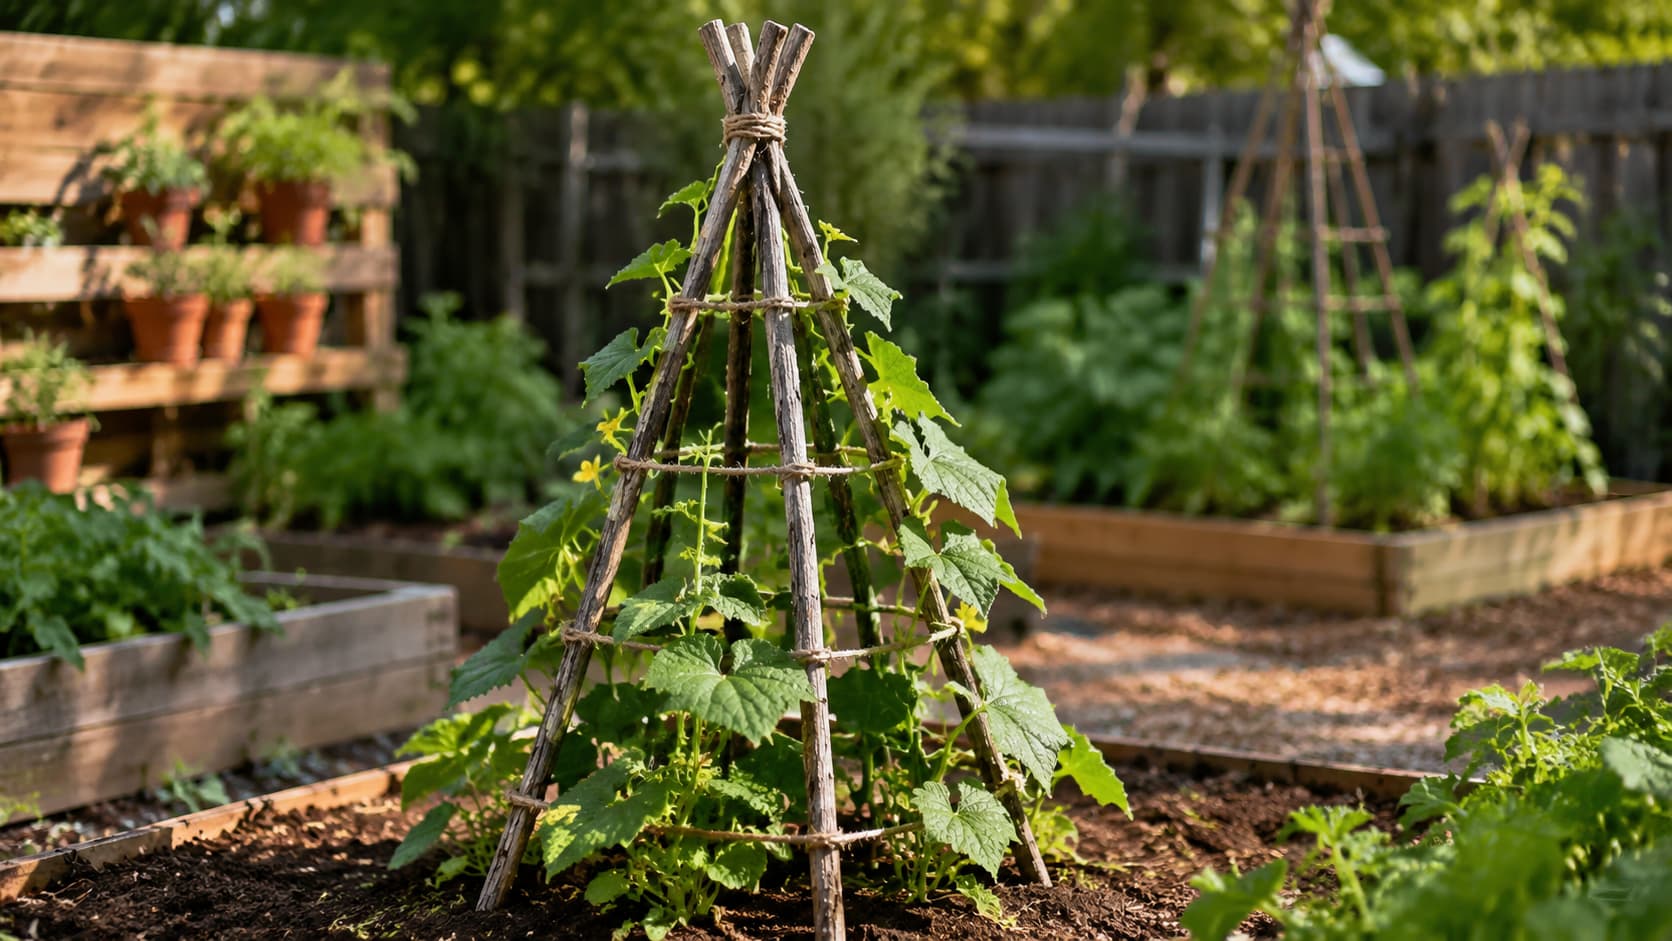
The fastest option. All you need are straight branches and garden twine.
- Step 1: Gather strong, straight branches from trimmed trees or dried sunflower stalks. Strip off any side branches and leaves. Look for pieces 5 to 6 feet long and at least one inch thick.
- Step 2: Push four branches into the soil in a teepee shape. Tie the tops firmly together using wire or cable ties.
- Step 3: Wrap thinner, flexible branches around the frame at three different heights. Secure each level with cable ties, then wrap twine over the ties for a stronger hold.
- Step 4: Plant cucumbers, climbing beans, or flowering vines around the base. Guide the first shoots onto the structure by hand, so they start climbing in the right direction.
- Step 5: After the first rain, check the stability. Re-anchor any posts that have shifted.
This style works well in small beds, containers, and tight corners. It also fits naturally alongside pallet planter ideas that already run along garden walls or the edges of raised beds.
Method 2: Stick and Wire Garden Fence (Low-Cost)
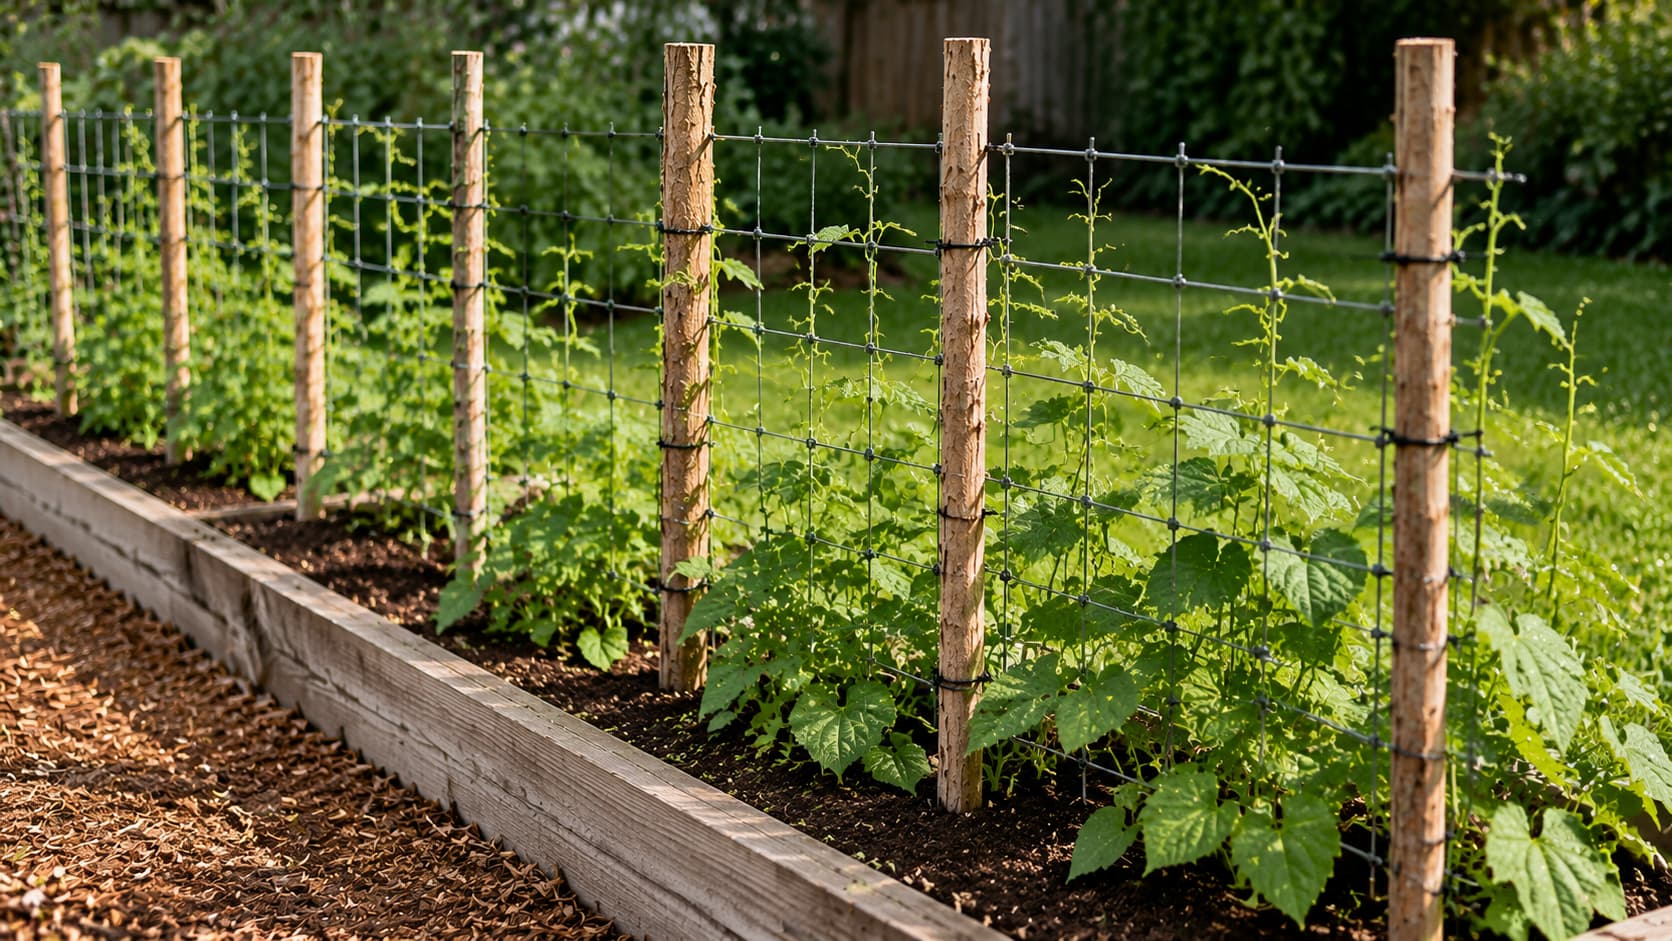
Best for supporting rows of beans, kale, zinnias, or sunflowers along the length of a bed.
- Step 1: Cut straight sticks or thin branches into 4-foot lengths. Drive them firmly into the ground about 2 feet apart along the bed edge.
- Step 2: Wrap 3-foot galvanized fencing around the first stick. Fix it with cable ties, keeping the wire taut as you pull it along the row.
- Step 3: Continue attaching the wire to each stick down the row until the fence is complete.
- Step 4: Train plants onto the fence early. Use soft garden twine to loosely tie loose stems to the wire every 6 to 8 inches up the plant.
This fence also adds a layer of protection against small pests in raised beds. It fits naturally alongside pallet fence ideas along shared border edges.
Method 3: A-Frame Trellis (For Tomatoes and Melons)
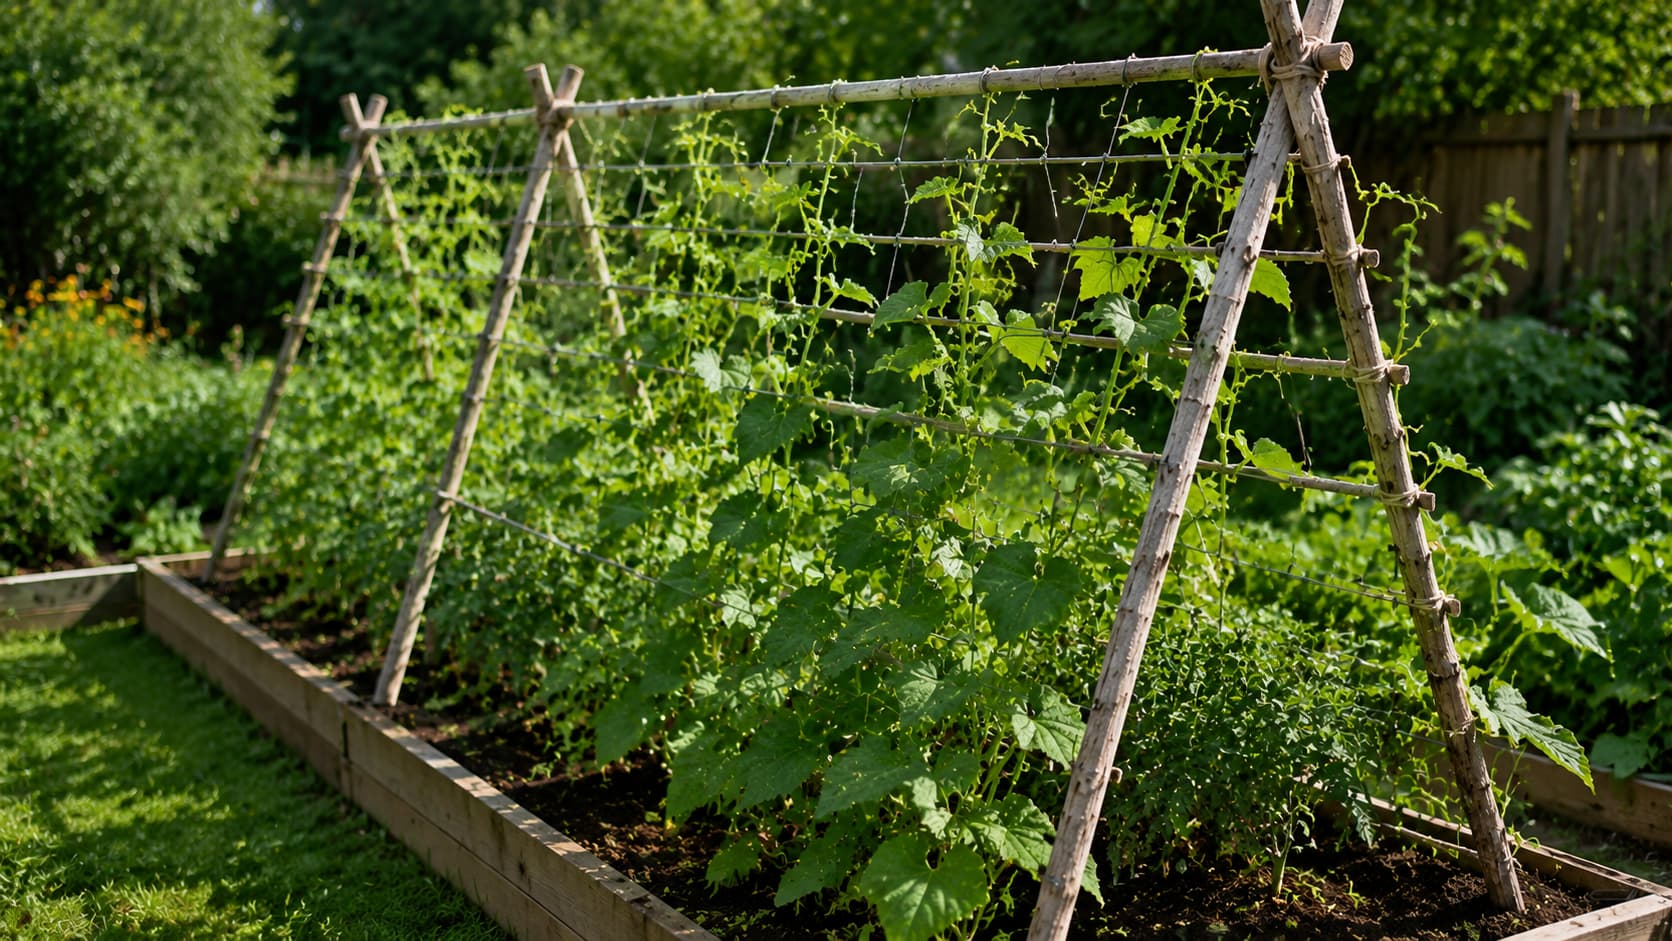
The A-frame is the strongest option for large vegetables. The angled double-sided design holds weight without tipping forward.
- Step 1: Drive two vertical support poles into the ground at one end of the planting row, about 2 feet apart. Angle them toward each other at the top and tie together securely.
- Step 2: Repeat on the other end of the row with two more poles.
- Step 3: Run galvanized wire or bamboo canes horizontally across both angled sides of the frame, spaced 6 inches apart. Tie at every crossing point to stop the wire from shifting under load.
- Step 4: Plant tomatoes, melons, or cucumbers along the outer face of each side. Guide vines upward and over the frame by hand as they grow.
Build at least 20% taller than your plant’s listed max height. Indeterminate tomatoes reach 8 feet by midsummer. Cucumbers keep going past 6 feet without slowing down.
Match Your DIY Trellis to Your Plant
Choosing the wrong structure for the plant is where most builds fail. A frame that’s too light topples once vines fill out with fruit. A frame that’s too short gets outgrown in a month.
This table matches each common climbing plant to the best trellis type and the minimum height needed:
| Plant | Best Trellis Type | Minimum Height |
|---|---|---|
| Pole beans | Bamboo teepee or wire fence | 5–6 ft |
| Cucumbers | A-frame, cattle panel arch, wire fence | 5–6 ft |
| Indeterminate tomatoes | T-post wire trellis, A-frame | 6–8 ft |
| Peas and sweet peas | Twine teepee, mini stick frame | 3–5 ft |
| Climbing roses | Fan trellis, wood panel | 5–7 ft |
| Clematis and jasmine | Diamond wire trellis, fan trellis | 5–8 ft |
| Melons and squash | Cattle panel arch, A-frame | 6 ft or more |
One rule applies to every plant type: wire gaps larger than six inches prevent small tendrils from gripping. This matters most for peas, sweet peas, and lightweight flowering climbers. Keep grid spacing at six inches or tighter for these plants.
10 Trellis Ideas DIY Gardeners Can Build This Weekend
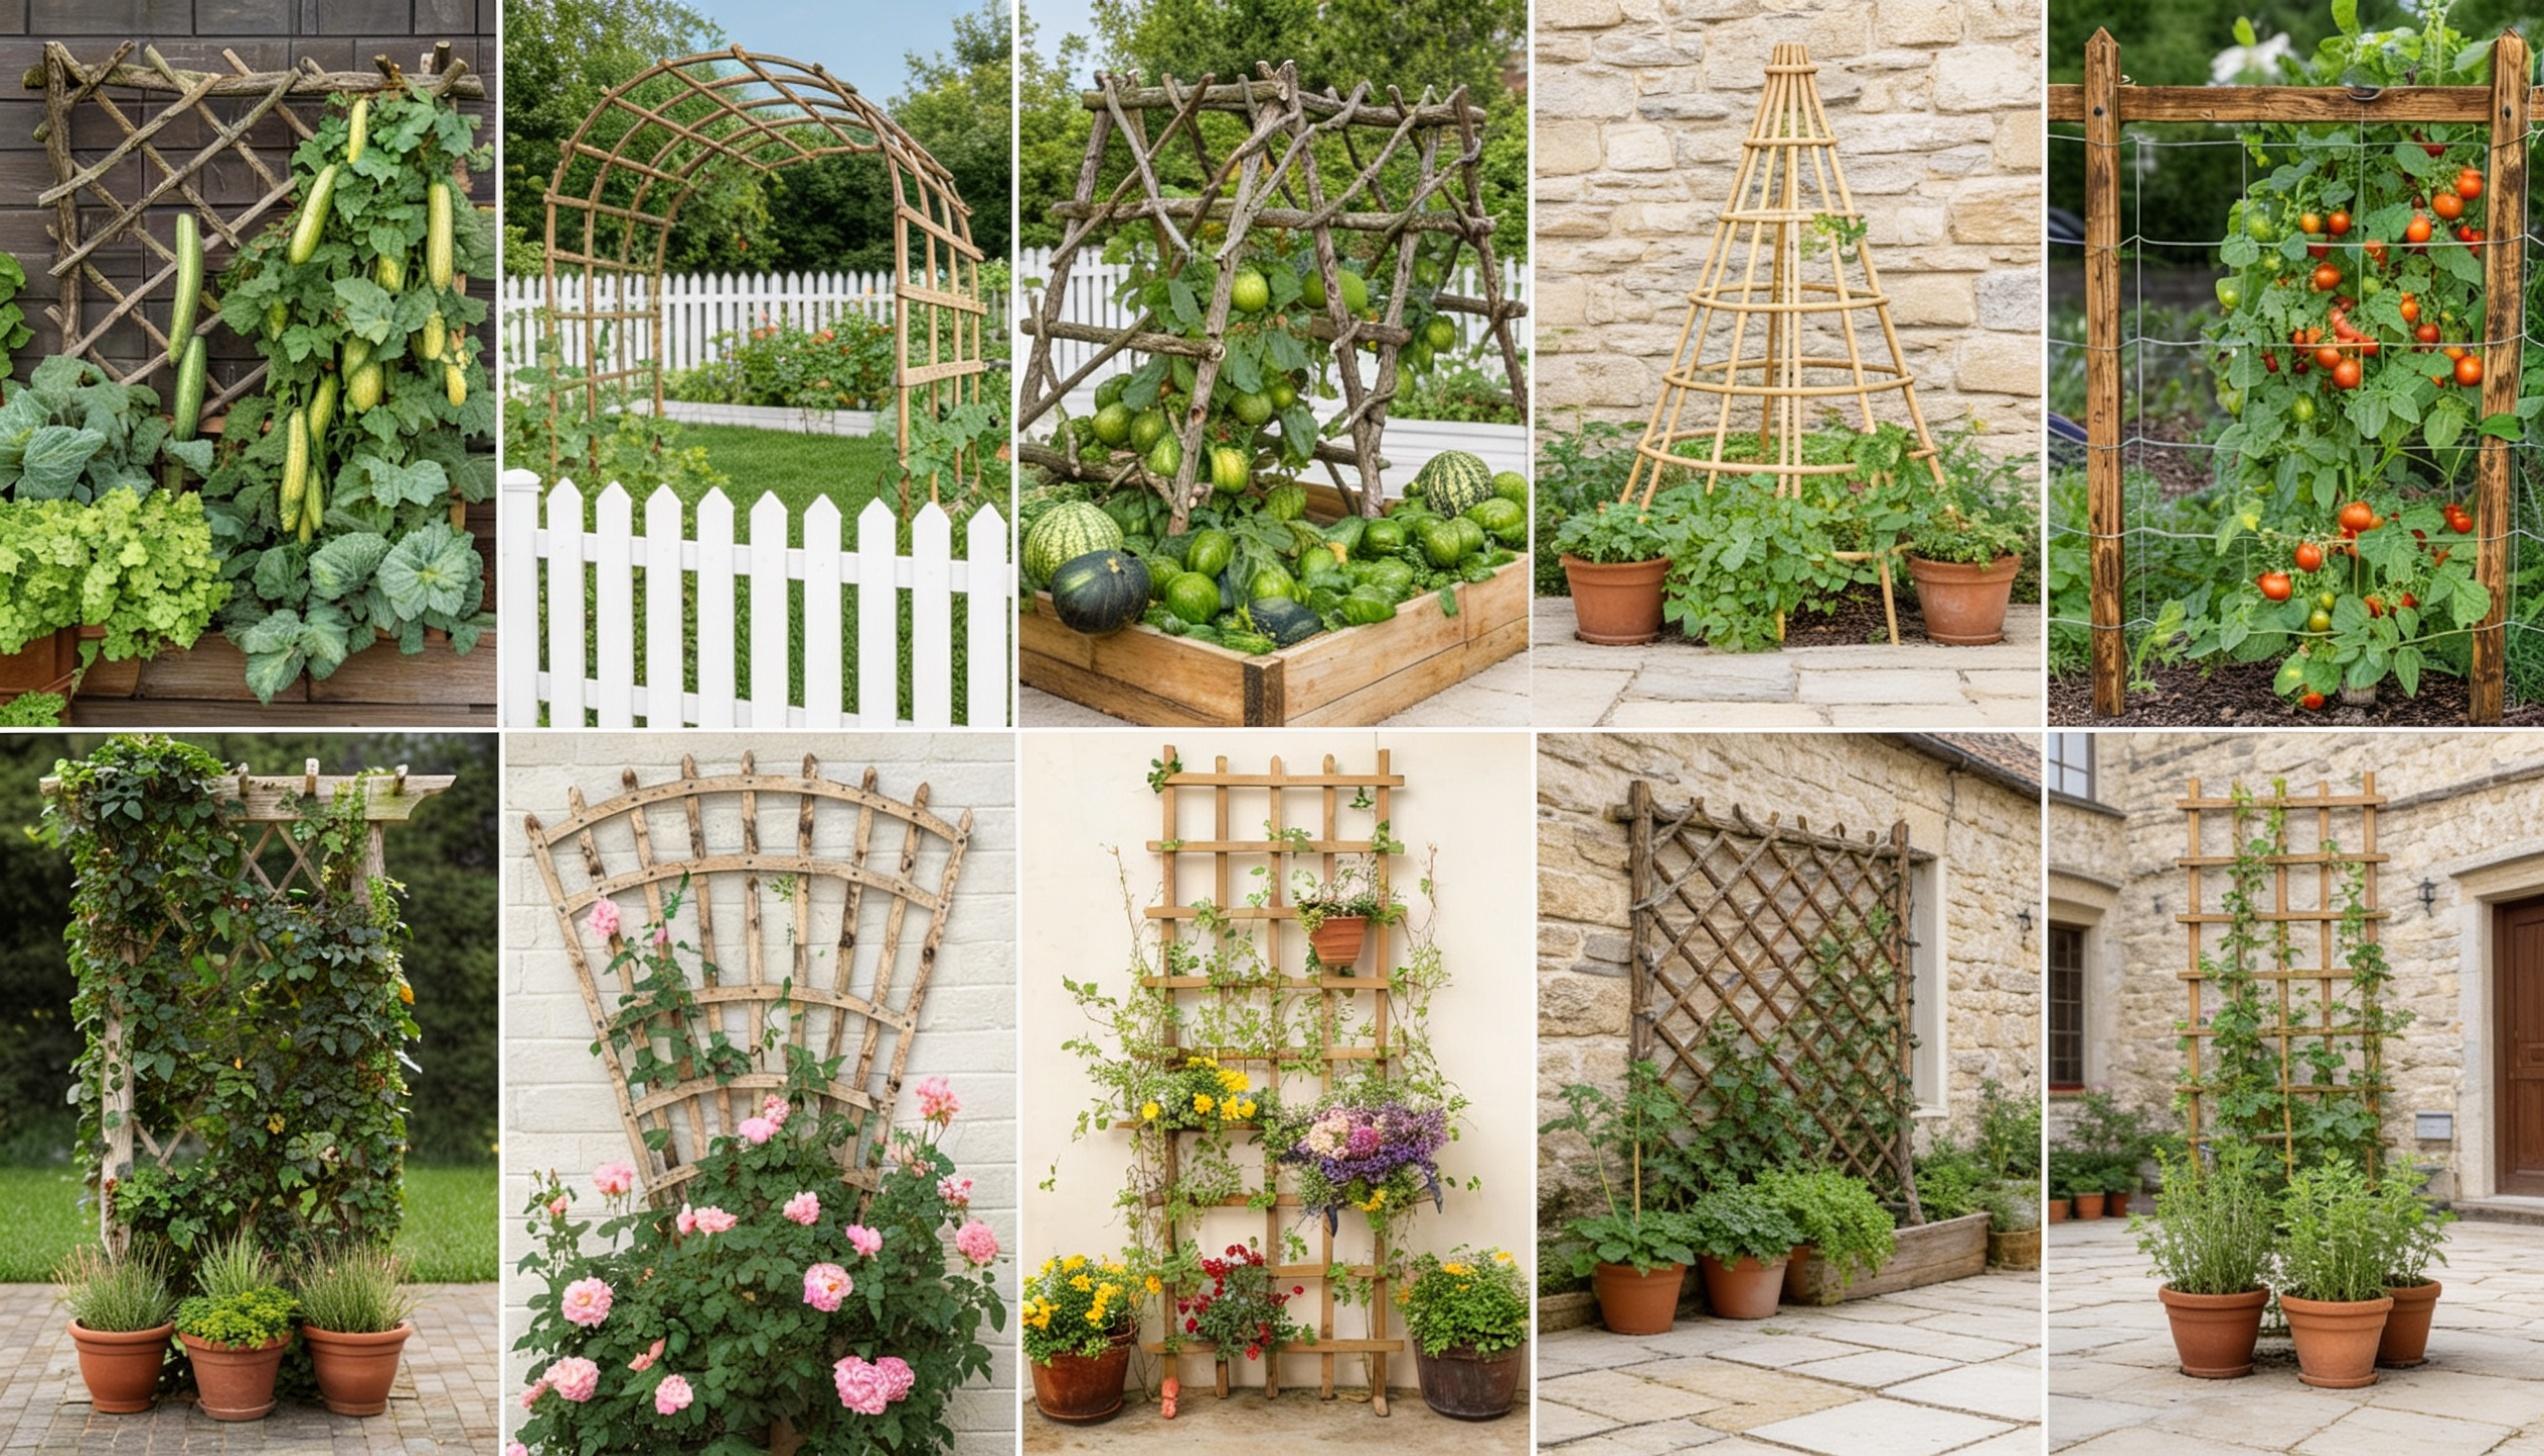
From free-branch builds to sturdy wood-panel structures, these options suit every garden size and budget. Pick the one that fits your space and what you’re growing.
- Classic wooden lattice — A simple wood frame with pre-made lattice panels. Reliable for cucumbers and beans in backyard vegetable beds.
- Cattle panel arch — Heavy steel panels bent into a walkway arch. Strong enough for squash, cucumbers, and dense bean vines that would flatten lighter frames.
- Bamboo teepee — Bamboo canes tied together at the top. Quick to build, lightweight, and good for beans and compact climbing vines.
- T-post and wire trellis — Metal posts with horizontal wire runs. Keeps heavy, indeterminate tomatoes upright throughout the growing season.
- Diamond wire wall trellis — Galvanized wire arranged in a diamond pattern on a wall or fence. A clean look for jasmine, clematis, or other ornamental climbers.
- Fan trellis — A wall-mounted, fan-shaped frame. Spreads climbing rose canes evenly so they don’t bunch and crowd each other.
- Repurposed ladder trellis — An old wooden ladder leaned against a fence or wall. Works for flowering vines in narrow side gardens or small urban plots.
- Mini stick trellis — A small branch or bamboo frame for containers. Fits inside a pot for peas or sweet peas on a balcony or patio.
- Freestanding ladder trellis — A self-standing portable frame. Good for rental spaces, patios, and seasonal container beds where nothing goes into the ground.
- Wood panel privacy trellis — Large custom panels with lattice or slats. Blocks sightlines while supporting climbing plants at the same time. Works well alongside privacy fence ideas along shared garden borders.
Taking Care of Your Trellis Year to Year
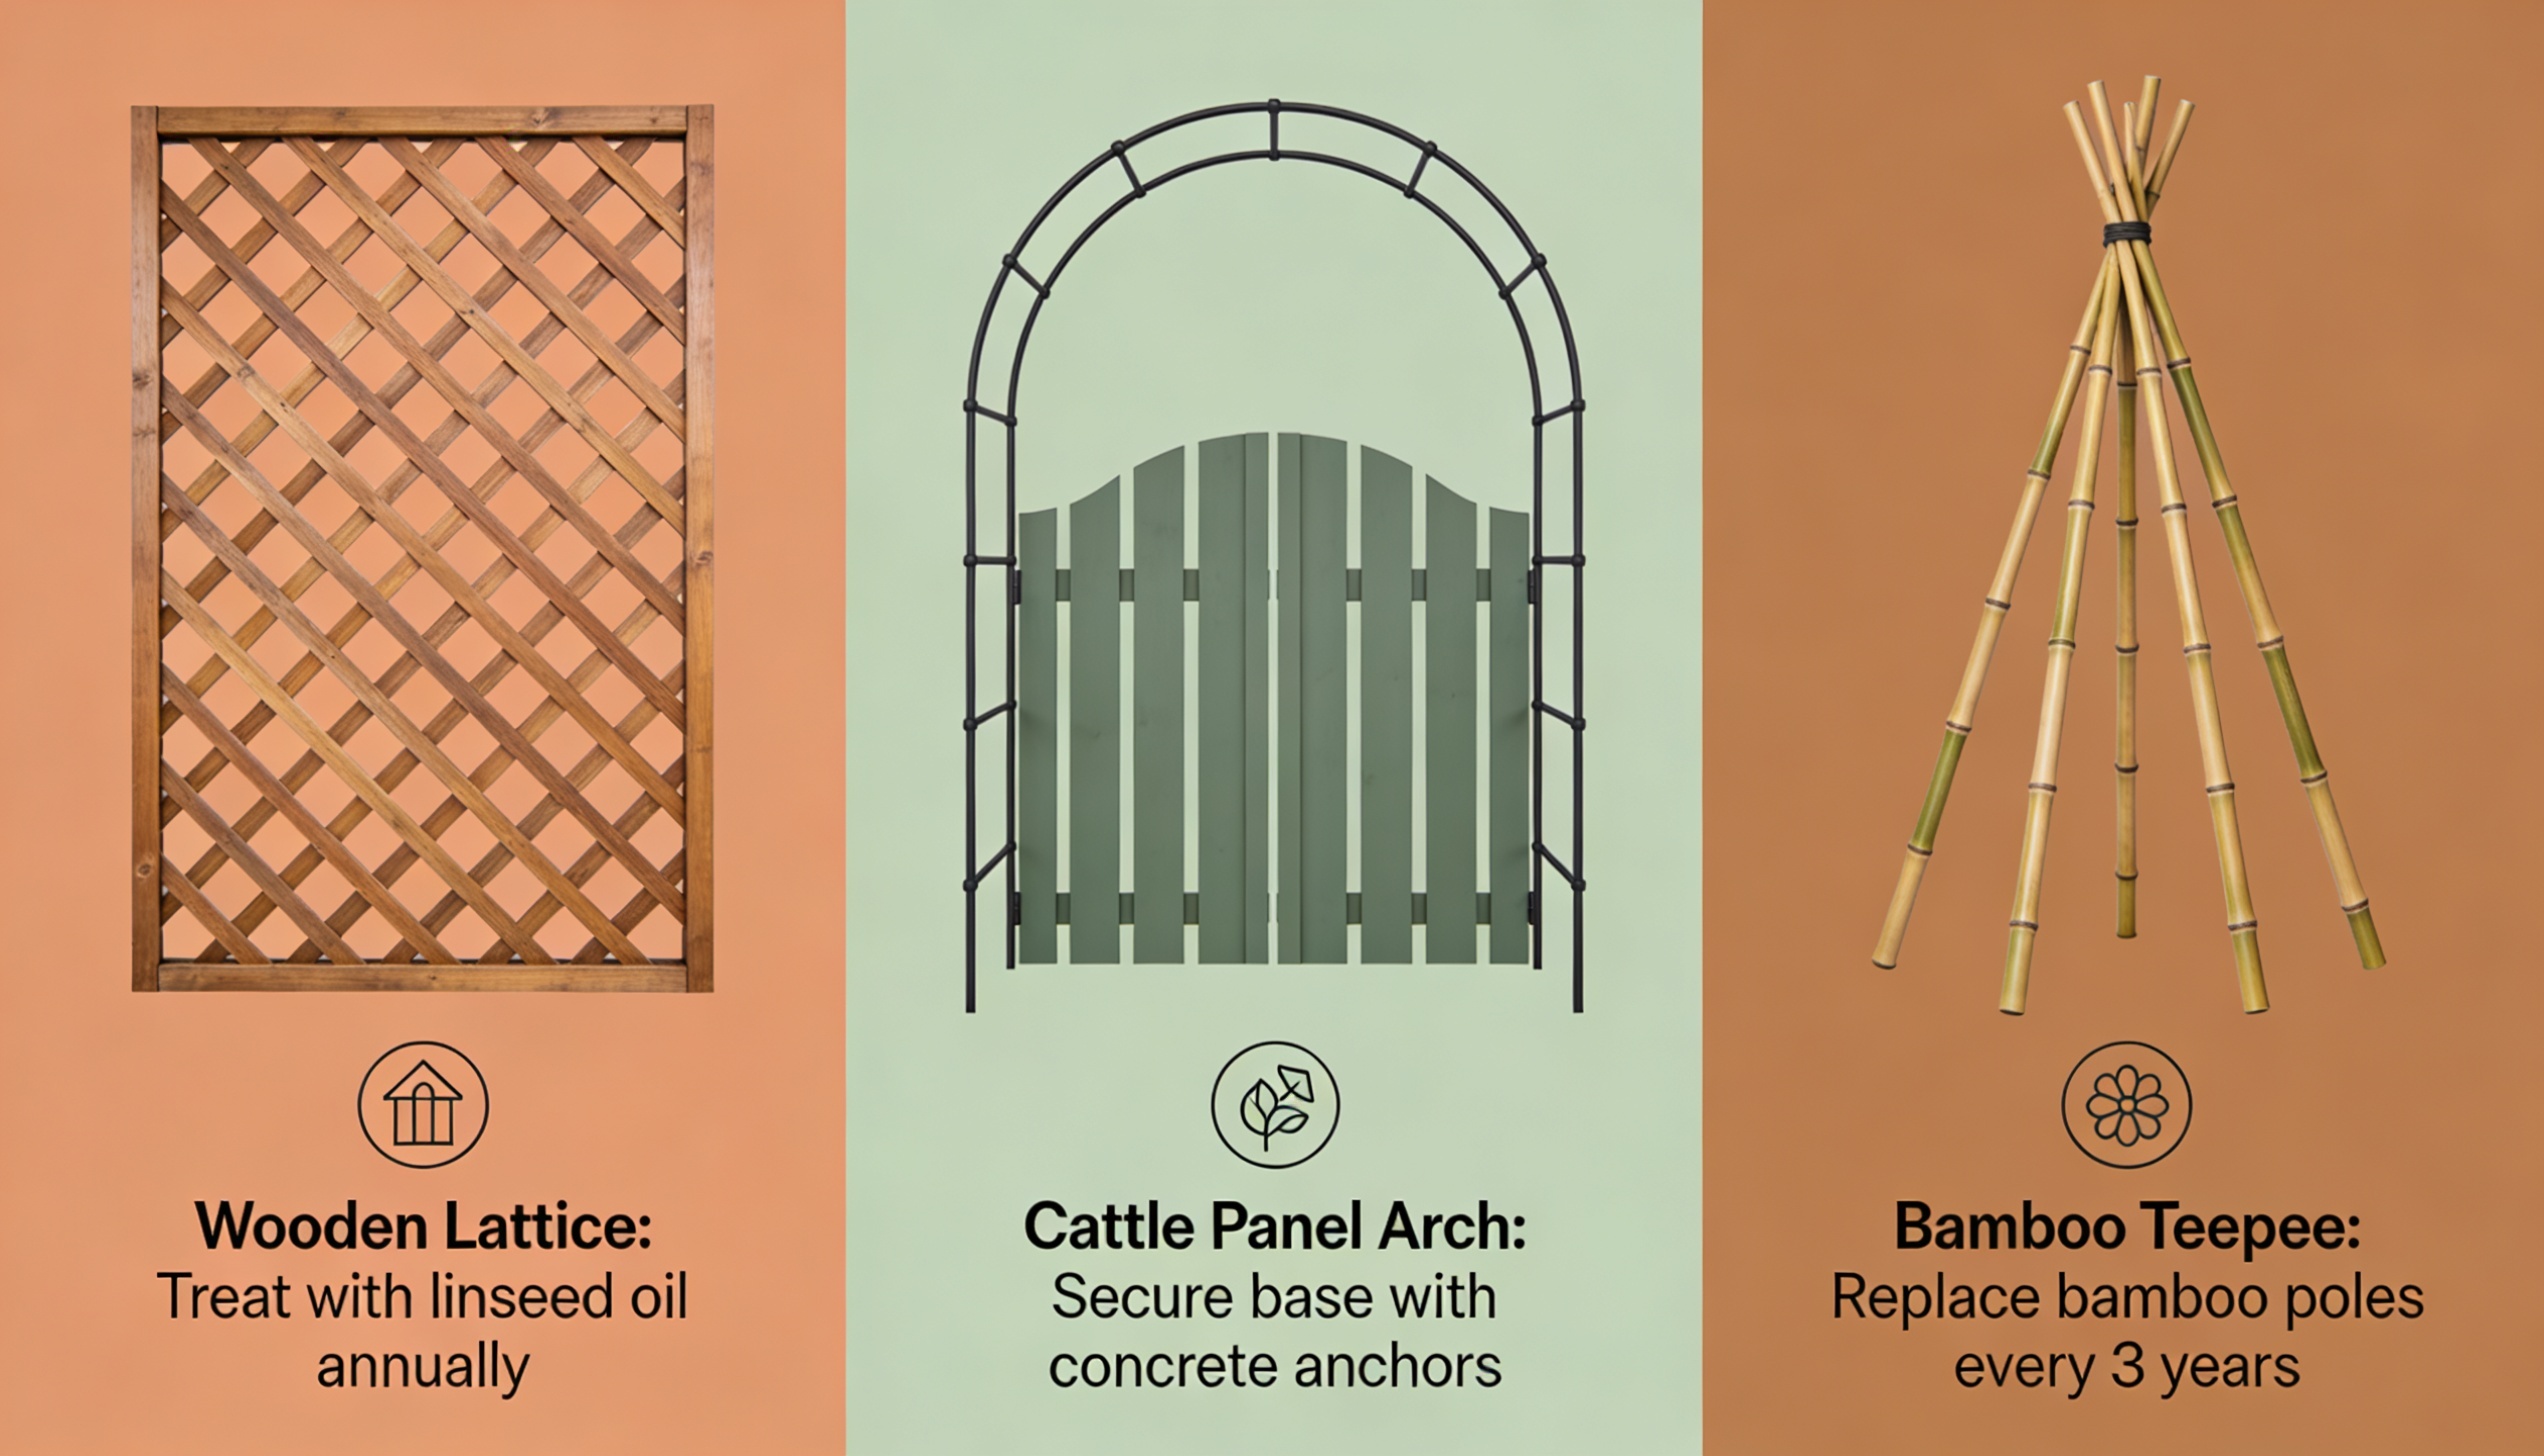
A trellis lasts much longer with minimal seasonal upkeep.
Wood trellises: Check joints each spring. Screws loosen as wood expands and contracts through the seasons. Reapply sealant every one to two years, focusing on any part that touches soil or sits near standing water.
Wire and metal trellises: Watch for rust spots each spring. A light coat of rust-inhibiting spray stops damage early where the galvanized coating wears thin.
End of season: Pull off dead vines before they dry out completely. Once dried, vines tighten around the wire, making them nearly impossible to remove without damaging the frame underneath.
Winter storage: Bring bamboo teepees and lightweight folding frames indoors. Large wood or metal structures can stay outside. A breathable cover over wooden joints reduces freeze-thaw damage through cold months.
For container gardens, a small trellis built right into the pot works just as well. Morning glories and jasmine growing in barrel planters stay tidy and well-supported when a fan trellis is inserted at planting time
When to Put Your Trellis Up
Install before planting day, not after.
Roots spread quickly once germination starts. Driving a post through an established root ball snaps fragile root anchors and sets the plant back by weeks.
Getting the structure in first also helps with planting placement. You put seeds or transplants right at the base of the support, where the climbing will start naturally.
For permanent wood-and-metal builds, spring is a good time to work. The soil is soft, and there are no roots to work around yet.
Conclusion
A trellis doesn’t have to be complicated. If you have bamboo canes and twine, you can build one before lunch. If you want something that lasts a decade and doubles as a privacy screen, that’s a weekend of work and maybe $150 in lumber.
What actually matters is getting it in the ground before your plants need it. Vines wait for no one. By the time a cucumber vine has nowhere to climb, you’ve already lost two weeks of vertical growth.
Start with what you’re growing, pick the design that fits your space and budget, and get the anchoring right. Everything else is just details.
If you try any of these builds, drop a comment below and let others know what worked and what you’d do differently next time.
Frequently Asked Questions
Is It Cheaper to Make Your Own Trellis?
Yes. A basic stick-and-wire build costs $15–25. Store-bought trellises often run $50 or more and rarely fit the right spot.
What Can I Use Instead of A Trellis?
Tomato cages, bamboo poles, garden stakes, cattle panels, wire fencing, and old ladders all support climbing plants without a dedicated trellis frame.
Does Dollar Tree Sell Trellises?
Yes. Small garden trellises and seasonal fencing appear at Dollar Tree stores in spring, usually during the main gardening season.
How Deep Should Trellis Posts Go Into the Ground?
At least one-third of the post’s total length. A 6-foot post needs 2 feet in the ground to hold a full vine load without pulling out.