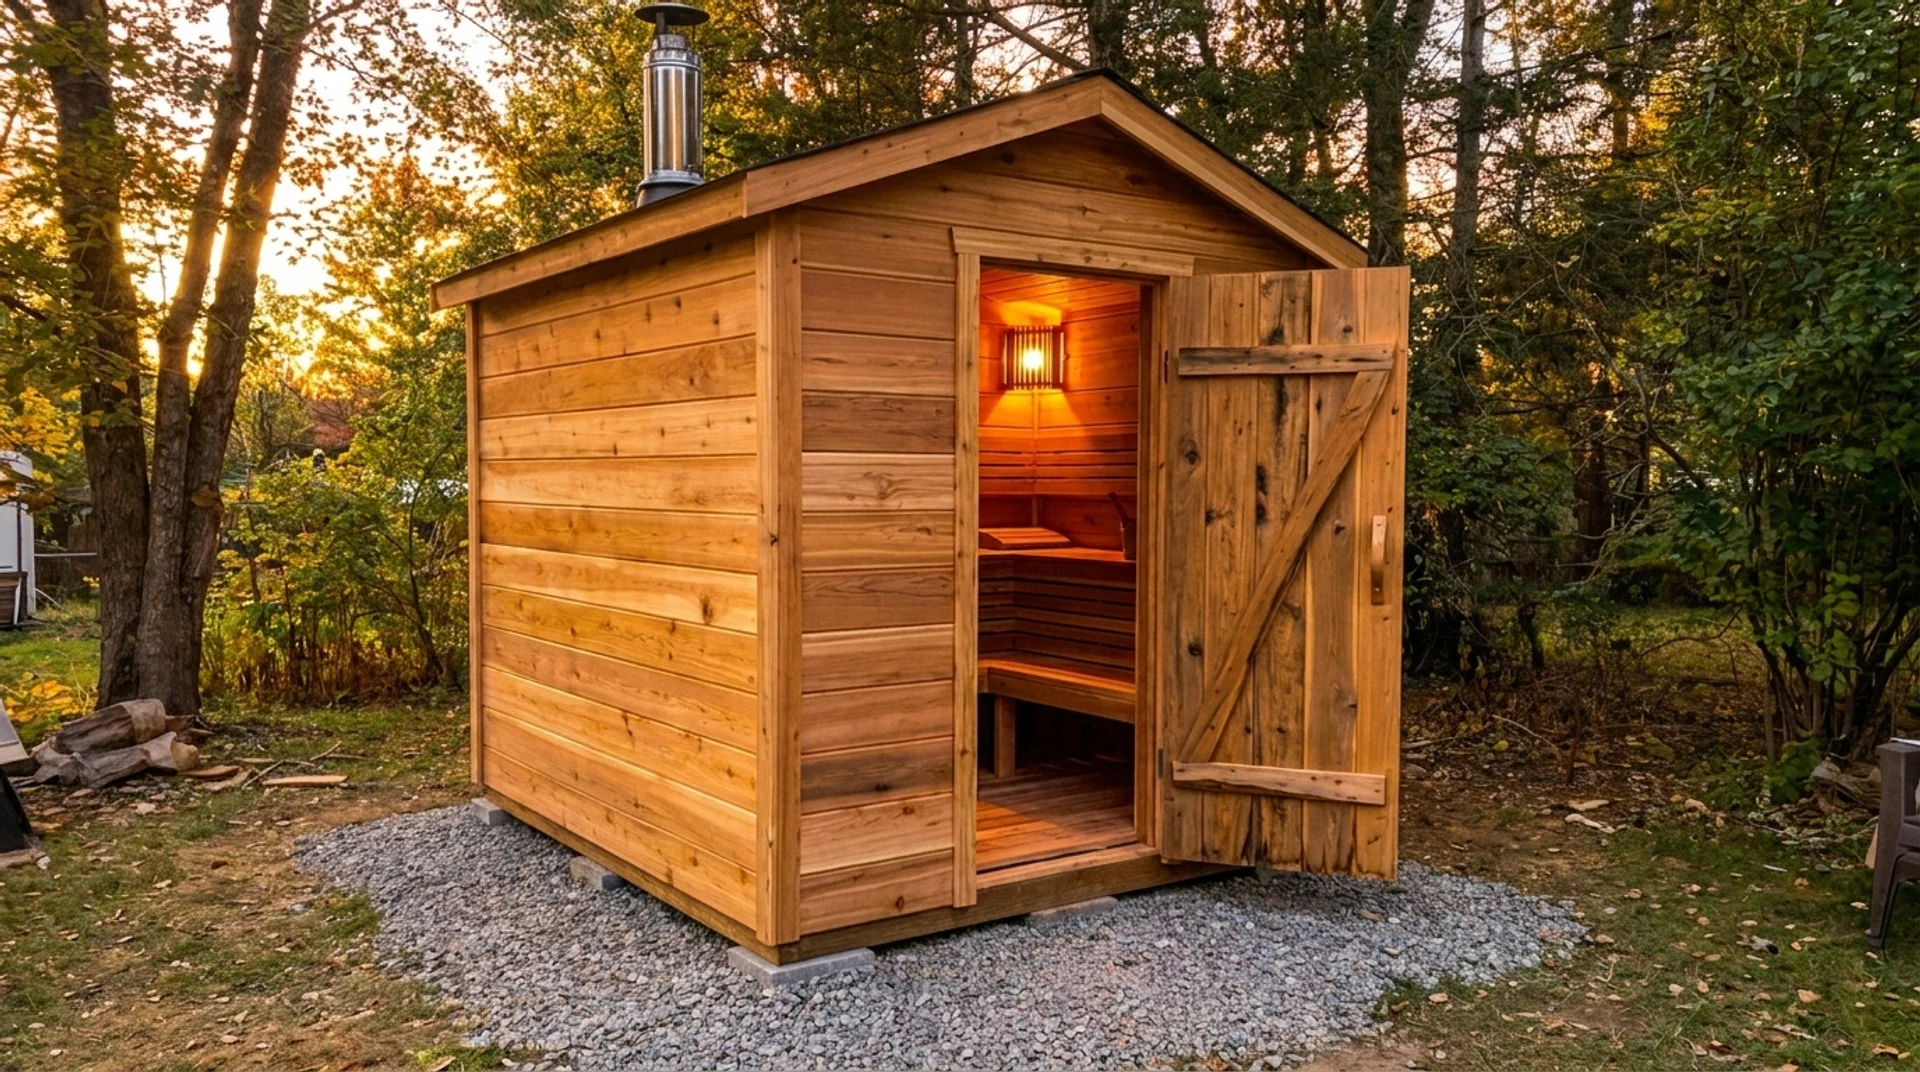
How to Build a DIY Sauna at Home for Under $3,000
Spa sessions cost $50 or more per visit. That adds up fast.
Building your own diy sauna costs $1,500 to $4,000 when you do the labor yourself. That is far less than a year of weekly spa visits.
A 2018 review published in Mayo Clinic Proceedings found regular sauna use lowers cardiovascular disease risk and reduces stress. You can get those same benefits at home.
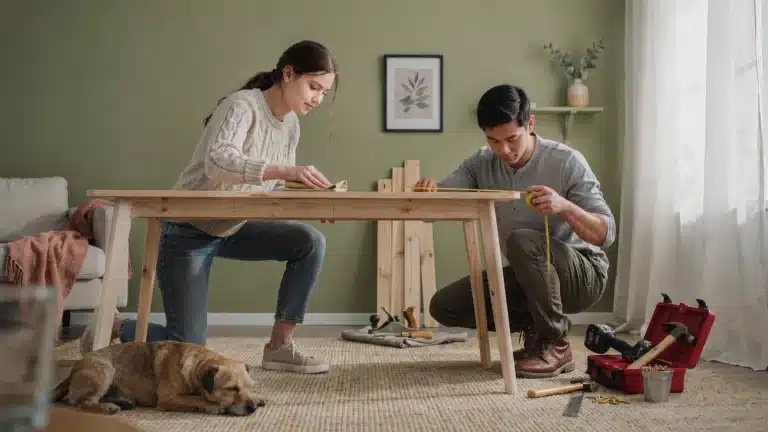
No contractor needed. You need basic carpentry skills, a few power tools, and the right materials. A small sauna takes one to two weekends to build and finish.
This post covers how to build a sauna from the ground up. Inside, you will find a full list of tools, step-by-step instructions, a cost breakdown, and the mistakes worth skipping.
What Is a DIY Sauna and How Does It Work?
A diy sauna is a small heated room built to produce high temperatures for sweating, relaxation, and muscle recovery. It traps heat inside an insulated wooden structure using a heater, controlled airflow, and moisture-safe materials.
The setup works on a simple principle. Insulation keeps heat inside the room. A lower intake vent brings fresh air in near the heater. An upper exhaust vent on the opposite wall removes stale air. That cycle keeps the space safe to breathe and comfortable to sit in.
Traditional saunas run between 160 and 185°F. Infrared models run cooler, between 120 and 140°F, by warming the body directly instead of heating the air. Both work well for home use depending on your space, budget, and preference.
Types of DIY Sauna Builds
Before buying materials, decide on your build type. Each option has different costs, space needs, and installation steps.
- Traditional (Finnish) Sauna: Uses a rock heater to reach 160 to 185°F. Pouring water on the heated rocks creates short bursts of steam. This is the most authentic setup and works indoors or outdoors.
- Indoor Sauna: Built inside a basement, spare room, or garage. Easier to heat and connect to existing electrical service. A 4×6 ft setup handles two people well. Good small space planning before framing saves time and money later.
- Outdoor Sauna: A standalone structure in your backyard. Requires weatherproofing, a foundation, and a dedicated electrical circuit. Outdoor sauna projects pair well with other backyard builds when you are planning a full weekend yard renovation.
- Barrel Sauna: A cylindrical design that heats faster and uses fewer materials than a box structure. A solid choice for smaller backyards with limited flat ground.
- Infrared Sauna: Uses heating panels instead of a traditional heater. Lower operating costs and easier installation. Runs at cooler temperatures, so the experience differs from a traditional hot-room sauna.
Tools and Materials Needed for a DIY Sauna
Before you swing a single hammer, let’s talk about what you actually need. Skipping this part is how people end up three hours in, sweaty for the wrong reasons, and missing half their supplies.
Getting your list together upfront saves you from a weekend trip to Home Depot mid-build. Here’s a basic material checklist to get you started:
| Tools | Materials |
|---|---|
| Circular Saw | Cedar or Hemlock Tongue-and-Groove Boards |
| Drill and Driver | 2×4 Framing Lumber |
| Nail Gun or Hammer | Vapor Barrier or Foil-Faced Insulation |
| Whacker Plate | Exterior-Grade Plywood |
| Staple Gun | Sauna Rocks |
| Orbital Sander | Vent Covers |
| Jigsaw | Sauna Door With Tempered Glass or Wood Panel |
| Tape Measure | Wooden Bench Boards |
| Level | Thermometer and Hygrometer |
| Utility Knife | Bucket and Ladle |
How to Build a DIY Sauna at Home Step by Step
Building a DIY sauna takes time, but most of the work becomes more straightforward once the base and framing are finished. Focus on one stage at a time, double-check measurements often, and avoid rushing the waterproofing or ventilation setup.
Step 1: Prepare and Level the Sauna Base
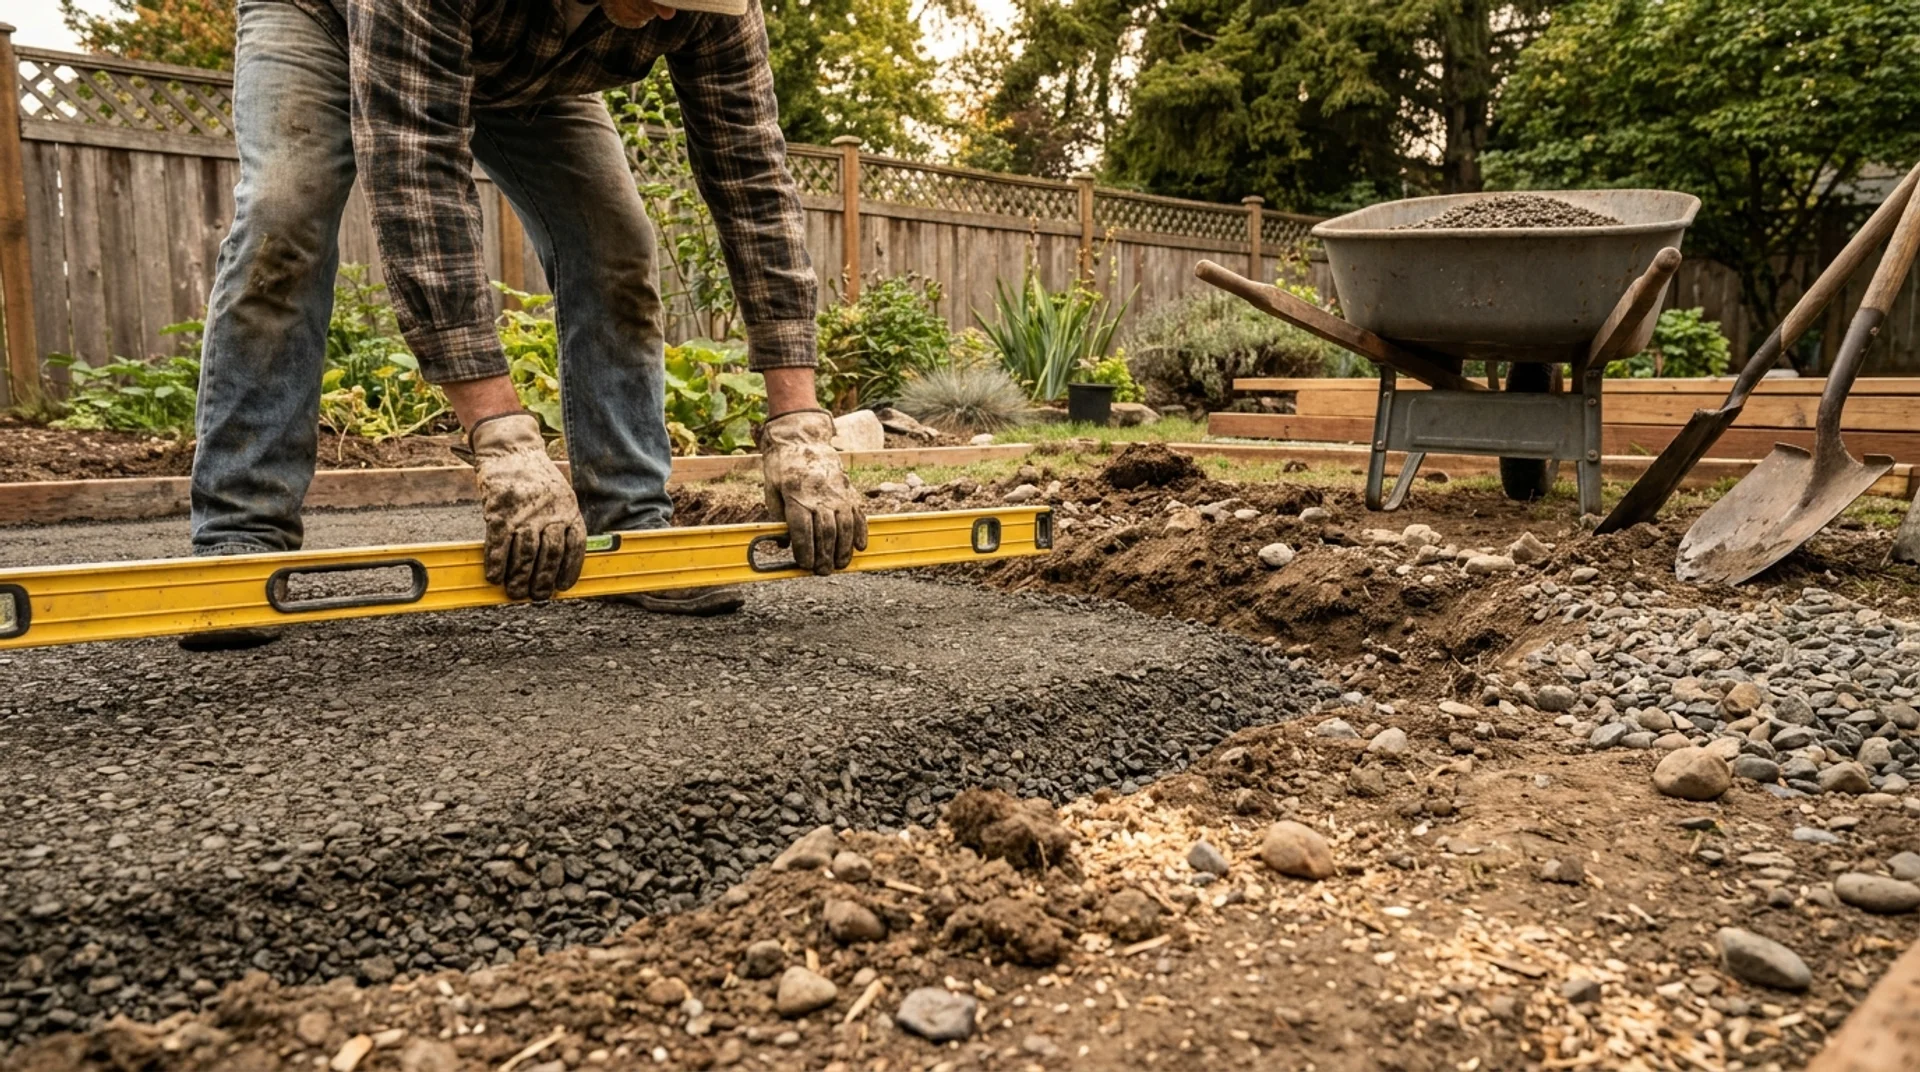
Pick your location first. Outdoor saunas sit on a concrete pad, gravel bed, or deck blocks. Check local building codes before starting. Some areas require a permit for outdoor structures with electrical wiring.
Clear the ground, remove soft soil, and compact the base layer. A 4-inch gravel base under a concrete pad works well for most backyard setups. A slight slope causes drainage issues and makes the frame harder to level.
Step 2: Build the Sauna Floor Frame
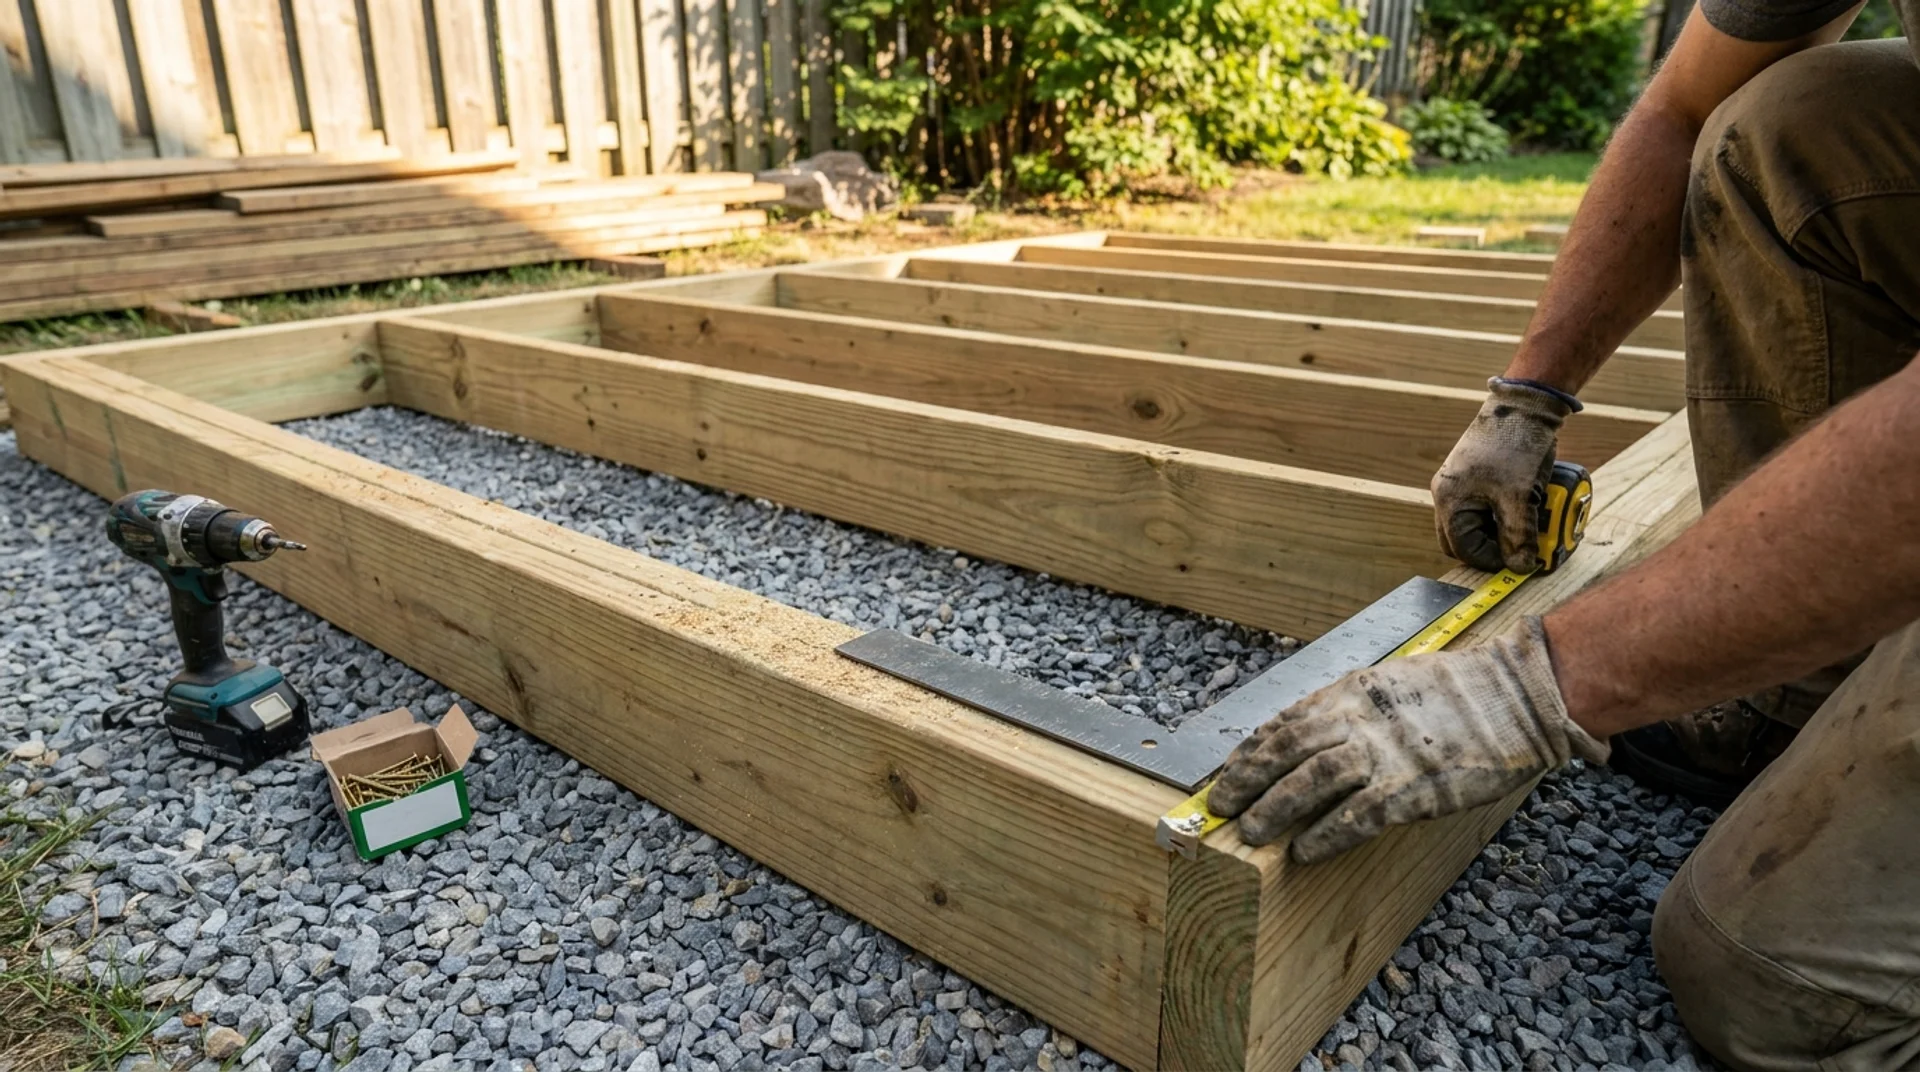
The floor frame sits directly on your prepared base. Use pressure-treated 2x4s or 2x6s here since they will be closest to moisture and ground contact. Frame it like a standard deck platform, with joists spaced 16 inches on center for a solid footing.
If you’re building indoors, a concrete basement floor works as your base, and you can skip this step. For outdoor builds, lay your frame, check it’s square by measuring diagonally from corner to corner, and secure it to the base before moving on.
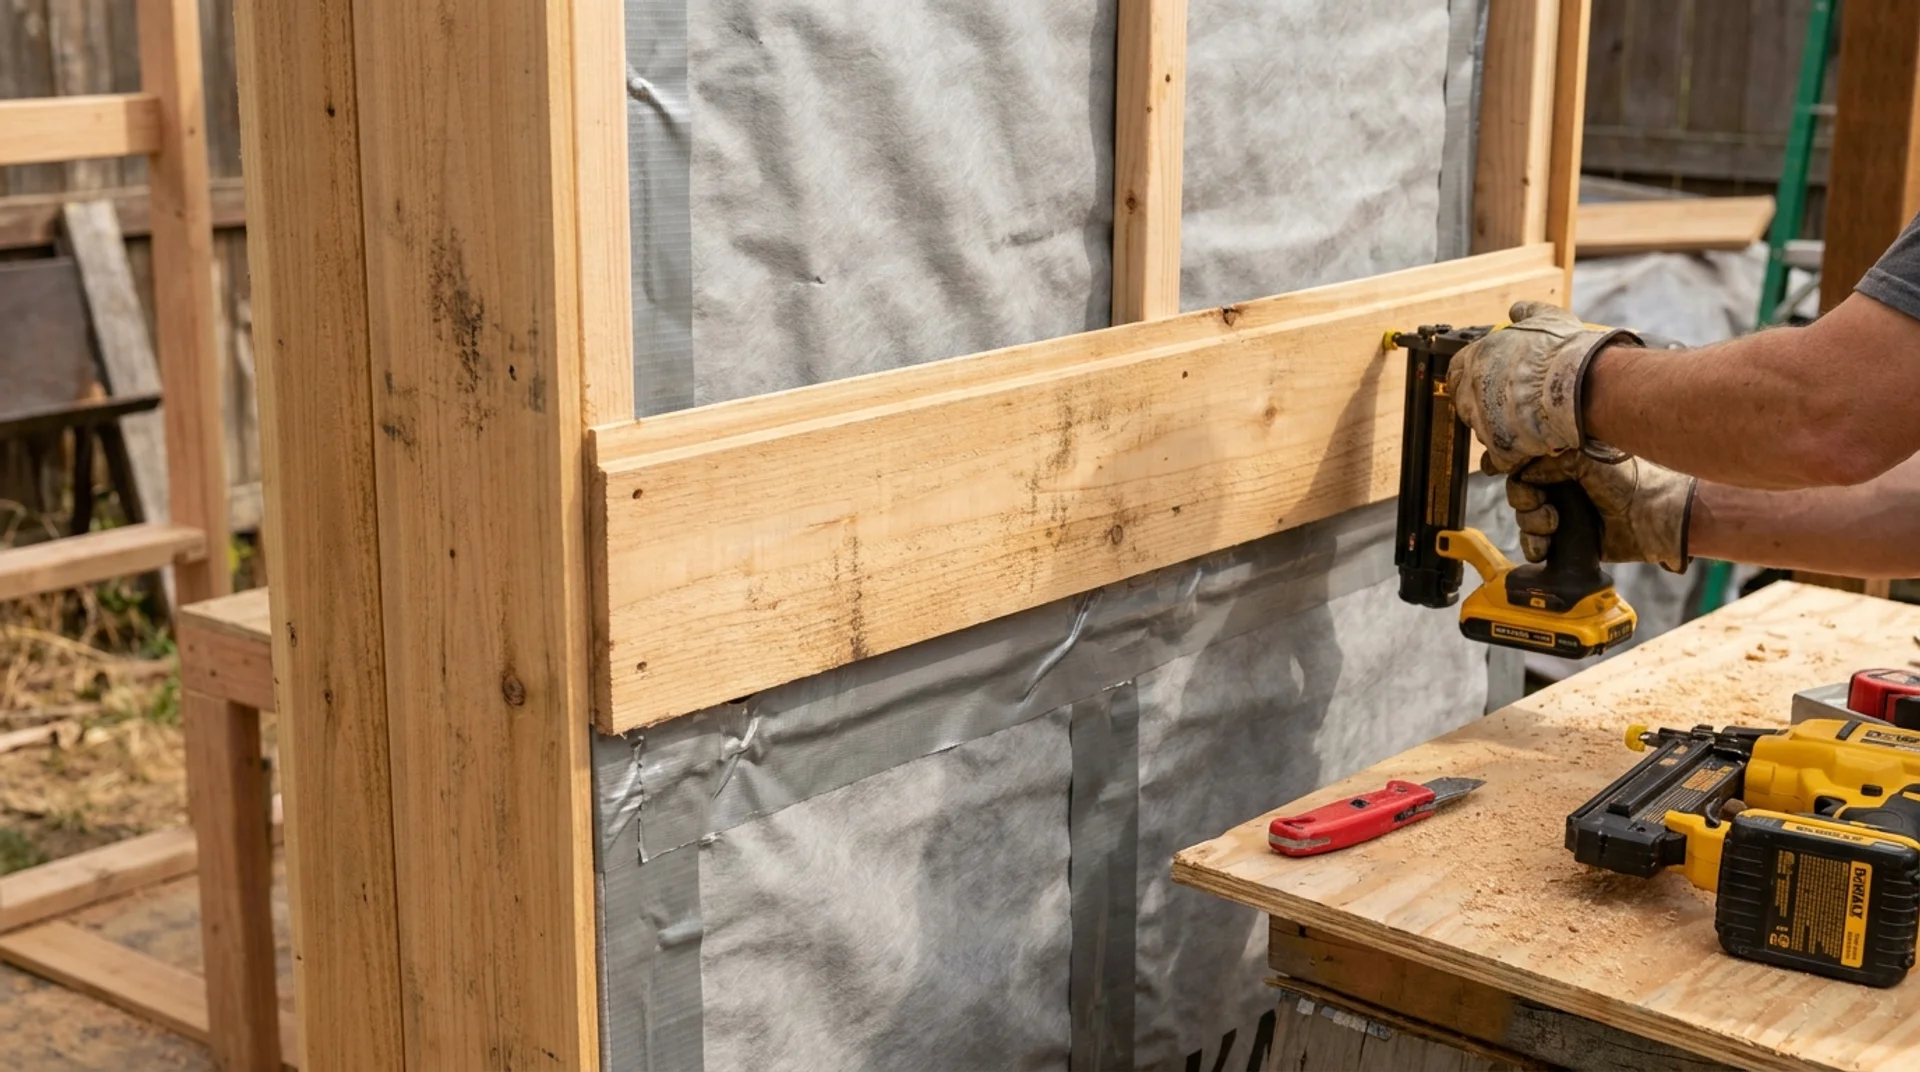
Step 3: Frame the Sauna Walls
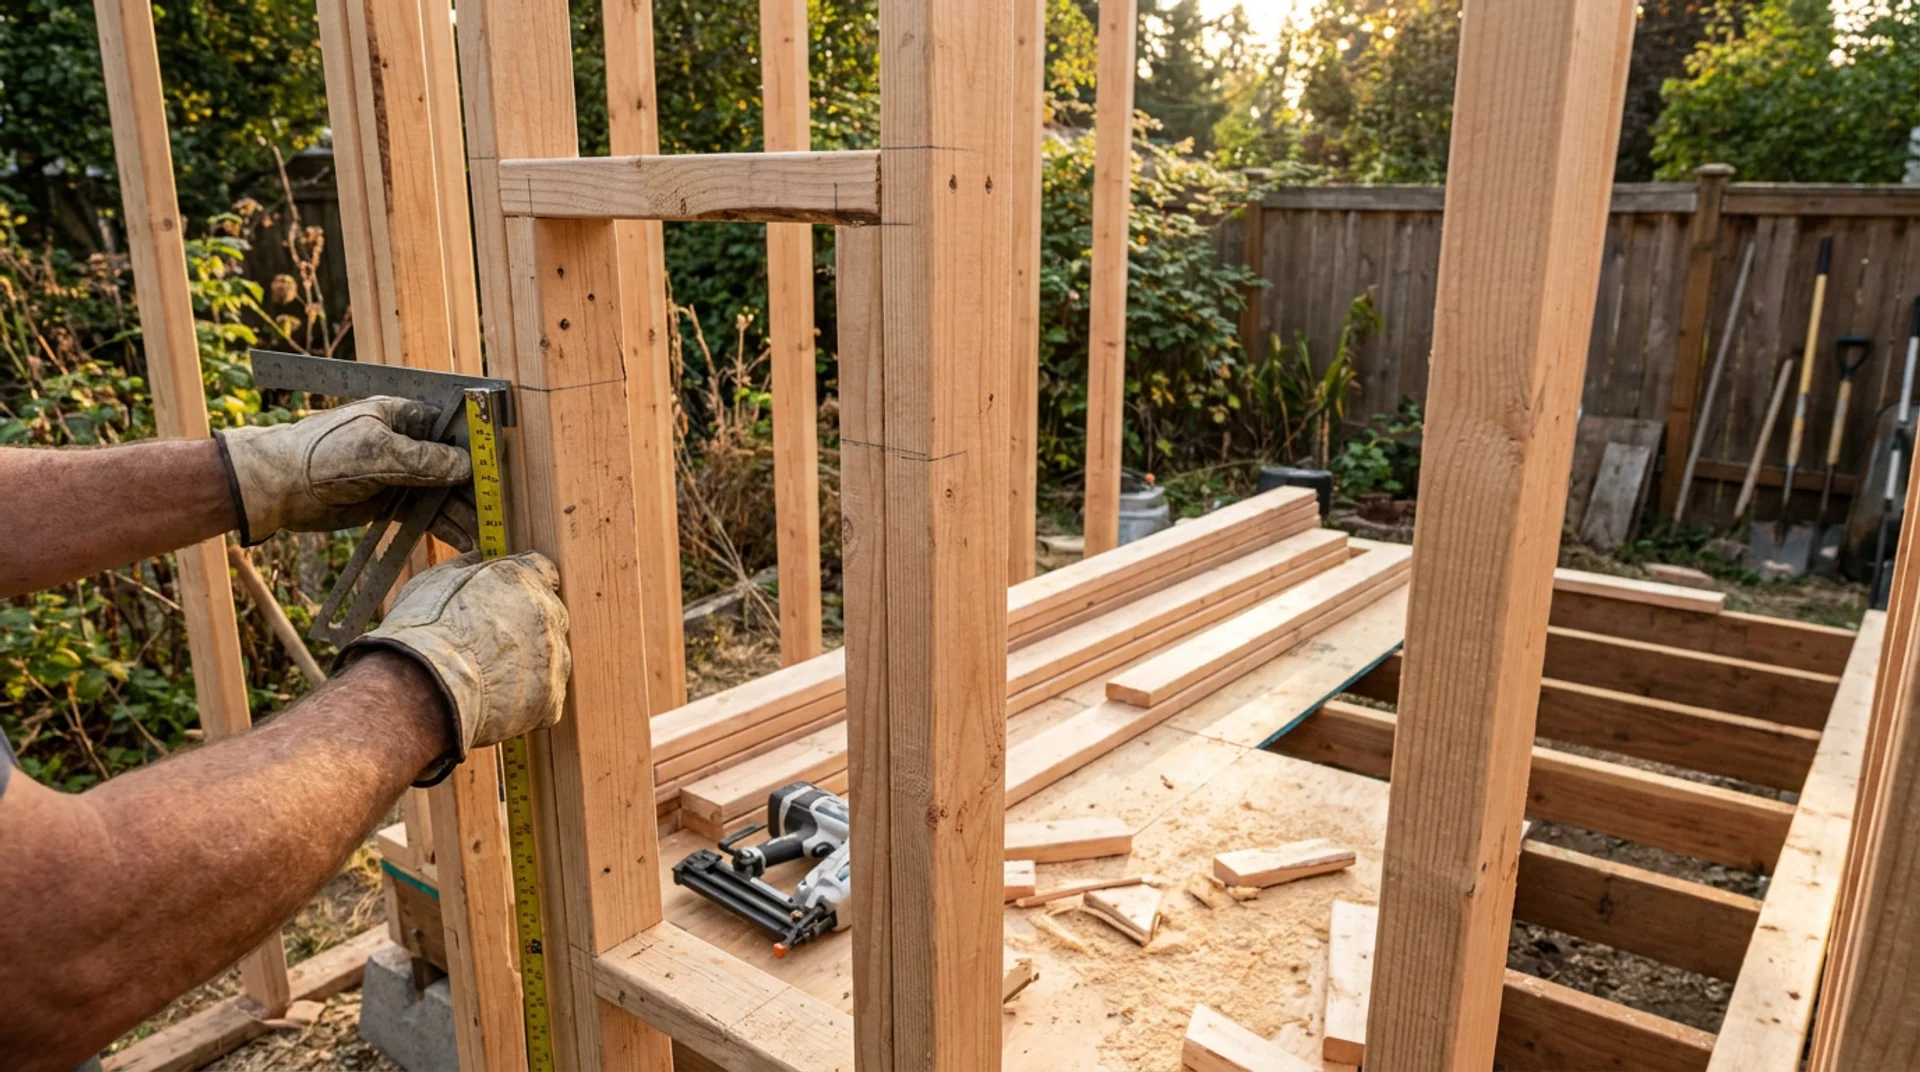
Standard wall framing applies here. Use 2×4 studs at 16 inches on-center, and keep your ceiling height between 7 and 8 feet. Too high and your heater works overtime trying to warm the dead air space above the benches. Too low and it feels like a closet.
Mark your door rough opening before you frame. Standard sauna doors run smaller than regular interior doors, typically around 24 inches wide and 72 inches tall, to keep heat from escaping every time someone walks in or out. Frame that opening with a proper header.
Step 4: Build and Waterproof the Roof
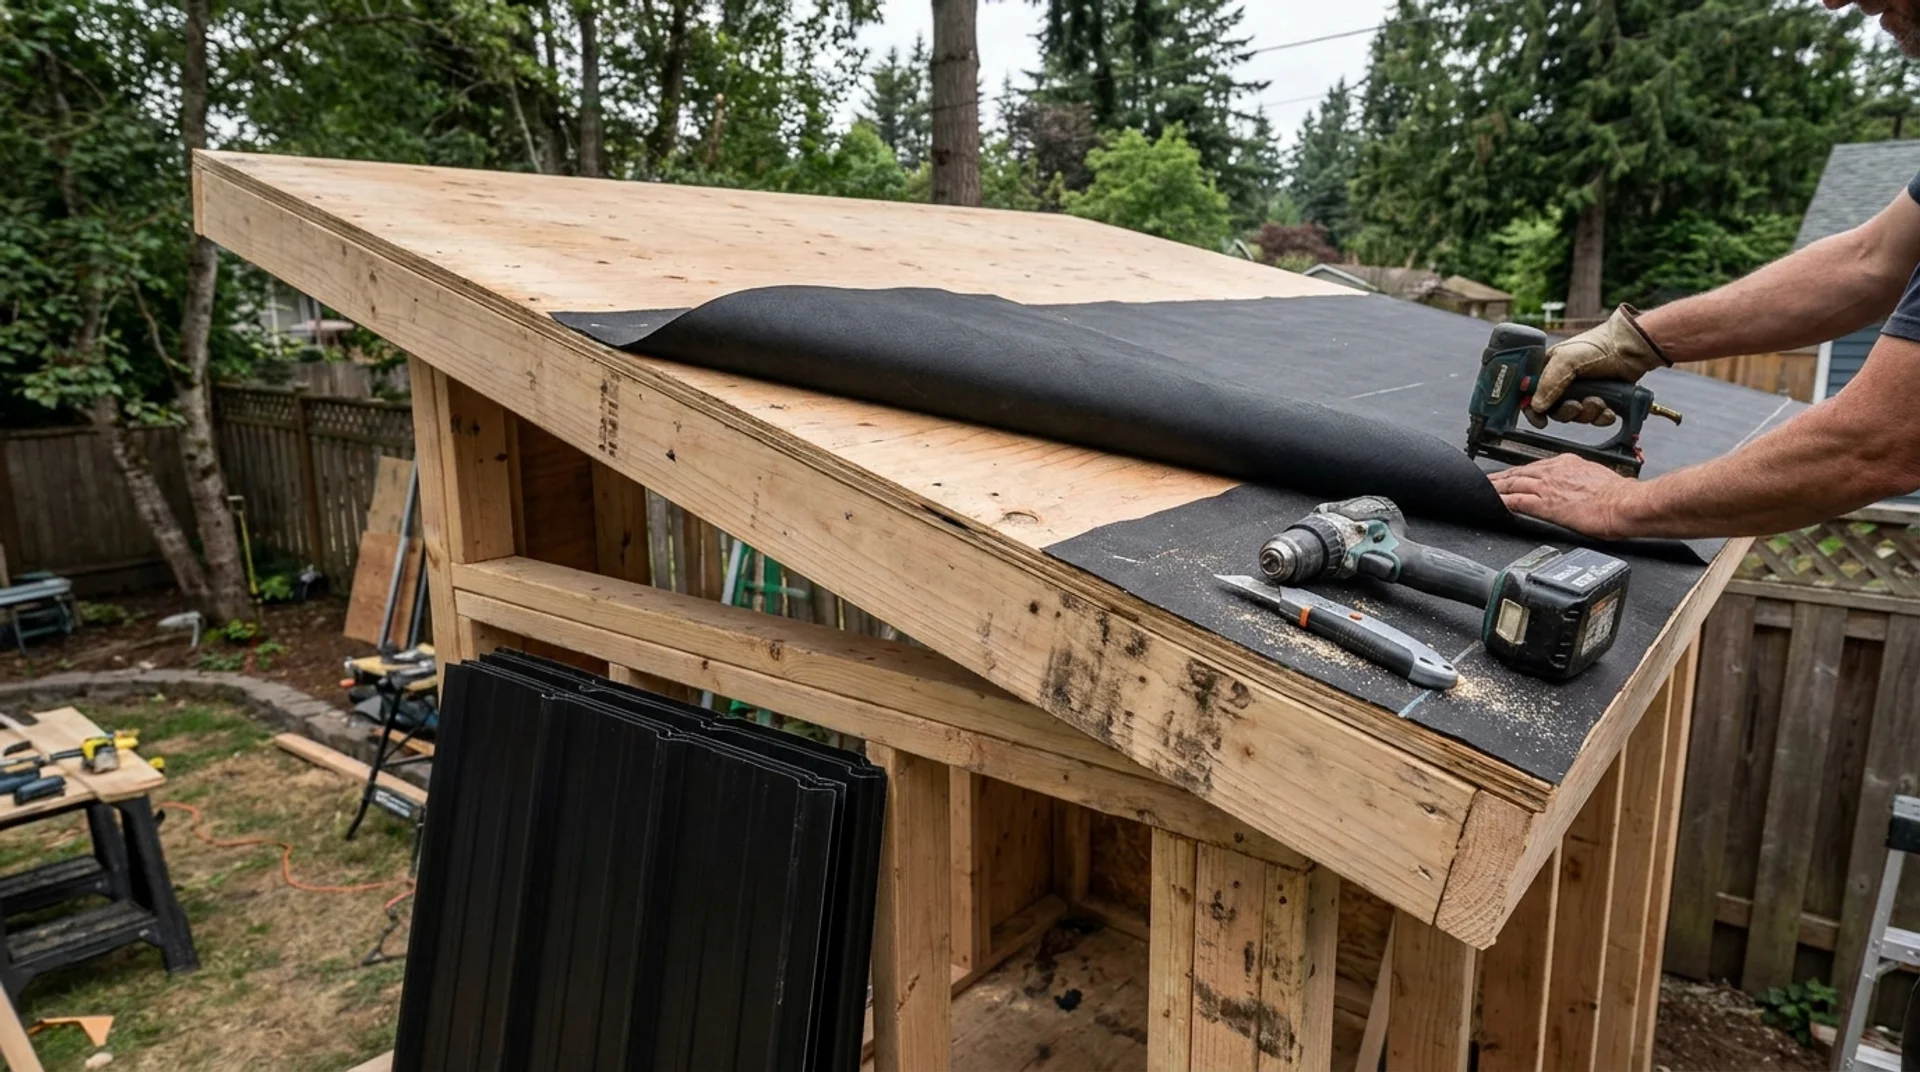
For outdoor saunas, a simple shed roof with a single slope is the most practical option. It sheds rain and snow without complicated framing. Pitch it away from the door side so water runs off the back.
Install roof sheathing, then add roofing felt, followed by your chosen roofing material. Metal roofing holds up well outdoors and handles temperature swings better than asphalt shingles over the long run.
Seal every seam, ridge, and edge properly. A leaky roof and a sauna are a terrible combination.
Step 5: Install Exterior Cladding and Weatherproofing
Exterior cladding protects your framing from rain, wind, and UV. Cedar siding is a natural fit since it matches the interior material and handles weather well. T1-11 siding is a cheaper option that works fine if the budget is tight.
Before siding goes on, wrap the exterior walls with a house wrap or weather-resistant barrier.
Overlap each piece properly, tape the seams, and ensure the wrap extends past the floor frame. This layer is what keeps moisture out of your wall cavity over the long term.
Step 6: Build and Install the Sauna Door
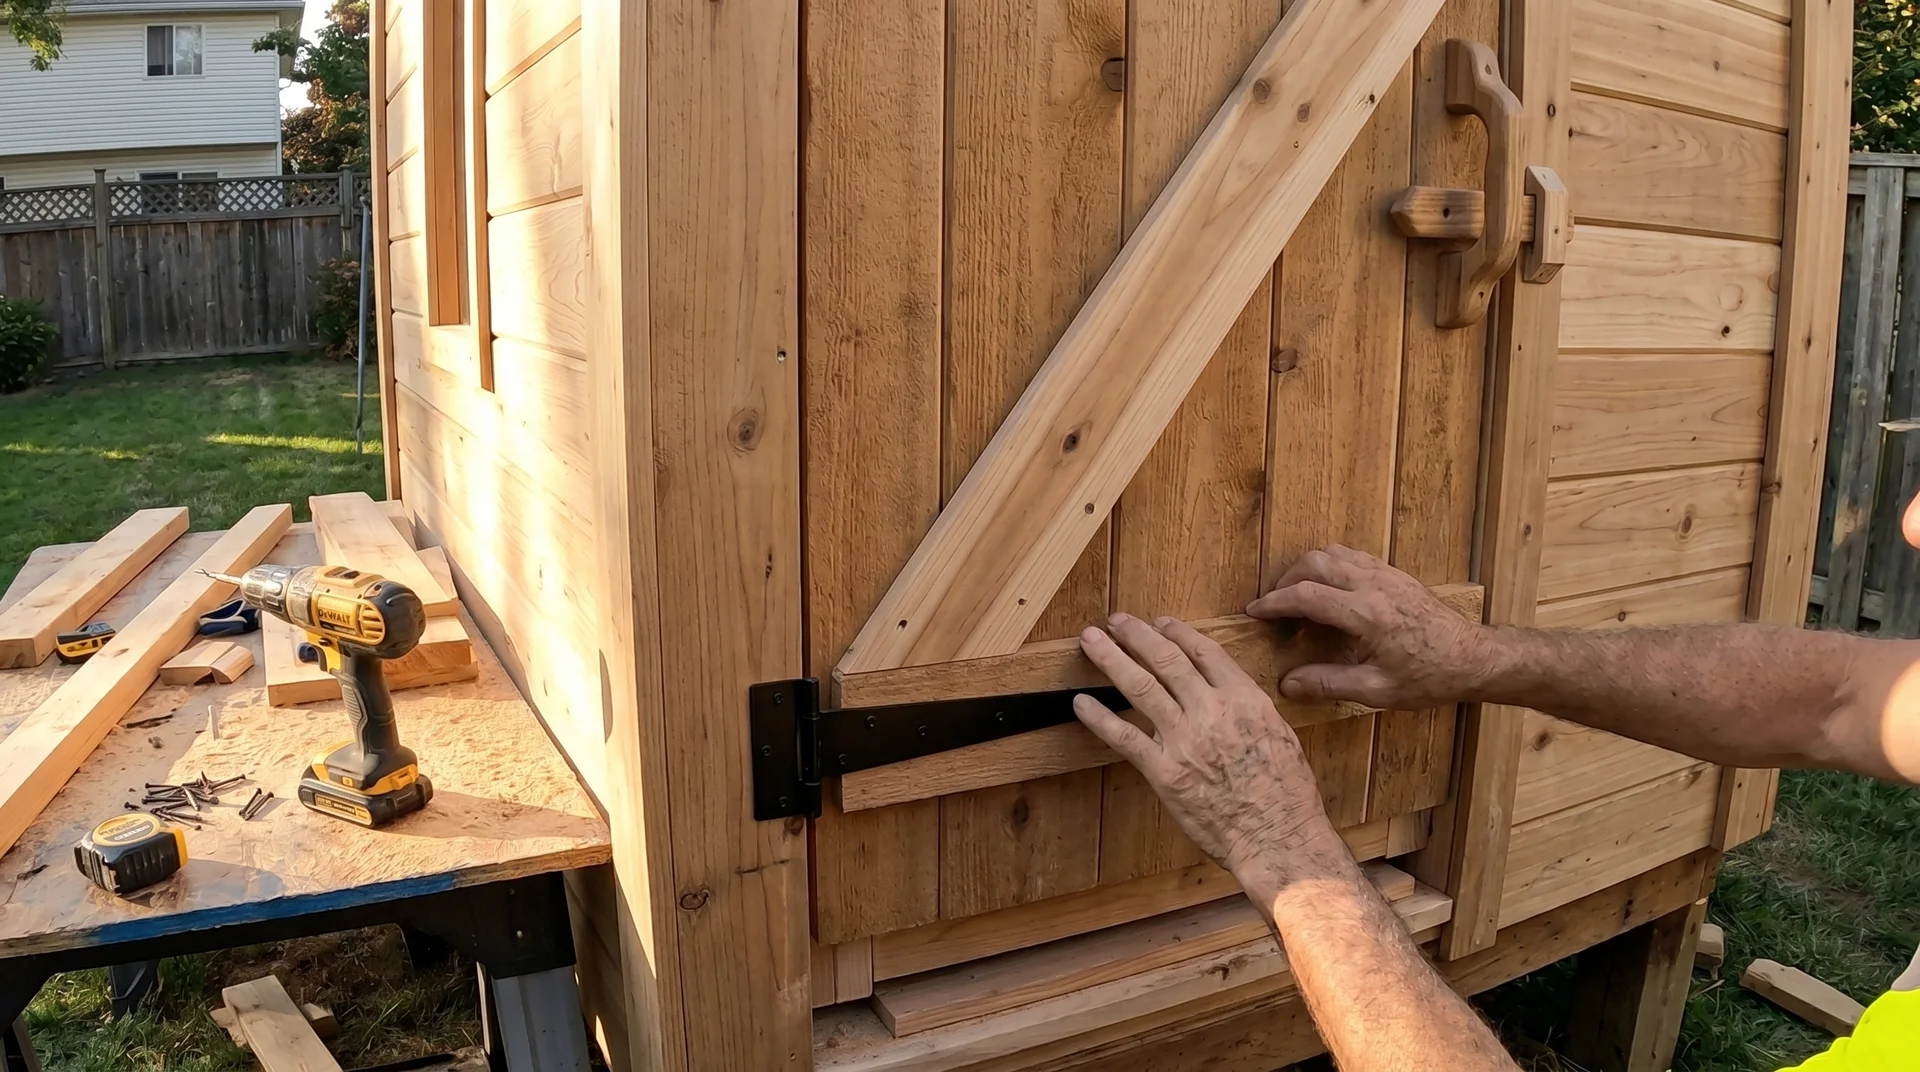
The door is one spot people often underestimate. A gap at the bottom or sides lets heat escape constantly, and your electricity bill climbs while the room never quite reaches the temperature it should. You have two options: buy a pre-built sauna door or build one from cedar boards with a wood frame.
If you build your own, use thick cedar planks and a solid Z-brace backing. The door should swing outward for safety reasons. Never install a sauna door that swings in.
Hang it with heavy-duty hinges, add a wooden handle, and use a magnetic or wooden latch instead of metal hardware since metal gets hot fast. Fit it carefully and add a door sweep along the bottom if there’s any gap.
Step 7: Add Insulation and Vapor Barrier
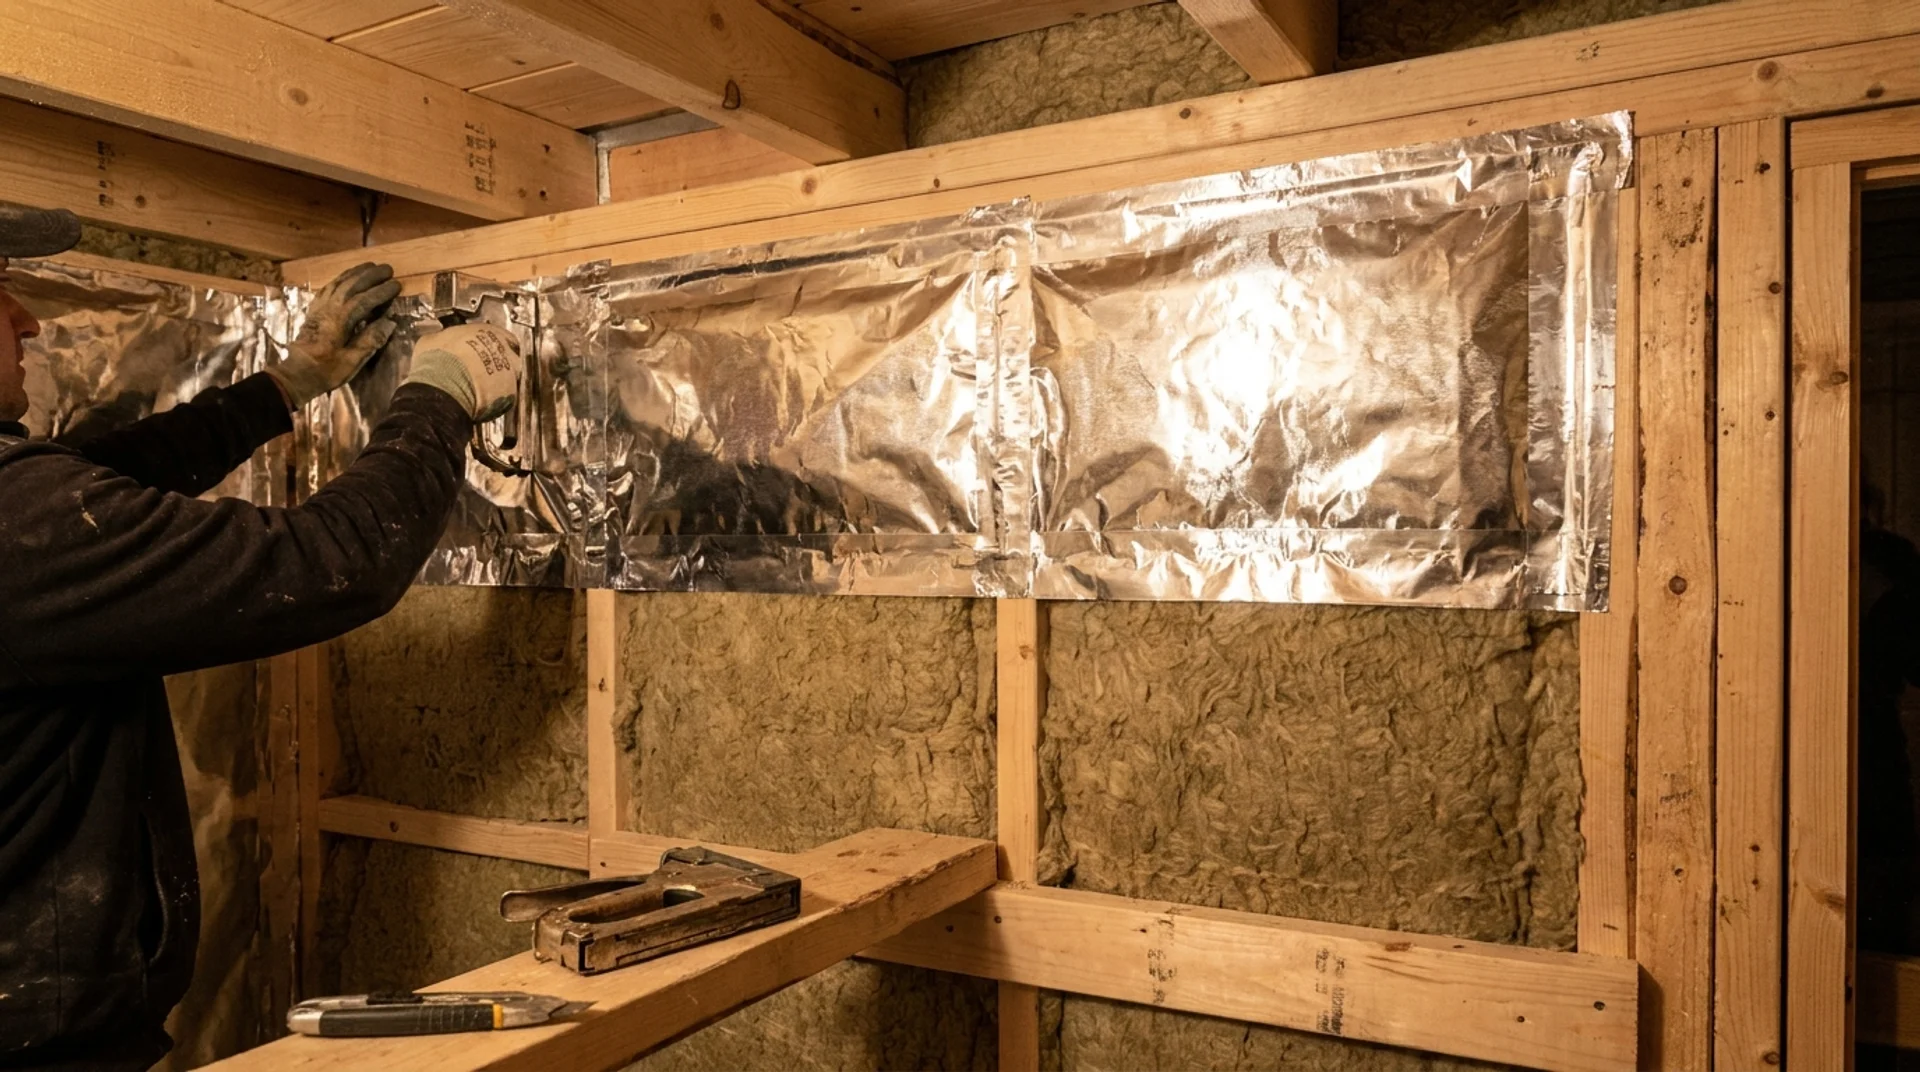
This step is where many DIY saunas succeed or fail. Insulation keeps the heat inside. The vapor barrier keeps moisture from rotting your wall framing from the inside out.
Fill the stud cavities with mineral wool or fiberglass batt insulation. Mineral wool handles heat better and doesn’t sag over time. Once the insulation is in place, staple a foil-faced vapor barrier over the entire interior surface, including the walls and ceiling, with the foil side facing inward toward the sauna.
Overlap seams by at least 6 inches and tape every joint with foil tape. Do not rush this part.
Step 8: Install Interior Cladding and Ventilation
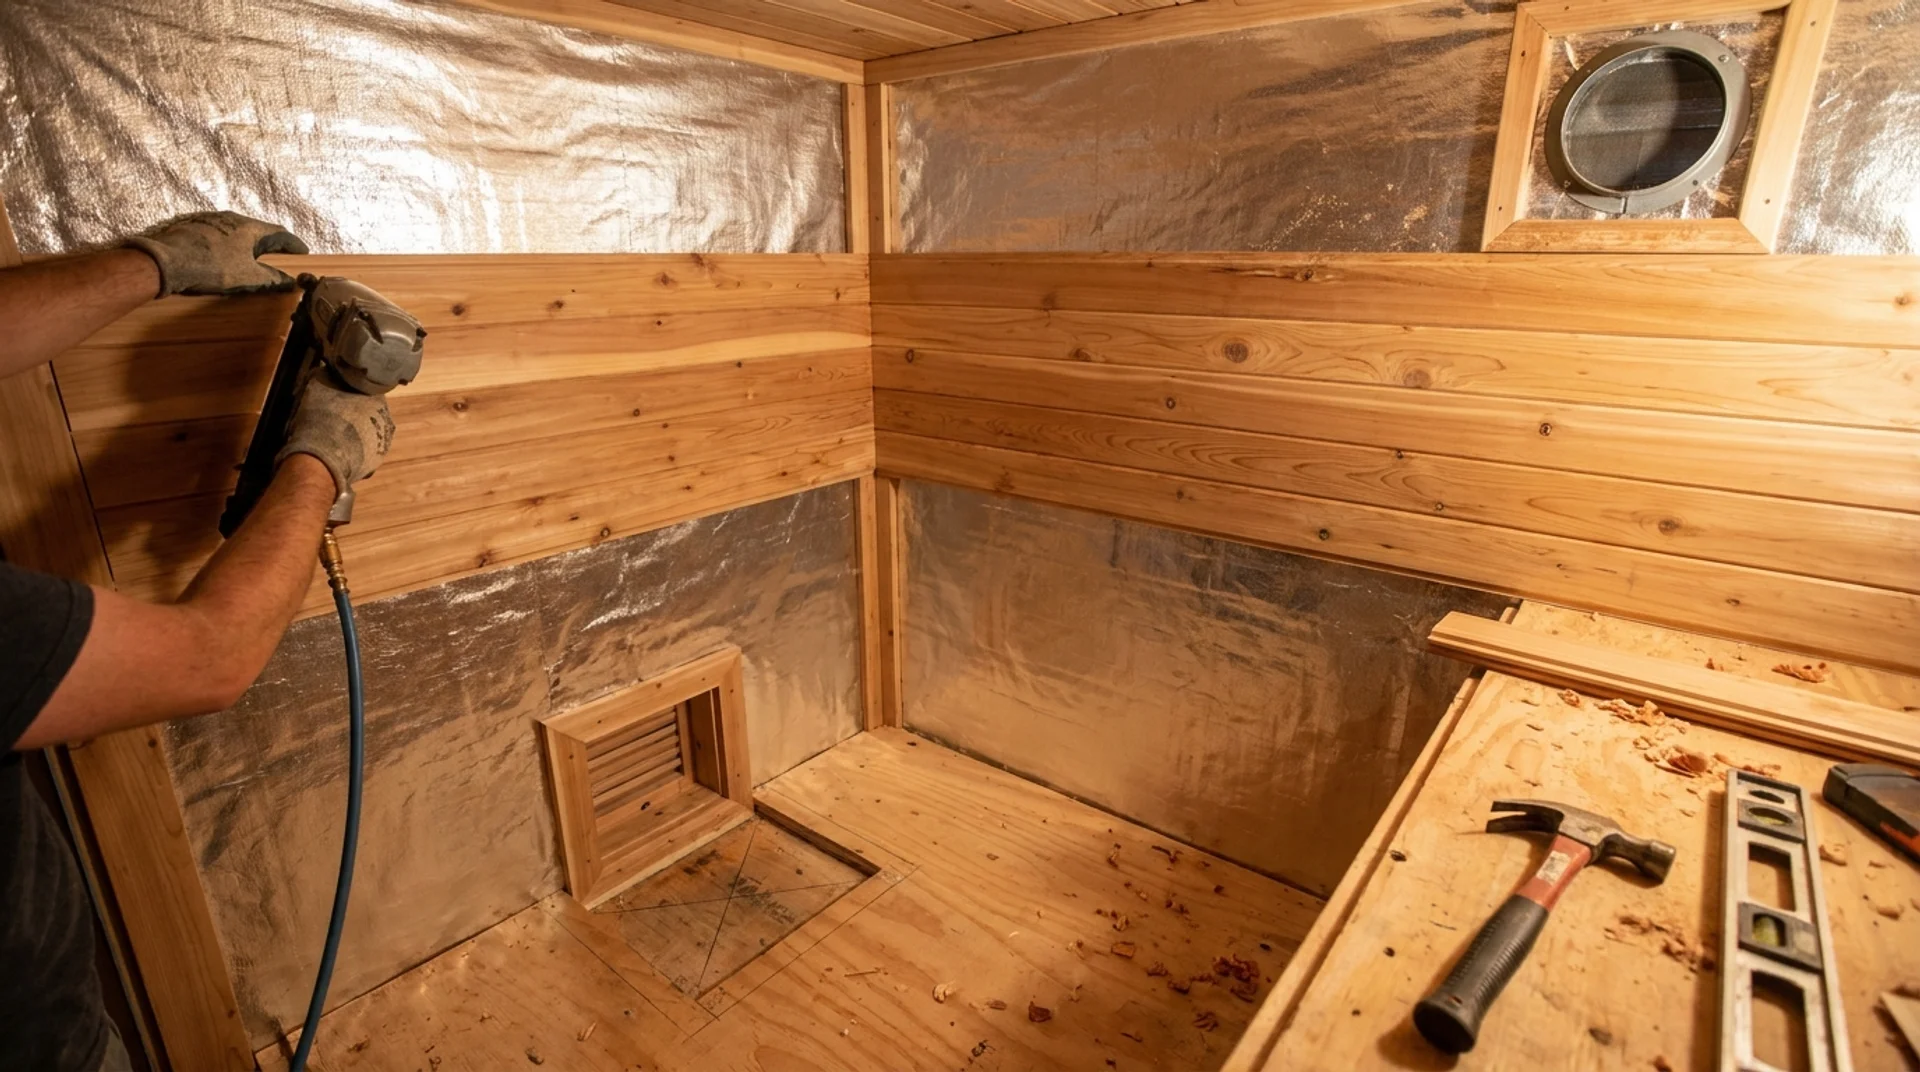
Once the vapor barrier is up, the sauna really starts taking shape. Tongue-and-groove cedar boards go up over it using a nail gun or hand nailing through the tongue at an angle so no fastener faces are exposed inside the heat space.
You need a lower intake vent near the heater, roughly 4 to 6 inches off the floor, and an upper exhaust vent on the opposite wall near the ceiling. Both vents matter.
This creates air circulation, making the heat feel even and breathable. Without proper airflow, you get stale, suffocating air. That’s not the relaxing experience you’re going for.
Step 9: Install the Sauna Heater and Chimney
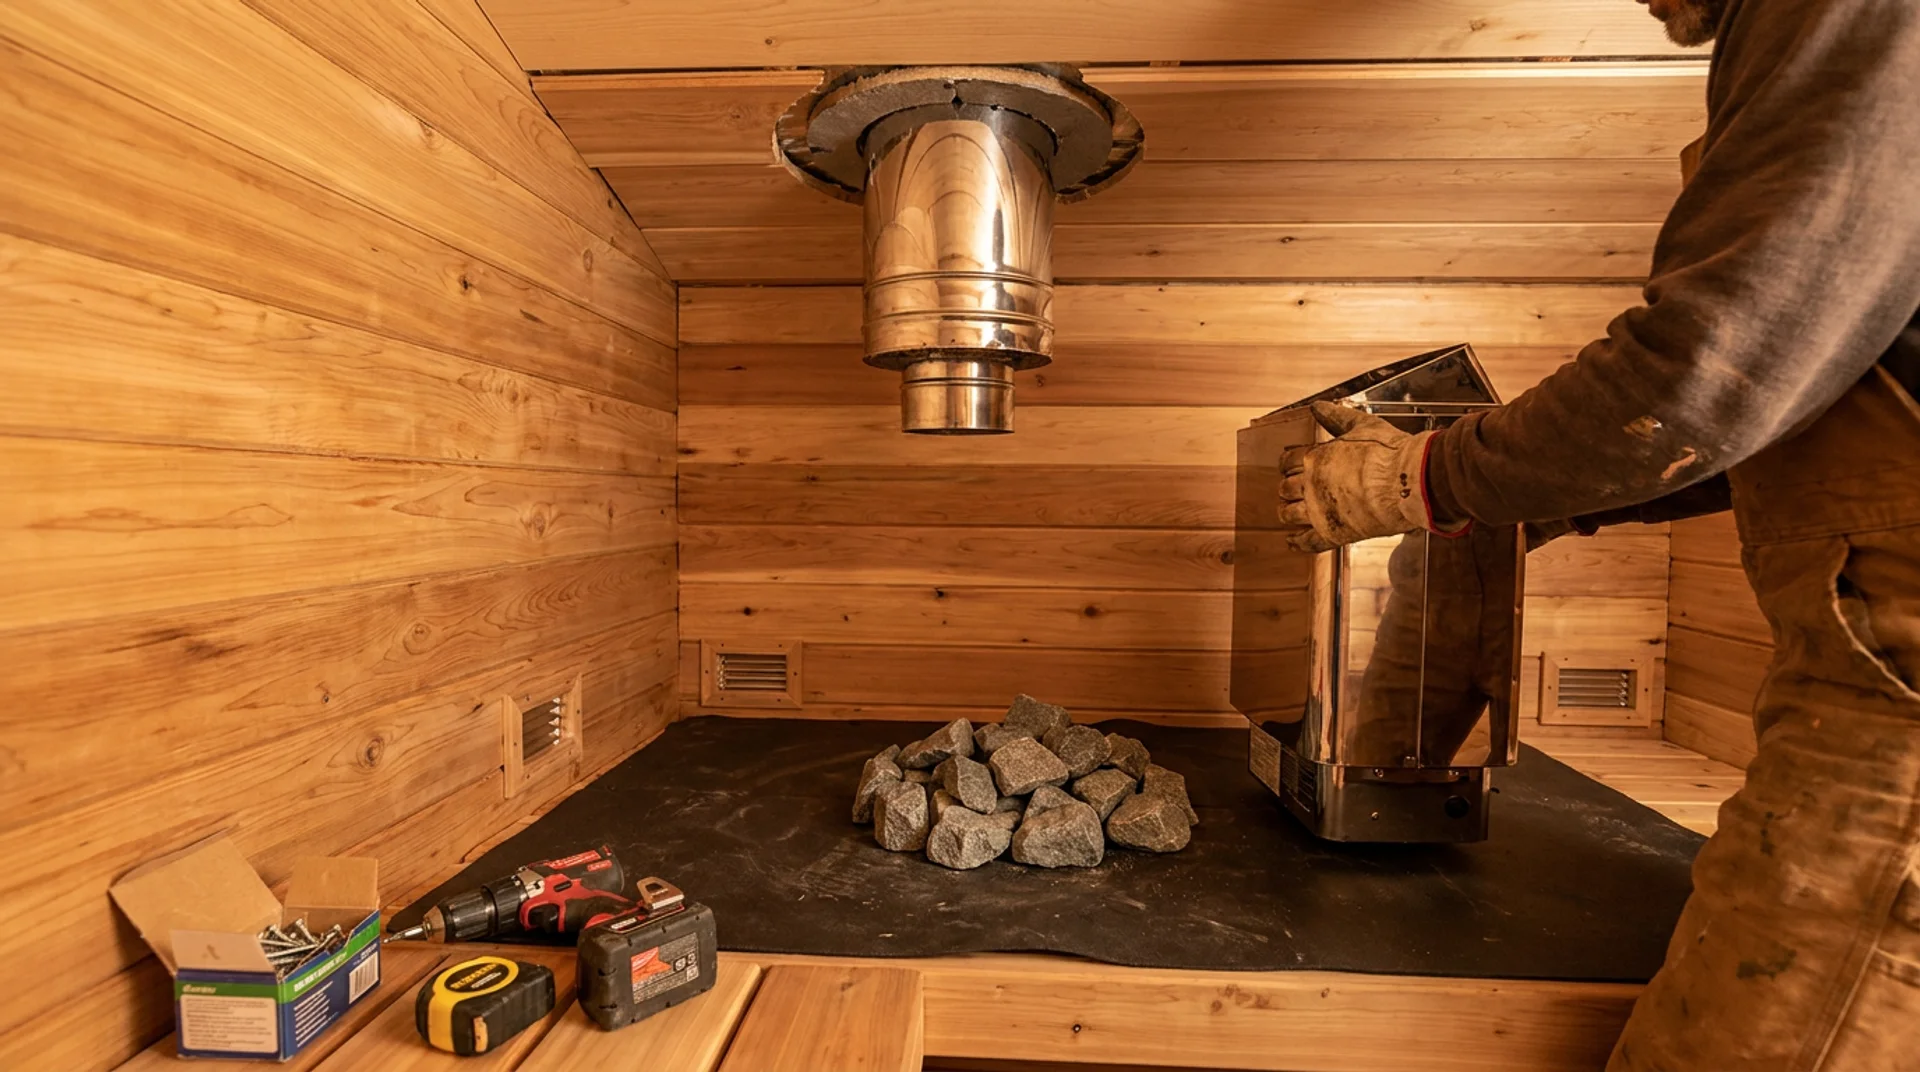
For electric heaters, use a dedicated 240V circuit. This is not a shared line. The standard sizing rule is 1 kilowatt per 45 cubic feet of sauna space. A room measuring 6x4x7 ft (168 cubic feet) needs at least a 3.7 kW heater. Get the heater spec sheet before finalizing your room size.
Electric sauna heaters also need GFCI protection on the circuit. This safety feature cuts power if a ground fault is detected. It matters in any space that combines heat and humidity.
If you are not confident with electrical wiring, hire a licensed electrician. The cost ranges from $200 to $500 and removes all safety risks from that step.
For wood-burning stoves, install a double-wall chimney pipe with proper clearances to all combustibles.
Wood-burning heaters share several installation principles with other outdoor fire features, including clearances, ventilation, and fire code compliance. Check local fire codes before installation. The stove needs at least 12 inches of clearance from all wood surfaces.
Step 10: Build the Benches and Finish the Interior
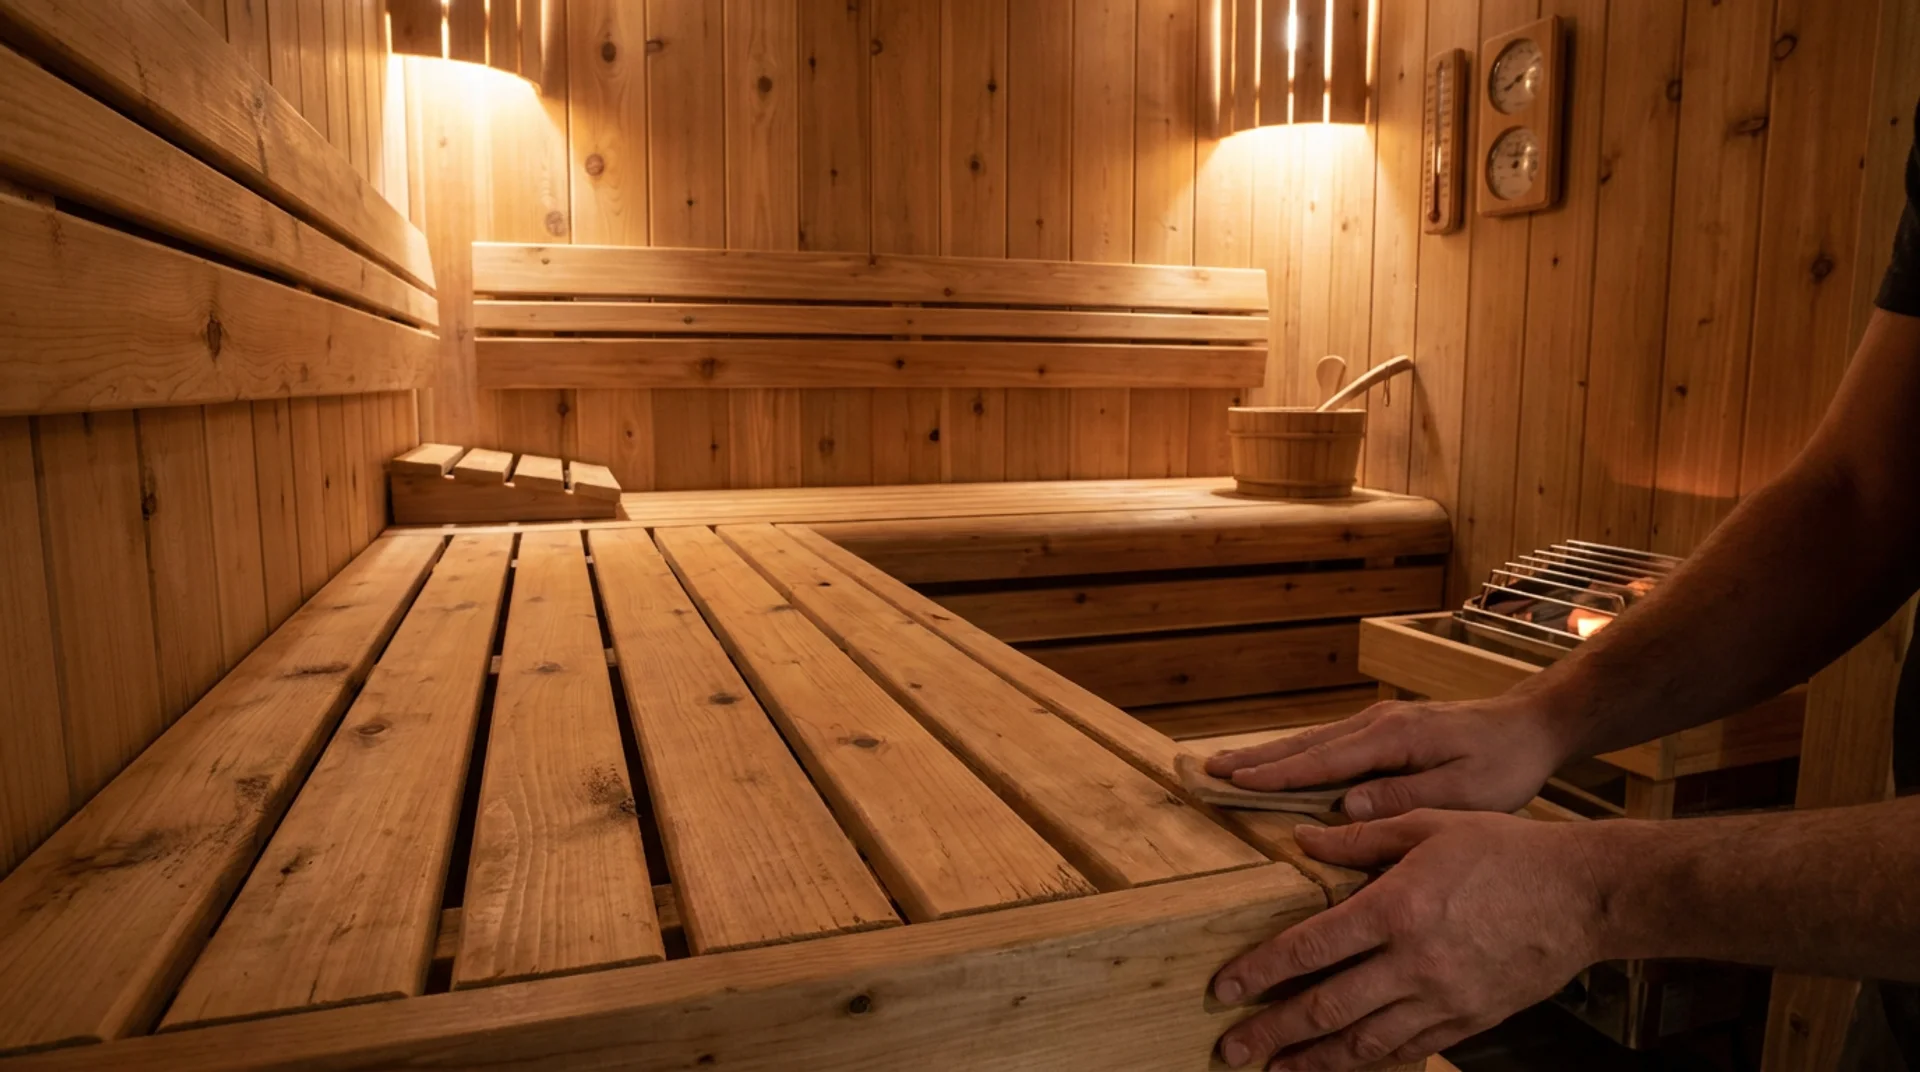
The benches are the last big piece and, honestly, one of the most satisfying parts of the build. The standard sauna bench layout has an upper bench and a lower bench on the back wall. The upper bench sits around 36 to 42 inches from the floor, which puts your head near the hottest air when lying down.
Build bench frames from 2×4 cedar, then top them with 1×4 cedar slats spaced about a quarter inch apart for airflow and drainage. Round off every exposed edge with sandpaper. Hot wood and sharp corners are a bad pairing. Add a backrest at the upper bench level for comfort during longer sessions.
Finish by adding your thermometer, hygrometer, bucket, ladle, and lighting. Use low-wattage sauna-rated light fixtures only. Regular fixtures are not built for that kind of heat and humidity, and a failed light inside a hot enclosed space is not a problem you want.
Sand everything smooth, leave the wood unfinished, and you’re ready for your first heat-up.
Video Tutorial
I’d like to give credit to The DIY Fix for their informative video, which served as a reference for this guide.
How Much Does It Cost to Build a Sauna?
Building a diy sauna varies in cost based on size, heater type, and whether you handle the labor yourself. Here is a realistic breakdown.
| Build Type | Estimated Cost |
|---|---|
| Basic Indoor Sauna (4×6 ft, DIY labor) | $1,500 – $3,000 |
| Mid-Range Outdoor Sauna (6×8 ft, DIY labor) | $3,500 – $5,500 |
| High-End Custom Build | $6,000 – $10,000+ |
Where the budget goes:
| Item | Estimated Cost |
|---|---|
| Lumber, framing, and insulation | $600 – $1,800 |
| Sauna heater | $300 – $1,500 |
| Sauna door | $150 – $600 |
| Ventilation, lighting, and accessories | $100 – $300 |
| Electrical or chimney installation | $200 – $500 |
The biggest cost factor is labor. Materials are fixed costs. Buy lumber in late fall or winter for 10 to 15 percent savings. Ask hardware stores about contractor packages on full material orders.
Hiring an electrician for the 240V circuit is the one step worth paying for. That cost ranges from $200 to $500 and eliminates all safety risks for that part of the project.
Common DIY Sauna Mistakes to Avoid
Most sauna build mistakes are not catastrophic. They’re just annoying, expensive to fix, and completely avoidable if you know what to watch for.
- Using the wrong interior wood. Treated lumber, MDF, and painted or varnished wood release fumes when heated. Use cedar, hemlock, or spruce on all interior surfaces without exception.
- Forgetting the lower vent. Some first-time builders install the upper exhaust vent and skip the lower intake. Without fresh air coming in near the floor, the heater loses oxygen and the room temperature stratifies. Your feet stay cold while your head overheats.
- Undersizing the heater. The rule is 1 kilowatt per 45 cubic feet. A heater that is too small never reaches the proper temperature. Do the math on your actual room dimensions before purchasing.
- Skipping the vapor barrier. Moisture works slowly and quietly. Without a properly sealed foil vapor barrier with overlapping seams and foil-taped joints, moisture can get into the wall framing and cause rot within a few years.
- Poor door fit. Even a small gap around the door frame lets heat escape steadily. The heater runs longer, electricity costs climb, and the room temperature never settles properly.
- Skipping permits. Outdoor saunas with electrical wiring typically need a building permit. Getting flagged after the build is far more expensive than handling the paperwork before you start.
Conclusion
A diy sauna is one of the few home projects that pays for itself over time. The build rewards patience more than advanced skill.
Get the vapor barrier right. Size the heater correctly. Fit the door with no gaps. Those three details make the biggest difference in long-term performance.
Outdoor cedar builds, basement conversions, and compact infrared setups all follow the same core principles. Good wood, proper insulation, the right heater, and airflow that works.
Take your time on each step. Run a heat test before finishing the interior. A well-built sauna lasts for years and earns back its cost with every week you use it.
Your first real session will be worth every hour you put into this.
Frequently Asked Questions
Is it Cheap to Build Your Own Sauna?
It can be. A basic DIY sauna runs $1,500 to $3,000 when you do the labor yourself, which is far less than a pre-built unit or a professional installation. The biggest savings come from using your own time.
What is the 200 Rule for Saunas?
The 200 rule means the combined temperature in Fahrenheit and humidity percentage should add up to around 200 for the ideal sauna experience. For example, 170°F with 30% humidity hits that sweet spot.
Do I Need a Permit for A Backyard Sauna?
Outdoor saunas with electrical wiring often need a building permit in the US. Check with your local county or building department before pouring a foundation or starting any electrical work.