That outdated hutch sits in your dining room, useful but not very nice to look at. You know the one—dark, heavy, and stuck in the past.
Good news: A fresh coat of paint can fix that problem! With some basic supplies and a weekend of work, you can turn an old hutch into the star of your home.
This guide will show you how to change that forgotten piece with paint and a few simple changes. We’ll cover color choices that work, personalize ideas, and provide quick fixes for common issues. You’ll see real before-and-after examples, plus ideas to make your hutch unique to your style.
Whether you want a bold statement piece or something light and fresh, we’ve got you covered.
Why Paint Your Hutch Instead of Buying New?
Old furniture holds stories and memories that new pieces don’t have. That worn hutch might be the spot where family photos sat for years or where holiday dishes found their home every season. Painting gives these cherished items new life without losing their history.
Painting furniture offers more than just a fresh look – it can become a welcome break from daily stress. Many people find that the steady, careful brushstrokes create a sense of calm. The focus required helps push away other worries, making the task feel more like self-care than work.
The cost savings when you paint rather than replace are clear. A quality new hutch might cost $800 to $2,000 or more, while custom pieces often start at $3,000.
For about $100 in supplies (paint, brushes, and prep materials), you can update your current piece while keeping money in your wallet. This smart choice gives you the fresh look you want without the hefty price tag.
Change Your Old Hutch: Before and After Painting Inspiration
See how a few coats of paint can completely transform a tired hutch into a stunning showpiece—with real-life examples, styling ideas, and pro tips to guide your makeover
1. From Heavy and Dated to Light and Fresh

That old brown hutch, with its thick wood and old-style carvings, can feel like it’s pulling your room down. A coat of white or soft blue paint lifts the mood right away, and new handles in silver or brass finish the fresh look.
Quick Tip: Chalk paint sticks well to most surfaces with less prep work needed.
Color Choice: Soft blue and light pastels make small rooms feel bigger.
Hardware Update: Simple metal pulls can update the look by 20 years.
Chalk paint is a great option for beginners; learn more in this guide on transforming furniture from dull to dreamy.
2. From Plain to Bold and Colorful
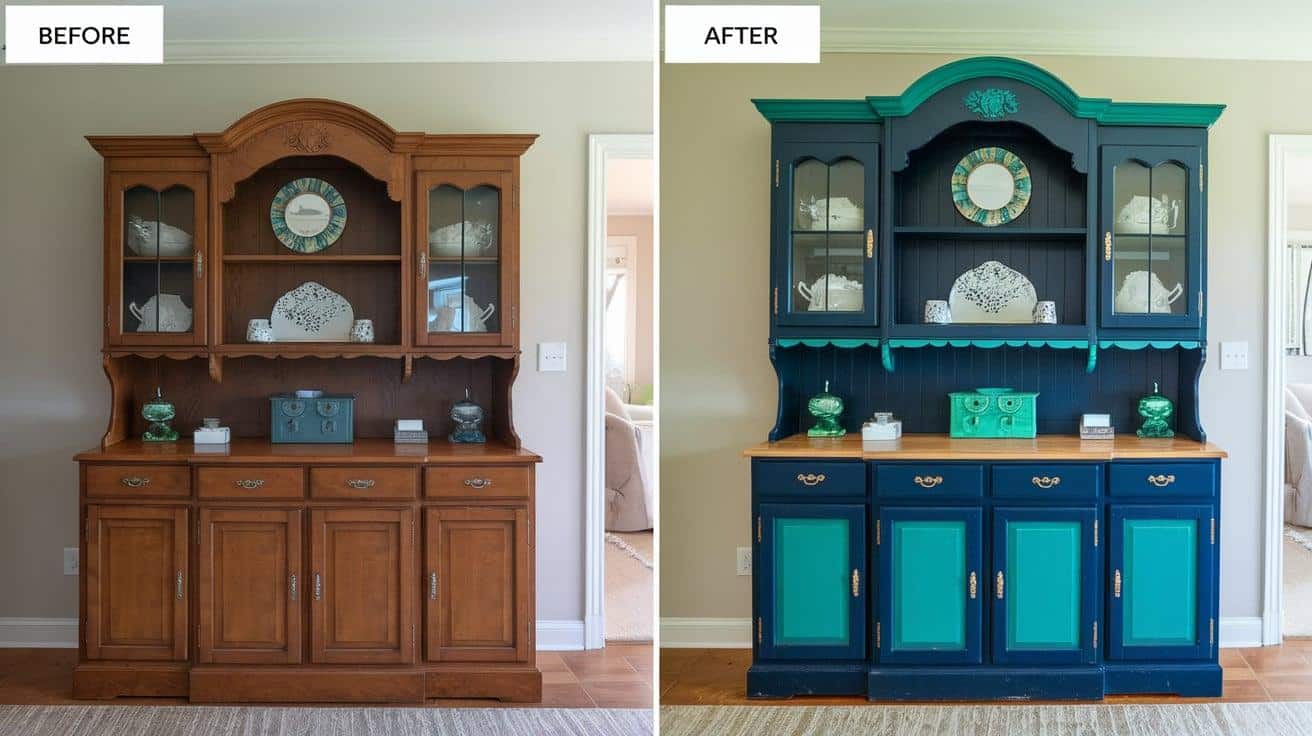
The basic brown hutch that sits quietly against your wall can become the star of the room. Navy, teal, or rich green paint turns a dull piece into one that grabs attention and sets the tone for your space.
Pattern Play: Use tape to create clean lines for stripes or boxes.
Color Impact: Bold colors work best in rooms with neutral walls and floors.
Paint Type: Satin or semi-gloss shows off the color depth best.
3. From Scratched and Worn to Smooth and Sophisticated

Those nicks, scrapes, and worn spots make your hutch look sad and old. Proper prep work fills the flaws, while good paint and a clear top coat create a smooth finish that looks brand new.
Prep Steps: Sand, clean, fill holes, sand again, then paint.
Finish Options: Matte for a soft look, gloss for a clean, modern feel.
Touch Test: Your hutch should feel as good as it looks when you run your hand over it.
4. From Forgotten to Functionally Beautiful

That hutch sitting unused in your garage can find new life as something you use daily. With fresh paint and a smart setup, you can turn it into a coffee bar, home office station, or kid’s art center.
New Uses: Add wine glass holders, file folders, or craft supply bins.
Location Tips: Place your “new” piece where you’ll use it most often.
Style Match: Paint colors that work with your other furniture make the hutch feel meant-to-be.
5. From Cold to Coastal Charm

That stark, cool-toned hutch can shift to a warm beach house feel. Soft blues and sandy tans create a seaside mood that makes everyone feel at ease and welcome.
Finish Look: Light sanding on edges creates a weathered beach look.
Accent Ideas: Add small touches of coral or seafoam green as trim colors.
Styling Tips: Fill with white dishes, clear glass, and natural elements.
6. From Unfinished to Professionally Styled

Two-color paint jobs can make half-done projects or plain wood pieces look store-bought. The combination of white and gray or cream and blue looks planned and high-end rather than DIY.
Paint Order: Always do the lighter color first, then add the darker shade.
Line Tricks: Use a level and good tape for sharp color changes.
Pro Touch: Paint the inside a different color for a happy surprise when doors open.
Creative Ways to Personalize Your Painted Hutch

1. Paint the Interior a Contrasting Color
Painting just the inside of your hutch in a bright or deep color creates a fun surprise. The hidden splash of pink, yellow, or teal makes items on your shelves stand out. This small change adds depth without being too bold on the outside.
The contrast makes dishes and decorations look more put-together and planned. For a pulled-together look, try colors that match your room’s accent pillows or art.
2. Use Stencils or Hand-Paint Details
Simple stencils turn a basic hutch into something truly yours. Small flowers along the edges or geometric shapes on doors add visual interest.
Even beginners can create professional-looking patterns with adhesive stencils. Hand-painted words or quotes make your piece tell a story. Focus details on just one area—like drawer fronts or the top crown—for the best impact.
3. Swap the Hardware
New knobs and pulls are like jewelry for your hutch. Look for vintage glass, ceramic, or brass options at flea markets for one-of-a-kind charm. Mix-and-match styles create a fun, collected-over-time feel. This small change costs little but changes the whole look of your piece.
Save old hardware in case you want to switch back in the future.
4. Add Shelf Lighting
Small battery lights make items on your shelves glow and feel special. The soft lighting turns ordinary objects into display-worthy treasures. Puck lights are easy to stick on, with no wiring or plugs needed.
Turn them on during parties to draw eyes to your favorite dishes or objects. The warm glow makes your hutch feel like a museum display case.
5. Line the Shelves with Fabric or Wallpaper
Patterned shelf backing adds depth and interest behind your items. Contact paper or peel-and-stick wallpaper makes this change quick and non-permanent. Choose stripes, florals, or subtle textures that complement your hutch’s paint color.
This small touch looks high-end but costs very little. You can easily change it when you want a fresh look without repainting.
Don’t Make These Hutch Painting Mistakes
| Mistake | Why It Happens | How to Avoid It |
|---|---|---|
| Skipping surface prep | Excitement to start right away | Clean, sand, and prime thoroughly |
| Choosing the wrong paint | Not all paints adhere to furniture | Use furniture, chalk, or mineral-based paints |
| Ignoring drying time | Trying to rush the transformation | Allow proper curing between coats |
| Skipping a topcoat | Paint can chip or peel over time | Use polycrylic or wax for protection |
| Leaving hardware on | Paint drips and has uneven coverage | Remove all hardware before painting |
Stylish Hutch Decorating Ideas if Painting Feels Too Big
- Re-stain the wood – A fresh coat of wood stain brings out grain patterns while keeping the natural wood look you love.
- Decoupage the panels – Cut pretty paper, maps, or book pages to fit door panels for a splash of pattern without changing the whole piece.
- Add glass or chicken wire – Replace solid panels with glass for a light, airy look or chicken wire for a country charm.
- Try a liming or whitewash technique – Brush on thinned white paint, then wipe back for a sun-bleached effect that shows the wood grain.
- Keep it rustic – Sand rough spots lightly and add clear wax to protect wood while keeping its raw, natural appeal.
Conclusion
Your hutch does not need to stay forgotten or be thrown away. With paint, time, and your touch, it can become the piece you love most in your home.
What makes painting a hutch so worth the effort? You save money while getting exactly what you want. A basic white hutch with new handles or a bright blue one with glass doors – both cost far less than buying new.
The steps are simple—clean, sand, prime, and paint. Fix the small issues as you go. Add your touch with colors inside, new knobs, or pretty paper on the back wall.
Next time you look at that old hutch, see what it could be, not what it is now. Try one color or mix two. Please keep it simple or add details. The choice is yours.
Why not grab your paint brush this weekend? Your soon-to-be-favorite piece of furniture is waiting for you to bring it back to life.
Frequently Asked Questions
1. Do I Need to Sand My Hutch Before Painting?
Yes – sanding helps paint stick better, especially on shiny surfaces.
2. What Kind of Paint Works Best for Furniture?
Chalk paint, milk paint, or acrylic furniture paint all work well for hutches.
3. How Many Coats of Paint Will I Need?
Most hutches need two coats, but dark wood might need three for full coverage.
4. How do I Fix Chips or Peeling on My Painted Hutch?
Sand the spot, apply a small amount of fresh paint, and blend with a dry brush.