If you’ve ever wished for a way to guide rainwater while adding beauty to your home, you’re in luck. Rain chains are the practical solution you’ve been waiting for! We’ll walk you through the simple steps of creating your very own rain chain – no DIY experience required! Picture the dreamy sound of raindrops dancing down a chain, and you’ll see why this project is worth your time.
Whether you’re a gardening guru, a home decor enthusiast, or just a curious soul, we promise this guide will spark your creativity. With materials you likely already have, you’ll be amazed at how easy it is to transform your downspout into a rain chain.
So, grab your tools (or borrow them from a friendly neighbor), and let’s embark on this delightful rain chain adventure together. Start scrolling to learn about the rain chains in a whole new way.
What is a Rain Chain?
It is a decorative alternative to a downspout that is used to guide rainwater from the roof to the ground or a storage container. It is typically made of a series of linked cups, bells, or other factors that are hung vertically from a chain or metal wire. Rain chains serve a both functional and aesthetic purposes. They help to control the flow of rainwater, preventing erosion and protecting the foundation of a building.
Installation of The Rain Chain
1. Choose the Location
Before installing it, you need to select the ideal location. Look for a spot where rainwater flows naturally from your roof, such as near a downspout or gutter. Ensure there is sufficient space for the rain chains to hang freely.
2. Remove the Downspout and Secure the Rain Chain basin
If you have a downspout in place, remove it carefully to make way for the rain chains. Unscrew any brackets or fasteners holding the downspout to the wall. Most rain chains come with a basin or decorative element at the bottom. Attach this basin to the ground using a stick or strong base. Ensure it is positioned in a way that allows water to flow freely into a nearby drainage system or rain tank.
3. Measure and Cut the Chain
Measure the height from the basin to the hanging point, leaving some extra length for adjustments. Use a pair of pliers or wire cutters to trim the chain to the needed length. Remember to leave enough length for the chain to hang freely without touching the ground.
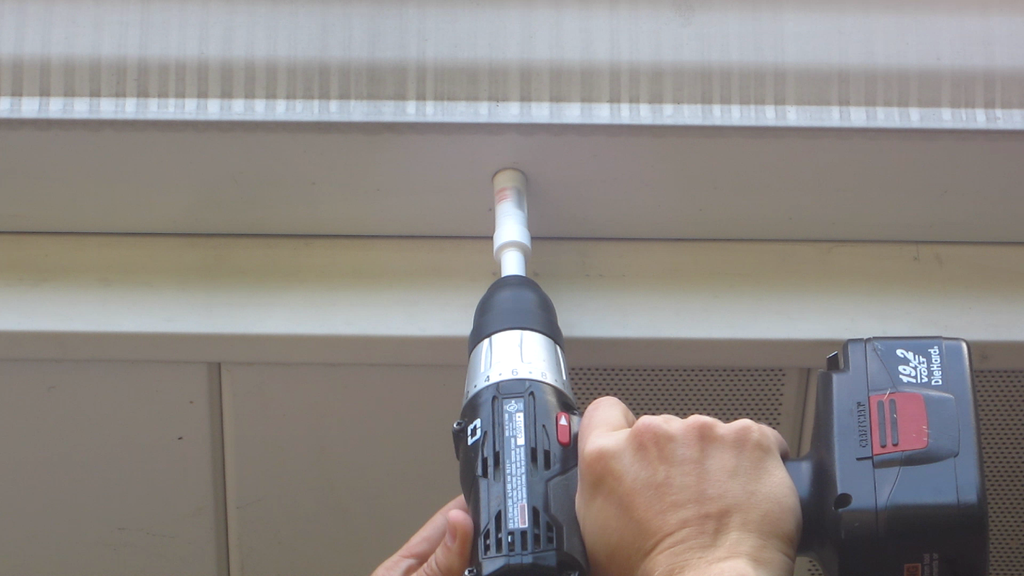
4. Attach the Installation Bracket
Install a muscular bracket or hanger to the side of your house or building. Make sure it is secure and can bear the weight of the rain chain. The bracket should be at a height that allows It to hang freely.
5. Connect the Rain Chain & Test the Water Flow
Take one end of the rain chain and attach it to the installation bracket. You can use an S-hook or a loop to secure the chain to the bracket. Ensure that it is tightly locked and won’t come loose during heavy rain or wind. Turn on your garden pipe or wait for a rainy day to test the water flow through the rain chain. Observe how the water flows down and adjust the length or position of the chain if necessary. You want a steady flow without any excessive splashing or overflowing.
6. Make Adjustments & Do Maintenance
If the rain chains don’t hang perfectly straight or if the water flow is uneven, make necessary adjustments. You can use additional hooks and chains or adjust the length to achieve the desired appearance and function. Regularly inspect your rain chains for any waste or blockages that may affect their performance. Clean it as needed to prevent blocking and ensure proper water flow.
Rain Chain Ideas
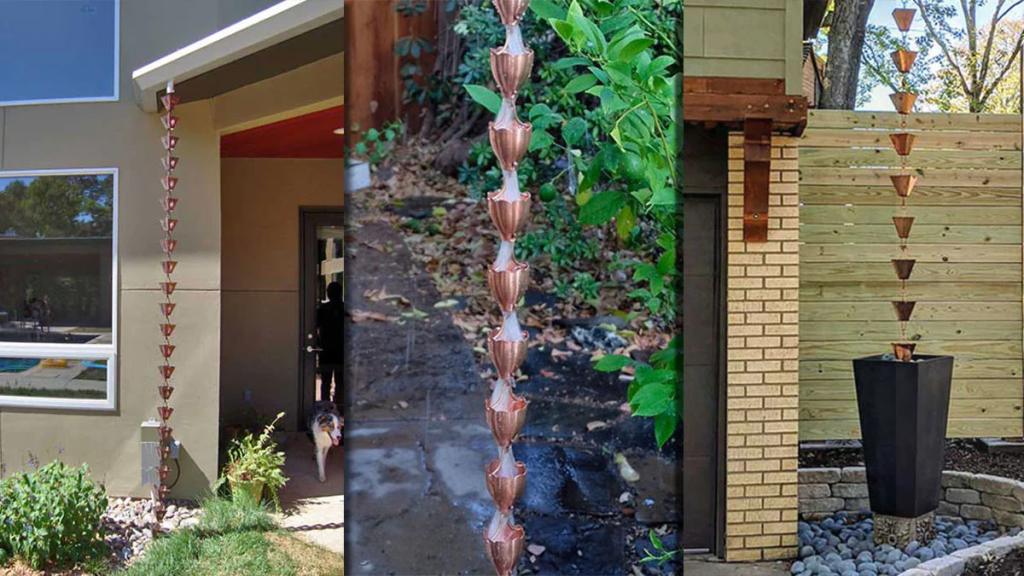
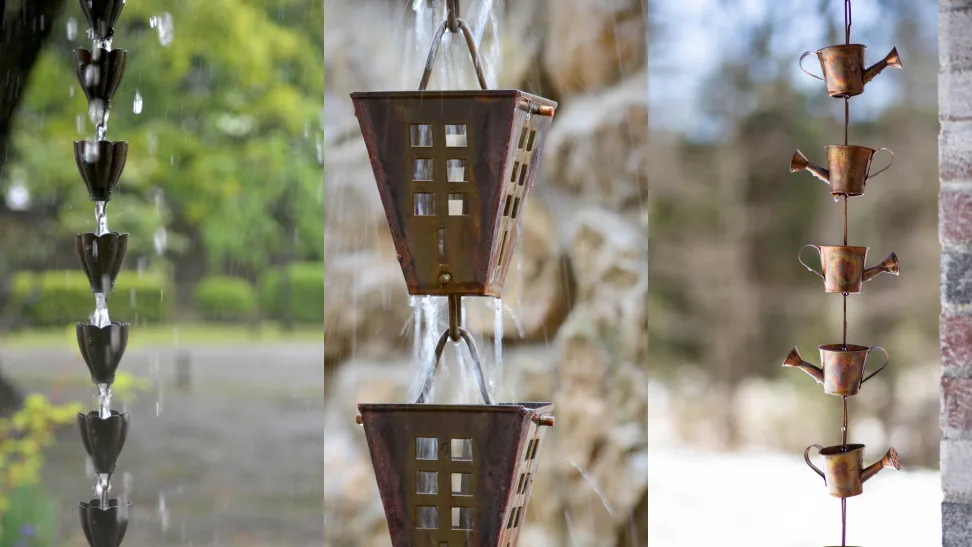
1. Copper Cups
Rain chains made of copper cups are a fancy and different way to replace regular downspouts. The beautiful colors of copper make the outside of any building look more innovative. Rain chains come in various designs, from simple cups to detailed shapes like flowers and birds. When it rains, the water flows down the chains, creating an attractive sight. It turns gloomy.
2. Bamboo Tubes
Bamboo rain chains offer creative and eco-friendly traditional downspouts. With their natural beauty and soothing sound, bamboo tubes can be used to create unique rain chains that increase the aesthetics of any outdoor space. Whether arranged in a flowing pattern or combined with other materials, bamboo rain chains provide a modish solution for diverting rainwater while adding organic beauty.
3. Flower Petals
Rain chains are pretty things you can add to your garden. If you put flower petals in them, they look even more beautiful. Instead of using regular metal links, you can use delicate petals. When it rains, the petals create a waterfall of colors. It doesn’t matter if the petals are real or fake; the rain chain will make your garden look lively and full of life.
4. Ceramic Discs
You can make rain chains look even more beautiful by using ceramic discs. These discs are very flexible and can be decorated with detailed patterns, bright colors, or designs inspired by nature. The smooth feel of ceramic adds a fancy touch to rain chains. When it rains, the water flows down from one disc to another, creating a beautiful sight. So, adding ceramic discs to your outdoor area can make it look even more attractive.
5. Sea Shells
Rain chains made with sea shells can give your home a special coastal feel. You can connect colorful shells in a row, so when it rains, the water flows down in a pretty waterfall effect. Another option is to use big sea shells as separate cups to catch the raindrops as they fall. These clever rain chain designs bring a lovely seaside beauty to your surroundings.
6. Glass Beads
You can make rain chains look even more beautiful by using glass beads. This will add a fancy touch to your outdoor area. You can choose bright and colorful beads or stick to a single color, both of which will create a really cool look when the rainwater flows down. Try using different sizes, colors, and patterns of beads to make your rain chain unique and eye-catching.
7. Leaf Designs
Leaf Designs provides many unique and creative ideas for rain chains that are both useful and pretty. Instead of boring downspouts, these rain chains are beautiful and make your outdoor area look even better. They have chains shaped like leaves that give a playful feeling, as well as modern designs that look very classy. Leaf Designs has something for everyone, whether you like nature or prefer a simple and latest look. Their collection will motivate you and make your home look even more beautiful when it’s raining.
8. Umbrella Chain
Rain chain ideas for umbrella chains provide a special and pretty way to make your outdoor areas more beautiful when it’s raining. Instead of regular pipes, umbrella chains are made up of different decorative things that help the rainwater go down. Some interesting ideas include using small umbrellas, colorful rain boots, or cute raindrop-shaped objects. These lovely rain chains don’t just work well by moving rainwater, but they also make your surroundings look nice and create a magical feeling, even on the rainiest days.
Required Tools for Rain Chain Installation
1. Ladder
A strong ladder with non-slip feet and secure locks is essential for safe access to the edge of your building. Ensure that the ladder is tall enough to reach the desired height for hanging the chain.
2. Pliers
Pliers with a comfortable grip will help remove any existing downspout or gutter attachments. They allow you to easily loosen the screws, bolts, or clamps holding the downspout in place.
3. Measuring Tape
A reliable measuring tape is necessary for determining the proper length of the chain. Measure the distance from the edge to the selected area where the rainwater will be directed, ensuring the rain chain is neither too short nor too long.
4. Hacksaw or Tin Snips
A hacksaw or tin snips are cutting tools that will come in handy if your chain needs to be trimmed to a specific length. Use them to carefully cut through the links or sections of the rain chains to achieve the desired size.
5. Level
A level is a tool that helps you determine whether the chain is straight and properly aligned. Place the level against the rain chains to ensure it hangs vertically and is not slanted or curved.
6. Hooks or Brackets
Depending on the design of your rain chains and the structure of your building, you may need hooks or brackets to hang the chain from the border securely. Choose hooks or brackets that are suitable for the weight and style of your rain chains, ensuring they are strong enough to suffer every weather condition.
7. Screwdriver or Drill
A screwdriver or drill will be necessary if you need to attach hooks or brackets to your building. Use the appropriate size and type of screws or anchors to securely fasten the hooks or brackets to the border, ensuring they are firmly in place.
8. Rope or Chain Anchors
In some cases, additional rope or chain anchors may be required to guide the rainwater from the rain chain to a designated area. These anchors can be attached to It and then secured to a rain tank, stone basin, or other collection system. Choose anchors that are durable, weather-resistant, and capable of supporting the weight of the rain chains and the water it carries. Remember to always follow the manufacturer’s instructions and take appropriate safety precautions when using tools and working at heights.
Conclusion
Now, it’s time to ditch those boring pipes that carry rainwater and go for the rain chain revolution! Installing rain chains not only gives attractiveness to your home but also helps you to connect with nature. Think about the joy of watching rainwater falls down a chain and creating musical sounds. It’s like having your very own mini fountain right in your backyard.
Who needs fancy water features when you can have a rain chain? You don’t need to be a DIY expert or hire a team of professionals. Just a few simple steps, and You’ll be the proud owner of the rain chains. It’s the perfect blend of nature’s beauty.
By directing the aim of rainwater away from using the traditional ways of draining, you can conserve water and give a helping hand to your thirsty garden. Install a rain chain and let the rain play with you most delightfully and amusingly.
Get ready to make a rain chains revolution and add a splash of joy to your life!
Frequently Asked Questions
What is a Rain Chain?
It is a decorative cover to traditional downspouts used to guide rainwater from your roof to the ground. It is typically made up of a series of interconnected links or decorative elements that create a pathway for the water to flow down, creating a visible pleasing, and soothing effect.
Are Rain Chains Effective in Managing Water Drainage?
Rain chains are primarily decorative and may be less efficient in managing water drainage than traditional downspouts. However, they can still effectively guide water from the roof to the ground if installed correctly. It’s important to ensure that it is properly positioned and connected to a suitable drainage system or rain drum.
Can Rain Chains Be Used in All Weather Conditions?
Rain chains are designed to withstand various weather conditions, including rain, snow, and wind. However, extreme weather events such as heavy storms or strong winds may cause the water flow to be disrupted or result in excessive splashing. It is advisable to monitor the performance of your rain chains during severe weather and make any necessary adjustments or replacements as needed.
Are Rain Chains Easy to Install?
Yes, rain chains are generally easy to install with basic tools and hardware. Most rain chains come with installation instructions, and the process usually involves removing the existing downspout, attaching the rain chains basin, cutting and connecting the chain, and securing it to the installation bracket. However, it is recommended to ask for the specific instructions provided by the manufacturer or seek professional assistance if needed.
How Do I Maintain and Clean My Rain Chains?
Regular maintenance and cleaning are essential to ensure the proper functioning and longevity of your rain chains. Remove any waste, leaves, or stem that may accumulate in the chain or basin to prevent clogging and obstruction of water flow. Depending on the material of your rain chains, you can use mild soap and water or a gentle metal cleaner to remove any dirt or stains. Inspect the chain periodically for any damaged wear signs and replace any worn-out components as necessary.