How about upgrading your home’s appearance with the addition of grand vaulted ceiling beams? Well, these beams are like long, beautiful pieces of wood or other materials that stretch across the ceiling, adding a pinch of beauty and style.
Whether you want a comfy, cabin-like feel or a mix of old and new, these ceiling beams are the way to go. You can choose from different materials like wood or faux wood, and these beams not only make your home look amazing but can also be useful.
You can hide lights inside them to create a kind, inviting atmosphere, or add a sound system for a cool movie experience. It’s a fun project that’ll modify your home into a luxurious and stylish space.
So, here we will guide you on how to install vaulted ceiling beams step by step and some ceiling beams ideas.
Types of Vaulted Ceiling Beams
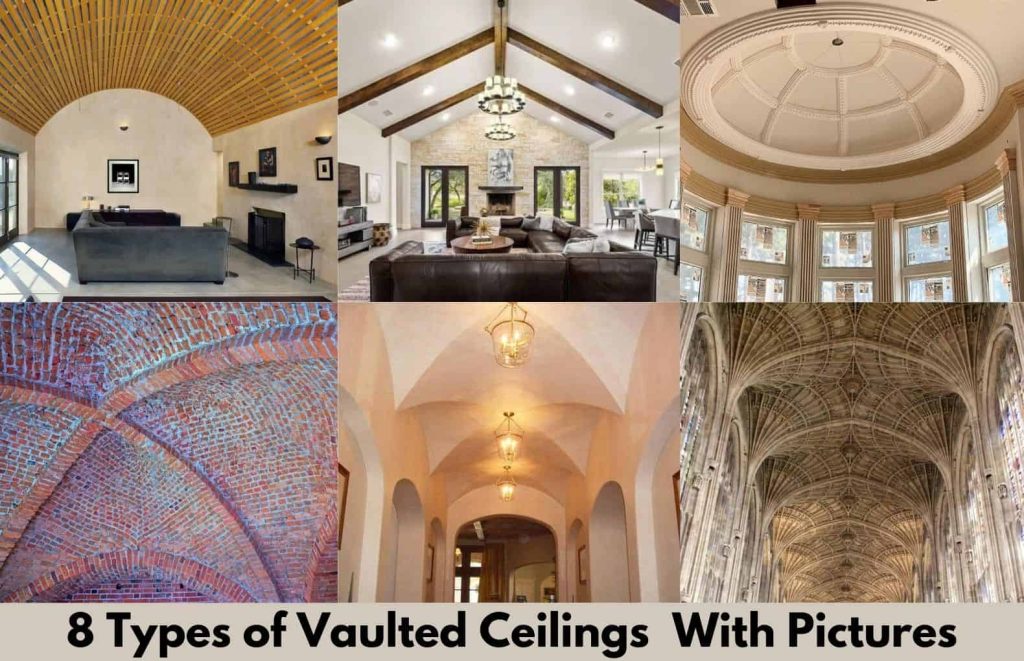
Before getting into the installation process, it’s essential to familiarise yourself with the various types of vaulted ceiling beams available. Each type offers a distinct character, catering to different interior design preferences.
The most common types of vaulted ceiling beams include:
1. Exposed Wood Beams
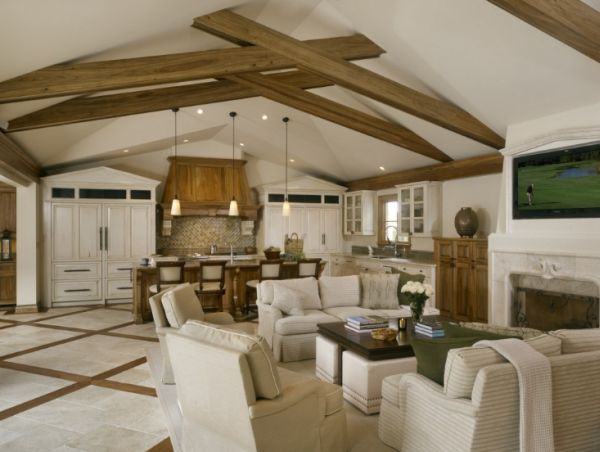
Exposed wood beams have a pretty and natural look. They’re made of solid wood, showing off the wood’s unique patterns and textures. These beams fit well in traditional and farmhouse-style interiors, adding kindness and character to the space. The wood’s mellow, earthy colors blend nicely with neutral colors, creating a mix of old-world beauty and modern comfort. Whether on the ceiling or near a fireplace, these beams bring a sense of history and authenticity to the room, making it feel comfortable and inviting, like a countryside resort.
2. Metal Beams
Metal ceiling beams with a modern and industrial feel come in different finishes like black, nickel, or bronze. You can easily match them to your existing decor. These beams are tough and need little maintenance, perfect for the latest interiors. They have clean lines and a bold glance that makes them the fascinating point, adding beauty to your room. Plus, they provide strong support for your ceiling, making it sturdy. With their simple care requirements, they save you time and effort, making them a smart choice for busy homeowners who want the latest and practical solution for their modern interiors.
3. Faux Wood Beams
Faux wood beams are a great choice if you want the look of real wood but don’t want to spend too much or deal with heavy materials. They’re made from a special foam that looks just like natural wood. These beams are light and simple to install, so they’re popular among DIY fans. Plus, you can find them in different styles and finishes to match your home’s style. On top of that, faux wood beams are tough and can resist damage from rot and pests, so they’ll stay attractive for a long time. They’re also eco-friendly, helping to save real wood and the environment.
4. Styrofoam Beams
Styrofoam beams, also known as polystyrene beams, are affordable and light. They are easy to handle and can be painted to seem like wood or metal. Although they may not be as real as actual wood or metal, they are a great choice for those with a small budget. Moreover, because they are lightweight, they are easy to install, save on labor costs, and are perfect for DIY projects. Additionally, polystyrene provides insulation, helping save energy in buildings and being eco-friendly. Despite their low cost, these flexible beams are durable and resistant to moisture, making them suitable for various indoor uses.
Installation of The Beams
1. Plan How The Beams will be Positioned
To start installing vaulted ceiling beams, carefully plan the layout. Consider the desired beam pattern and the room’s dimensions. Measure the ceiling’s width and length, ensuring the beams’ placement will be balanced and fine. Use chalk lines or painter’s tape to mark the beam positions for easy reference during the installation process.
2. Add Color to The Beams
Before installing the beams, apply stains to increase their appearance and protect the wood. Choose a stain color that boosts the room’s decor and apply it evenly using a brush or cloth. Allow sufficient drying time as per the manufacturer’s instructions to prevent dirt during handling and installation.
3. Measure and Indicate Where the Beams will Go
With the layout determined and the beams stained, measure and mark the exact spots where the beams will be attached. Use a level to ensure accuracy and create precise reference points for mounting the beams.
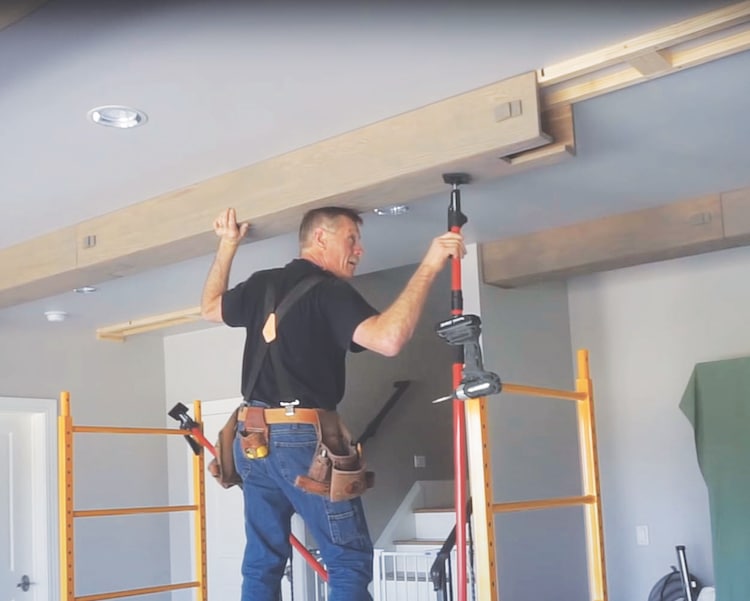
4. Construct and Connect the Main Beam in The Middle
The large center beam serves as the primary support and viewpoint. Construct it using solid wood or engineered beams. Secure it firmly to the ceiling’s peak, ensuring it’s level and centered. Utilize heavy-duty screws or nails to firmly attach them in place, providing stability and strength to the entire vaulted ceiling structure.
5. Fasten the Ceiling Boards
After installing the center beam, start attaching the ceiling planks between the beams. Use wood screws or nails to secure the planks, ensuring they are evenly spaced and flush with the beams. This step adds deepness and class to the ceiling while providing a smooth surface for further beam installation.
6. Create and Put up The Smaller Beams
Construct the smaller beams that will complement the center beam. Measure and cut them to the appropriate length, ensuring they fit easily between the ceiling and the center beam. Attach these smaller beams using screws or nails, providing additional support and a clear view of the vaulted ceiling.
7. Put Back the HVAC Vents and Lights
Before completing the project, remember to reinstall any HVAC vents or lights that were temporarily removed. Ensure they are properly aligned with the new ceiling layout and securely fastened to avoid any future issues.
Ideas for Vaulted Ceiling Beams
1. Partial Arch Ceiling Enhanced with Beams
Go for a half-vaulted ceiling with beams for a balanced and interesting design. In this style, only one side of the ceiling slopes upward while the other remains flat, creating a melodic contrast. Exposed beams highlight the sloped portion, adding texture and glamour. To increase the design and provide usability, consider installing a stylish ceiling fan that matches the room’s decor. This design is ideal for rooms with unbalanced layouts or those seeking a unique take on vaulted ceilings.
2. Dark Beams Showing in a Raised White Ceiling
For a strong and dramatic statement, choose a dark-finished exposed beam against crisp white vaulted ceiling beams. This eye-catching combination adds value and coolness to any room. The dark beam can be made of wood or faux materials and is mounted on the ceiling to highlight its prominence; pair it with LED track lighting to highlight the beam and draw attention to its stunning features. The contrasting colors draw the eye upward, giving the illusion of more height. The result is an eye-catching point that boosts the room’s overall view.
3. Weathered Gray Beams Revealed in a High Ceiling
A mellow gray beam exposed in a high ceiling gives a vintage and worn-out glamour, perfect for homes with a plain or coastal theme. To achieve this glance, the gray beam is made to seem old and weathered. When placed against a neutral-colored high ceiling, the distressed gray beam becomes the focus point, bringing a feeling of history and character to the space. You can add a vintage wall clock nearby to boost the atmosphere and match the distressed beam’s appearance.
4. Wooden Ceiling with Raised Planks and White Support Bars
Create a comfy and inviting vibe in your home with a cedar plank vaulted ceiling adorned with gorgeous white beams and some lovely indoor plants. Cedar planks are strong and have a natural beauty that adds kindness to any room. The white beams create a nice contrast, making the space feel more spacious. To set up this design, securely attach the cedar planks to the ceiling’s framework and connect the white beams for a smooth layout. It’s a perfect combination of present-day and plain elements, ideal for making homes or cabins feel connected to nature indoors.
5. Interlocking Wooden Ceiling with Custom-Fitted Beams
Make a lasting and smooth vaulted ceiling by using tongue and groove paneling paired with measuring tools for precise installation of the cut and fit beams. The tongue and groove technique interlocks the wooden panels, resulting in a smooth and amazing surface. Complementing this design, cut and fit beams are tailored to fit precisely within the grooves, imparting a polished and characterized finish. This mixture works well in both old-fashioned and present-day interiors, providing a hint of simplicity.
6. Old Pine Ceiling Accented by Strong Oak Beams
Upgrade your space into an attractive spot with an antique chandelier and a classy pine vaulted ceiling accompanied by strong and solid oak beams. Antique pine shows a characterized view, while solid oak beams add strongness and a trace of luxury. The contrasting textures and tones create an eye-catching interplay of natural elements, making this design ideal for homes seeking a comfy and long-lasting appearance.
7. High Ceiling Covered with Drywall
Attain a current and clean layout with a vaulted ceiling finished with drywall and LED Recessed Lights. This method involves attaching drywall sheets to the ceiling framework, providing a smooth surface ready for paint or texture. The result is a smooth and simple appearance, suitable for recent and transitional homes. Drywall allows for easy customization, enabling homeowners to experiment with different colors or finishes.
8. Arched Designs for High Ceilings
Add a special touch to your room by introducing vaulted ceiling arch designs. Arches make the room look bigger and more stylish. There are different arch styles, like pointed or rounded, so you can choose the one that fits your taste and design. To install the arch, supportive materials like wood or metal are used to create an impressive effect that upgrades the overall appearance of the vaulted ceiling beams. For an even more classic look, you can also include Arch Mouldings, which are beautifully crafted designs that perfectly match the arches. These Arch Mouldings not only add coolness but also give a nice finishing touch to your architectural masterpiece.
Conclusion
Last but not least, installing vaulted ceiling beams is a fantastic way to make a room look beautiful and unique. It can add a special touch to the space and make it feel more cool and stylish. The process might seem a little tricky, but with careful planning and following the steps, anyone can do it.
Vaulted ceiling beams work well with different styles of homes, and you can choose the one that fits your taste. They can also hide wires and provide support for the ceiling, which is useful. Adding a vaulted ceiling is a great idea because it not only seems good but also serves practical purposes.
So, don’t hesitate to give it a try; once you’re done, you’ll have an artistic room that will impress everyone with its lasting beauty and style.
Enjoy the upgradation and the new atmosphere brings to your space.
Frequently Asked Questions
Are Vaulted Ceiling Beams Suitable for All Room Sizes?
Vaulted ceiling beams can work well in various room sizes, but it’s essential to consider the height and proportions of the room. In smaller rooms, thinner beams can create the illusion of space, while larger rooms can hold more substantial beams for a grander effect.
Can I Install Ceiling Beams on My Own?
Yes, with the right tools and materials, installing vaulted ceiling beams can be a rewarding DIY project. However, if you’re unsure about the process, it’s advisable to seek professional help to ensure a safe and secure installation.
What Are the Cost Implications of Installing Vaulted Ceiling Beams?
The cost of these ceiling beams can vary depending on the material and design you choose. Faux wood and Styrofoam beams are generally more affordable than real wood or metal beams. Additionally, installation costs may vary based on the complexity of the project.
Do Vaulted Ceiling Beams Add Value to a Property?
Yes, it can increase a property’s value and appeal. They add a pinch of luxury and prettiness to the interior, making the space more attractive to potential buyers.