
After years of installing paver walkways, I’ve found that curved designs add a special touch to any landscape.
In this guide, I’ll share my experience creating a custom curved paver walkway from start to finish.
This project took me about 4 days (with one rainy day setback), but the results were absolutely worth it.
I’ll walk you through each step of the process, from proper base preparation to the finishing touches.
While I didn’t capture every moment on camera as I’d hoped, I’ve made sure to document the most important techniques, especially how to handle those tricky curved cuts that give this walkway its unique character.
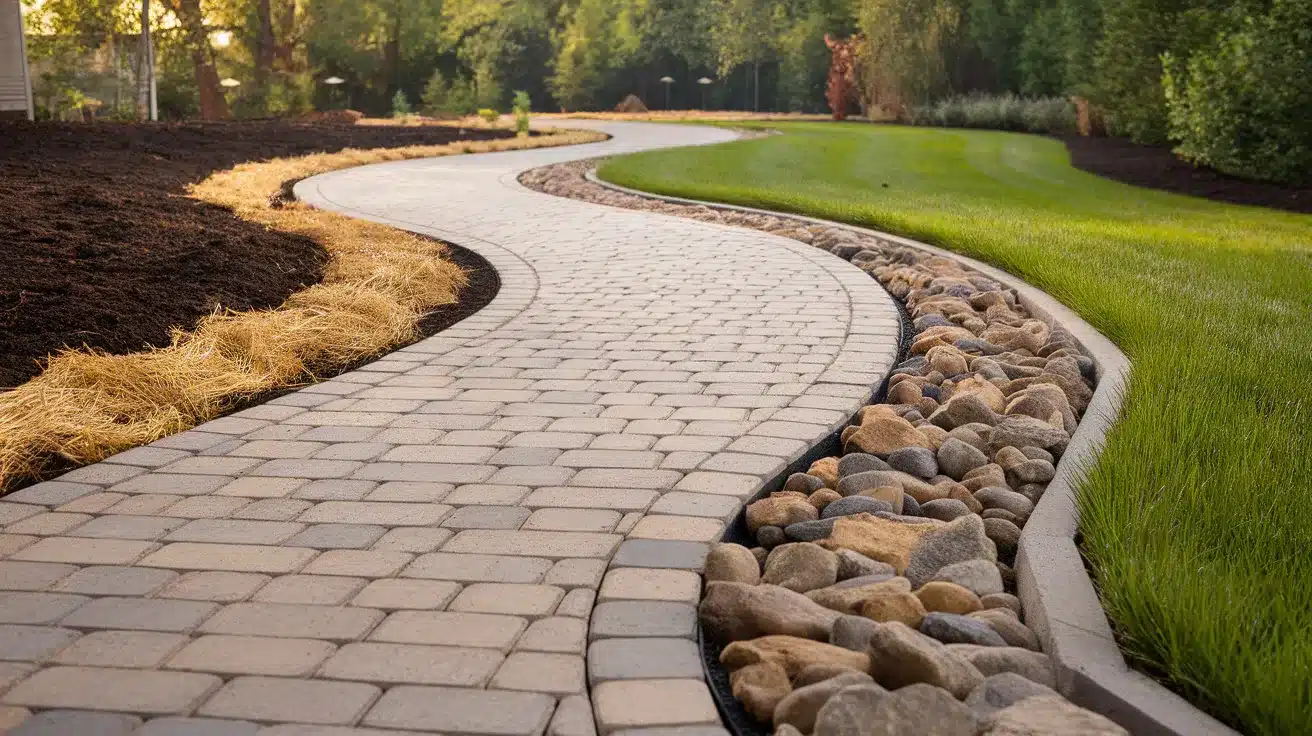
Why Choose a Curved Paver Walkway?
When my clients asked for something different than the standard straight walkway, I knew curves would create the perfect solution.
Curved walkways naturally guide visitors through your landscape, creating a more inviting and organic feel than straight paths. They complement both modern and traditional home styles while adding visual interest to any yard.
Though they require more cutting and precision work, the end result delivers a custom, high-end appearance that straight walkways can’t match. The following lines draw the eye and create a sense of journey through your outdoor space.
While this project requires patience due to its numerous custom cuts, the finished walkway becomes an artistic element rather than just a functional path, transforming an ordinary yard into a thoughtfully designed landscape.
Tools and Materials Needed
| Category | Item | Description/Use |
|---|---|---|
| Tools | Laser level | Ensures a level surface layout |
| Compactor | Compresses the base material for stability | |
| Pave tool screeder | Screed the bedding layer evenly | |
| Demo saw / handheld steel saw. | Cuts pavers and materials | |
| Chop saw | Precision cutting of pavers | |
| Marking tools (pencil, board) | For measuring and marking inlays | |
| Materials | Pavers (standard rectangular) | Main surfacing units |
| Charcoal 4×8 edging pavers | Edging definition and boundary setting | |
| 3/4″ clean rock/gravel | Base layer for drainage and stability | |
| Chat / 3/8″ minus | Fine bedding layer for setting pavers | |
| Poly sand | Fills joints between pavers, stabilizes. | |
| Mortar/concrete | Used for edge restraint | |
| Weed barrier | Prevents weed growth underneath | |
| Landscape rock | Aesthetic and functional top layer | |
| Topsoil | For finishing and leveling lawn areas | |
| Seed and straw | For planting grass and stabilizing soil |
Step-By-Step Guide to Installing a Curved Paver Walkway
Convert your outdoor space with a professional curved paver walkway through careful preparation, precise installation techniques, and proper finishing details.
Step 1: Excavation and Base Preparation
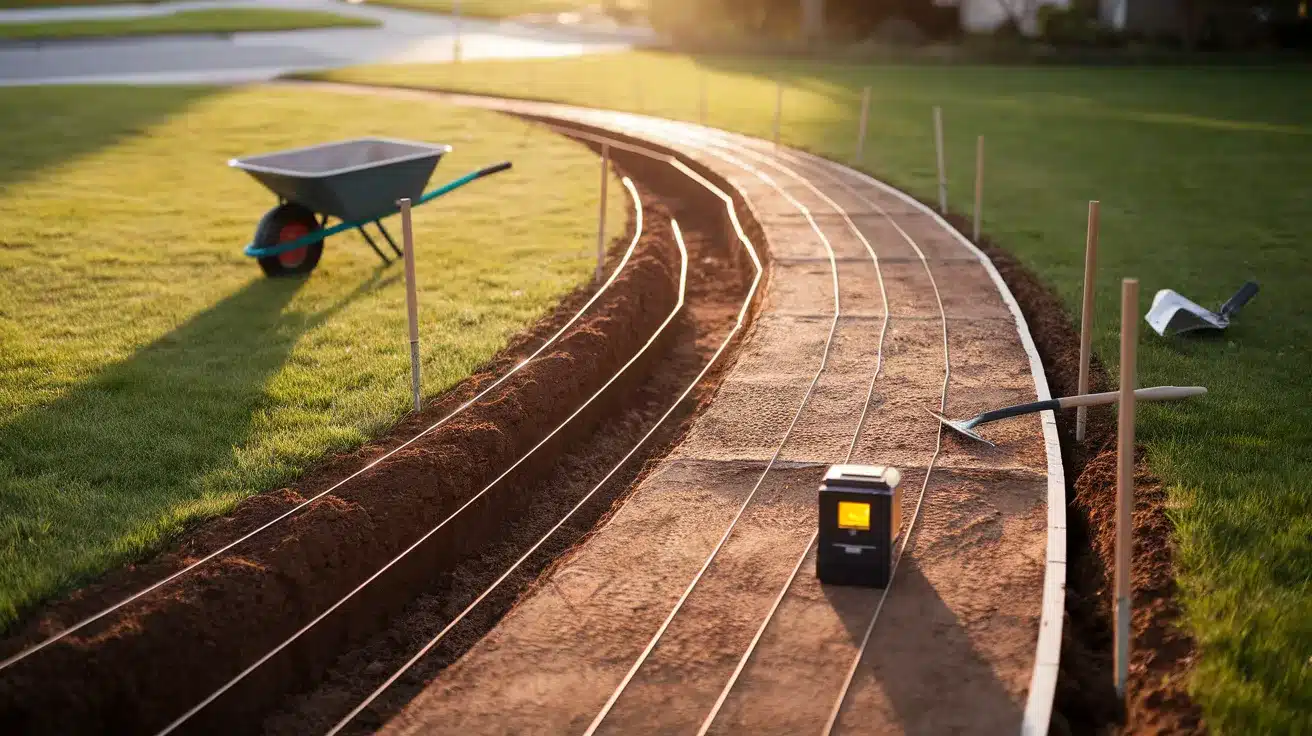
First, dig out the area where the walkway will be installed, making it slightly deeper than needed for all materials. The excavation should be wide enough to accommodate the walkway design plus a few extra inches on each side. Create a slight slope away from any structures for proper drainage.
Pro tip: Use stakes and string lines to mark your excavation area before digging to ensure you’re following your desired pathway design.
Step 2: Install and Compact Base Material
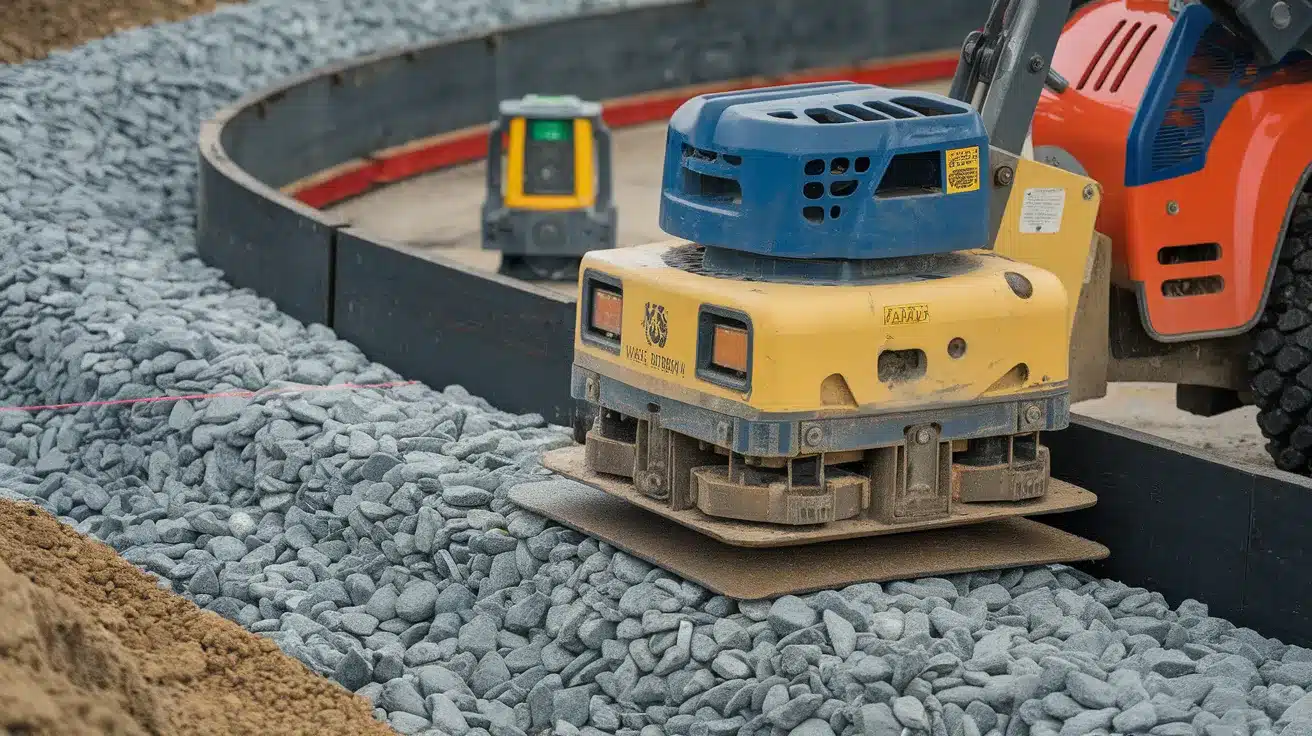
Lay down the 3/4″ clean rock as your base layer and compact it thoroughly using a mechanical compactor. This creates a solid foundation that prevents future sinking. The base should be 4-6 inches thick, depending on your soil conditions.
Pro tip: Compact in 2-3 inch layers rather than trying to compact the entire depth at once – you’ll get much better compaction and a more stable base that will prevent settling issues later.
Step 3: Install Steps (If Applicable)
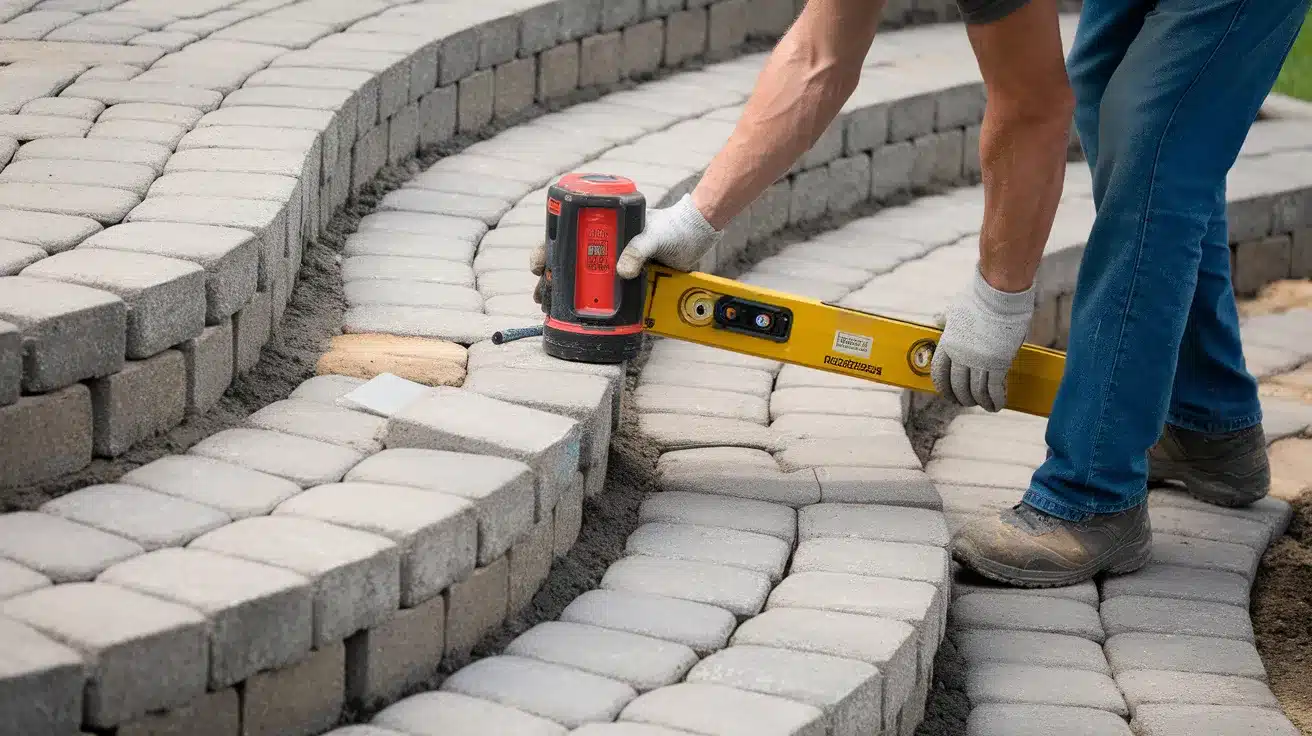
When building steps, use a laser level to ensure perfect horizontal alignment. Set the blocks or step materials in place, checking constantly with the level. Steps should be as close to perfect as possible since any error will be very noticeable.
Pro tip: When installing step caps, aim for them to touch or nearly touch – a gap of 1/8″ or less creates a clean, professional look that won’t accumulate debris.
Step 4: Add Bedding Layer
Spread a 1-inch layer of chat (3/8″ minus) fine material over your compacted base. This creates the perfect setting bed for your pavers. Use screed rails (pipes) set on the compacted base and a screed tool to create a perfectly level surface.
Pro tip: Roughly level the material first with a rake before using the screed tool – this makes screeding much faster as you’re not trying to move large amounts of material with the screeder.
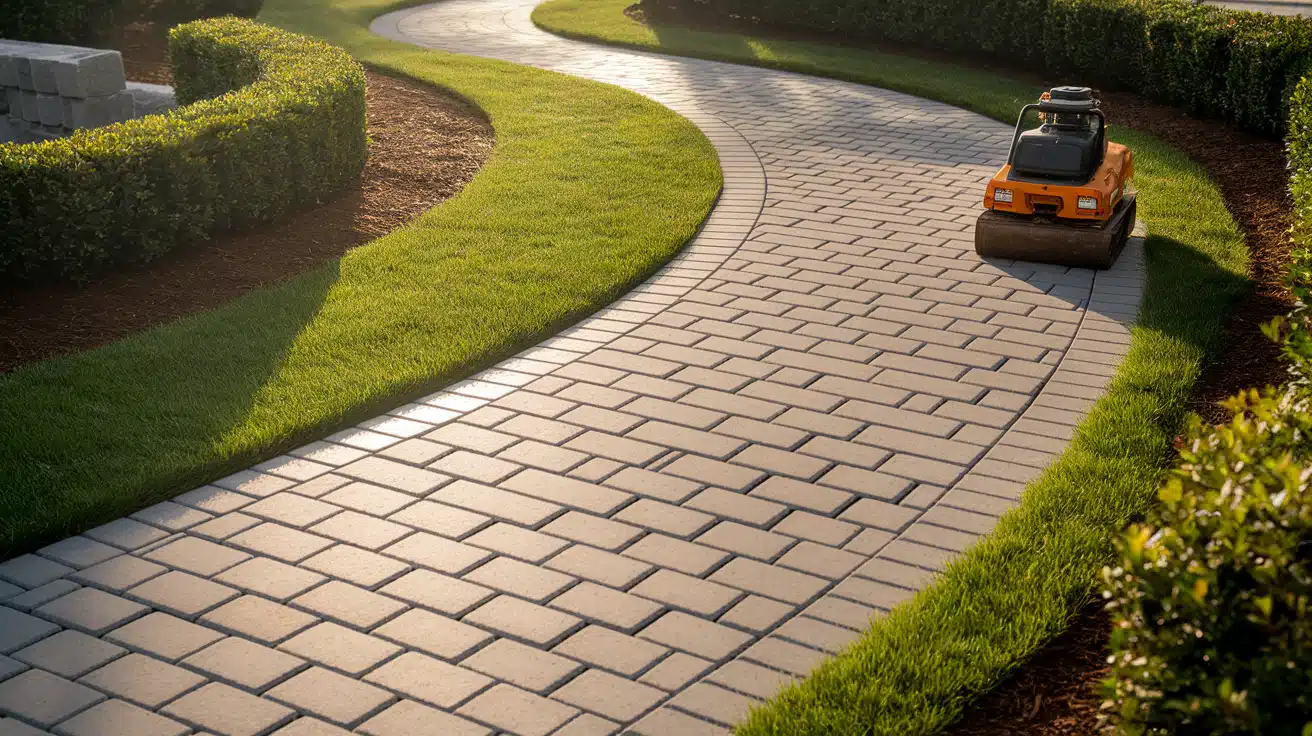
Step 5: Lay Straight Sections of Pavers
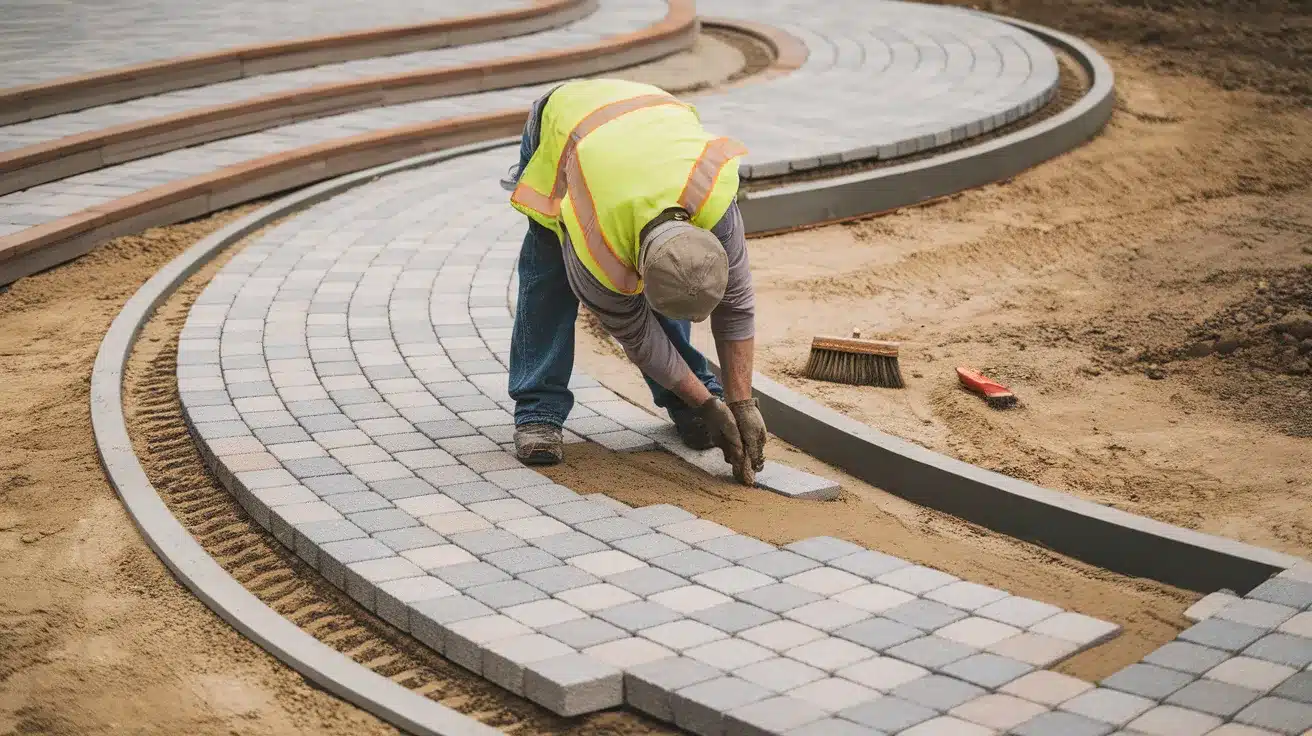
Begin laying pavers in the straight sections first, working from a fixed point like steps or an existing structure. Place each paver snugly against the others, checking periodically for level and alignment. Work in small sections and avoid walking on your freshly screeded bedding material.
Pro tip: Keep a small brush handy to sweep away any bedding material that gets on top of the pavers – this prevents scratching when you’re adjusting or aligning pavers.
Step 6: Mark and Cut Curved Sections
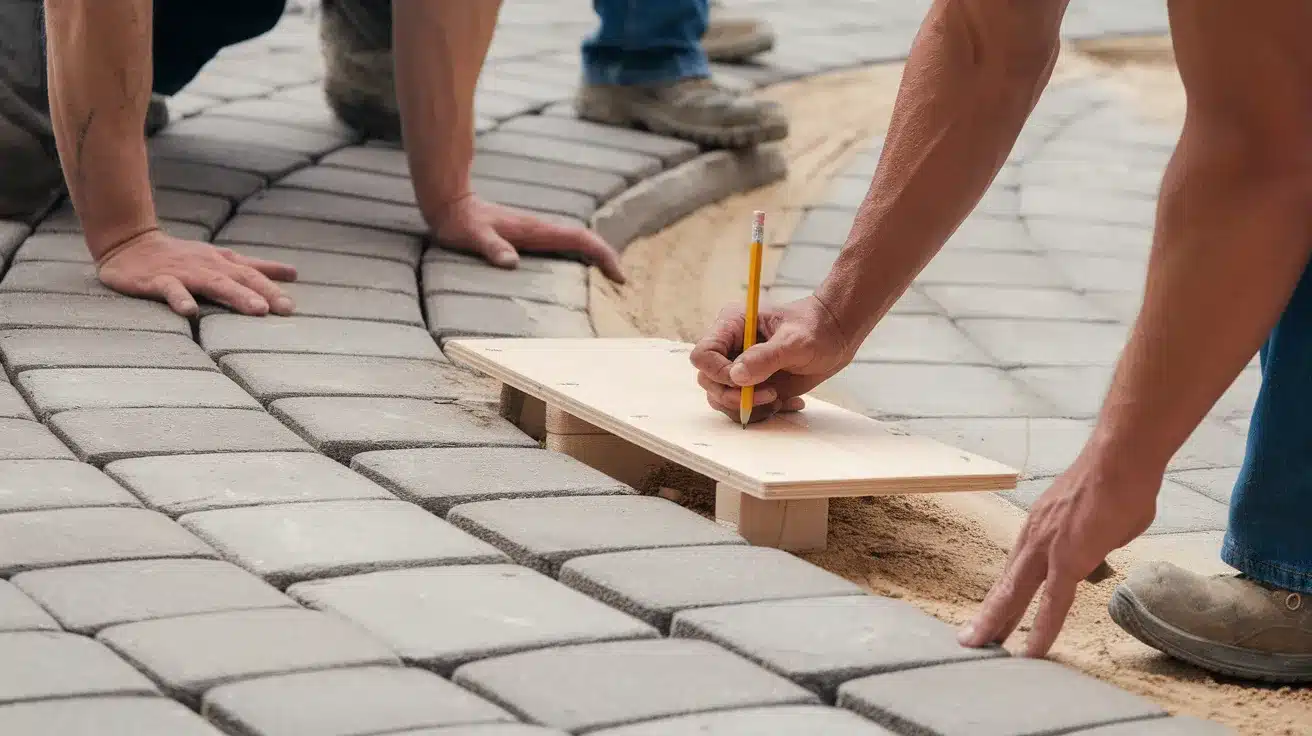
For curved sections, place full pavers along the curve, then mark cutting lines freehand. Use a board cut to your desired inlay size to help mark consistent cutting lines along the curve. One person holds the board while another draws along it with a pencil.
Pro tip: Score your cutting lines first with the saw instead of cutting all the way through – this gives you a chance to verify your cuts will look right before making the final cut.
Step 7: Cut and Install Curved Pavers
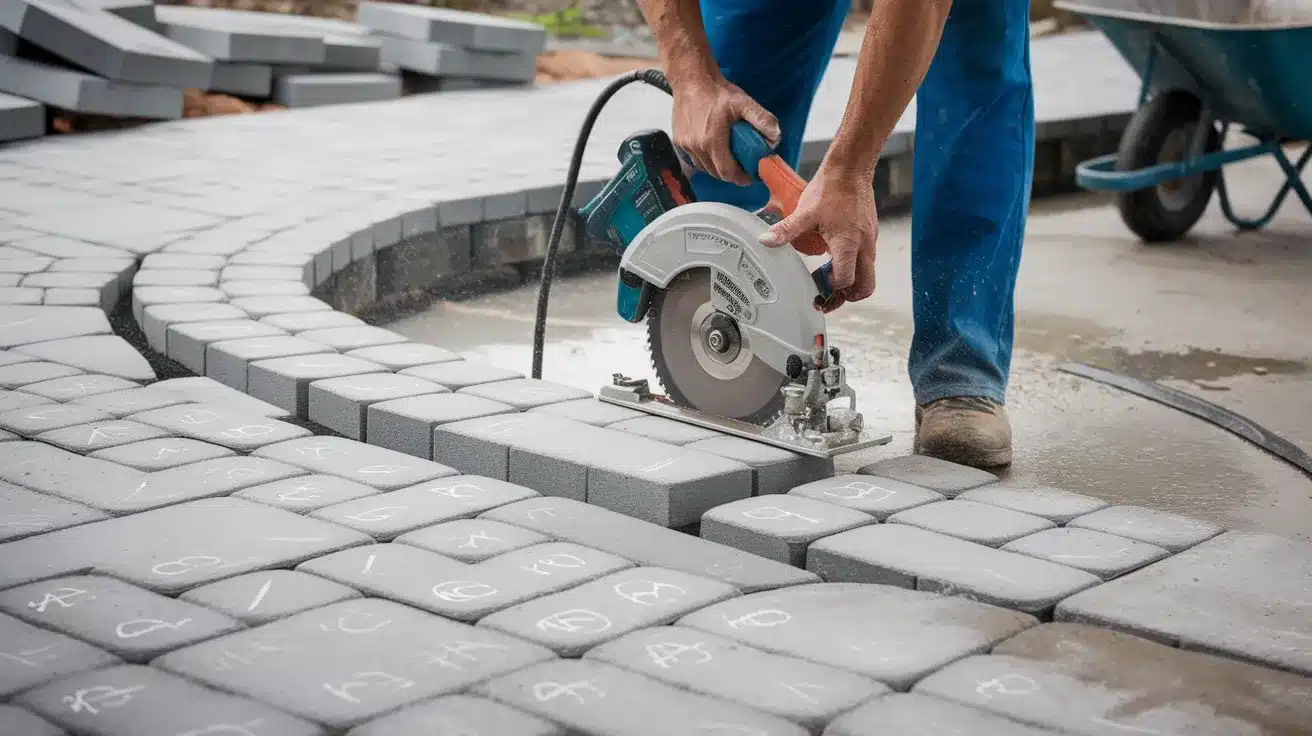
Remove the marked pavers one by one and cut them on a chop saw following your marked lines. Return each cut paver to its position immediately to maintain your pattern and spacing. Adjust as needed for the best fit and appearance.
Pro tip: Number your pavers with chalk before removing them for cutting to ensure each piece goes back exactly where it belongs – this is especially important for intricate curve patterns.
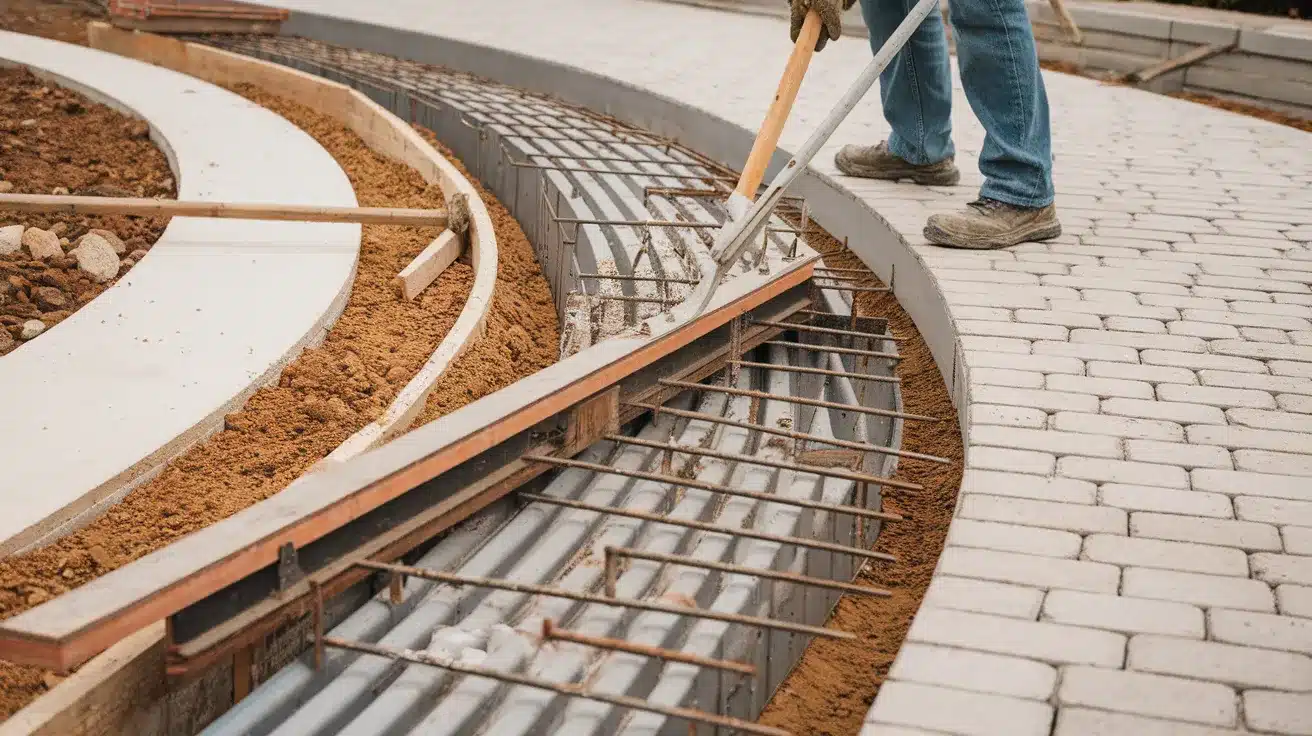
Step 8: Install Edge Restraint
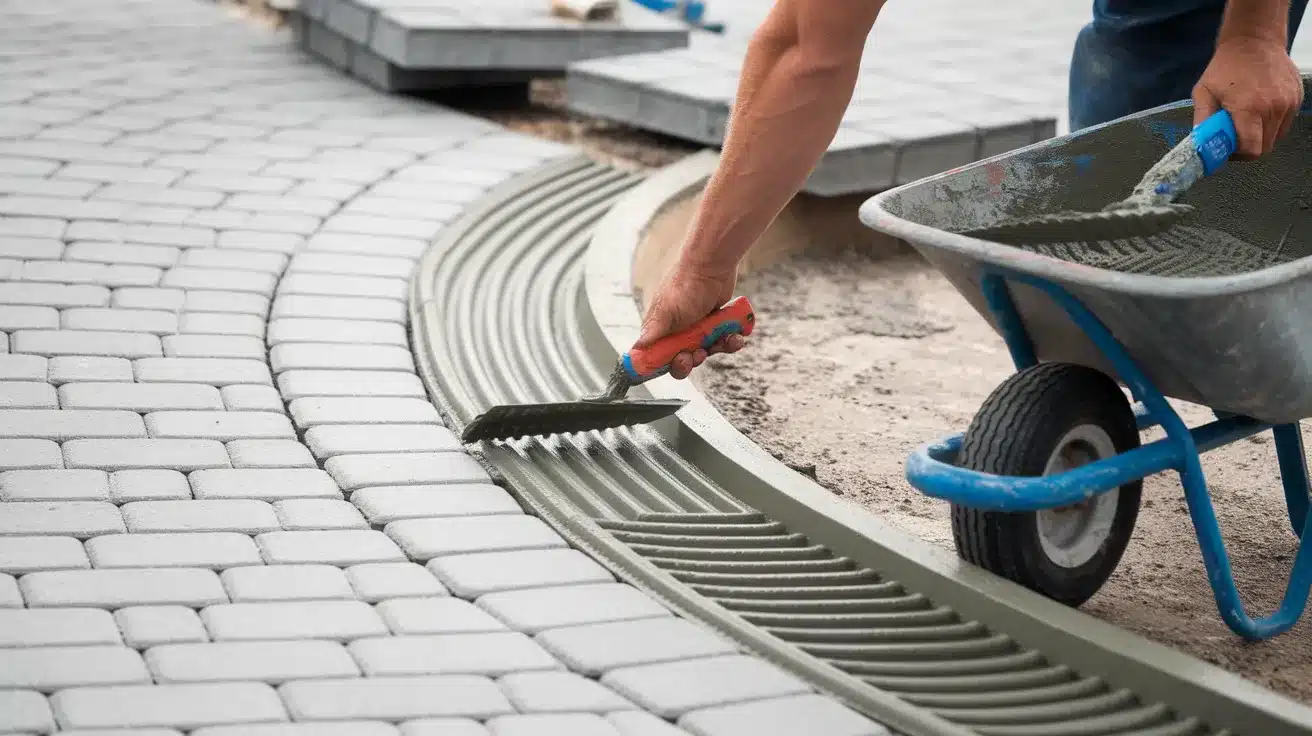
Use mortar or concrete rather than plastic edging for a more permanent edge restraint. Mix in a wheelbarrow and apply along the outside edges of your paver installation. This keeps the pavers from shifting outward over time.
Pro tip: Install your edge restraint slightly below the surface of your pavers so it won’t be visible once you add topsoil around the edges – this creates a cleaner, more professional finished look.
Step 9: Apply Poly Sand
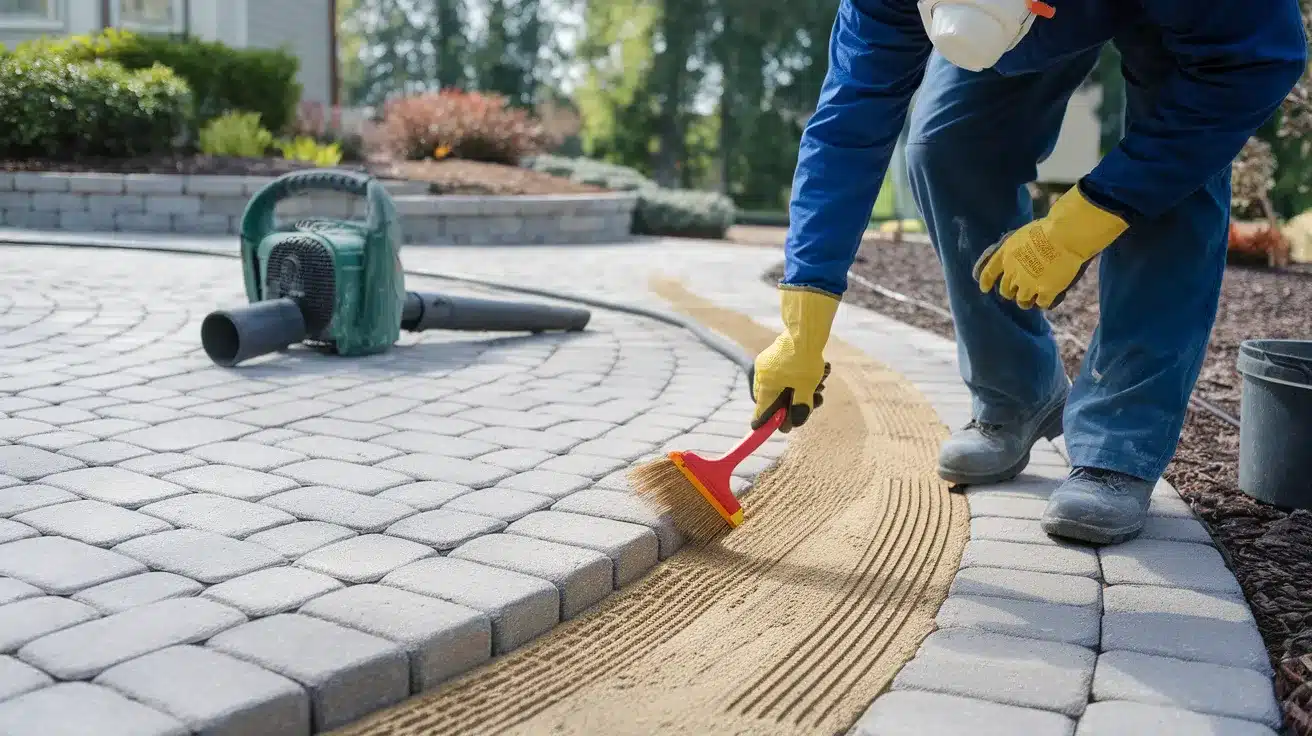
After all pavers are installed and the edge restraint is in place, spread poly sand over the entire surface. Sweep it into the joints between pavers, ensuring complete filling. Follow the manufacturer’s instructions for wetting to activate the binding agents.
Pro tip: Use a leaf blower on a low setting to remove all poly sand from the paver surfaces before wetting. Any remaining on top will harden and create a hazy film that’s difficult to remove.
Step 10: Landscape Finishing
Complete the project by installing a weed barrier and landscape rock on the inside edge of the walkway. Add topsoil, seed, and straw to the outer edge. This creates a finished look and proper transition to the surrounding yard.
Pro tip: Extend your landscape rock about an inch under the edge of your walkway pavers – this prevents grass from growing into the edge of your walkway and reduces the need for string trimming maintenance.
Video Tutorial
I’d like to acknowledge Nickens Landscaping & Excavating LLC for the insightful video, which was a key reference in putting this guide together.
Tips for a Successful Installation
- Plan for 3-4 days of work, depending on the walkway size and the complexity of curves
- Measure twice, cut once – especially important for curved sections
- Keep your saw blade wet when cutting pavers to reduce dust and extend blade life
- Allow for proper drainage with a slight slope away from buildings
- Use high-quality materials – this isn’t the place to cut corners
- Take your time with the base preparation – it’s the foundation of your project
- Be patient with curved cuts – they make your walkway unique
- Always have extra pavers on hand for mistakes or future repairs
Conclusion
Creating a curved paver walkway converts ordinary landscapes into eye-catching outdoor spaces. While this project requires dedication and precision, particularly when cutting pavers for curves, the results speak for themselves.
I’ve found that taking time with each step—from proper base preparation to meticulous finishing touches—ensures a walkway that will last for years.
The curved design creates visual interest impossible to achieve with straight paths, guiding visitors through your landscape with sleek flow.
Though it may take a few days longer than a standard installation, the custom appearance is worth every extra minute spent.
Remember that patience is key, especially when working on those challenging curved sections that make your walkway truly unique.