Easy DIY Bird Bath Projects for Total Beginners
You do not need a fancy garden or a big budget to bring more birds to your backyard. Most people overlook how simple it really is.
A DIY bird bath is one of the easiest projects you can add to your outdoor space. It costs very little and takes just a few hours to build.
Here you will find four beginner-friendly builds, practical finishing tips, smart placement advice, and simple ways to make your bird bath work even better for birds.
Pick a build that suits your skill level and available materials, follow the steps, and have a finished bird bath ready before the day is done.
Why Build Your Own Bird Bath?
Building a bird bath at home costs far less than buying one from a store. A few basic materials and a free afternoon are all you need to get started.
| Reason | What It Means |
|---|---|
| Cost-Effective | Spend less than store-bought versions using basic, easy-to-find materials |
| Customizable | Pick your own size, shape, color, and material to fit your garden |
| A Satisfying DIY Project | Fun to build and even more rewarding once birds start visiting |
| Wildlife-Friendly |
Gives local birds a safe spot to drink and bathe right in your backyard |
Simple DIY Bird Bath Projects
There are plenty of ways to build a bird bath at home, from basic beginner builds to slightly more involved projects. Pick one that matches your skill level and the materials you have available.
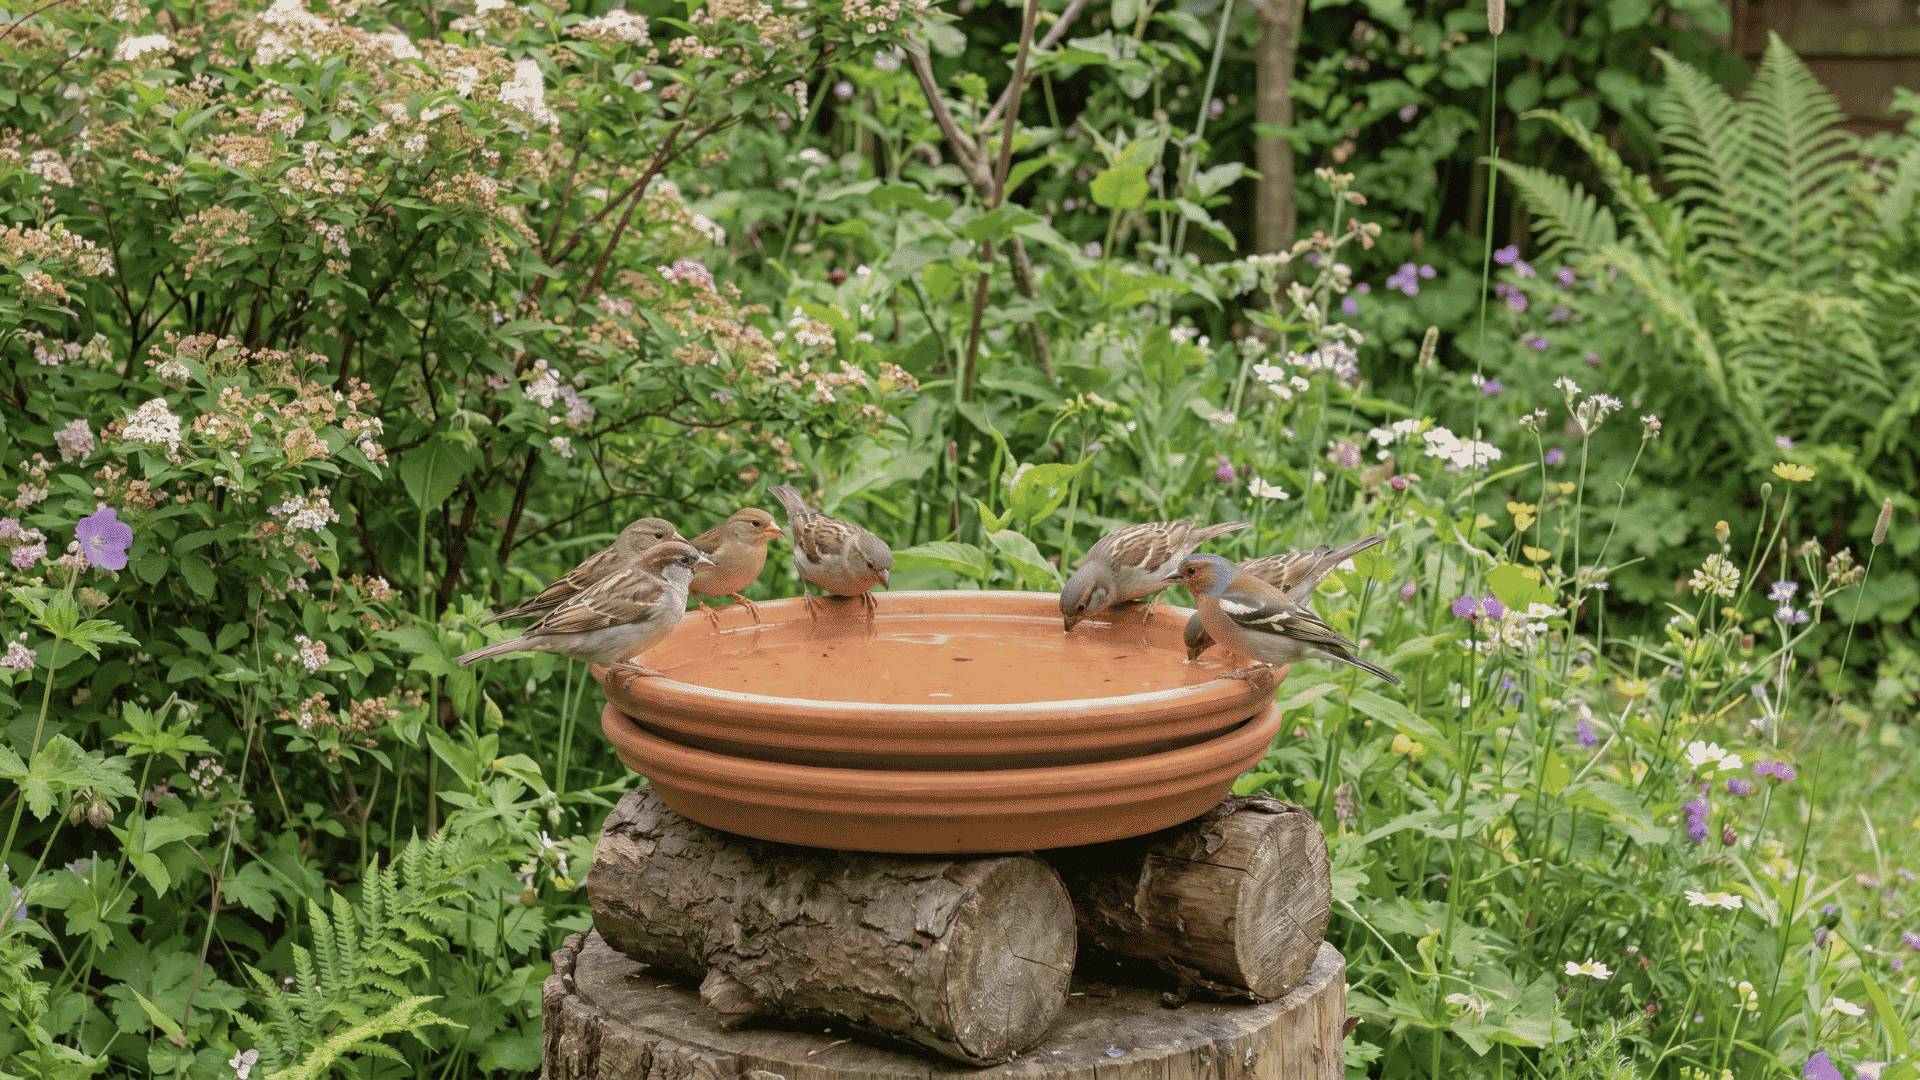
1. Upcycled Plant Saucer Bird Bath

This is one of the easiest bird baths you can make. It uses items you may already have at home and takes very little time to put together.
What You Need
- Shallow plant saucer
- Inverted pot or stand
- Heavy-duty waterproof adhesive
- Flat stones
How To Build It
- Fix the saucer on top of the inverted pot using waterproof adhesive.
- Place it in a level spot close to shrubs or trees for cover.
- Add a few flat stones inside the saucer so birds have a place to stand.
Beginner Tip: This project is perfect if you have never built anything before. It costs very little and can be ready in under an hour.
2. Modern Minimalist Bird Bath

This design is clean, simple, and works well in smaller yards. Three wooden dowels act as the base, making it easy to set up almost anywhere outdoors.
What You Need
- 3 wooden dowels
- Shallow dish
- Paint or wood stain
- Sealant
How To Build It
- Sand and seal the dowels before use.
- Hammer all three dowels evenly into the ground.
- Place the shallow dish on top and fill it with half an inch to two inches of water.
- Add a small rock inside the dish for birds to perch on.
Beginner Tip: Seal the dowels well to make them last longer outdoors. This design stays tidy and holds up well over time.
3. Concrete Leaf Bird Bath
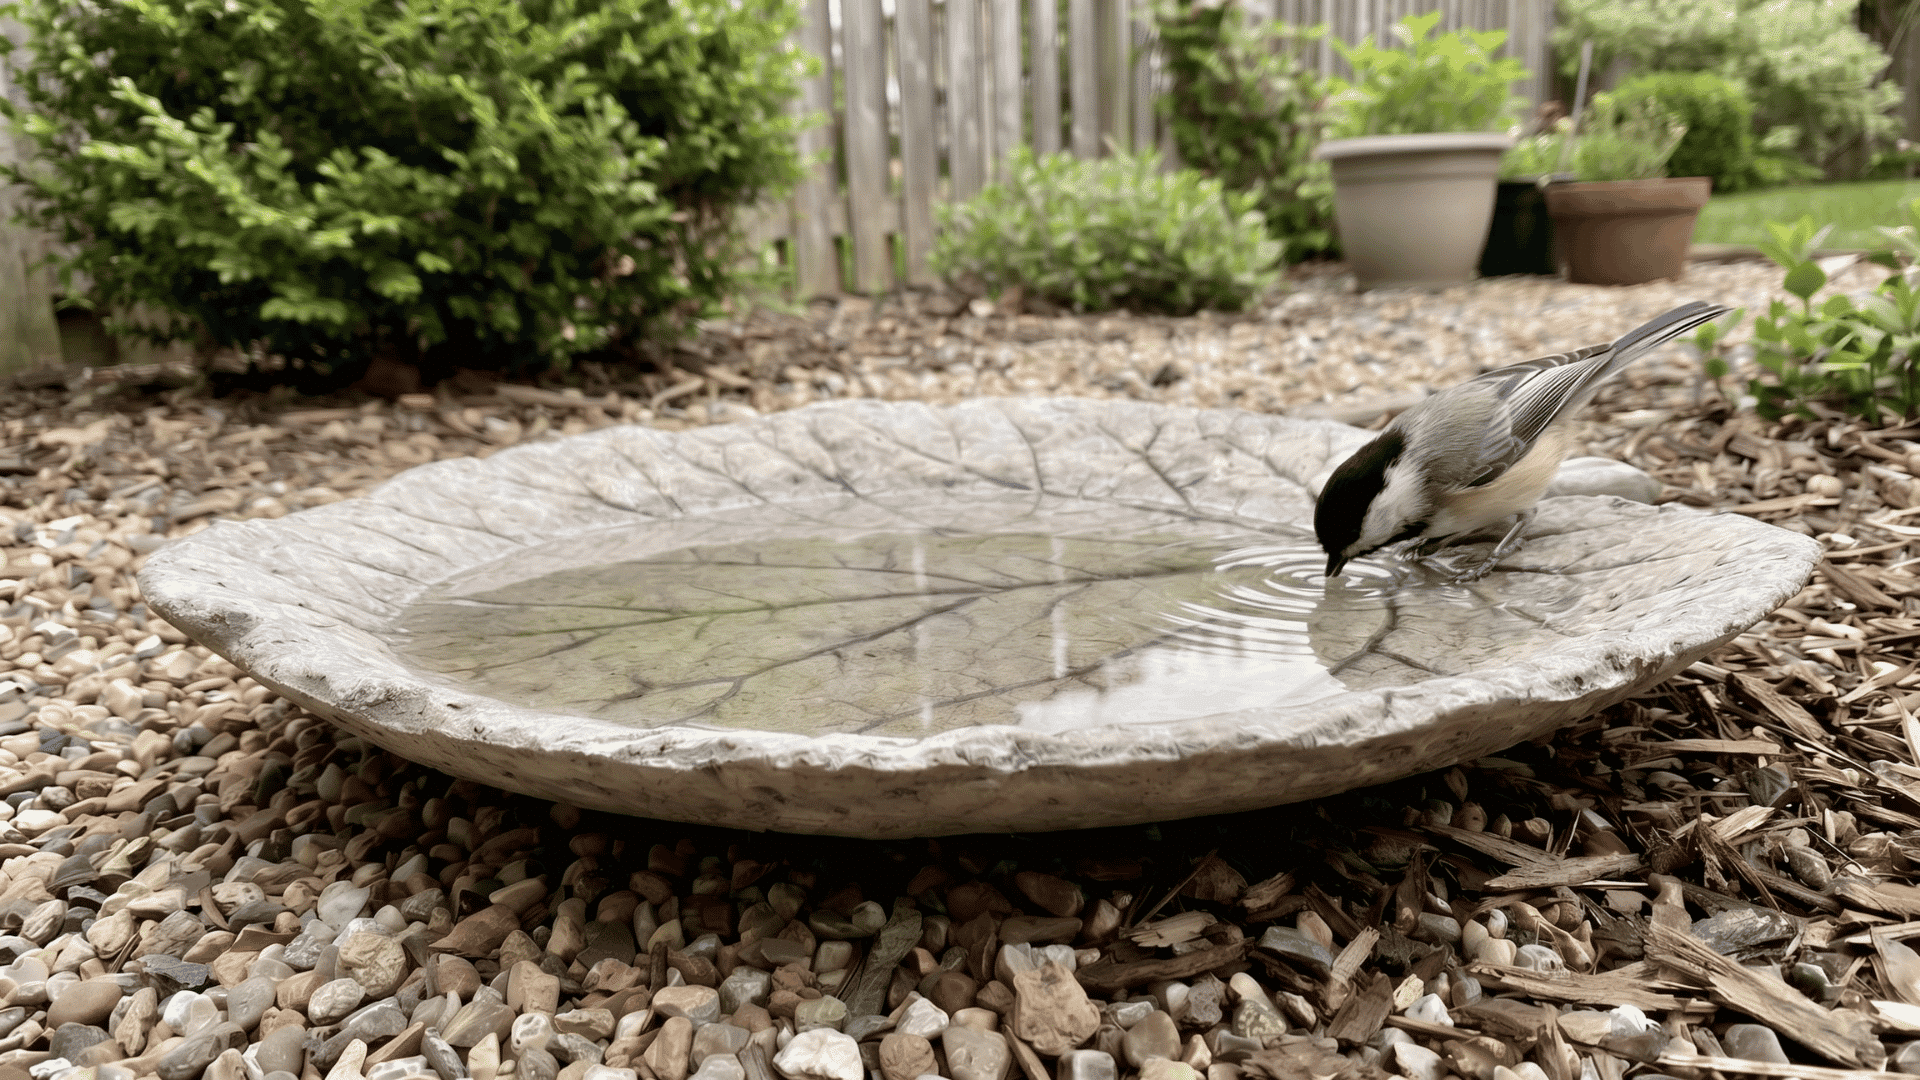
This project takes more time but produces a beautiful, natural-looking bird bath. A large leaf acts as the mold, leaving behind a detailed print once the concrete sets.
What You Need
- Concrete mix
- Large leaf such as rhubarb or elephant ear
- Chicken wire
- Mold oil or vegetable oil
- Concrete sealer
How To Build It
- Shape a dome using sand and cover it with plastic sheeting.
- Lay the leaf face-down on the plastic and coat the veins with vegetable oil.
- Mix the concrete and press it over the leaf, adding chicken wire in the middle for strength.
- Leave it to cure for 48 hours, then carefully remove the leaf.
- Allow it to cure for one full week before applying concrete sealer.
- Once sealed, it is ready to fill with water.
Beginner Tip: This one takes patience, but the result is worth it. The leaf print gives it a natural, organic look that fits well in any garden.
4. Tiered Water Park Bird Bath
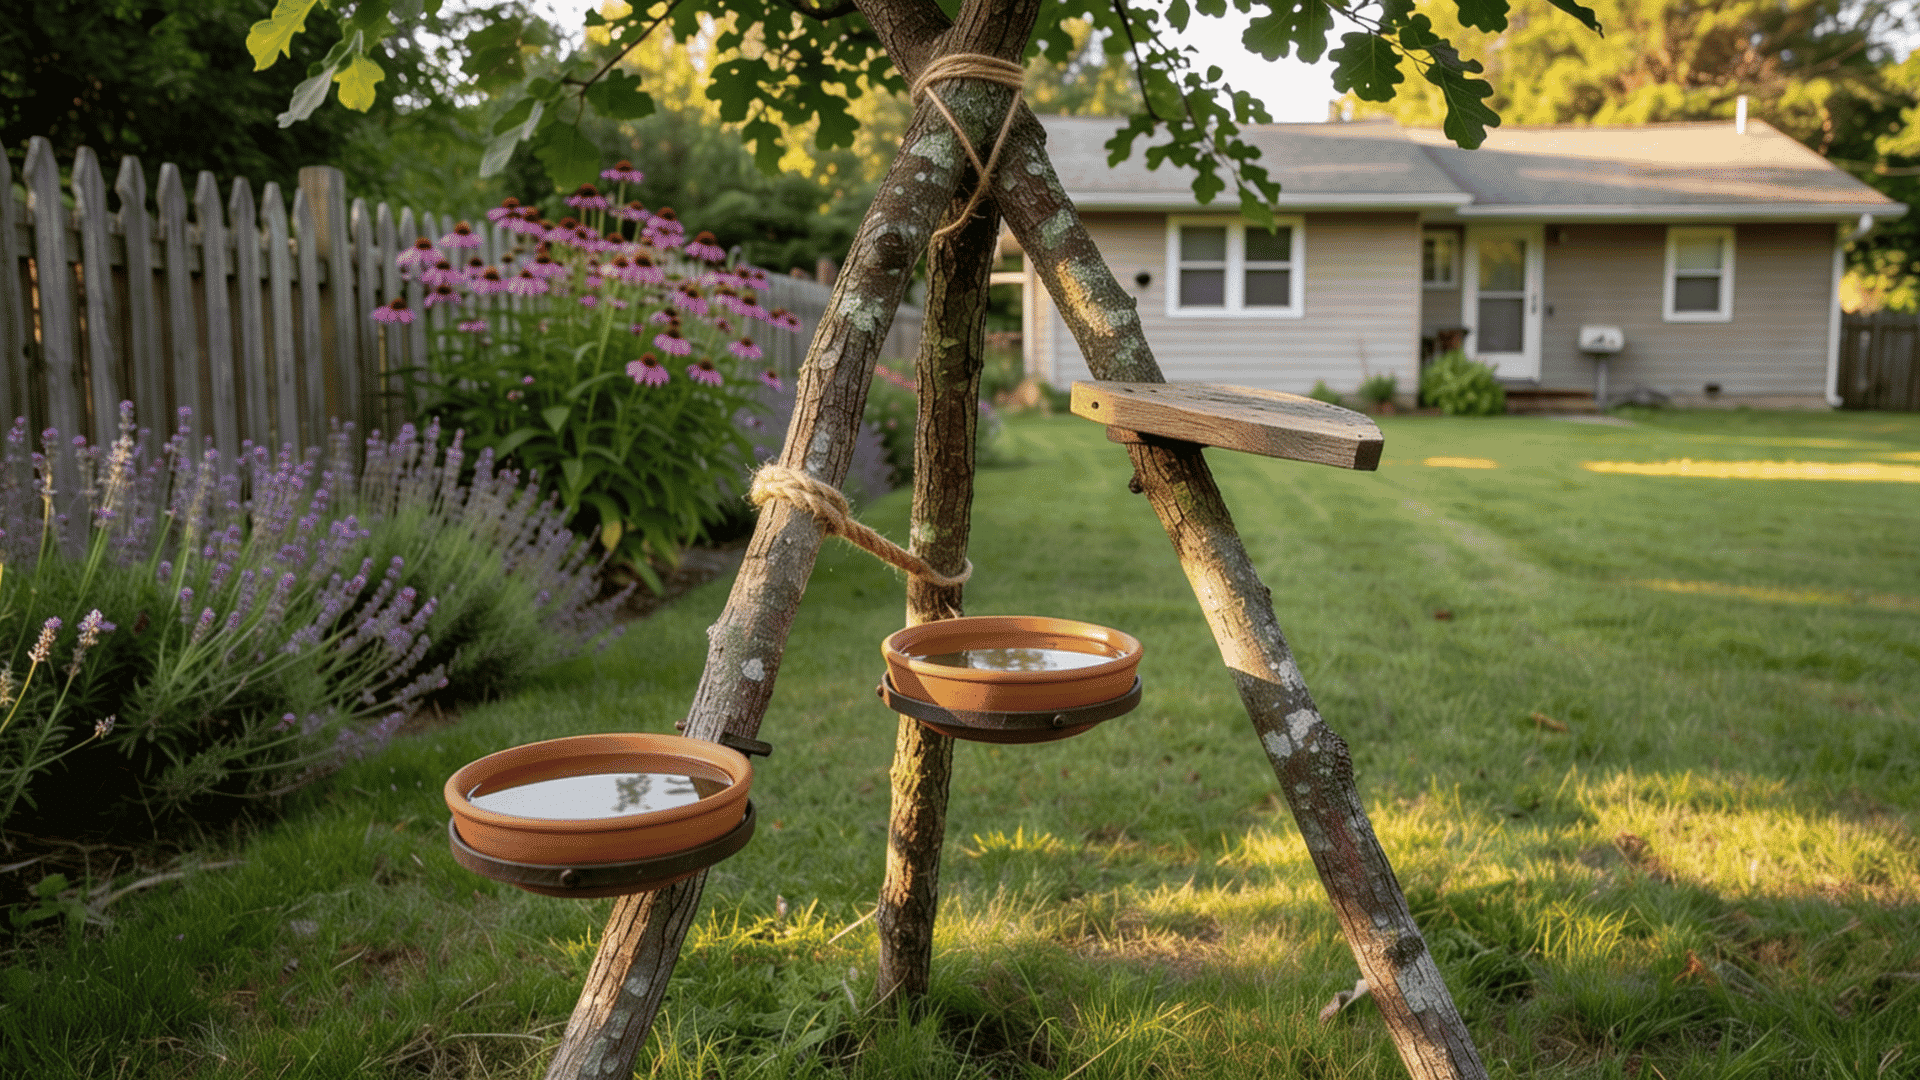
This multi-level design uses branches and bowls of different sizes to create a bird bath that works for several types of wildlife at once. It also makes a great visual feature in the backyard.
What You Need
- 3 sturdy branches
- Bowls in various sizes
- Screws
- Plant holders
- Optional rocks
How To Build It
- Join the three branches at the top to form a tripod shape.
- Attach plant holders at different heights along the branches using screws.
- Place a bowl in each holder and fill them with shallow water.
- Add rocks inside the bowls for perching and to help smaller creatures like chipmunks reach the water safely.
Beginner Tip: Use bowls of different sizes to attract a wider range of birds and small animals. This setup is one of the most eye-catching options on the list.
Painting, Sealing, and Finishing
Once your bird bath is built, a few finishing steps help it last longer and stay safe for birds. This part does not take much time but makes a real difference.
Painting
Stick to acrylic paints when adding color to your bird bath. Use them on the top edges or as small accents to keep things simple and safe.
Always avoid paints that contain toxic ingredients. Birds will be drinking from the water nearby, so using non-toxic paint is not optional, it is necessary.
Sealing
Sealing is especially important for concrete bird baths. Use a bird-safe concrete or acrylic sealer to protect the surface from wear and water damage.
A proper seal also makes regular cleaning much easier. It helps the bath hold up through rain, heat, and cold without cracking or breaking down quickly.
Optional Pedestal or Base
Adding a pedestal improves stability and puts the bath at a comfortable height for birds. Good options include a concrete tube, a wood block, or any sturdy repurposed item.
Make sure whatever base you choose sits level on the ground. A wobbly base can tip the bath over and become unsafe for birds visiting the water.
|
Quick Checklist Before You Fill With Water:
|
Placement and Maintenance
Where you place your bird bath and how often you care for it directly affects how many birds visit. A few simple habits keep it safe and working well.
| Category | What To Do | Why It Matters |
|---|---|---|
| Ideal Placement | Place near trees or fences, visible from a window. Avoid dense shrubs directly around the bath | Birds feel safe, can spot predators easily, and have clear space to fly away quickly |
| Water Management | Refill every one to two days and always keep water shallow | Keeps water fresh, prevents health risks, and stops mosquito larvae from forming |
| Cleaning | Scrub weekly with diluted vinegar or a weak bleach solution | Removes algae and debris safely without causing harm to visiting birds |
| Seasonal Tips | Bring indoors when temperatures drop below freezing or use a heated insert | Protects the material from cracking and keeps water from freezing in cold months |
Enhancing Your Bird Bath
A few small additions can make your bird bath much more appealing to birds. These upgrades are easy to do and do not require a big budget or special skills.
1. Rocks and Perches
Place small stones or a wooden perch inside the bath so birds can stand and check the water depth before stepping in fully.
- Use flat rocks of different sizes to suit birds of all sizes
- Smooth river stones are easy to clean and do not shift around
- A wooden perch along the edge gives birds a stable landing spot
- Avoid round or slippery stones that cause birds to lose footing
2. Moving Water
Adding a solar fountain or floating pump makes your bird bath far more attractive to birds. Moving water catches their attention and draws them in consistently from a distance.
| Option | How It Works | Key Benefit |
|---|---|---|
| Solar Fountain | Runs on sunlight, no wiring needed | Attracts birds and prevents mosquito larvae |
| Floating Pump | Sits inside the bath and circulates water | Slows algae growth and keeps water fresh |
3. Custom Design Options
Old dishes, teacups, or pie plates can be repurposed into creative bird baths. These upcycled options cost almost nothing and add a personal touch to any garden.
Mixing different shapes and sizes makes the setup more functional too. A shallow teacup works well for smaller birds while a wide pie plate suits larger species comfortably.
Tip: Set up multiple bowls at different heights to attract more birds. Smaller birds prefer lower levels while larger ones use higher spots.
Wrapping Up
Building a DIY bird bath is simpler than most people expect. A few basic materials and an afternoon are all it takes to create something birds will genuinely use.
Just like the introduction pointed out, you do not need a big budget or a perfect garden. Small, thoughtful additions make a real difference to local wildlife over time.
Now you know the builds, the finishing steps, the best placement spots, and the small upgrades that keep a bird bath working well all year round.
Have you already built one or have a design idea in mind? Leave a comment below with your experience, suggestions, or any questions you might have.
Frequently Asked Questions
Do Birds Prefer Birdbath in Sun or Shade?
Birds prefer a bird bath placed in partial shade. It keeps the water cooler and fresher for longer while still remaining visible and accessible to birds throughout the day.
What Color Do Birds Avoid?
Birds generally avoid white and bright reflective colors as they can signal danger. Earthy tones like brown, green, and grey tend to attract birds more consistently to a bath.
Why Put Copper Pennies in Bird Bath?
Copper naturally inhibits algae and bacterial growth in water. Placing a few copper pennies in your bird bath helps keep the water cleaner for longer between your weekly cleaning sessions.