ADA Sink Requirements: Height, Clearance and Installation Rules

You measured the height. You picked the right faucet. The inspection still came back as a fail.
ADA sink compliance is a system, not a single number. The rim height has to land correctly. The space below the basin must remain fully open.
The floor in front needs a clear, unobstructed approach zone. The faucet has to respond to one hand and minimal pressure. The pipes underneath cannot pose a burn risk.
This post covers every ADA sink requirement you need to pass inspection: mounting height, knee and toe clearance, floor approach rules, faucet hardware, pipe safety, sink types, mirror height, and a ready-to-use checklist.
What Are ADA Sink Requirements?
ADA sink requirements are federal rules that define how sinks must be built and installed in any facility open to the public. They appear under Section 606 of the 2010 ADA Standards for Accessible Design, published by the U.S. Access Board.
Four features define a compliant sink:
- Height: Rim must sit no higher than 34 inches from the floor
- Knee and toe clearance: Open space below the sink for wheelchair users to roll close
- Clear floor space: Unblocked zone in front of the sink for a safe approach
- Accessible faucets: Controls that work without gripping, twisting, or pinching
Important: Product labels saying “ADA-compliant” do not override field measurements. Inspectors evaluate the installed condition. A sink that meets specifications on paper can fail once cabinetry, thicker finishes, or shifted plumbing reduce the actual clearance.
ADA Sink Height Requirements
Sink mounting height is the first item checked in any ADA inspection. Measuring to the countertop instead of the rim is the most common error inspectors find.
1. Maximum Rim Height
The maximum rim height is 34 inches from the finished floor to the highest point of the sink rim.
- Measure to the rim only, not the countertop
- Do not include the faucet body in the measurement
- Use a tape measure every time
- The “finished floor” means after flooring, tile, or other floor materials are installed
2. Knee and Toe Clearance
A wheelchair user must roll partially under the sink to reach the basin and faucet. The space below must stay fully open.
Knee Clearance:
- Height: at least 27 inches
- Width: at least 30 inches
- Depth: at least 19 inches
Toe Clearance:
- Height: at least 9 inches
- Depth: at least 6 inches (the combined knee and toe space must extend at least 17 inches from the front edge)
How Much Floor Space Does an ADA Sink Need?
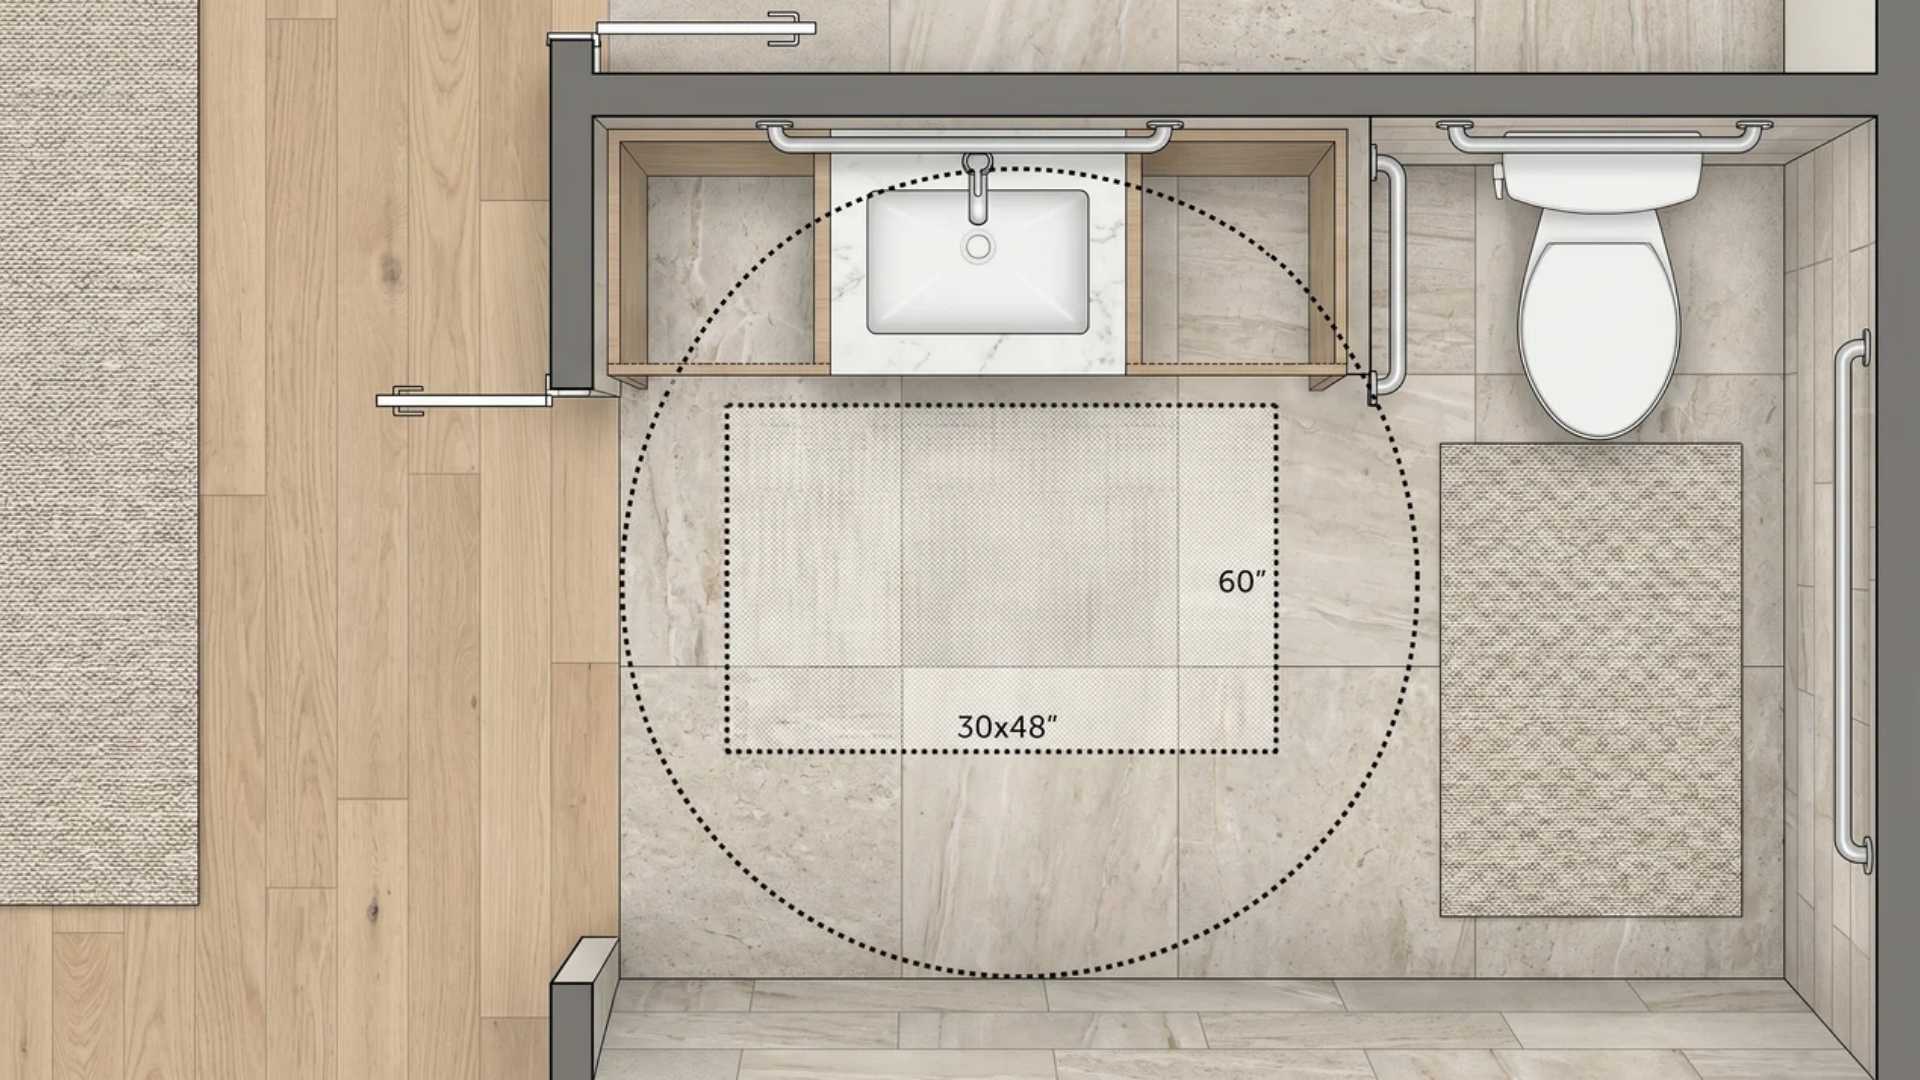
The floor directly in front of an ADA sink must stay completely clear. Without open space, a wheelchair user cannot safely approach or use the fixture.
Minimum Clear Floor Space
The ADA requires a clear floor space of 30 inches wide by 48 inches deep directly in front of the sink.
- No trash bins, cleaning supplies, or movable furniture in this zone
- A door that swings into this space is a violation
- Even a correctly mounted sink fails if this space is blocked
Forward vs. Parallel Approach
Wheelchair users can approach a sink from two directions. Each approach has different requirements.
| Approach Type | User Position | Knee Clearance Required |
|---|---|---|
| Forward | Face the sink directly | Yes |
| Parallel | Pulls up alongside the sink | No |
Wheelchair Turning Radius
A full 180-degree wheelchair turn requires a clear diameter of 60 inches. The turning circle and clear floor space can overlap. No separate room is needed for both, as long as the layout supports each use.
Which Faucets Meet ADA Sink Requirements?
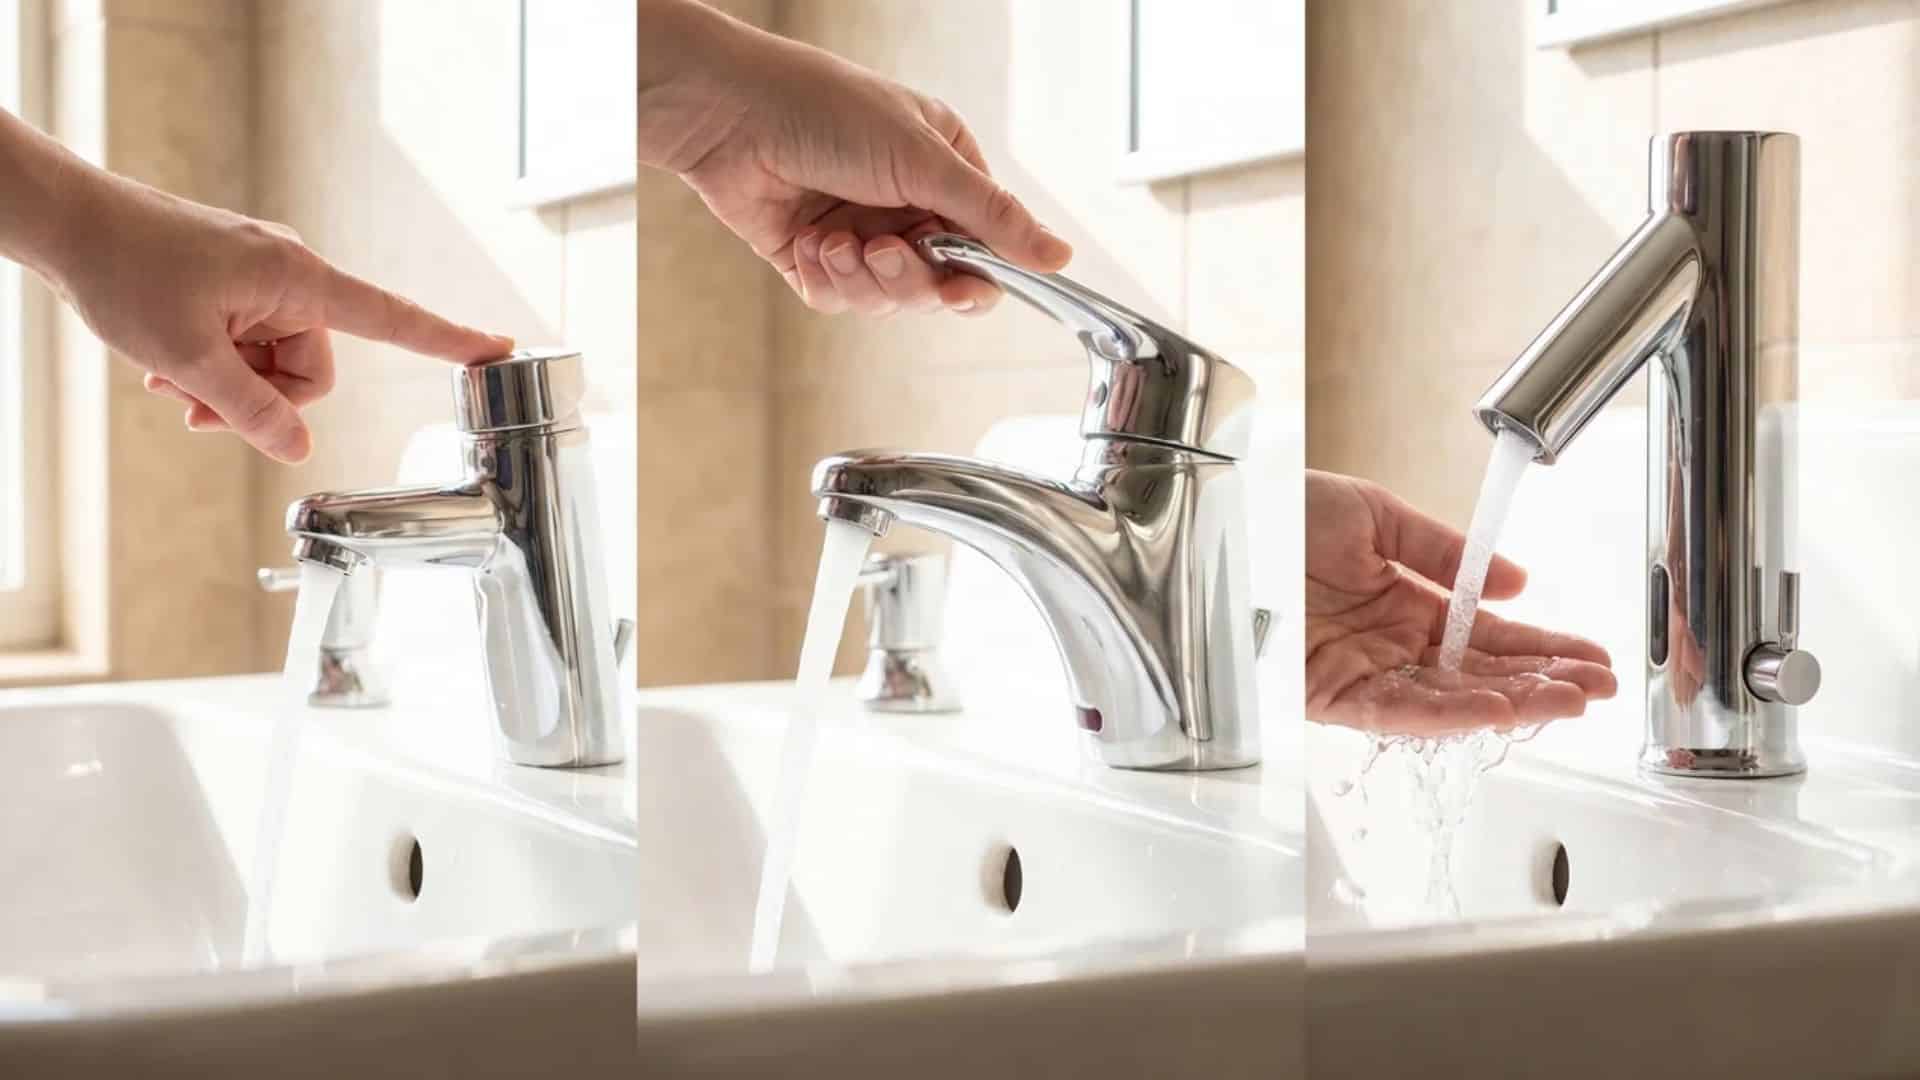
Not every faucet is compliant. Handle type, operating force, and reach distance all determine whether the hardware passes. Installing the wrong faucet on an otherwise compliant sink is one of the most common failures.
1. Approved Faucet Types
The ADA requires faucets that anyone can operate with one hand and without gripping or twisting.
- Lever-handle faucets: Push up, down, or to the side. No grip required.
- Push-button faucets: A single press activates and stops the water.
- Sensor or touchless faucets: No physical contact needed at any point.
2. Maximum Operating Force
All faucet controls must require no more than 5 pounds of force to operate. This applies to turning on, adjusting the temperature, and shutting off the water. Test with a force gauge before final sign-off. A faucet that exceeds 5 lbs fails, regardless of the handle style.
3. Faucet Handle Reach
All faucet controls must sit within 48 inches of the finished floor. Controls too far back on the sink deck are out of reach for wheelchair users. Position handles toward the front edge of the sink.
4. Retrofitting Existing Faucets
Swapping a non-compliant faucet is one of the fastest ways to achieve compliance.
- Lever-handle models fit standard mounting holes with no extra work
- Sensor faucets connect to existing supply lines in most cases
- Confirm operating force and reach distance before purchasing
ADA Sink Plumbing and Pipe Safety
ADA plumbing rules protect wheelchair users from burns and physical injury. Pipes must be wrapped, carefully routed, and completely free of sharp parts within the clearance zone.
1. Pipe Insulation
A wheelchair user’s legs sit directly within the knee-to-toe clearance zone. All exposed hot water pipes and drain lines in this zone must be covered with one of the following:
- Foam pipe insulation sleeves
- Padded pipe wrap kits
- Pre-made under-sink accessibility cover panels
2. No Sharp Edges or Protruding Parts
Every surface within the clearance zone must be smooth and flush. Remove or cover:
- Exposed bolt ends or rough washers
- Unfinished edges where the basin meets the wall or counter
- Hardware extending into the knee or toe clearance space
- Shut-off valve handles in the path of a wheelchair user’s legs
3. Pipe Routing
Pipes running through the center of the knee clearance zone block wheelchair access directly.
- Route the P-trap and shut-off valves toward the back or sides of the cabinet
- Never run pipes through the center of the knee zone
- Specify offset or rear-discharge P-traps during rough-in
ADA Sink Types and Compliance Differences
Not all sink types carry the same compliance risk. Choosing the right type at the design stage prevents clearance problems after installation.
| Sink Type | Compliance Risk | Notes |
|---|---|---|
| Wall-mounted | Low | Best option. Naturally keeps the knee and toe zone open. Standard in public restrooms. |
| Countertop | Medium | The cabinet base must be fully removed or replaced. Requires careful clearance planning. |
| Pedestal | High | Usually non-compliant. The pedestal itself blocks the knee zone. Only specially designed models may qualify. |
For a wall-mounted sink, a shallow basin depth also matters. Kitchen ADA sinks must not exceed 6.5 inches in basin depth. A deeper vessel reduces the usable knee space below, even when the rim height is correct.
If you are selecting a bathroom vanity for an accessible space, confirm the base cabinet can be fully opened or removed before purchase.
ADA Sink Requirements: Kitchen vs. Bathroom
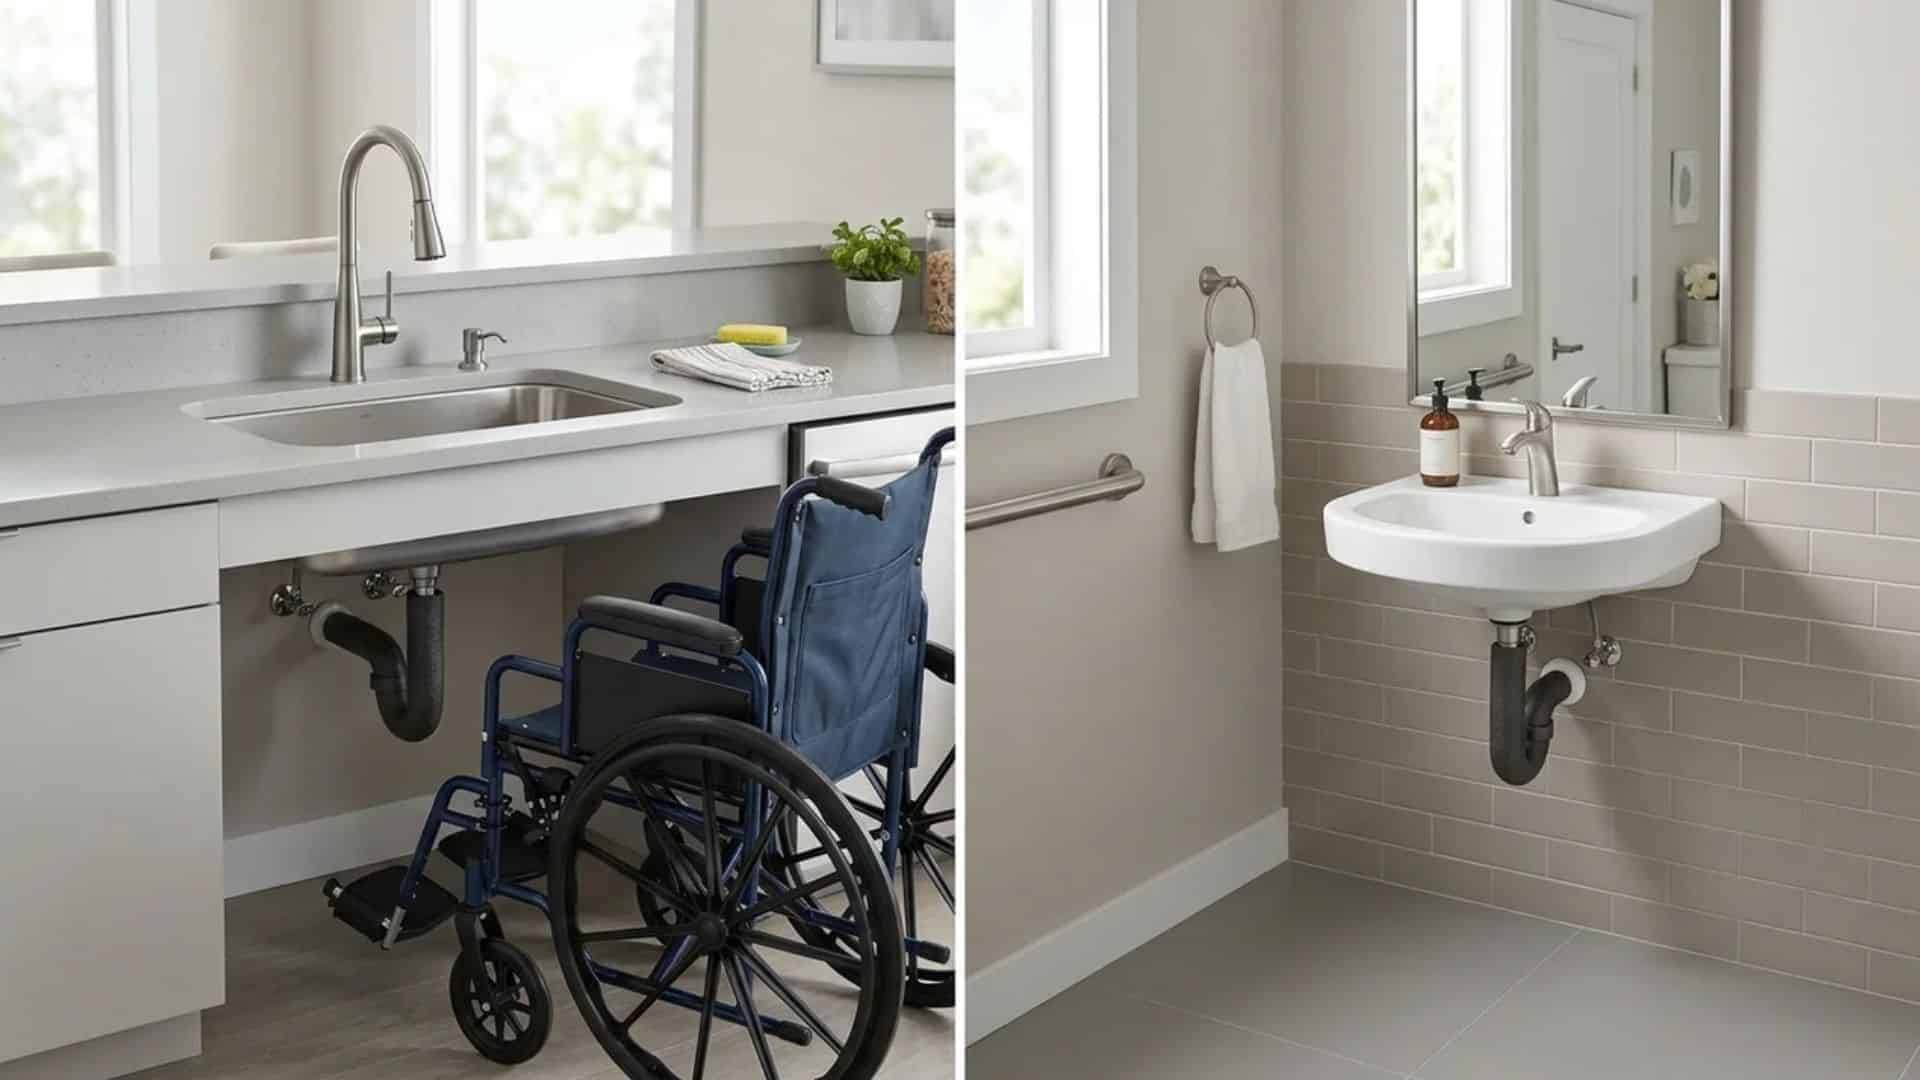
Both spaces follow the same core rules, but the layouts differ. Knowing the differences helps you plan the correct installation from the start without guesswork or rework.
| Feature | Kitchen | Bathroom |
|---|---|---|
| Max rim height | 34 inches | 34 inches |
| Basin depth | 6.5 inches max | Varies |
| Knee clearance | Required | Required |
| Toe clearance | Required | Required |
| Mounting type | Counter-mounted | Wall-mounted preferred |
| Faucet type | Lever or sensor | Lever or sensor |
| Clear floor space | 30″ x 48″ | 30″ x 48″ |
Mirror Height and Accessory Rules
The sink itself is only part of what inspectors check. The mirror and accessories above or near the sink have their own ADA rules.
- Mirror height: The bottom of the reflecting surface must sit no higher than 40 inches from the finished floor (ADA Section 603.3)
- Soap dispensers: Must be within a reachable range and operable with one hand
- Towel dispensers and paper towel holders: Must also fall within the standard 48-inch forward reach range
For guidance on choosing a mirror that fits within these height limits, the right bathroom mirror dimensions can help you balance proportion with compliance at the same time.
Common ADA Sink Compliance Mistakes
Small errors during installation lead to failed inspections and expensive retrofits. These are the violations that appear most often during ADA inspections, along with how to fix each one.
- Sink mounted too high: Installers often measure to the countertop rather than the rim. Always measure to the rim.
- Blocked knee or toe clearance: Cabinet aprons, closed doors, and poorly routed pipes reduce the required zone. Remove cabinetry. Re-route pipes to the rear or sides.
- Insufficient clear floor space: The 30 x 48-inch zone must be physically measured. Doors, bins, and furniture often encroach on this zone.
- Non-compliant faucets: Any faucet that requires gripping, twisting, or two hands to operate fails. Replace it with a lever, push-button, or sensor model.
- Plumbing in the clearance zone: Pipes running through the center of the knee space directly block wheelchair access. This is a rough-in error. Fix it at the plumbing stage, not after walls are closed.
Ignoring mirror and accessory height: A sink that passes all dimensional checks can still fail if the mirror bottom exceeds 40 inches. - Legal exposure: Facilities open to the public face civil lawsuits, DOJ investigations, court-ordered retrofits, and legal fees if accessible fixtures are not compliant.
Disclaimer: ADA compliance is a federal legal requirement. The measurements and rules in this post reflect the 2010 ADA Standards for Accessible Design. Always verify requirements with a certified accessibility specialist or licensed contractor before installation. State and local codes may impose additional standards beyond federal minimums.
ADA Sink Compliance Checklist
Before final approval, every ADA sink installation should be verified against code requirements, clearance rules, and usability standards to ensure full compliance and avoid inspection failure.
This checklist helps confirm that the sink is accessible, safe, and correctly installed for wheelchair users in accordance with ADA 2010 guidelines.
Before Installation
- Confirm the sink type supports ADA clearance rules
- Verify wall or cabinet structural support
- Plan plumbing routing outside clearance zones
- Choose a wall-mounted sink where the layout allows
During Installation
- Sink rim height confirmed at 34 inches or below
- Knee and toe clearance fully open
- Pipes insulated and correctly routed
- Faucet installed within reach range
- Mirror bottom confirmed at 40 inches or below
Final Verification
- 30 x 48-inch floor space confirmed unobstructed
- Faucet tested for one-hand, low-force operation
- No physical obstruction in the approach path
- Full wheelchair access confirmed
- Accessories and dispensers checked for reach compliance
ADA Sink Requirements: Commercial vs. Residential
Commercial spaces must follow strict ADA rules to pass inspections and ensure public accessibility. Residential spaces don’t require compliance, but many still follow ADA guidelines for comfort and future accessibility.
Commercial Spaces
- Mandatory compliance in offices, restaurants, hospitals, schools, and public facilities
- Strict inspections before occupancy
- Legal penalties apply for non-compliant installations
Residential Use
- Not legally required in private homes
- Common in aging-in-place and accessibility-focused designs
- Recommended for long-term usability and resale value
Conclusion
ADA sink requirements come down to a set of connected checkpoints, not one single number. A 34-inch rim. Open knee and toe space below. 30 by 48 inches of clear floor in front.
A faucet that responds to one hand at five pounds of pressure or less. Pipes that cannot burn anyone who rolls close. A mirror bottom no higher than 40 inches.
Every part of that list has to pass at the same time. One failed measurement means a non-compliant installation, regardless of how well the rest was done.
Before any space goes live, run through the full checklist above. Cross-reference against Section 606 of the 2010 ADA Standards when a contractor gives you a number that feels off. Fix anything that falls short before an inspector does.
Frequently Asked Questions
What is the Difference Between a Standard Sink and an Ada Sink?
A standard sink has no set height or clearance rules. An ADA sink must meet specific dimensions so wheelchair users can reach and operate it safely.
How Far Off the Wall Does an ADA Sink Need to Be?
The basin must extend at least 17 inches from the wall to provide the required toe clearance depth beneath the fixture for wheelchair access.
Do Ada Sink Requirements Apply to Houses?
ADA rules cover public and commercial facilities, not private homes. Following them is still strongly recommended for accessible residential bathroom and kitchen designs.
How to Make a Sink ADA?
Mount it below 34 inches, open the cabinet base for clearance, insulate exposed pipes, and replace the faucet with a lever or sensor model.