Want to know how window capping can change your home’s look? Many homeowners ignore this simple update until water damage becomes a problem.
Window capping adds a metal cover to your existing frames. This method stops rot, reduces drafts, and cuts down on maintenance costs. Your utility bills may drop, too!
This guide shows you what happens before, during, and after the capping process. You’ll see real examples, learn about material options, and find out exactly what to expect from start to finish.
Ready to see how this small change makes a big difference? Keep reading to learn why window capping might be the smart fix your home needs today.
What is Window Capping?
Window capping is the process of adding a thin metal covering over the outside parts of your window frames. Think of it as putting a protective shield around your windows. This cover, usually made of aluminum, fits over the existing wood trim and sills.
The main goal of window capping is to protect your window frames from damage caused by rain, snow, and sun. Without protection, wooden window frames can rot, crack, and fade over time.
The metal cover prevents water from getting to the wood and blocks harmful UV rays that can cause window frames to break down faster. The caps are bent and shaped to fit each window perfectly.
Window capping is different from full window replacement. You keep your current windows but add a layer of defense, making it a less costly option for many homeowners who want to protect their windows without buying new ones.
Many people choose window capping because it needs very little upkeep. Once installed, you won’t need to paint or seal the window frames again.
Why Window Capping Matters?
Window capping provides several important benefits for homeowners looking to protect their investments.
1. Protection Against Weather Damage: Window capping shields your frames from rain, snow, and harsh sunlight. Without it, wooden frames can rot, warp, or crack when exposed to the elements year after year.
2. Lower Maintenance Needs: Capped windows don’t need regular painting or sealing. The metal covering stays looking good with just an occasional cleaning.
3. Energy Bill Savings: Properly installed capping can help seal tiny gaps around windows. This reduces drafts and helps keep your heating and cooling where it belongs—inside your home.
4. Extended Window Life: Adding capping can add years to your existing windows. The protective layer prevents the damage that often leads to full window replacement.
5. Improved Home Appearance: Fresh window capping gives your home a clean, updated look. The finished edges and consistent color create a neater exterior appearance.
6. Cost-Effective Solution: Compared to full window replacement, capping offers many benefits at a fraction of the cost. It’s a practical middle-ground between doing nothing and complete replacement.
Tools and Materials Required for This Project
Tools Required
| Tool | Function |
|---|---|
| Measuring Tape | For precise window and frame measurements |
| Pencil or Marker | To mark dimensions and cut lines |
| Set Square | Helps draw accurate straight and angled lines |
| Tin Snips (Straight/Left/Right) | Used to cut aluminum to size |
| Exacto Knife / Utility Knife | For scoring and trimming aluminum |
| Aluminum Brake | Bends aluminum to fit frame edges |
| Drill or Screwdriver | Drives screws into wood to secure capping |
| Ladder | Accesses higher windows safely |
| Safety Gear (Gloves, Glasses) | Protects hands and eyes while cutting/handling metal |
Materials Required
| Material | Description | Purpose |
|---|---|---|
| Aluminum Capping (Trim Coil) | Pre-finished aluminum sheet | Covers and protects window frame |
| Wood for Framing (2×2, 2×3, 2×4) | Structural lumber | Builds the box/frame around the window |
| Exterior Caulking | Weather-resistant sealant | Seals gaps to prevent water intrusion |
| Small White Exterior Screws | Rust-resistant screws | Secures aluminum pieces in place |
How to Install a Window Capping: Step-By-Step Process
Window capping requires careful attention to detail and proper technique to ensure water stays out. Follow these steps to complete your project like a professional.
Step 1: Measure the Window Frame
Begin by measuring your window carefully. Measure from the window outward and add a quarter inch to allow for the portion that slides into the window. This extra quarter inch is crucial for a proper fit.
Also, measure the width across the frame, which is often about two and a half inches. Note the frame thickness (typically one and a half inches for 2×3 lumber).
Add three inches to the height measurement from the top to the bottom of the window for proper coverage.
Step 2: Prepare the Framing
Box and frame the window using your chosen lumber. You can use 2x2s, 2x3s, or 2x4s depending on your preference and the window’s needs.
The frame provides the structure to which you’ll attach the aluminum capping. Make sure the frame is level and securely attached to the house.
Step 3: Cut the Aluminum to Size
Use your measurements to cut the aluminum trim coil to the correct size. Add up all measurements (width plus frame thickness plus overhang) to determine the total width needed.
Mark these measurements clearly on your aluminum sheet. Cut the aluminum to the proper width using tin snips.
Step 4: Bend the Aluminum
Place the aluminum in a brake tool and bend it according to your measurements. Remember: when bending around something, measure and fold from the inside of the aluminum.
When bending away from something, mark and bend from the outer side. These precise bends will create a shape that fits perfectly around your window frame.
Step 5: Test Fit and Mark Cuts
Position the bent aluminum piece against the window frame. Keep a longer overhang at the bottom than at the top to help with water runoff.
Use a set square to mark straight lines at the top and bottom of the frame on your aluminum piece. These marks will guide your cuts.
Step 6: Cut and Score the Aluminum
Cut along the marked lines using tin snips. Then, score the inside of the metal from your cuts to the end of the piece using an exacto knife.
This scoring allows for clean bends. Always verify your cuts by test-fitting the piece on the frame before proceeding.
Step 7: Create the Corner Angles
Place the cut piece on the frame. Use a set square to mark a 45-degree angle at the corners, aligning it with both the inside metal edge and the outer edge.
Score this line several times, then bend it back and forth to create a clean, finished 45-degree angle.
Step 8: Prepare All Four Sides
Repeat steps 3-7 for all four sides of the window (bottom, top, and both sides). Each piece will need its own measurements, cuts, and corner angles to fit properly.
Step 9: Install in the Correct Order
Install the pieces in this specific order: the bottom piece first, then the sides, and finally, the top.
This sequence ensures proper water flow – water will run down the top piece, past the sides, and off the bottom without seeping behind the capping. This installation order is vital for effective water leak prevention.
Step 10: Finish with Caulking and Screws
Complete the installation by applying exterior caulking to seal all gaps. Secure the aluminum in place with small white exterior screws. These final steps ensure the capping stays in place and provides complete water protection for your window frames.
Image Comparison: Before and After Window Capping
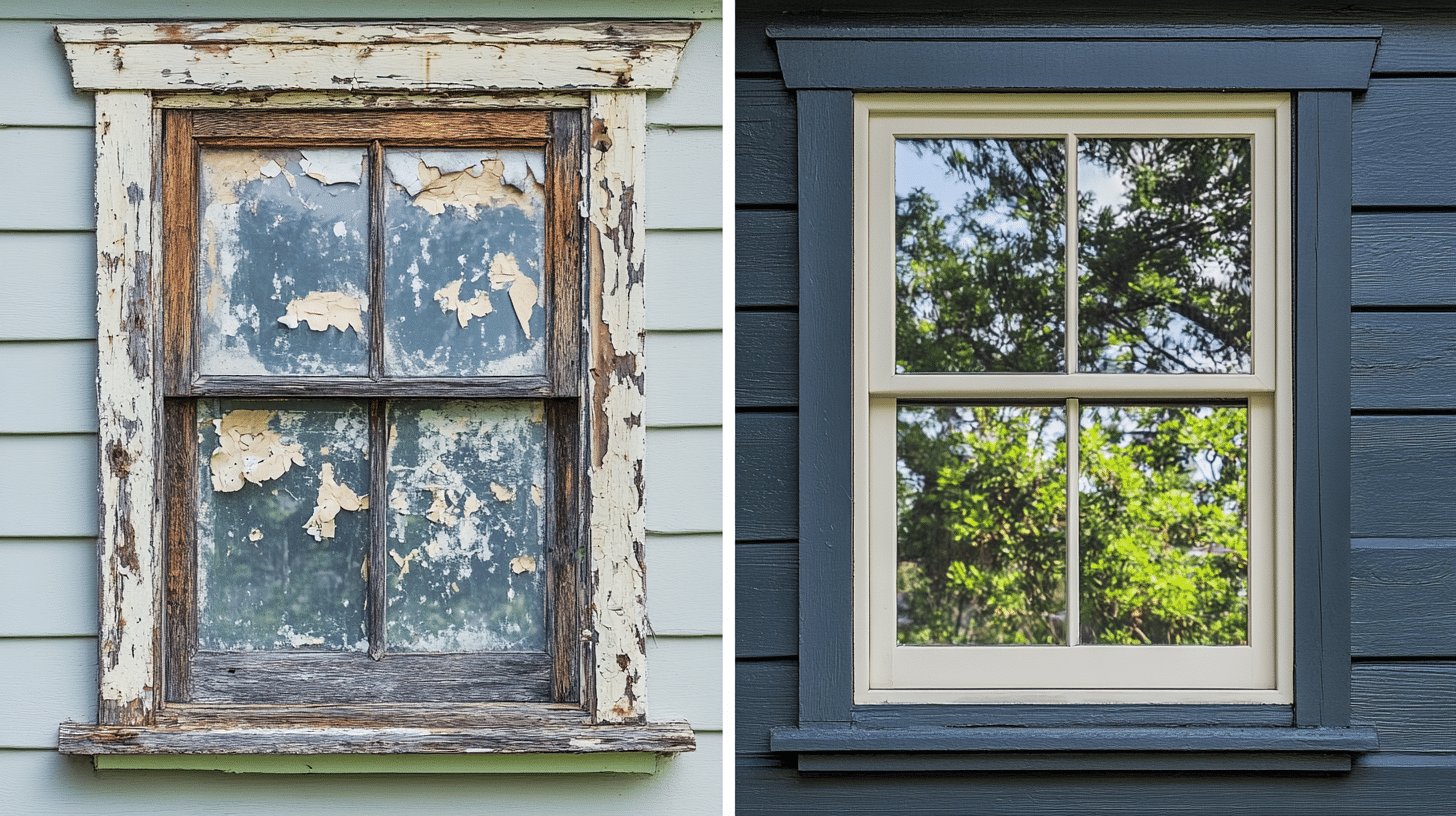
Before capping, window frames show clear signs of wear and neglect. The wood appears worn down, with paint peeling away in patches. Water has seeped into cracks, creating visible damage along the edges.
The color varies across the frame, with some parts darker from moisture and others faded from sun exposure.
Corner sections often reveal the first signs of rot, with wood fibers breaking down and becoming soft to the touch. The overall finish looks dull and weathered from years of exposure to the elements.
After capping is installed, the difference is striking. The metal finish presents a clean, smooth surface that reflects light evenly. The color remains consistent across all parts of the window frame.
All previous gaps are sealed, preventing water from finding entry points. The corners feature sharp, precise bends that direct water away from the window. The new capping creates a fresh appearance that won’t need painting or regular maintenance for many years to come.
Conclusion
Window capping offers a simple fix for common window problems. This guide shows you the signs that indicate you need capping, the required tools, and how to install it properly.
We covered the step-by-step process from measuring to final installation. We also highlighted common mistakes to avoid during the project.
Window capping shields frames from weather damage, reduces maintenance work, and improves your home’s look. The before-and-after differences are clear—worn, damaged frames become clean, protected surfaces.
Remember that proper installation order matters for water control. The bottom piece first, then the sides, and the top last ensures water flows away from your window.
With this guide, you now have the knowledge to make informed decisions about window capping for your home.


