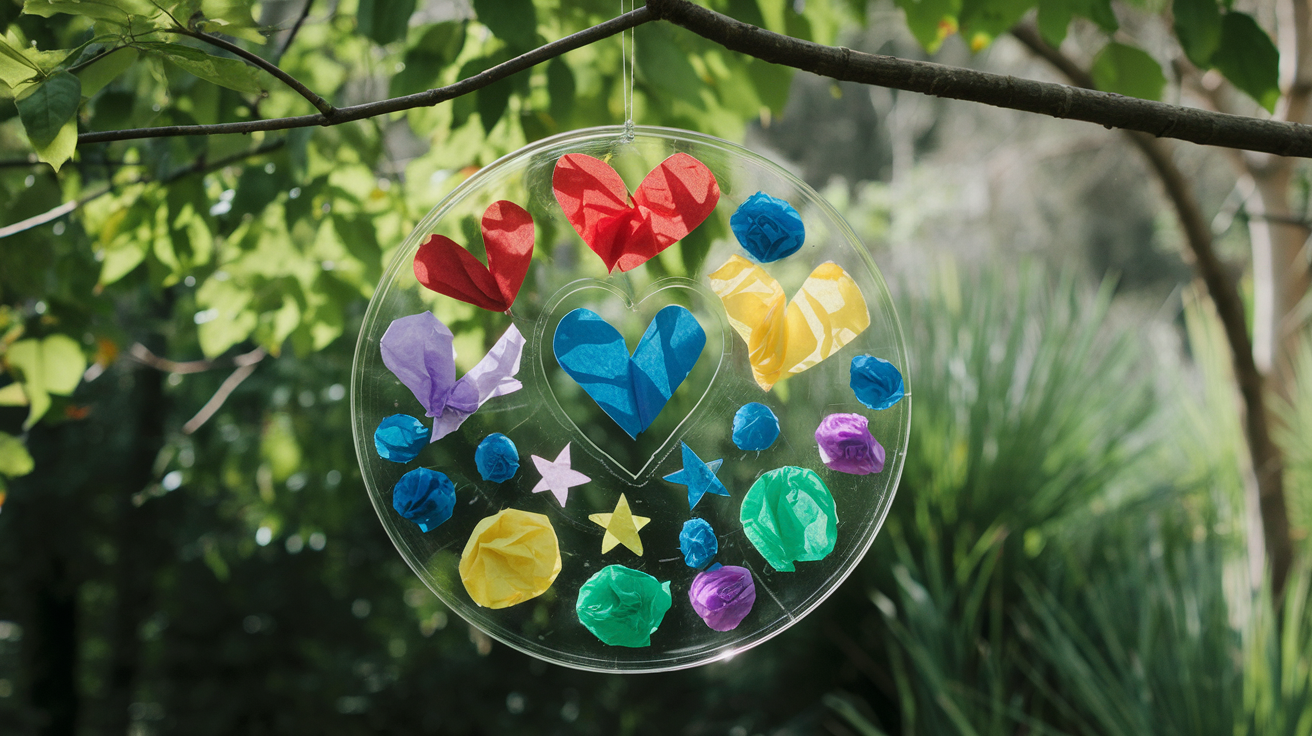

Sunlight streams through your window, casting dull shadows across your room. But what if that same light could paint your walls with rainbow colors?
Most people think beautiful window decorations must be bought from stores. Yet you can make stunning light catchers at home with basic materials you already own.
Your friends will ask where you found such a pretty decoration. You’ll feel proud saying, “I made it myself!” Plus, this project takes less than an hour to complete.
Read on to learn five simple steps to craft your own colorful suncatcher. You’ll turn ordinary sunlight into a dazzling display of colors that brightens your home every day. Get your supplies ready – we’re about to start!
Tools and Materials Required
| Material/Tool | Purpose |
|---|---|
| Wax paper | Base material that holds the design and allows light to pass through |
| Colored tissue paper | Creates the colorful elements that filter light |
| White glue | Adheres tissue paper to wax paper |
| Water | Dilutes glue for easier application |
| Paintbrush | Applies glue mixture to wax paper and tissue paper |
| Small cup | Container for mixing glue with water |
| Scissors | Cuts tissue paper into small pieces |
| Frame (craft sticks/embroidery hoop/paper plate) | Provides structure and support for the finished suncatcher |
| Pipe cleaner | Creates a hanging loop for displaying the suncatcher |
| Beads | Decorate the hanging loop (if desired) |
| Hole punch | Creates holes for attaching the hanging loop |
| Art mat or table cover | Protects work surface from glue and mess |
How to Make a DIY Suncatcher: A Step-By-Step Guide
Step 1- Prepare Your Workspace

Clear the table and cover it with an art mat. Arrange all materials within easy reach. Good preparation prevents mess and makes the creative process smooth.
Having everything ready before you start lets you focus on the fun part – creating your colorful suncatcher.
Step 2- Prepare the Materials

Cut or tear tissue paper into small pieces of various sizes. Mix white glue with water in a small cup until it reaches a thin, milk-like consistency.
Stir well to remove lumps. Thinned glue spreads more easily and dries clearer than full-strength glue.
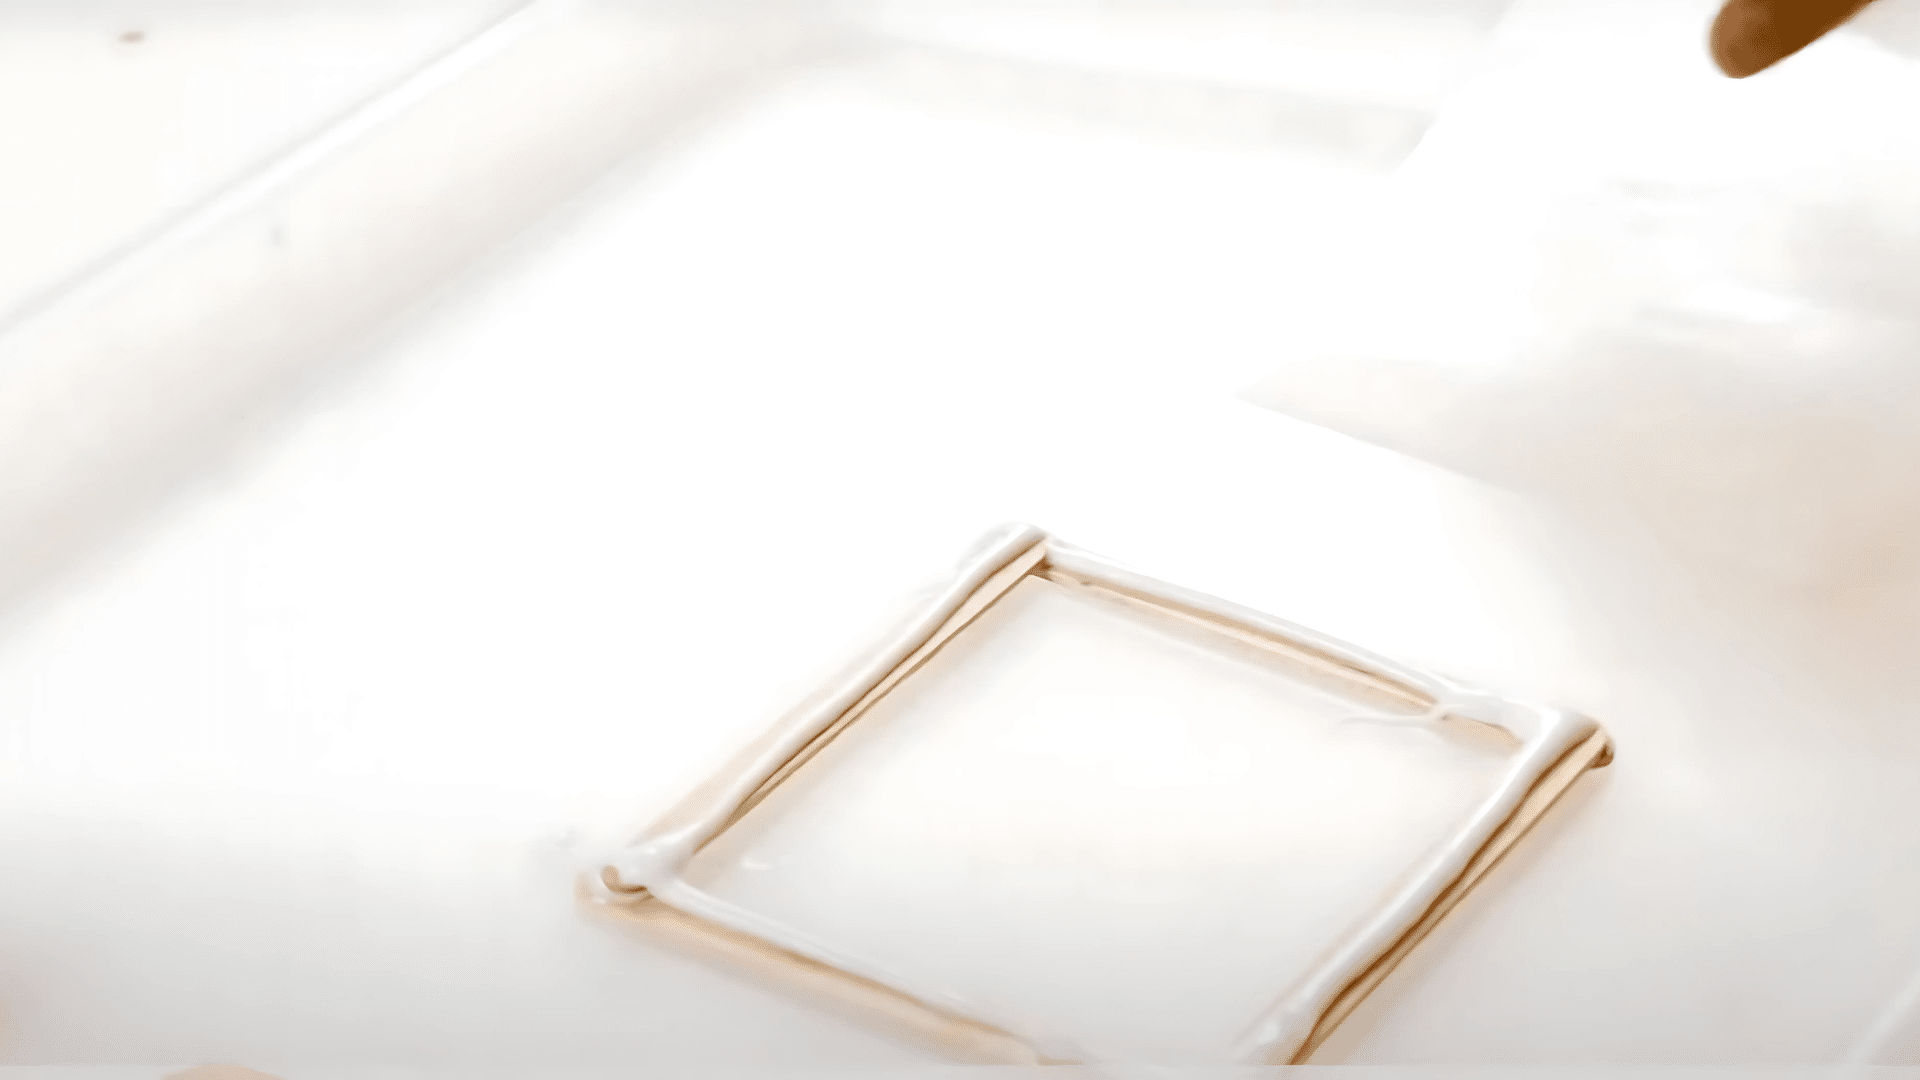
Step 3- Prepare the Frame

For wooden craft sticks, glue them at corners to form a square. With paper plates, cut out the center, leaving a 1-2 inch border.
For embroidery hoops, separate the rings for now. The frame adds structure to your finished piece and makes hanging easier.
Step 4- Apply Base Layer
Place wax paper flat on your work surface. Make sure it’s larger than your frame if using one.
Apply a thin layer of the watered-down glue with your paintbrush across the entire wax paper surface. Work quickly before the glue starts to dry.
Step 5- Add Tissue Paper and Seal with Top Layer

Place colored tissue paper onto the wet glue. Create patterns, pictures, or random designs with different colors.
Pieces can overlap for deeper color effects. After arranging all the pieces, brush another glue mixture over the top.
This seals the tissue paper in place and creates a sandwich effect. Make sure all edges and corners are completely sealed with glue.
Step 7- Allow to Dry

Set your creation aside to dry completely. This takes several hours or overnight, depending on the glue amount.
The suncatcher should feel dry and slightly stiff when ready. Avoid moving it while wet to prevent tearing or shifting of tissue paper.
8. Attach to Frame

Place dried wax paper with tissue design onto your frame. For wooden frames, fold edges over and glue to the back.
For paper plate frames, glue edges to the plate. With embroidery hoops, place between rings and tighten the screw.
9. Add Hanging Element

Punch holes at the top of your frame or through the wax paper if not using a frame. Thread a pipe cleaner through the holes and twist to create a loop. Add beads to the pipe cleaner if wanted for extra decoration.
10. Display Your Suncatcher

Hang your finished suncatcher in a window that gets direct sunlight. The light will shine through, casting colorful patterns into your room.
Try different windows to find the best light effect. These also make wonderful gifts for friends and family.
For a Visual Tutorial, Refer to This Video:
Common Mistakes to Avoid
- Using Too Much Glue: Adding excess glue makes the project take longer to dry. It can also cause the tissue paper colors to run together too much. Apply thin, even layers of glue for best results. Too much glue might make the wax paper warp or curl as it dries.
- Rushing the Drying Process: Trying to move or hang your suncatcher before it’s fully dry can ruin your design. The wet tissue paper can tear or slide out of place. Give your creation at least 8 hours to dry completely before handling it.
- Making Pieces Too Large: Using tissue paper pieces that are too big can block too much light. The magic of suncatchers comes from light passing through the colored paper. Smaller pieces create more interesting light patterns and color-blending effects.
- Forgetting to Seal the Edges: Not enough glue around the edges leaves openings where tissue paper can lift. Make sure to brush glue to the edges of your design. This prevents peeling and extends the life of your suncatcher.
- Skipping the Frame: While frames are optional, suncatchers without frames tend to curl over time. The frame keeps your creation flat and looks nice longer. Frames also make your suncatcher look more finished as a gift or display.
Tips for Perfect Suncatchers
- Use bright, vibrant tissue paper colors for the best light effects.
- Try layering different colors of tissue for new color blends.
- Cut tissue into shapes like hearts, stars, or flowers for themed designs.
- Add a border of darker-colored tissue paper to frame your design.
- Work on a flat, level surface to prevent glue from pooling.
- Let kids tear tissue paper instead of cutting it for a more natural look.
- Keep a damp cloth nearby to wipe up any spills quickly.
- Add clear contact paper over dried suncatchers for weather protection.
- Try using cookie cutters as templates for tissue paper shapes.
- Make seasonal suncatchers with themed colors (orange/black for Halloween).
- Sprinkle glitter into wet glue for extra sparkle in the sunlight.
- Press leaves or dried flowers between tissue layers for a nature theme.
Conclusion
Your DIY suncatcher is now ready to bring splashes of color to your home. We’ve walked through each step, from gathering materials to hanging your finished piece in a window.
Remember that suncatchers work best in direct sunlight. As the sun moves throughout the day, your creation will cast different color patterns across your room.
This simple craft turns ordinary materials into something special. The best part? Each suncatcher is one-of-a-kind, reflecting your personal style and color choices.
If your first attempt isn’t perfect, don’t worry. Practice makes better results each time. Many crafters find this project so fun they make several in different designs.
Now your windows can shine with handmade color instead of plain sunlight.