Step-by-Step Guide to Painting Metal Siding
Many homeowners believe pre-finished metal siding never needs painting. The hard truth is that factory coatings eventually chalk, fade, and lose their shine. Over time, your metal siding can look worn out and may even start to rust.
I understand this frustration. Your home’s appearance matters, and dealing with faded metal siding isn’t what you signed up for.
The good news is that metal siding is one of the easiest exterior surfaces to repaint. Proper preparation and the right materials can restore your siding to its former freshness.
In this guide, I’ll walk you through the complete process—from cleaning and prepping to selecting the right products and applying paint correctly so you can transform your metal siding with lasting results.
Can You Paint Metal Siding?
Yes, you can! Contrary to myths, metal siding is one of the best surfaces to repaint correctly. Many homeowners don’t realize this option exists, thinking their faded siding must be replaced entirely.
Painting metal siding can restore its look while adding years of life to your home’s exterior.
The process differs from painting other surfaces, but with the right approach, most homeowners can handle this project themselves.
Benefits of Repainting Metal Siding
1. Bring Faded Siding Back to Life
Over time, exposure to the elements causes metal siding to fade, chalk, or even rust. A new coat of paint instantly restores its appearance, making your home look well-maintained and modern.
2. Protect Your Home from the Elements
Painting does more than improve aesthetics—it also acts as a protective barrier against moisture, UV rays, and oxidation. This prevents rust and corrosion, helping your siding last for years to come.
3. A Budget-Friendly Alternative to Replacement
Instead of spending thousands on new siding, repainting allows you to update your home’s exterior at a fraction of the cost. With quality paint and proper technique, you can achieve a professional look without breaking the bank.
With the right prep work and materials, painting metal siding is an easy and rewarding DIY project that can completely transform your home’s exterior!
Tools and Materials You’ll Need to Paint Metal Siding
| Item | Purpose |
|---|---|
| Power washer | Removes dirt, chalk, and debris from the siding for better paint adhesion. |
| TSP cleaning solution | Degrease and clean the surface thoroughly before painting. |
| Paint sprayer | It provides even coverage and speeds up the painting process. |
| Primer | Ensures proper paint adhesion and protects against rust. |
| Exterior paint | Durable, weather-resistant paint designed for metal siding. |
| Paintbrushes | Helps with detailed painting and hard-to-reach areas. |
| Painter’s tape | Protects edges, trims, and areas not meant to be painted. |
| Plastic sheeting | Covers windows, doors, and surrounding areas to prevent overspray. |
| Caulk | Seals gaps and cracks to create a smooth, even surface. |
| Grout (for stone repairs) | Repair damaged stone surfaces before painting nearby areas. |
| Ladders or scaffolding | Provides safe access to higher sections of the siding. |
| Rigid foam insulation | Blocks overspray and protects nearby surfaces. |
Step-by-Step Guide to Painting Your Metal Siding
Step 1: Power Washing

- Mix TSP (trisodium phosphate) solution in a bucket.
- Use the solution with a brush on the aluminum siding to clean.
- Power wash the entire exterior surface.
- Pay extra attention to the north and south sides, which tend to get dirtier.
- Allow the house to dry completely.
Step 2: Repairs and Prep Work

- Fill gaps and holes with caulk.
- Repair stone elements (like capstones) with grout if needed.
- Make sure all surfaces are clean and ready for primer.
Step 3: Taping and Protection

- Tape around doors, windows, and trim that won’t be painted.
- Cover foundation areas with plastic sheeting.
- Protect soffits and other areas from overspray.
- Pro tip: Tape more than you think you need – it saves time on cleanup.
Step 4: Applying Primer

- Use a paint sprayer for large areas.
- Keep the sprayer moving to avoid runs and drips.
- Use a paintbrush for areas the sprayer can’t reach.
- Pay attention to attic vents and small details.
- Allow primer to dry completely.
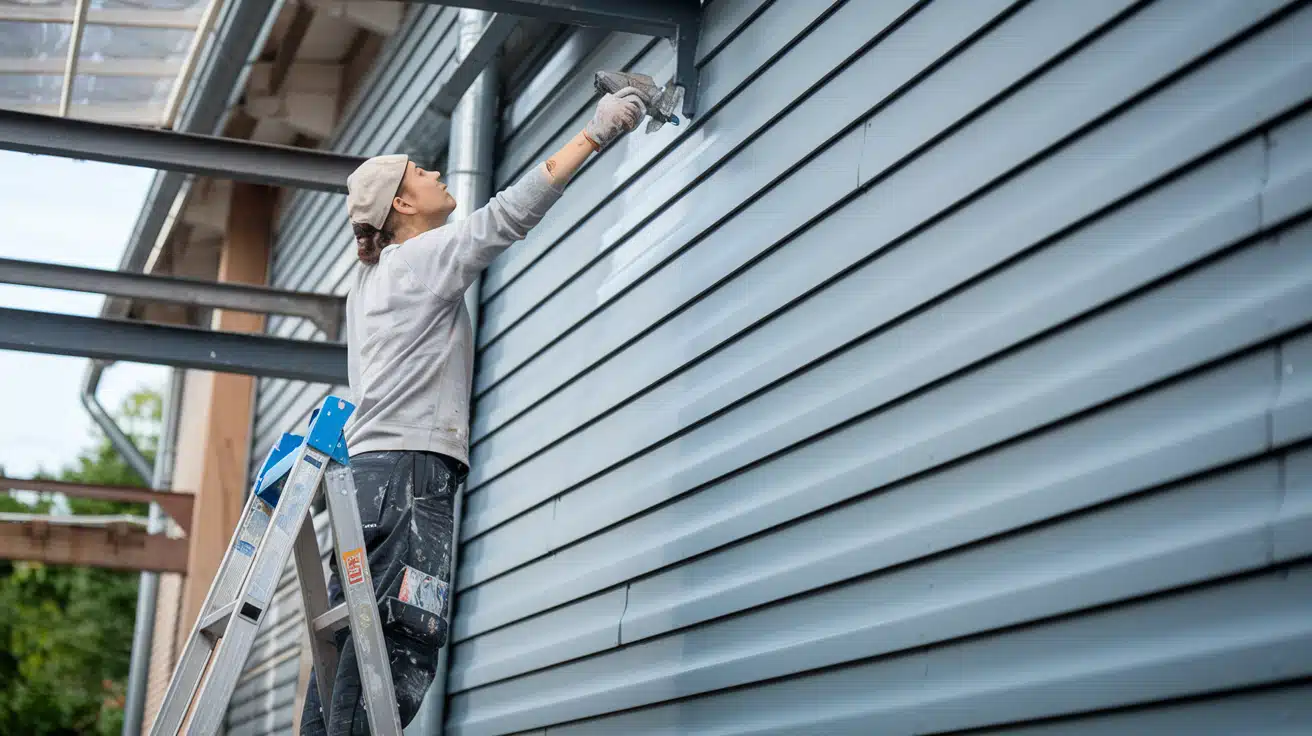
Step 5: Setting Up Safe Access

- Create a stable work platform (the owners made a simple scaffold with two 2×10 boards).
- Ensure all ladders are secure and on level ground.
- Position your equipment so you can reach all areas safely.
Step 6: Applying Paint

- Apply the first coat lightly – don’t try to get full coverage.
- Keep the sprayer moving at a consistent speed.
- Spray in an overlapping pattern.
- Important: Make sure to spray underneath the siding edges where pieces overlap.
- Allow the first coat to dry completely.
Step 7: Touch-ups and Second Coat

- Check for missed spots, especially under siding laps.
- Apply a second coat for complete coverage.
- Use a paintbrush to reach areas missed by the sprayer.
- Touch up any runs or uneven spots.
Video Tutorial
Check out this YouTube video for a detailed step-by-step Guide by –Raptor Renovation.
6 Simple Tips for Painting Metal Siding Like a Pro
Even with all the steps covered, some insider knowledge can make your metal siding painting project go more smoothly. These professional tips help you avoid common problems and achieve better results.
1. Check the Weather Forecast
Timing matters greatly when painting metal siding. Avoid days with high humidity (above 70%) or when rain is expected within 24 hours. The ideal painting conditions include moderate temperatures (between 50-85°F) with low humidity and light cloud cover.
Extreme heat can cause paint to dry too quickly, preventing proper adhesion and flow. Cold temperatures slow drying time and can affect how the paint cures. Plan your project during mild weather for best results.
2. Use a Sprayer for Efficiency
While rollers and brushes work well, a paint sprayer often provides the smoothest finish on metal siding. Sprayers reach into the small ridges and textures that brushes might miss.
Spraying also applies paint more evenly and quickly than other methods. Renting a paint sprayer daily can save work hours and improve your results if you tackle a large area.
3. Always Do a Test Patch
Before painting your entire home, apply primer and paint to a small, less visible section. Let it dry for 24-48 hours, then perform the tape test to check how well it adheres.
This simple step can save you from discovering compatibility issues after you’ve painted an entire wall. Different metal sidings and factory finishes react differently to various paints and primers.
4. Don’t Rush Drying Time.
Each coat needs to dry completely before adding another layer. The manufacturer’s recommended drying times aren’t suggestions—they’re requirements for proper curing.
Rushing between coats can cause bubbling, peeling, and poor adhesion. When in doubt, wait longer than you think necessary, especially in cooler or humid conditions.
5. Clean Gutters & Soffits First
Before painting your siding, clean the gutters, soffits, and overhangs above. This prevents dirt and debris from washing down onto freshly painted surfaces during the next rainfall.
Many homeowners focus only on the siding itself, but neglecting these adjacent areas can ruin your hard work quickly.
6. Avoid Painting in Direct Sunlight
Direct sun causes paint to dry too quickly, leading to poor adhesion and visible brush marks. Follow the shade around your house, painting areas after the sun has passed them.
If working in summer, start on the east side of your home in the morning and move to the west side in the afternoon to avoid the strongest direct sunlight.
Common Mistakes to Avoid While Painting Metal Siding
| Common Mistake | Why It’s a Problem | How to Avoid It |
|---|---|---|
| Skipping Prep Work | This leads to peeling and chipping paint due to poor adhesion. | Clean the surface thoroughly, remove rust and chalk, and sand any glossy areas before painting. |
| Using the Wrong Paint | Regular house paint lacks flexibility and durability for metal surfaces. | Use 100% acrylic latex exterior paint or oil-based paint with a suitable primer. Avoid interior paints. |
| Applying Thick Layers | It causes drips, uneven texture, and cracking, reducing durability. | Apply multiple thin coats instead of one thick layer for a smooth, even finish. |
| Not Letting Paint Dry Properly | This leads to lifting, cracking, or flaking when coats are applied too soon. | Follow the manufacturer’s drying time recommendations and adjust based on weather conditions. |
Conclusion
Painting metal siding doesn’t need to be overwhelming. With the right preparation, materials, and application methods, you can transform your home’s exterior and extend its lifespan.
Remember these key points: thorough cleaning is non-negotiable. Choose paint specifically formulated for metal and apply multiple thin coats for the best results. Test a small area first to confirm compatibility between your siding and chosen products.
Your preparation effort directly affects the longevity of your paint job. Take time with each step, allow proper drying between coats, and don’t rush the process.
Do you have questions about your specific metal siding? Most paint stores offer free consultations to help you select the right products for your project. Your refreshed home exterior is just a paint job away!