Accurate wood measurement is the foundation of any successful woodworking or construction project. Without it, your materials can go to waste, and costs can quickly rise.
Imagine cutting your lumber with perfect precision, achieving flawless fits, and avoiding costly mistakes – that’s where a wood sizing chart comes in.
Mastering these measurements will save you time and money and ensure a higher-quality finish for your work.
In this guide, you’ll learn how to use wood sizing charts effectively, interpret common wood dimensions, and apply this knowledge to your projects for better results.
Let’s get started and sharpen your skills in wood measurement!
Understanding Wood Measurements
Accurate wood measurements form the foundation of any successful woodworking or construction project. Properly measuring wood ensures that each piece fits together as planned, providing strength, stability, and artistic appeal. Even a small error in measurement can lead to material waste, extra costs, and structural issues.
Why Precision Matters
Precision is key to achieving the desired results in both construction and woodworking. Slight miscalculations in dimensions, whether in length, width, or thickness, can disrupt the design and lead to misalignments.
For example, a small deviation in length when building furniture can cause pieces not to fit correctly, or an inaccurate thickness could compromise the durability of the structure.
Real-World Impact of Measurements
Different projects require different approaches to measurement. In furniture making, the dimensions of wood must be carefully considered to ensure stability and aesthetic harmony.
For instance, the thickness of a tabletop influences its durability, while the width and length contribute to the overall look and proportion.
In construction, precise measurements of dimensional lumber are crucial for framing walls, floors, and roofs, where any misstep could impact the integrity of the entire structure.
Estimating Materials for Large Projects
Accurate material estimation is key to managing costs and minimizing waste when working on large projects, such as building a house or constructing furniture.
While it’s important to understand the basic dimensions of each piece of wood, you also need to estimate the overall volume of wood required.
This can be done through board feet, a standard measurement used in lumber sales. Board feet help you accurately calculate the quantity of wood required for large-scale projects without over-purchasing or underestimating.
If you're ready to take your DIY pantry shelves to the next level, be sure to explore the Step-by-Step Guide to DIY Pantry Shelves for additional tips and inspiration to get the perfect fit for your project!
What is a Wood Sizing Chart?
A wood sizing chart is a reference tool that shows the actual dimensions of wood products. It helps woodworkers understand the difference between nominal sizes (the labeled dimensions) and actual sizes (the true, processed measurements).
For instance, a “2×4” piece of lumber is labeled as 2 inches by 4 inches, but due to the drying and planing processes, its actual size is typically 1.5 inches by 3.5 inches.
These charts provide accurate measurements for various types of wood, including dimensional lumber, plywood, and hardwoods, ensuring that woodworkers select the right materials for their projects.
By consulting a wood sizing chart, woodworkers can make informed decisions, avoid costly mistakes, and ensure that their cuts and material calculations are precise.
Types of Wood Measurements
Wood measurement involves understanding the key dimensions that define the size and fit of lumber for any woodworking project. These fundamental measurements are crucial for achieving precise and accurate cuts.
Length, Width, and Thickness
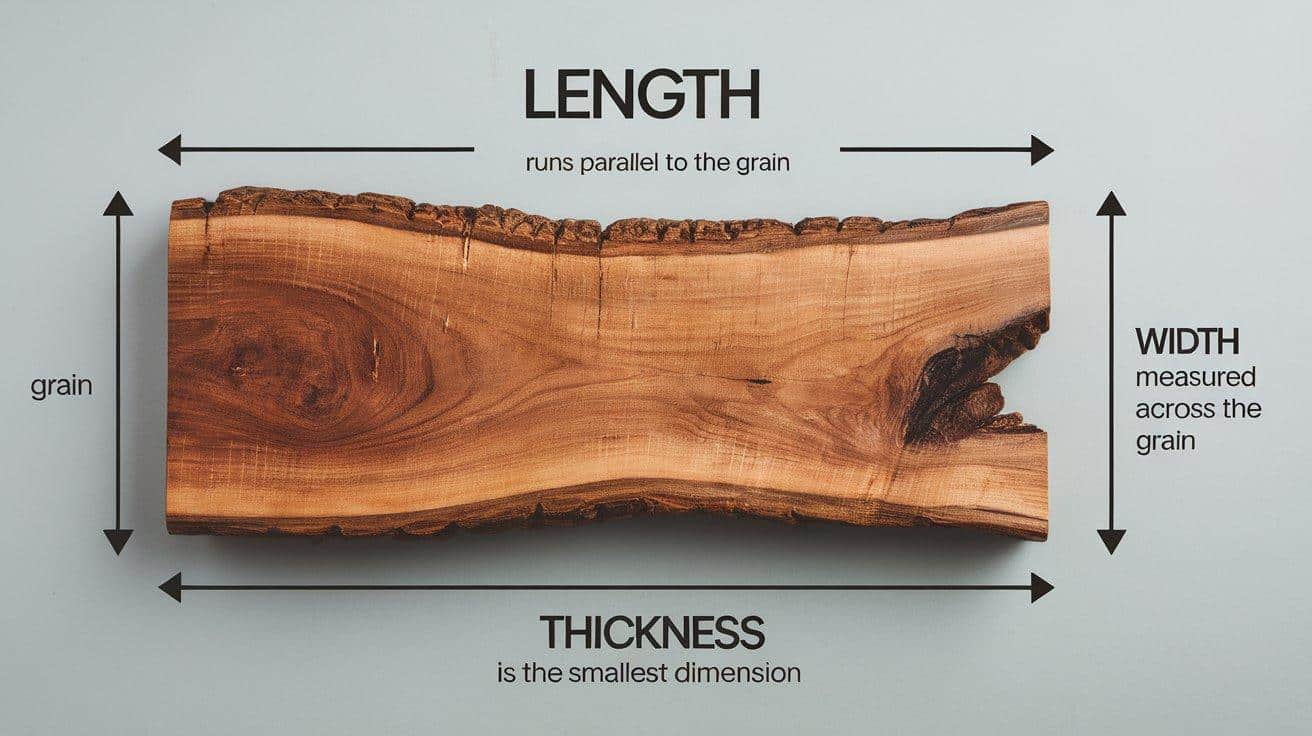
These three fundamental measurements form the basis of all woodworking calculations. Length typically runs with the grain, while width measures across the grain.
Thickness refers to the smallest dimension, often expressed in fractions of an inch or millimeters.
Board Feet Calculation
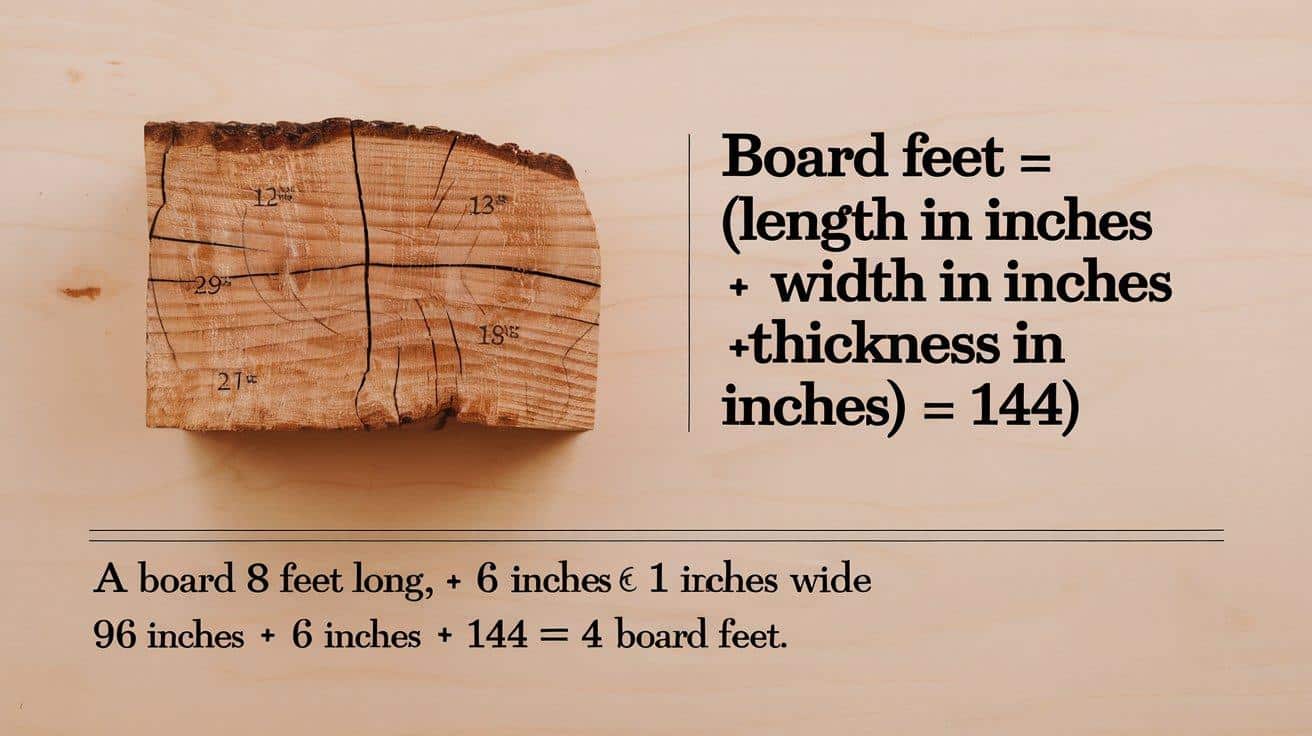
A board foot equals a piece of wood measuring 1 foot long, 1 foot wide, and 1 inch thick (144 cubic inches). Calculate board feet using this formula:
Board Feet = (Length in inches × Width in inches × Thickness in inches) ÷ 144.
For example, a board that measures 8 feet long, 6 inches wide, and 1 inch thick would be: (96 inches × 6 inches × 1 inch) ÷ 144 = 4 board feet
Custom Cuts and Specialized Measurements
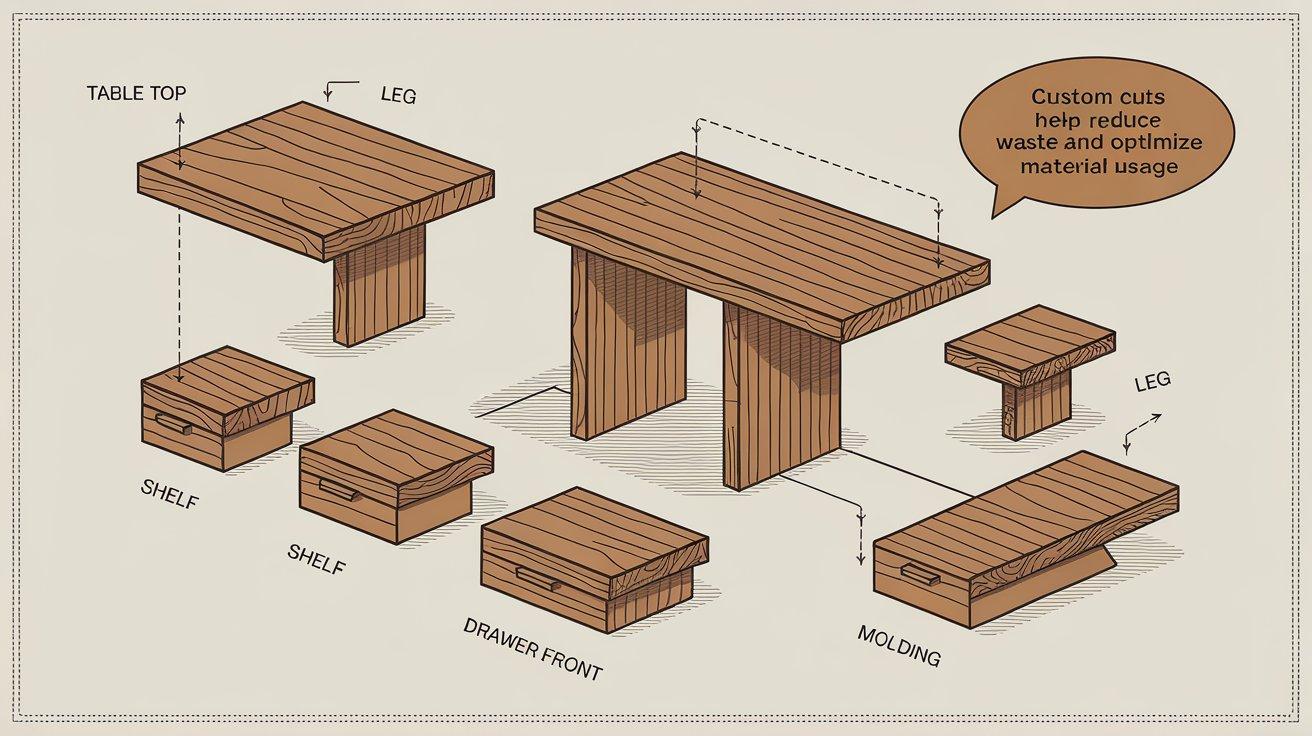
Some projects need non-standard measurements. In these cases, it’s helpful to create a cutting diagram to maximize material usage and minimize waste.
Custom cuts are common in furniture making, cabinet construction, and decorative woodworking, where standard lumber sizes might not fit the design requirements.
How to Read a Wood Sizing Chart
Step-by-Step Guide
- Identify the type of wood you need (dimensional lumber, plywood, hardwood)
- Find the corresponding chart section
- Locate the nominal size in the left column
- Read across to find the actual dimensions
- Note any special grading or quality indicators
- Use these actual measurements in your project plans
Key Terms and Symbols
Many charts use specific terminology that might be unfamiliar to beginners:
- Nominal size: The name given to the lumber (e.g., 2×4)
- Actual size: The true measured dimensions after processing
- S4S: Surfaced on four sides (smooth on all sides)
- S2S: Surfaced on two sides (smooth on the two wide faces)
- MC: Moisture content percentage
- FAS: First and Second grade (high-quality hardwood)
- Select: A high grade with minimal defects
- Common: A lower grade with some defects allowed
Real-Life Application
The sizing chart for a deck project requiring 2×6 boards reveals that these actually measure 1.5×5.5 inches. This knowledge allows you to correctly space your deck joists and calculate the exact number of boards needed.
Similarly, when building wall frames, knowing that a 2×4 stud is actually 1.5×3.5 inches helps you calculate the true wall thickness and plan for insulation, drywall, and trim accordingly.
The Most Common Wood Sizing Charts and Their Applications
Dimensional Lumber Chart
| Nominal Size | Actual Size (inches) |
|---|---|
| 1×2 | 0.75×1.5 |
| 1×3 | 0.75×2.5 |
| 1×4 | 0.75×3.5 |
| 1×6 | 0.75×5.5 |
| 1×8 | 0.75×7.25 |
| 1×10 | 0.75×9.25 |
| 1×12 | 0.75×11.25 |
| 2×2 | 1.5×1.5 |
| 2×3 | 1.5×2.5 |
| 2×4 | 1.5×3.5 |
| 2×6 | 1.5×5.5 |
| 2×8 | 1.5×7.25 |
| 2×10 | 1.5×9.25 |
| 2×12 | 1.5×11.25 |
| 4×4 | 3.5×3.5 |
| 4×6 | 3.5×5.5 |
| 6×6 | 5.5×5.5 |
This Dimensional Lumber Chart shows the actual sizes of commonly used lumber, contrasting them with their nominal sizes.
Nominal sizes are the labeled dimensions of lumber, such as “2×4” or “1×6,” but the actual dimensions of the wood are typically smaller due to the drying and surfacing processes.
For example, a “2×4” nominal board actually measures 1.5 inches by 3.5 inches. This chart helps woodworkers and builders understand the true dimensions of the lumber they are working with, ensuring proper planning and accurate project calculations.
The chart includes common dimensions for both smaller boards (like 1×2 and 1×3) and larger boards (like 2×12, 4×4, and 6×6), providing clarity for a variety of woodworking and construction tasks.
Plywood Sizing Chart
| Nominal Size | Actual Size (inches) | Common Thicknesses (inches) | Standard Grades | Typical Applications |
|---|---|---|---|---|
| 4×8 | 48×96 | 1/4, 3/8, 1/2, 5/8, 3/4, 1 | A-A, A-B, A-C, B-C, C-D | Furniture, cabinets, structural sheathing |
| 4×10 | 48×120 | 1/2, 5/8, 3/4 | A-C, B-C, C-D | Roofing, large area flooring |
| 5×5 | 60×60 | 1/2, 3/4 | A-C, B-C | Special applications, concrete forms |
| 2×2 | 24×24 | 1/4, 1/2 | A-B, A-C | Small projects, patches |
| 2×4 | 24×48 | 1/4, 1/2 | A-B, A-C | Small furniture, craftwork |
| 4×4 | 48×48 | 1/2, 3/4 | A-C, B-C | Square panels, tabletops |
Plywood Grade Explanation:
Plywood grading involves two main components: the quality of the face veneer and the quality of the back veneer. The grading system uses two letters to indicate these qualities.
-
“A” Grade: The highest quality plywood, with a smooth surface that is ideal for painting or staining. It has very few defects and is used in projects that require a flawless finish, such as furniture or cabinetry.
-
“B” Grade: This grade offers a solid surface but may have minor repairs such as small knots or blemishes. It’s suitable for projects where appearance is important, but some imperfections are acceptable.
-
“C” Grade: Plywood with visible defects such as knots and patches, but it still maintains strength. This grade is often used in structural applications where appearance is less important.
-
“D” Grade: The lowest quality plywood, with many visible defects. It is typically used in construction projects where the surface appearance is not a concern, and the plywood is primarily used for structural purposes.
Specialty Plywood Types:
- Marine plywood: Water-resistant with no voids
- Baltic birch: Multiple thin, high-quality plies
- Cabinet-grade: Premium appearance for visible applications
- Structura
- Engineered for load-bearing applications
Hardwood vs Softwood Charts
| Characteristic | Hardwood | Softwood |
|---|---|---|
| Source | Deciduous trees (broadleaf) | Coniferous trees (evergreens) |
| Wood Structure | Denser, harder, more durable | Lighter, less dense |
| Growth Rate | Slower growth, matures over decades | Faster growth, matures quickly |
| Leaf Type | Broad, flat leaves | Needle-like leaves |
| Grain Pattern | More complex, decorative grain | Simpler, more uniform grain |
| Common Uses | Furniture, flooring, cabinetry, veneers | Construction, paper, furniture, panels |
| Examples | Oak, Maple, Cherry, Walnut | Pine, Cedar, Spruce, Fir |
| Standard Lengths | 4 to 16 feet (in 1-foot increments) | 6 to 24 feet (in 2-foot increments) |
| Standard Widths | No fixed standard; minimums by grade: FAS/F1F: 6″, Selects: 4″, Common: 3″ | Nominal: 2″ to 16″, Actual: e.g., 2×4 = 1.5″ × 3.5″, 2×6 = 1.5″ × 5.5″ |
| Standard Thickness | Sold in “quarters” (e.g., 4/4 = 1″ rough), surfaced thicknesses: 13/16″ (S2S for 4/4) | Nominal: 1″, 2″, 4″, 6″, etc.; Actual: e.g., 1″ = 0.75″, 2″ = 1.5″ after surfacing |
Hardwood Lumber Sizes
-
Thickness: Sold in quarters of an inch (e.g., 4/4 = 1″ rough, 5/4 = 1.25″ rough). Surfaced (S2S) 4/4 hardwood is typically 13/16″ thick.
-
Widths: No fixed standard; minimums depend on grade (FAS/F1F: 6″, Selects: 4″, Common: 3″).
-
Lengths: Standard lengths are 4 to 16 feet, in 1-foot increments.
Softwood Lumber Sizes
-
Thickness and Width: Sold by nominal sizes (e.g., 2×4, 2×6). Actual size is less after surfacing (e.g., 2×4 = 1.5″ × 3.5″).
-
Widths: Nominal widths range from 2″ to 16″, actual widths are typically 0.5″ to 0.75″ less than nominal.
-
Lengths: Standard lengths are 6 to 24 feet, in 2-foot increments.
Tips for Using Wood Sizing Charts Effectively
-
Always verify your measurements before cutting.
-
Follow the “measure twice, cut once” rule to save materials, time, and money.
-
For critical joints or precision work, create test pieces before cutting expensive materials.
-
Wood with high moisture content will shrink as it dries.
-
Freshly cut “green” lumber, like a 2×4, may shrink to smaller than standard dimensions as it dries.
-
Most lumber yards sell kiln-dried wood with stable moisture content, typically 6-9% for interior use and 12-15% for exterior applications.
-
Invest in a good-quality tape measure with clear markings for accurate measurements.
-
Use a combination square to check for right angles.
-
A digital caliper is essential for precise thickness measurements.
-
A moisture meter helps check the wood’s moisture content before use.
-
Wood moves with changes in humidity and temperature.
-
Expansion across the grain can be substantial, while movement along the grain is minimal.
-
Leave appropriate gaps in your construction to accommodate this movement (e.g., table tops should be attached to bases using methods that allow for seasonal movement).
Common Mistakes to Avoid
Misreading the Chart- Double-check that you’re looking at the correct row and column in sizing charts. Confusing nominal and actual sizes can cause project-ruining errors. This is particularly important when working with international materials, as measurement systems and standards vary by country.
Ignoring Wood Movement- Failing to account for seasonal expansion and contraction can lead to warped furniture, stuck drawers, and cracked panels. Allow for proper movement, especially in wide boards. A solid wood tabletop might move 1/8 inch or more across its width with seasonal humidity changes.
Improper Tools- Using worn or inaccurate measuring tools compounds errors. Keep tools in good condition and replace them when they become damaged or worn. A tape measure that’s been dropped repeatedly may have a loose hook that introduces inconsistency into all measurements.
Conclusion
Mastering wood measurements and understanding wood sizing charts provides the foundation for successful woodworking and construction projects.
The gap between nominal and actual sizes might seem confusing at first, but with this guide, you can confidently select and work with lumber of all types.
Remember that accuracy in measurement translates directly to quality in your finished work. Take the time to learn these fundamental concepts, practice using sizing charts, and apply this knowledge to your next project.
I encourage you to keep a sizing chart handy in your workshop and refer to it often as you work. Your careful attention to measurement details will show in the quality of everything you build.
Frequently Asked Questions
What Is the Actual Size of A 4×10?
The actual size of a 4×10 piece of lumber is 3.5 inches by 9.25 inches.
What Is the Actual Size of 2×3 Lumber?
The actual size of a 2×3 piece of lumber is 1.5 inches by 2.5 inches.
What Lumber Is Actually 1 Inch Thick?
Lumber that is labeled as 1 inch thick typically has an actual thickness of 3/4 inch. This includes common sizes like 1×4, 1×6, and 1×8 lumber.