Build Your Octagon Gazebo: A Complete Guide
Are you looking to add a beautiful octagon gazebo to your backyard? Many homeowners struggle with where to start and how to complete this project without errors.
Building your own octagon gazebo doesn’t have to be hard. With the right steps and tools, you can create a perfect outdoor space for family gatherings and quiet evenings.
Your new gazebo will become the focal point of your yard, giving you a cozy spot to relax and boosting your property value at the same time.
This guide walks you through the entire process from planning to final touches. We’ll cover materials, measurements, and money-saving tips to help you build a lasting octagon gazebo you’ll enjoy for years.
Let’s get started with your gazebo project!
What is an Octagon Gazebo?
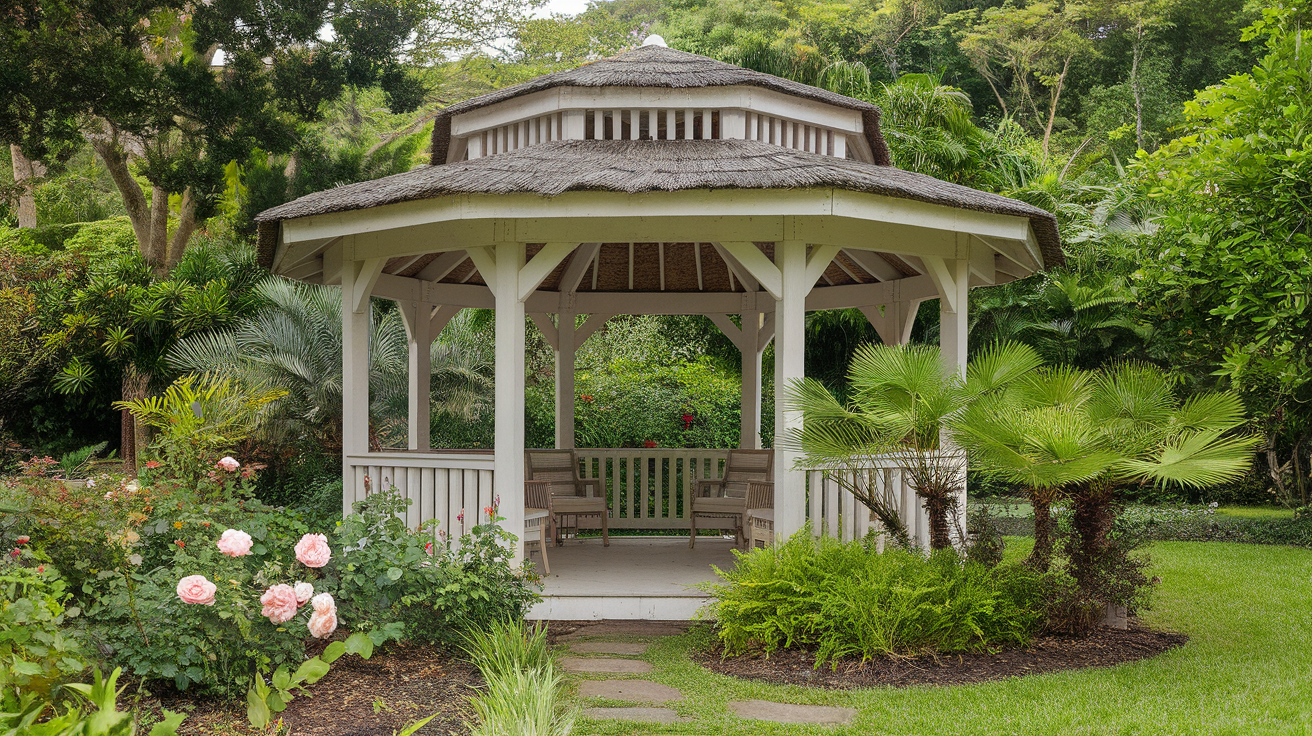
An octagon gazebo is an eight-sided outdoor structure with a roof. This popular backyard addition stands out because of its unique shape, which offers more space and viewing angles than four-sided structures.
These gazebos come in various sizes, typically ranging from 8 to 14 feet across. The eight-sided design creates a nearly round look while still using straight boards that are easier to work with than curved ones.
Most octagon gazebos include a raised floor platform, eight supporting posts, railings between posts, and a pointed or domed roof. The design allows for good air flow and views from multiple directions. You can build one from wood, vinyl, or metal, depending on your budget and maintenance preferences.
People use octagon gazebos for outdoor meals, small gatherings, hot tubs, or just as a quiet spot to sit. The shape fits well in both large and small yards, making it a flexible option for many homes.
Step-by-Step Construction Overview
Building an octagon gazebo takes time, but follows a logical order. Begin with a solid plan and proceed through each phase carefully. This overview outlines the main steps, from the ground up, to the final details.
Tools and Materials Checklist:
| Category | Items | Use |
|---|---|---|
| Lumber | 2x4s, 2x6s, 4x4s, 1x6s | Frame, joists, posts, flooring |
| Roofing | Shingles, plywood, flashing | Weather protection and ceiling |
| Fasteners | Screws, nails, bolts, lag screws | Joining all components securely |
| Tools | Drill, circular saw, level, tape measure, hammer | Cutting, measuring, assembly |
| Optional | LED lights, benches, screen panels | Comfort and added function |
Step 1: Laying the Foundation

The foundation is the most critical part of your gazebo. It needs to be perfectly level and strong enough to support the structure for years. Take your time with this step and double-check all measurements.
- Mark out the octagon shape using stakes and string
- Dig holes for concrete footings at each corner
- Pour concrete and set anchor bolts while wet
- Allow concrete to cure fully (at least 48 hours)
- Check all measurements before moving forward
Keep in mind: Your foundation must be level and square or every step that follows will be off.
Step 2: Framing the Floor and Base

The floor frame creates the base shape of your octagon and supports all the weight. You’ll need to cut precise angles for the eight sides and make sure everything aligns correctly before securing it permanently.
- Attach rim joists to form the octagon perimeter
- Install inner joists in a spoke pattern from center
- Secure all joints with metal brackets
- Add blocking between joists for extra support
- Lay and secure floor boards with proper spacing
Keep in mind: Use treated lumber for any parts that might contact ground or moisture.
Step 3: Building the Posts and Roof Frame

The posts and roof frame give your gazebo its height and shape. This phase transforms your project from a platform to a three-dimensional structure. The posts must be vertical and the roof frame must be symmetrical.
- Secure the eight corner posts to the base
- Install horizontal supports between posts
- Build the roof ridge support in the center
- Add rafters from center to each corner
- Brace all connections for wind resistance
Keep in mind: Posts must be perfectly plumb or your roof won’t sit correctly.
Step 4: Installing the Roof Panels

The roof keeps rain and sun off your new outdoor space. This step requires careful work at height and attention to detail for proper water runoff. The roof should extend past the sides to keep water away from the structure.
- Add roof sheathing over the rafters
- Install drip edge around perimeter
- Apply roofing underlayment for water barrier
- Secure roofing material starting from bottom
- Cap the peak with proper venting
Keep in mind: Overlap roofing materials in the direction that water flows.
Step 5: Finishing Touches

The final phase adds both beauty and protection to your gazebo. These details make the difference between a basic structure and a polished outdoor living space that adds value to your home.
- Install railings between posts
- Add trim to hide joints and edges
- Apply sealant or paint to all exposed wood
- Install any electrical fixtures
- Add final touches like steps or decorative elements
Keep in mind: These final details both protect your structure and make it look complete.
Key Considerations Before Starting
Before you buy any materials or make your first cut, take time to plan your gazebo project properly. Good planning prevents costly mistakes and ensures your gazebo meets your needs.
1. Site Selection
Pick a spot that balances sun and shade based on when you’ll use the gazebo most. Consider the view, privacy, and distance from your house. The ground should be fairly level, and away from areas where water collects after rain.
2. Size Options
An 8-foot gazebo works for 2-4 people. A 10-foot fits a small table and chairs. For larger gatherings or hot tubs, choose a 12-foot or 14-foot size. Remember to account for roof overhang when measuring your space.
3. Materials
Cedar resists bugs and rot but costs more than pine. Pressure-treated pine is budget-friendly but may warp. For roofing, asphalt shingles are economical, metal lasts longer, and polycarbonate lets in light. Use only outdoor-rated hardware.
4. Local Building Codes and Permits
Check with your local building department about permits. Many areas have rules about structure size, height, and distance from property lines. Getting proper permits now prevents possible fines later.
Common Mistakes
- Not ensuring the foundation is perfectly level can lead to a crooked structure.
- Skipping the curing time for the concrete can weaken the foundation.
- Misplacing the anchor bolts, causing alignment issues in future steps.
- Failing to properly seal exposed wood resulting in early rot and decay.
- Using regular nails instead of galvanized or stainless steel fasteners that resist rust.
- Forgetting to account for the roof overhang when planning the gazebo location.
- Rushing the measuring process leads to uneven sides and angles.
Tips for Success
1. Precision Matters: Measure twice, cut once. All eight sides must have identical angles for proper alignment of posts, railings, and roof components.
2. Annual Protection: Apply fresh sealer or stain every year. This shields wood from UV rays, moisture damage, and insect attacks.
3. Proper Water Management: Install metal flashing at roof junctions. This directs water away from vulnerable areas and prevents rot at key connection points.
4. Strategic Ventilation: Leave 1/8-inch gaps between floor boards. This allows for wood expansion, water drainage, and air circulation underneath.
5. Regular Maintenance: Schedule spring and fall cleanings. Remove leaves, branches, and dirt that hold moisture against surfaces and accelerate deterioration.
Conclusion
Building an octagon gazebo takes time and effort, but the results are worth it. These eight-sided structures add charm and function to any yard, giving you a special place to relax or gather with friends.
We’ve walked through the main steps from planning to finishing touches. Now it’s your turn to put these ideas to work. Choose a size and style that fits your space and matches your building skills. Start small if you’re new to construction, or go bigger if you feel ready for a challenge.
Ready to start? Share photos of your finished project with us – we’d love to see what you create!
Frequently Asked Questions
Is It Cheaper to Build or Buy a Gazebo?
Building a gazebo yourself is typically cheaper than buying pre-made ones, saving 40-60% on costs, though it requires time and skills.
What Are the Angles of An Octagon Gazebo?
An octagon gazebo has interior angles of 135 degrees and exterior angles of 45 degrees at each corner.

