How High to Run Stone on a House: Smart Design Rules
Stone accents can significantly enhance or detract from your home’s curb appeal.
Get the height wrong, and your house looks awkward or unbalanced. Get it right, and you create timeless visual appeal that boosts property value.
The secret lies in understanding proportion, architectural balance, and how stone interacts with your siding and roofline.
Many homeowners struggle with this decision, often placing stones too high or stopping at random points that disrupt visual flow.
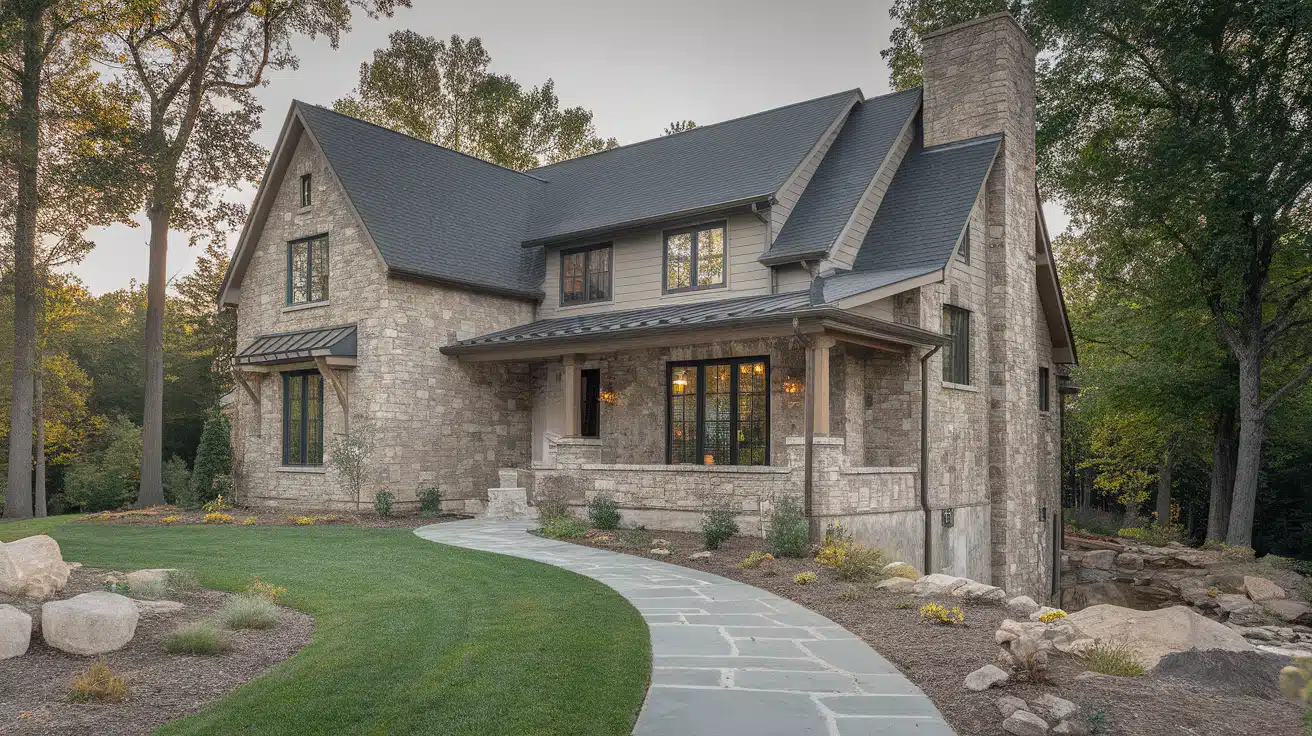
The charm of white houses and stone accents demonstrates how proper placement creates incredible results. This guide reveals proven design rules that architects use to achieve perfect stone height every time.
You’ll learn the rule of thirds, foundation-to-sill guidelines, and best applications that can save you thousands in renovation regrets.
Why Stone Placement Height Matters?
Stone placement height plays a crucial role in determining the visual appeal and architectural harmony of your home. When positioned correctly, stone creates the perfect balance between your siding, trim, and rooflines.
The height you choose directly impacts how heavy or light your home appears. Lower stone placements create a solid foundation feel, while higher applications can make your house look top-heavy.
Style-Specific Requirements:
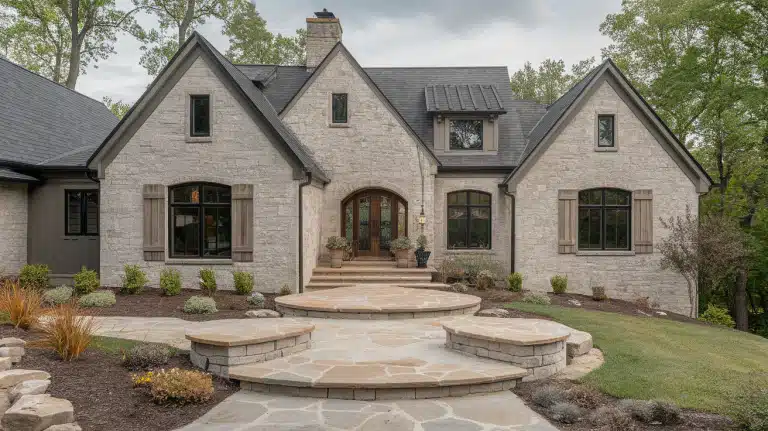
- Rustic homes: Can handle extensive stone coverage up to 5-6 feet
- Traditional colonials: Work best with conservative 3-4 foot wainscoting heights
- Modern farmhouse: Thrive with clean stone lines matching simplified profiles
- Ranch style: Need lower stone heights to complement horizontal proportions
Wrong placement creates an unbalanced look that feels off to viewers. Proper height establishes intentional architectural flow.
Getting this fundamental element right sets the stage for a cohesive exterior that feels intentional rather than haphazard.
Core Design Rules for Stone Height
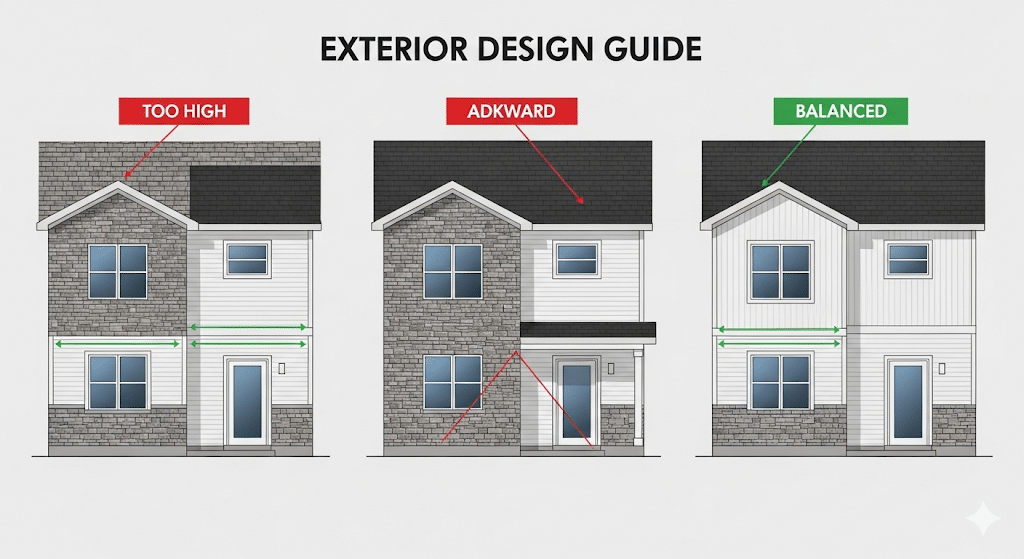
Getting stone placement right is about proportion, balance, and curb appeal. These simple yet timeless guidelines ensure your home looks intentional and cohesive rather than pieced together.
1. Rule of Thirds
The one-third height rule creates the most pleasing visual proportion because it mirrors the golden ratio found in nature.
Stone covering roughly one-third of your home’s height from ground to roofline establishes a strong foundation without overwhelming the upper siding materials.
2. Foundation-to-Sill Rule
Stopping stone just below your first-floor window sills creates clean, defined lines that frame your windows beautifully.
This approach prevents stone from competing with window trim and maintains clear visual boundaries between materials.
3. Avoid the “Half Wall Cut-Off
Never end a stone at awkward midpoints, such as halfway up walls or at random heights that don’t align with architectural features.
These arbitrary stopping points create visual confusion and give your home a look of being unfinished or poorly planned.
When applying these design rules, consider the entire exterior as a whole. The stone height should complement the siding lines, window sills, and even choices like the best roof colors for a white house to achieve a balanced look that feels cohesive from foundation to peak.
What Influences the Ideal Stone Height
The perfect stone height isn’t one-size-fits-all; it depends on your home’s style, proportions, and materials. Considering these factors ensures the stone feels like a natural extension of the architecture.
1. Home Style
Ranch homes work best with lower stone heights (2-3 feet) to complement their horizontal lines, while colonial houses can handle taller stone applications up to window sills.
Craftsman styles benefit from stone that follows their natural material emphasis, and farmhouse designs look best with clean, simple stone lines that don’t compete with board-and-batten or lap siding.
2. Proportions & Rooflines
Single-story homes need conservative stone heights to avoid looking bottom-heavy, while two-story houses can support stone up to 4-5 feet without losing balance.
Consider your roofline pitch; steep roofs can handle more stone coverage, while low-pitched roofs require restrained stone application to maintain proper visual weight distribution.
3. Stone Type & Finish
Light-colored stacked stone creates less visual weight and can run slightly higher without overwhelming your design.
Heavy fieldstone or dark natural stone should stay lower on the wall to prevent your home from appearing too grounded or fortress-like.
4. Climate Durability
Stone provides excellent moisture protection in wet climates, making higher applications practical for areas with heavy rain or snow.
In harsh weather regions, running stone higher protects your siding investment while adding functional value beyond pure visual appeal.
Practical Ways to Use Stone for Maximum Impact
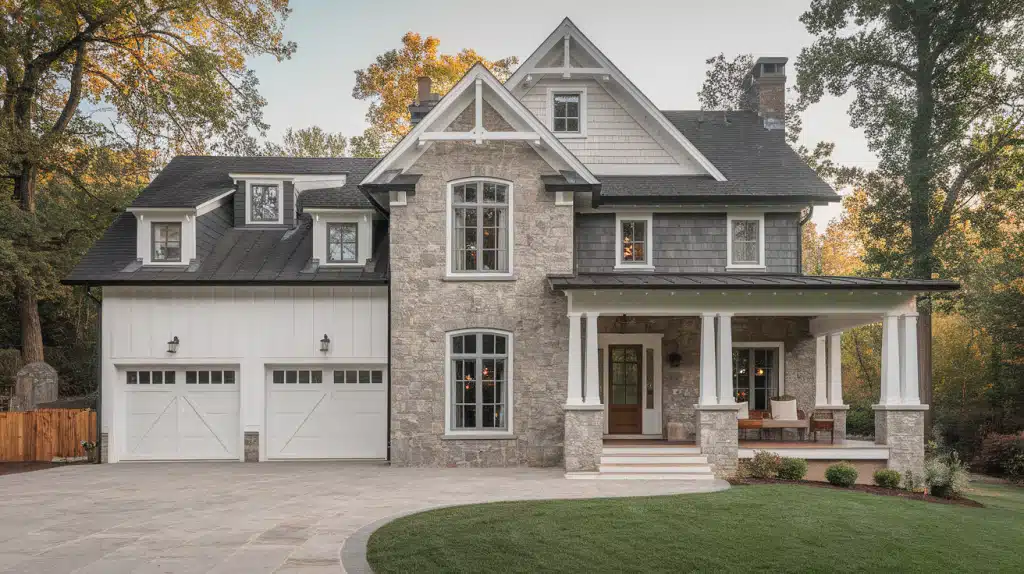
From low wainscoting to full façades and accent features, stone can be applied in different ways to highlight your home’s best details and boost curb appeal.
| Application Type | Height/Coverage | Best For | Design Impact |
|---|---|---|---|
| Stone Wainscoting | 3-4 feet from the ground | Traditional, colonial, craftsman homes | Creates a classic foundation look, protects lower walls from moisture and impact damage |
| Full-Front Height | Above one-third height (5-6 feet) | Large farmhouse, rustic, or statement homes with strong rooflines | Makes bold focal points, works when balanced with extensive upper siding |
| Vertical Uses | Full height on specific features | Chimneys, porch columns, entryways, and accent walls | Adds architectural interest, creates natural focal points without overwhelming |
| Garage & Porch Matching | Same height as the main house stone | Attached garages, covered porches, and outdoor living spaces | Maintains design consistency, creates cohesive exterior flow throughout the property |
Pro Tip: Mix applications thoughtfully, combine wainscoting on main walls with full-height stone on chimneys or entryways for visual variety without chaos.
Designer Tips for Cohesive Exteriors
A well-designed exterior is all about harmony; stone should flow naturally with siding, trim, and rooflines. These expert tips help tie every element together for a balanced, polished look.
- Align stone height with siding breaks and trim lines: Match your stone termination point with existing horizontal elements, such as window sills, porch railings, or natural siding transitions, for clean, intentional-looking lines.
- Coordinate with color schemes and textures: Select stone colors that complement your siding and trim, rather than competing with them. Warm stones pair well with cream siding, while cool gray stones work beautifully with white or charcoal exteriors.
- Respect the roofline and porch scale for balance: Keep stone proportions smaller on homes with low rooflines or small porches to avoid overwhelming these delicate architectural features.
- Use stone strategically for a premium but not heavy look: Apply stone to high-impact areas, such as front elevations and entryways, while using siding on less visible sides to create luxury appeal without excessive material costs or visual weight.
Key Takeaways
Getting stone height right changes your home from ordinary to extraordinary.
Remember the core rules: stick to the one-third proportion, align with architectural features, and respect your home’s natural lines. Avoid random stopping points that break visual harmony.
Your stone placement should complement your home’s style, whether ranch, colonial, or farmhouse, while providing both beauty and practical protection.
Consider your roofline, siding materials, and overall proportions when making height decisions. Stone done right creates lasting curb appeal that increases property value and makes neighbors take notice.
Use these proven design principles to achieve professional results that stand the test of time.
Ready to change your exterior? Apply these height rules to your next stone project and watch your home’s appeal soar.