Are you tired of kneeling to pot your plants and searching for scattered gardening tools?
A well-built potting bench solves these common gardening challenges.
This guide shows you how to build your solid workstation that makes plant care simpler and more comfortable.
This bench stands out with its practical design – featuring strong 4×4 legs for stability, a spacious work area for all your potting needs, and two thoughtfully placed shelves.
You can build this bench over the weekend using basic tools and materials from your local hardware store.
You’ll create a lasting addition to your garden space with clear steps and simple techniques.
Ready to make gardening more organized?
Let’s gather the materials and start building.
What You’ll Need
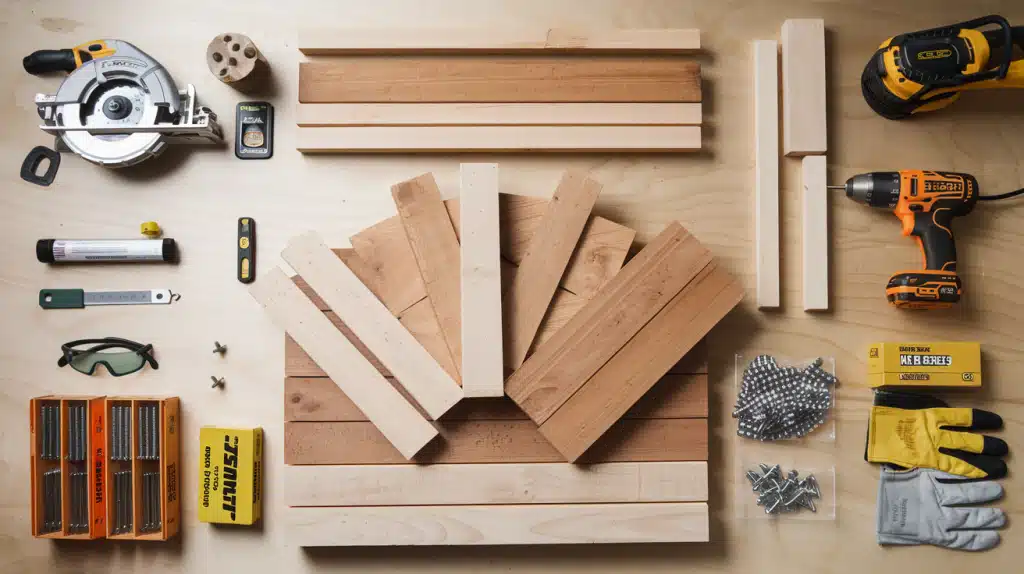
Materials List
1. Lumber Components
| Detail | Information |
|---|---|
| 5/4″ x 6″ deck boards | 3 pieces (10′ length), 2 pieces (8′ length) |
| 2″ x 4″ boards | 3 pieces (12′ length), 1 piece (8′ length) |
| 1″ x 4″ boards | 1 piece (10′ length), 1 piece (8′ length) |
| 4″ x 4″ posts | 2 pieces (8′ length) |
2. Hardware
| Detail | Information |
|---|---|
| 3-inch coated screws | 1 pound |
| 2-inch coated screws | 1 pound |
| Rubber feet (optional) | – |
Tools Needed
| S.No | |
|---|---|
| 1 | Circular saw |
| 2 | Power drill |
| 3 | Countersink drill bit |
| 4 | Measuring tape |
| 5 | Pencil |
| 6 | Speed square |
| 7 | Orbital sander |
| 8 | Safety glasses |
| 9 | Work gloves |
| 10 | Sawhorses (2) |
Step-By-Step Potting Bench Construction Guide
Step 1 – Preparation
- Set up your workspace by placing sawhorses 4 feet apart on level ground
- Sort all lumber by size and type for easy access during building
- Position tools within reach but away from walking paths
- Clear the area around your workspace for safe movement
- Put on safety glasses and work gloves before starting
- Review your cutting list and mark initial measurements
Step 2 – Cutting The Lumber
- Start with four 2x4s cut to 58 inches for the tabletop frame
- Cut three 2x4s to 23.5 inches for side and center supports
- Measure and cut five deck boards to 60 inches for the work surface
- Set saw to 45 degrees for bottom shelf frame cuts
- Cut two 2x4s to 55 inches and two to 23.5 inches with 45-degree angles
- Cut back legs at 48 inches and front legs at 35 inches from 4x4s
- Prepare upper shelf pieces: three 7-inch supports and three 60-inch boards
Step 3 – Building The Base Frame
- Position your front legs at the corners of your frame
- Mark a 35-inch height line on the back legs for alignment
- Attach legs using 3-inch screws through pre-drilled holes
- Add center support between front and back frame pieces
- Check for square corners using a speed square
- Make sure your legs stand straight and even
Step 4 – Creating The Work Surface
- Lay out the 58-inch front and back frame pieces
- Connect side supports to create the frame rectangle
- Center and attach the middle support
- Place deck boards across the frame with even spacing
- Leave 3/4 inch overhang on all sides
- Secure boards with 2-inch screws in pre-drilled holes
Step 5 – Adding The Bottom Shelf
- Mark 23 inches down from the tabletop for shelf height
- Install front and back shelf supports with 45-degree cuts
- Add side supports to complete the frame
- Place eight deck boards across supports
- Space boards 3/8 inch apart for drainage
- Secure all boards with 2-inch screws
Step 6 – Upper Shelf Construction
- Assemble the upper shelf frame using 58-inch supports
- Space three 7-inch blocks evenly for board support
- Place three 1×4 boards across supports
- Ensure equal overhang on all sides
- Pre-drill and secure with 2-inch screws
- Check all connections are tight
Step 7 – Final Assembly
- Place the upper shelf unit on top of the back legs
- Align the shelf unit carefully with the back frame
- Secure shelf to legs with 3-inch screws
- Check all connections and tighten if needed
- Test stability by pushing gently from all sides
- Level the bench if needed, with shims
Step 8 – Finishing Your Potting Bench – Surface Preparation
- Start with 120-grit sandpaper on your orbital sander
- Pay extra attention to the main work surface where you’ll pot plants
- Smooth all corners and edges to prevent splinters
- Sand off any visible manufacturer stamps from lumber
- Remove any pencil marks or guidelines
- Wipe all surfaces clean with a dry cloth to remove dust
Video Tutorial
Below is a tutorial video on creating a DIY potting bench by ‘PCO Woodcrafting.’
Potting Bench Maintenance Tips
1. Remove soil, plant debris, and excess water from your work surface after each gardening session. This prevents material buildup and keeps your bench clean for next time. Use a stiff brush to clean between boards where soil tends to collect.
2. Perform monthly checks of all screws and fasteners. Temperature changes and regular use can loosen connections over time. Keep a screwdriver nearby to tighten any loose spots you find during inspection.
3. Clean the gaps between deck boards every season using a putty knife or thin tool. Built-up dirt in these spaces traps moisture and speeds up wood decay. Good airflow between boards helps your bench dry properly.
4. Keep your shelves organized and avoid overloading them. Distribute weight evenly, with heavier items on the bottom shelf. This helps maintain the bench’s stability and prevents uneven wear.
Common Mistakes to Avoid
When building your potting bench, watch out for these frequent errors that can affect your final result:
1. Rushing Through Measurements: Measuring carefully avoids future issues.
Many builders skip checking cuts, resulting in mismatched pieces.
Measure twice, cut once, and mark cutting lines clearly with a pencil and square.
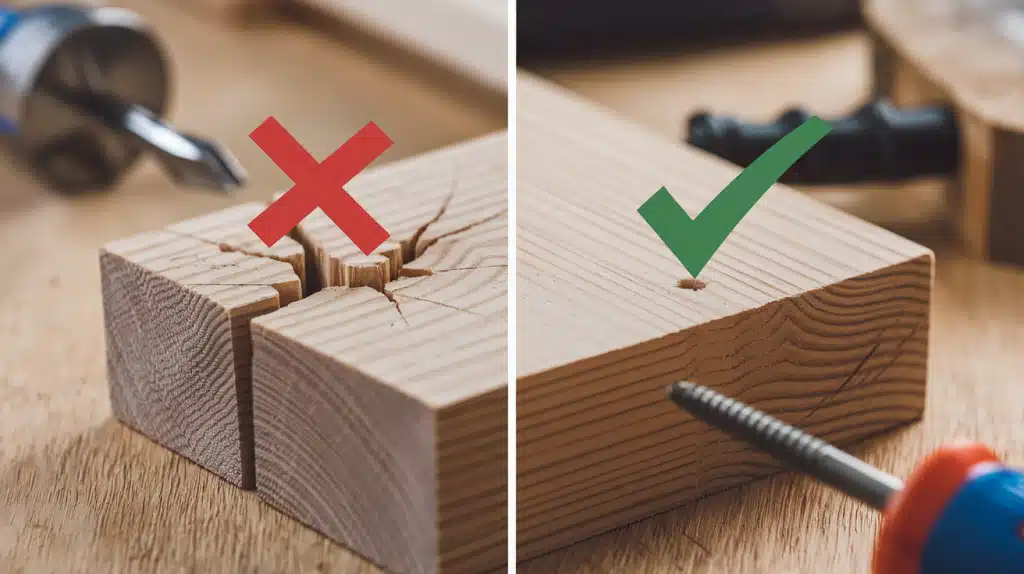
2. Skipping Pre-drill Steps: Don’t skip pre-drilling your screw holes.
Forcing screws into the wood without pre-drilling often results in split boards, especially near the edges.
This weakens your bench’s structure and creates an unattractive finish.
3. Incorrect Screw Selection: Using the wrong screw length can either fail to hold pieces together or poke through surfaces.
Stick to our recommended 2-inch screws for deck boards and 3-inch screws for frame assembly.
Make sure all screws are coated for outdoor use.
4. Poor Level Checks: Uneven ground leads to wobbling benches. Check levels during leg installation and after completing each major section.
Use shims if needed to create a stable work surface.
5. Not Planning for Wood Thickness: Remember that lumber measurements like “2×4” aren’t exact.
Plan your cuts accounting for true wood thickness to ensure proper fit. A 2×4 measures 1.5 x 3.5 inches.
Conclusion
Building your potting bench brings satisfaction and practicality to your gardening routine.
This well-planned design offers plenty of space for gardening tasks, with helpful features like the low-set bottom shelf for heavy items and a handy upper shelf for tools.
You can complete this project over the weekend using basic tools and materials from your local store.
The steps are clear, and the results are long-lasting. From cutting the first board to tightening the final screw, each step adds to creating a useful garden workspace.
Take care of your bench with quick cleanups after use and regular checks of screws and surfaces.
Your effort in building this bench will pay off every time you work comfortably at just the right height, with all your tools and supplies within easy reach.