
Do you find the look of mushrooms in gardens and potted plants appealing? Many folks find it hard to add this touch to their yard.
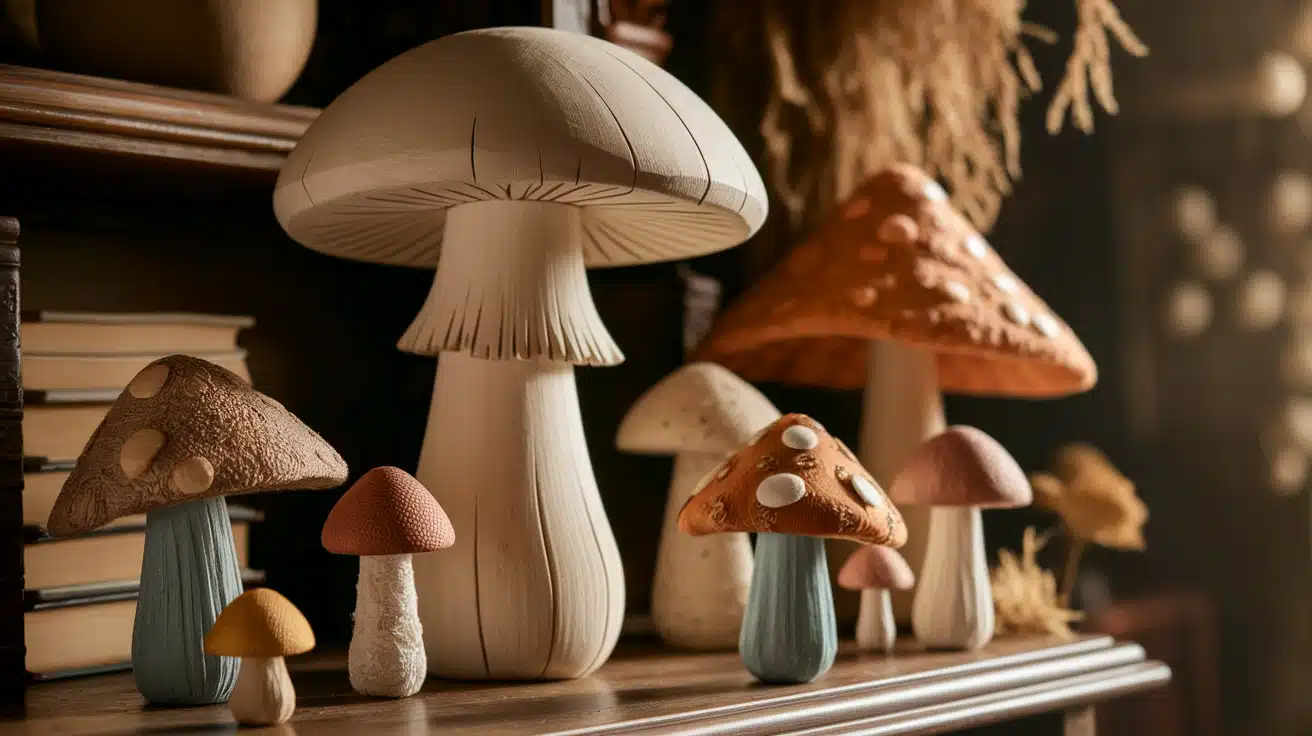
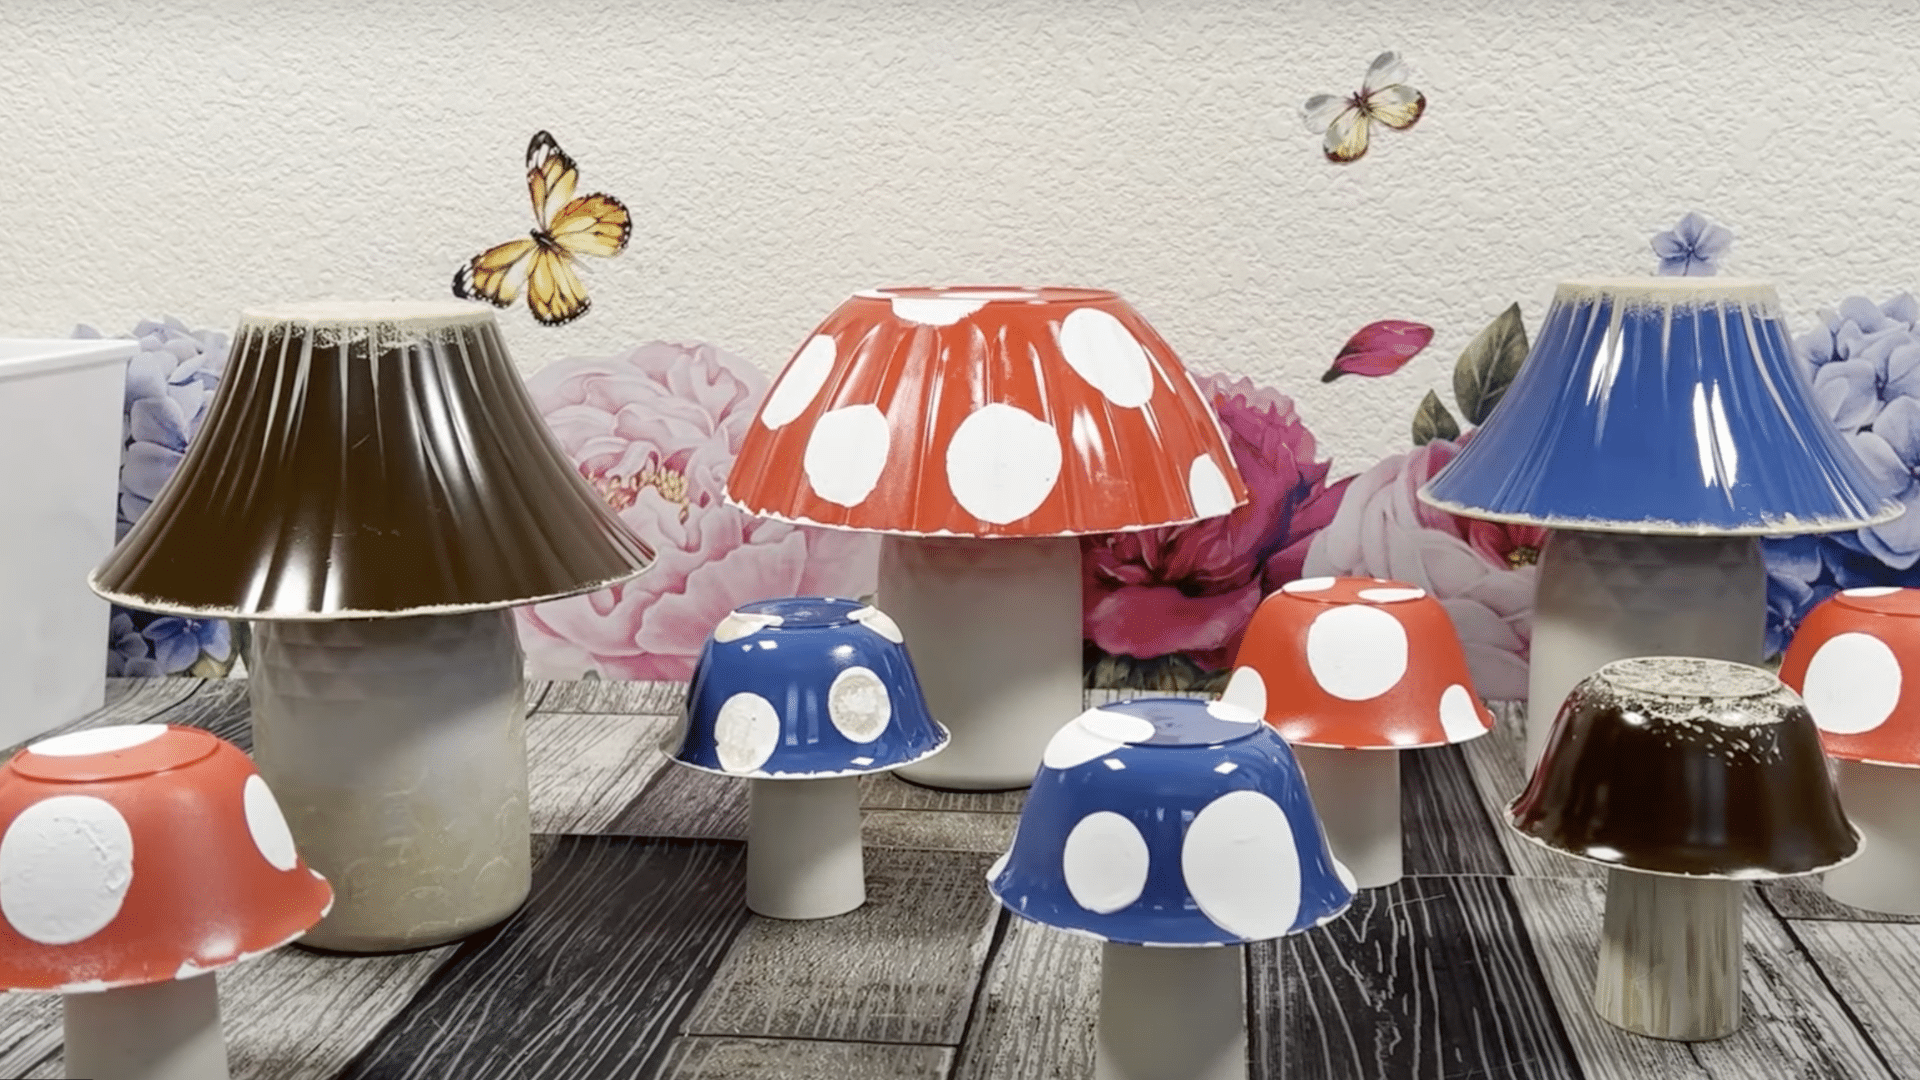
The good news is that you can make your mushroom decor with items from the dollar store. These cute mushroom pieces work well in yards, potted plants, or as home decor.
They’re simple to make and cost very little. This post will show you how to craft these sweet mushroom decor items step by step. With just a few basic tools and some dollar-store finds, you’ll soon have your own set of fungi friends to place in your garden or home.
Follow along to learn about this fun and quick project that adds charm to any space.
Why Make DIY Mushroom Decor?
Mushroom decor has gained much love in homes and gardens. These whimsical items bring a touch of fun to any spot they grace. Store-bought versions often come with high price tags, but making your own saves cash while giving you full control of colors and sizes.
The best part? You can make them in just a few hours with easy-to-find stuff. Plus, this project works well for all skill levels – even if you’ve never done crafts before.
The result looks much more costly than it is, making these little fungi the perfect way to add flair to your space without spending too much.
What You’ll Need for Crafting DIY Mushroom Decor
| Tools | Materials |
|---|---|
| Spray paint in various colors | Mini glasses (6-piece) from Dollar Tree |
| White acrylic paint | Wine decanters or glass vases |
| Light beige/brown acrylic paint | Small plastic bowls (12-piece) |
| Paint sponge dabbers (3 sizes) | Decorative plastic bowls |
| Detail paint brushes (flat and round) | E6000 or Fix All adhesive |
| Hot glue gun and glue sticks | Small stones (for outdoor pieces) |
| Sanding block | Mortar mix or quick-set cement (for outdoor) |
| Newspaper | Triple-thick thick crystal clear glaze (for outdoor) |
| Paint turntable (optional) | Paint a tent or a protected area for spray painting |
Step-by-Step Guide to Making DIY Mushroom Decor
This easy-to-follow guide will help you create charming and whimsical mushroom decor, perfect for adding a touch of nature and creativity to any space.
Step 1: Gather Your Supplies
Start by visiting Dollar Tree and looking in their catering section. Pick up one or two packages of mini glasses that will serve as stems for small mushrooms. Find wine decanters or straight glass vases with larger stems to accommodate the mushroom.
Then, get plastic bowls in various sizes and shapes to use as mushroom caps. Ensure that you select shapes that look good when turned upside down. Remove all tags and clean each piece thoroughly to ensure the paint adheres properly.
Step 2: Prepare Your Painting Area
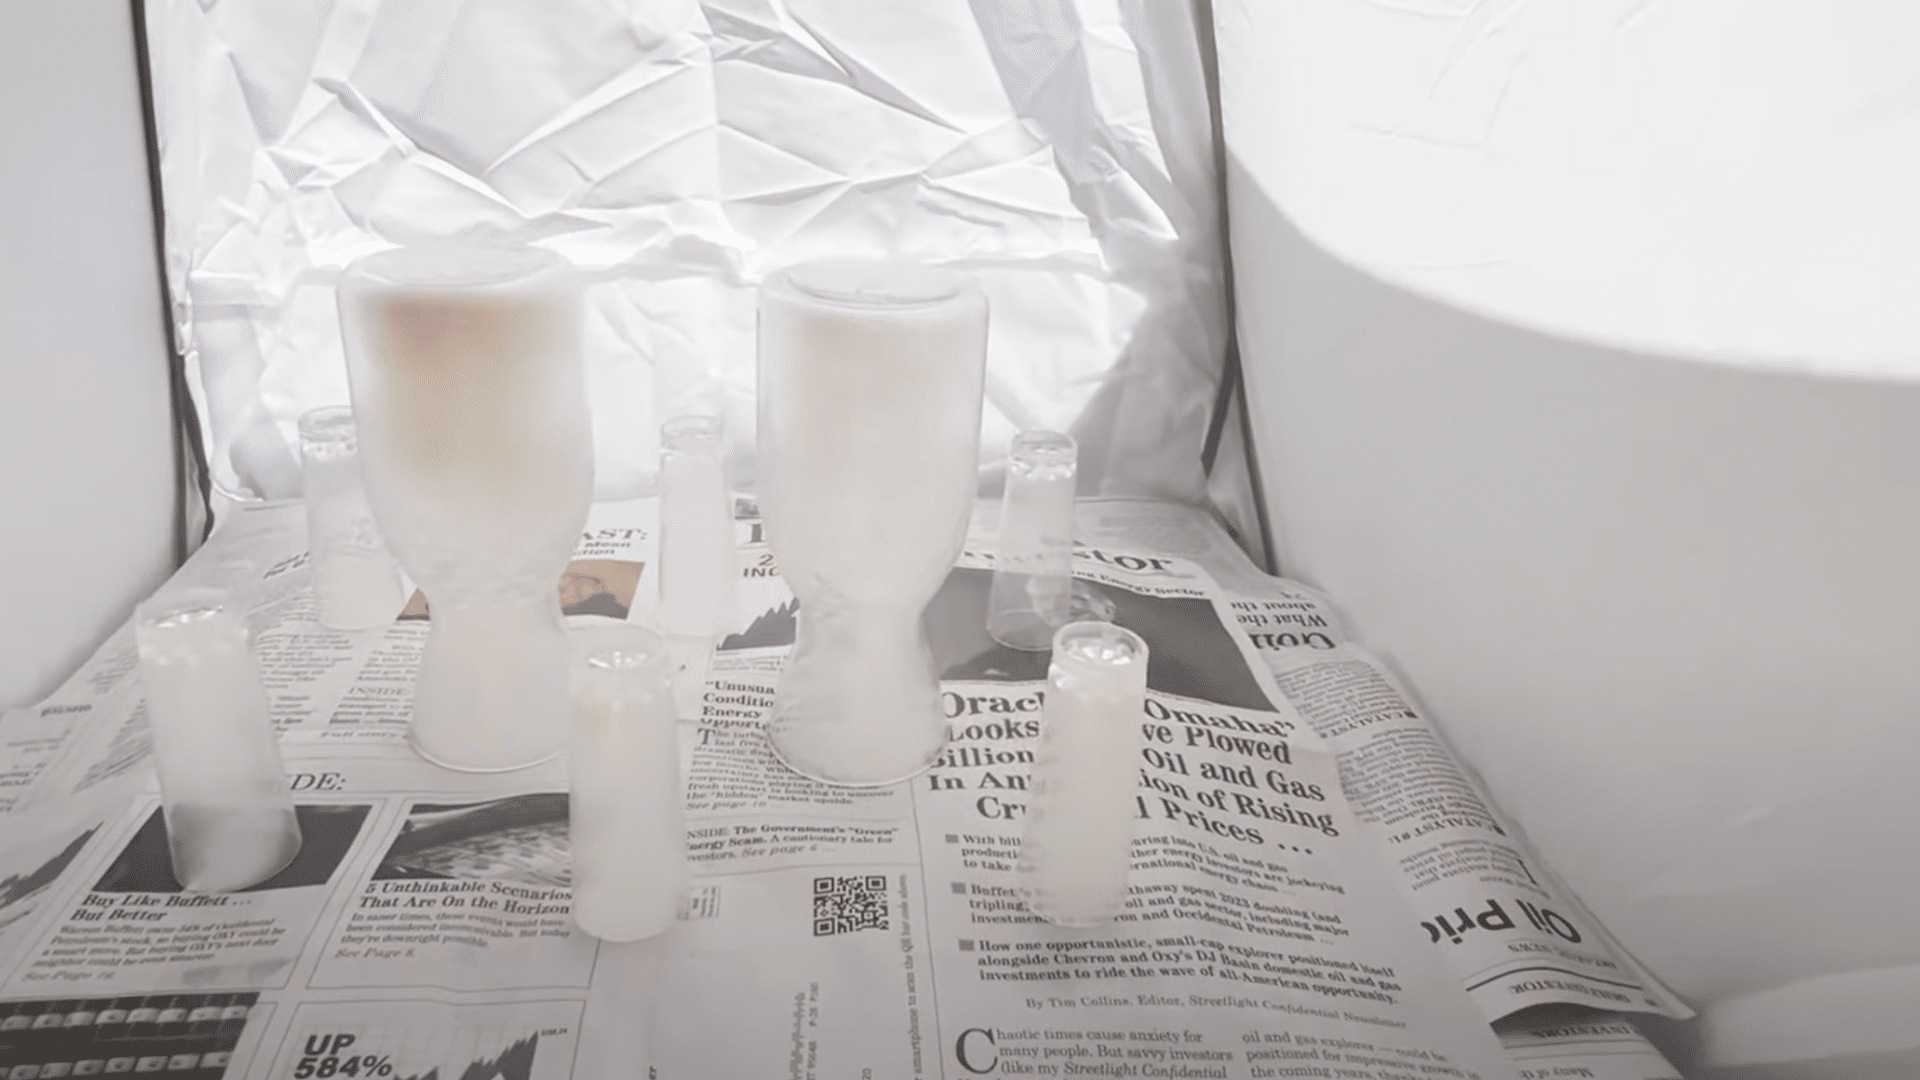
Set up a spot to spray paint, such as a paint tent, or lay down newspaper in a well-ventilated space. A turntable makes the job much faster, as you can spin items while painting for full coverage. Make sure your area is clean and free from dust.
Line your work area with newspaper to catch any spray paint that might miss your items. Keep your paint cans at room temperature for the best results, and shake them well before use.
Step 3: Paint the Bases and Caps
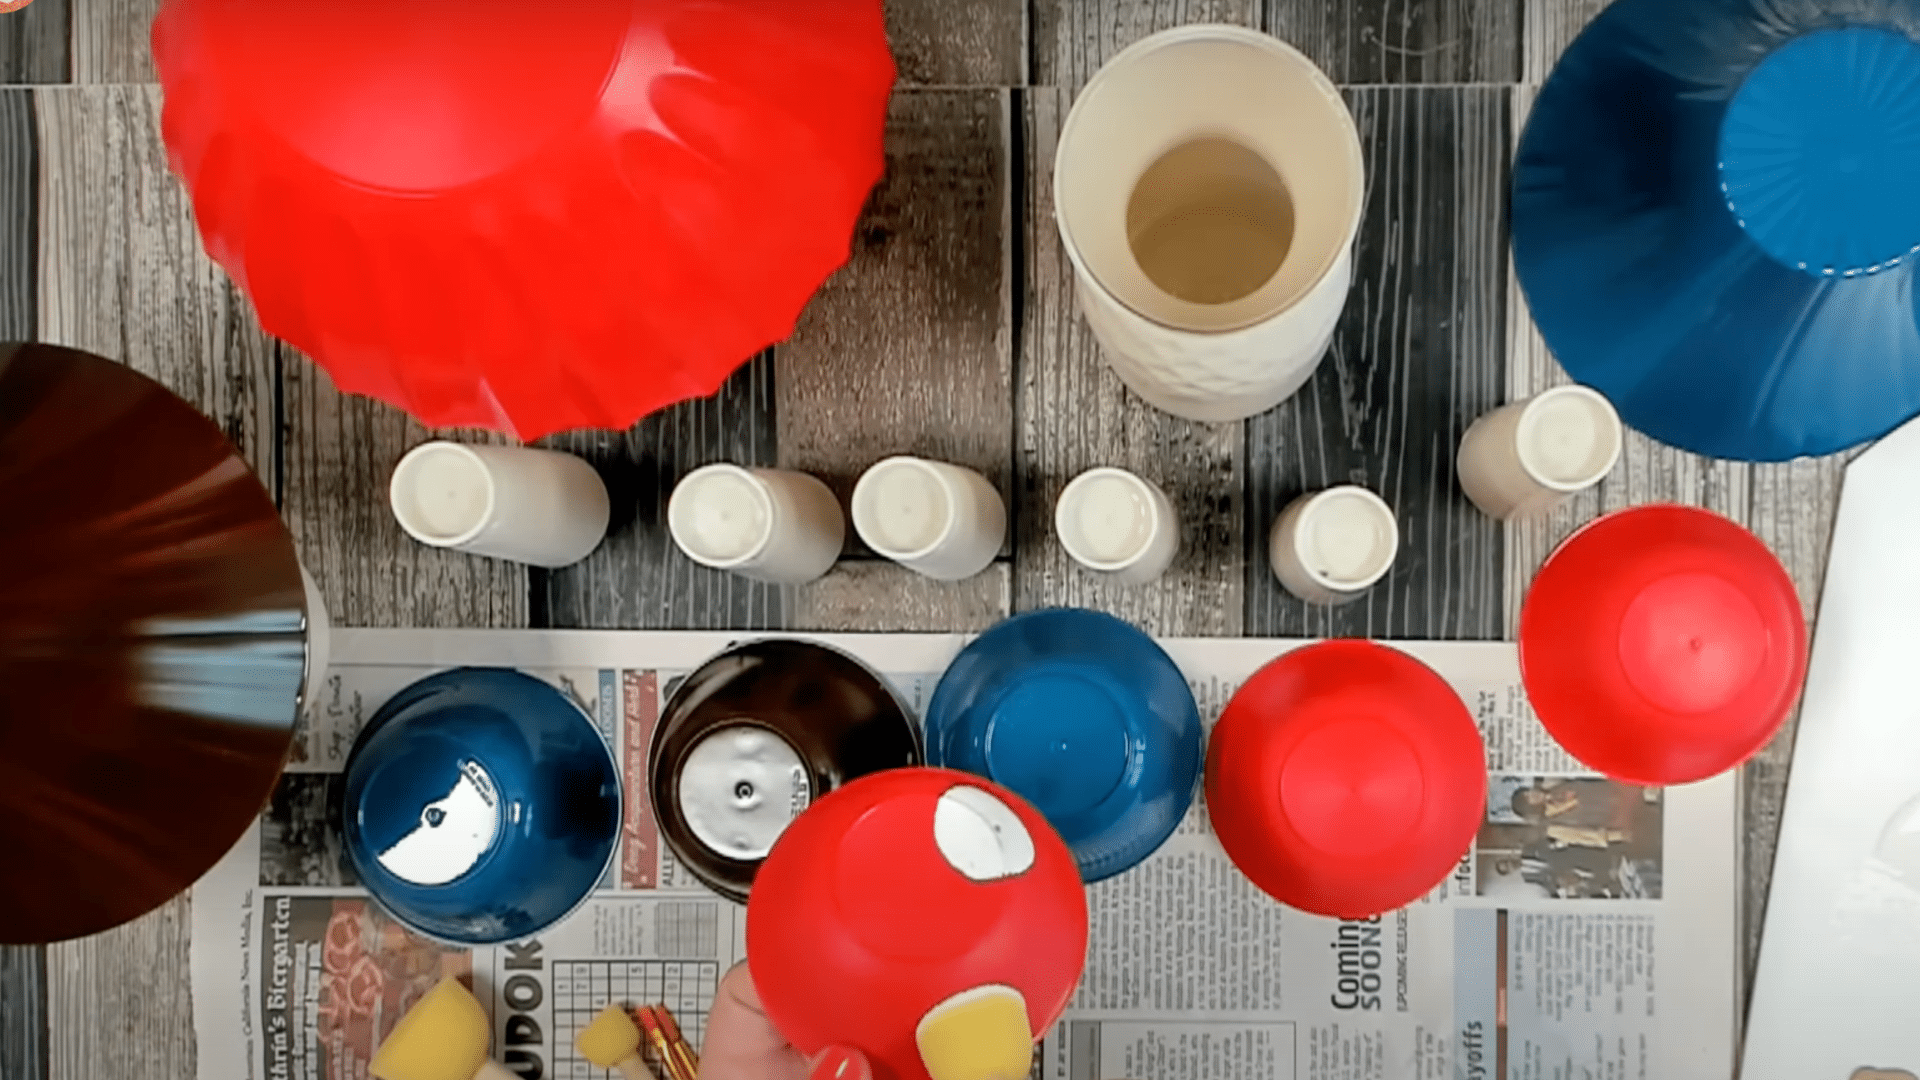
Start by painting all the stems with a light color like matte clamshell or beige. Apply the paint in light, even coats to avoid drips. Let dry fully between coats. For the caps, use bright colors like red, blue, and brown.
Hold the can about 8 inches from the item and spray in a sweeping motion. Apply 2-3 light coats rather than one thick coat, which might run. Let each coat dry fully before adding the next layer of paint.
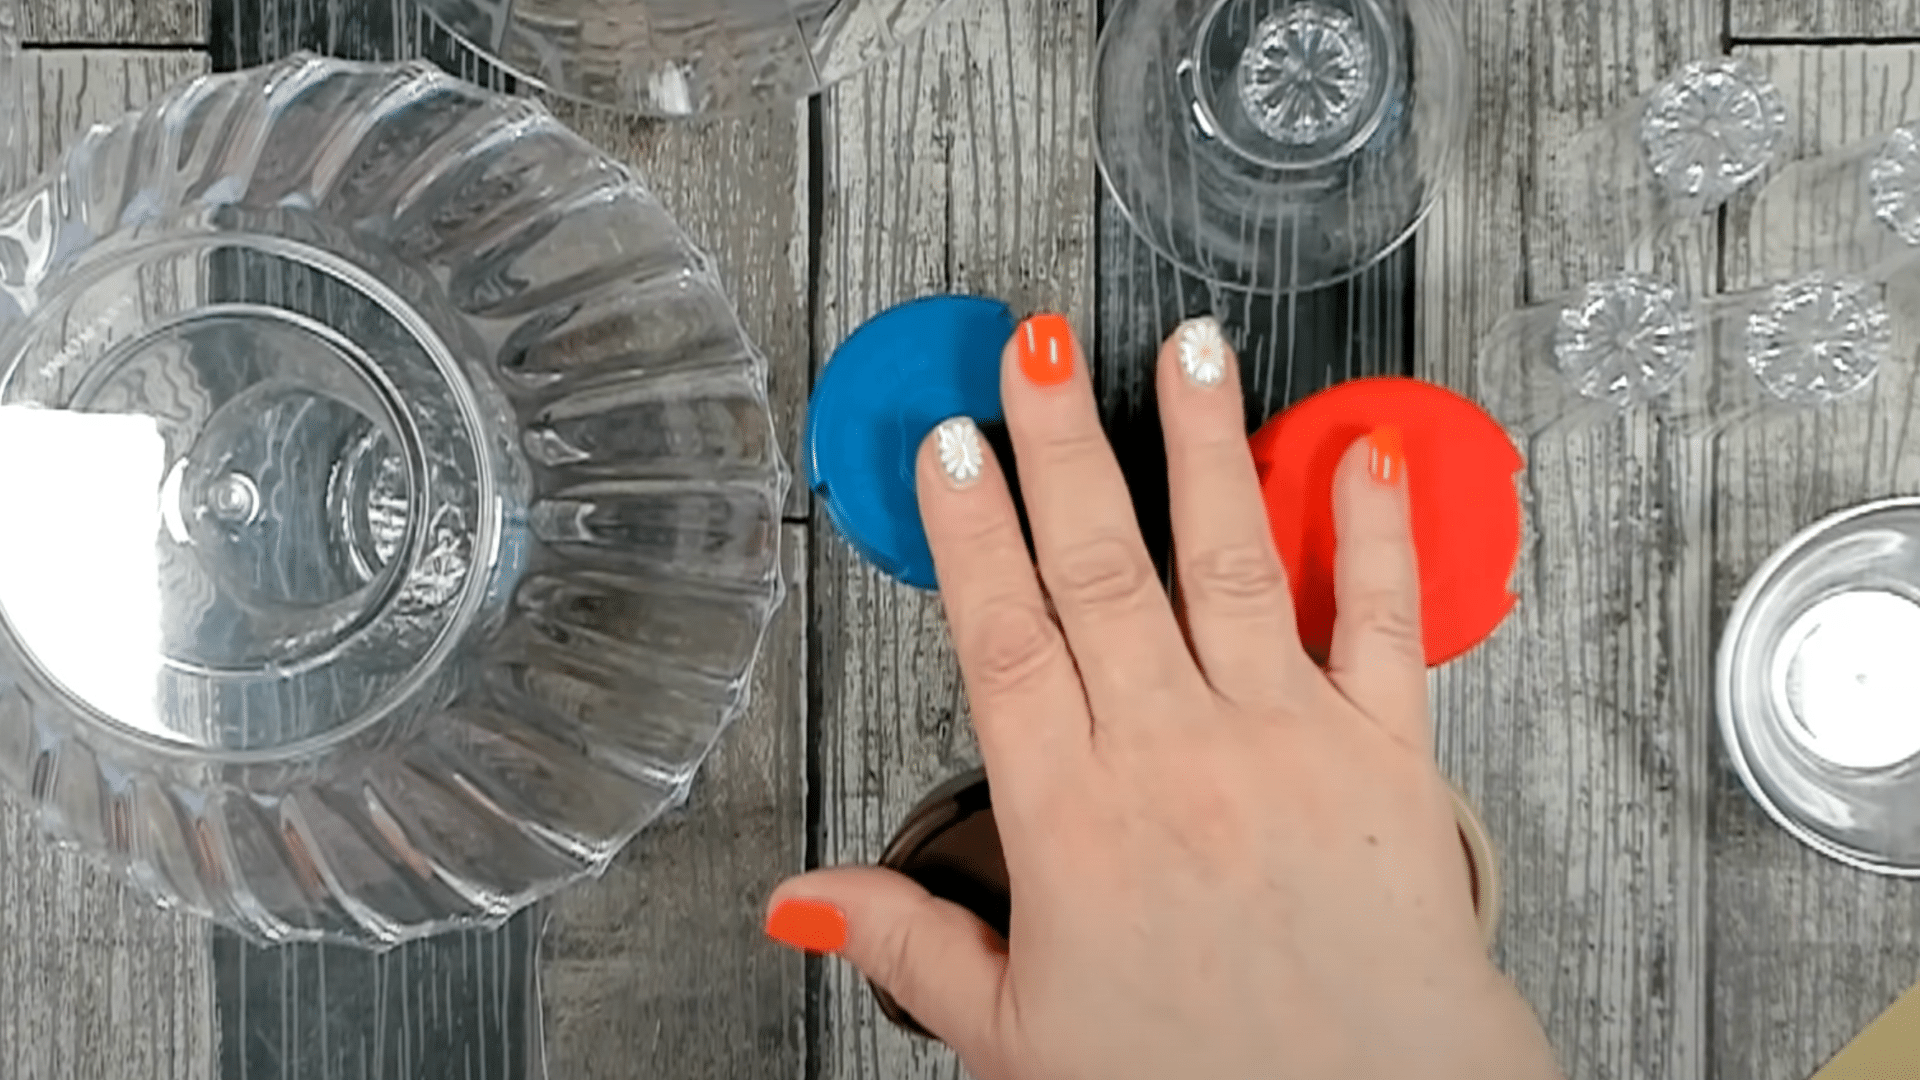
Step 4: Add Spots and Details
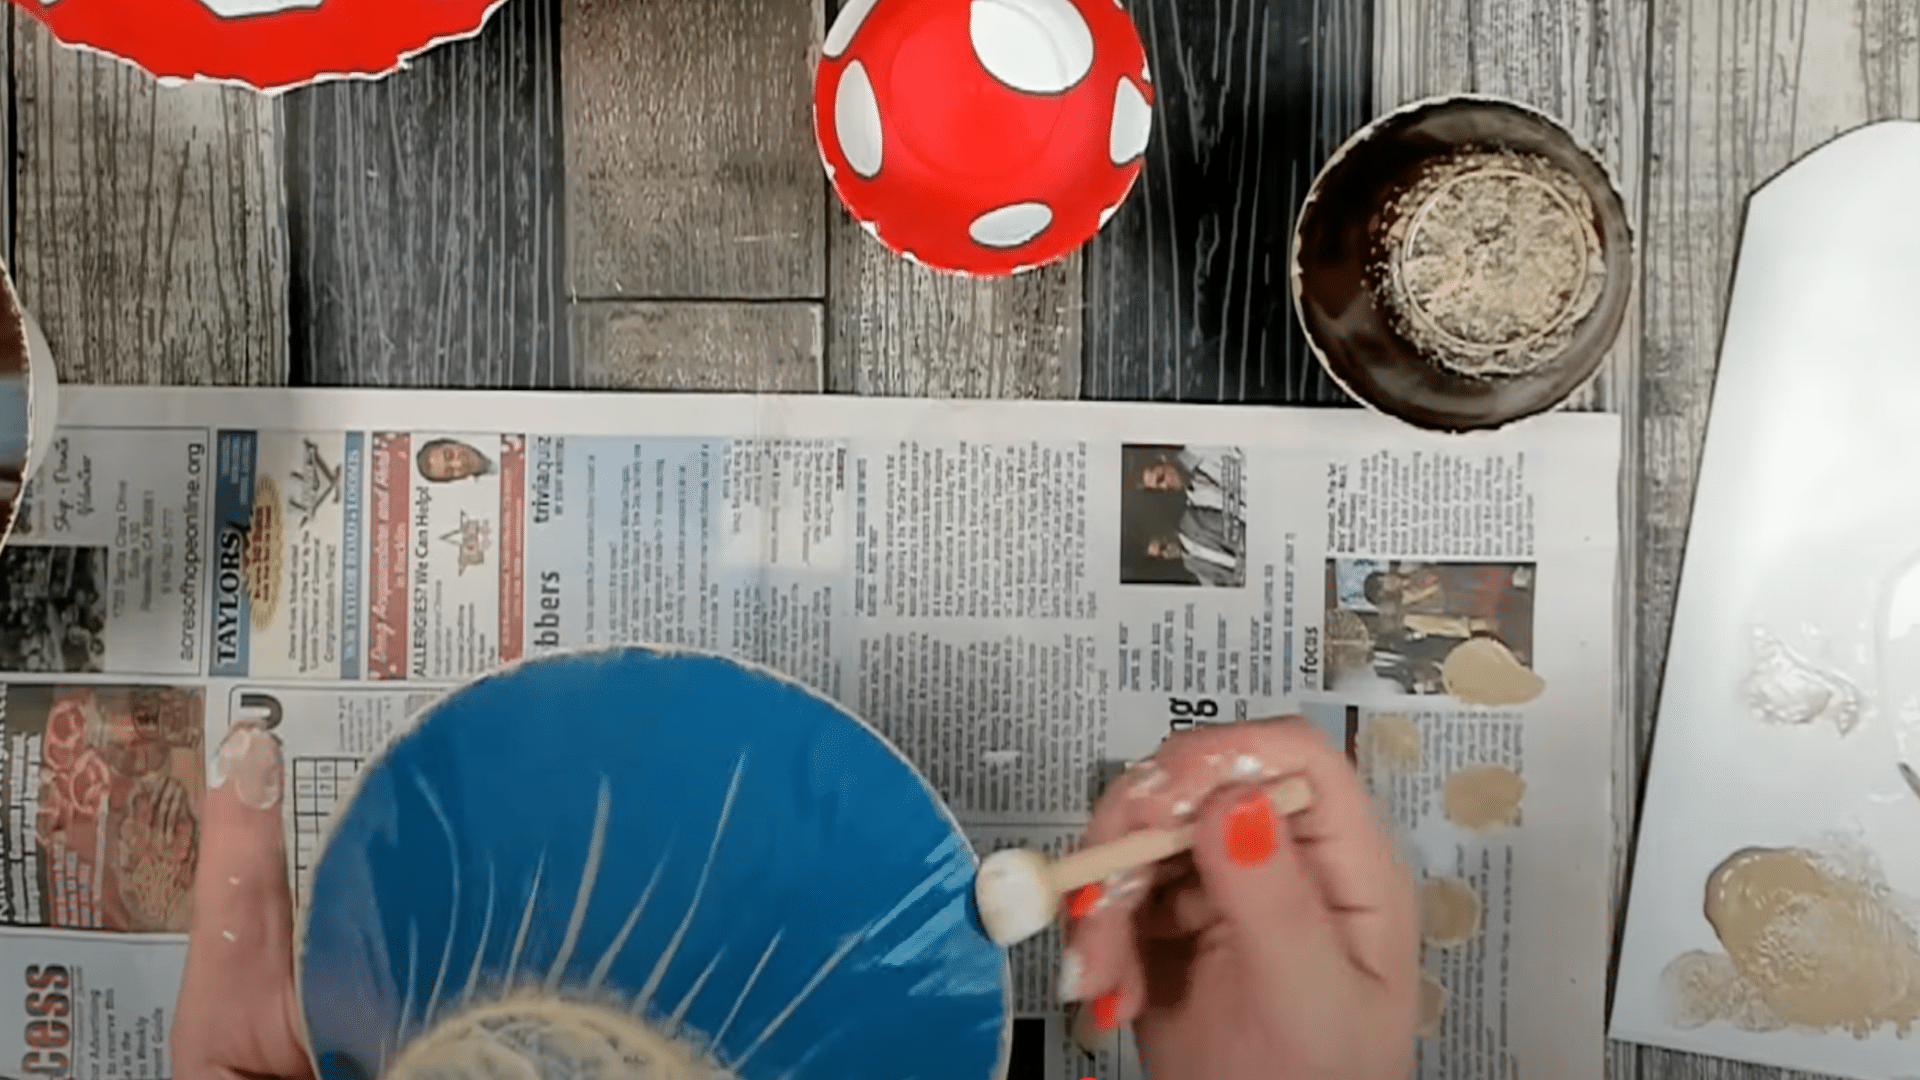
Once the base coats are dry, add spots to your mushroom caps using sponge dabbers. Dip the sponge in white paint, press it firmly on the cap, and lift straight up. Vary the size of the spots by using small, medium, and large dabbers.
White spots look best on blue caps. For red caps, try both white and beige spots. You can also add stripes to the stems with a brush. Let all added details dry fully before moving to the next step.
Step 5: Prepare the Bases for Gluing
Sand the top rim of each stem where you’ll attach the cap. This step is key – if you skip it, the glue won’t stick well to the painted surface. Use a sanding block and rub until you see bare plastic or glass. Clean off any dust from sanding before gluing.
This extra work will ensure that your mushrooms stay in one piece for much longer, so don’t rush this part of the process.
Step 6: Attach the Caps to the Stems
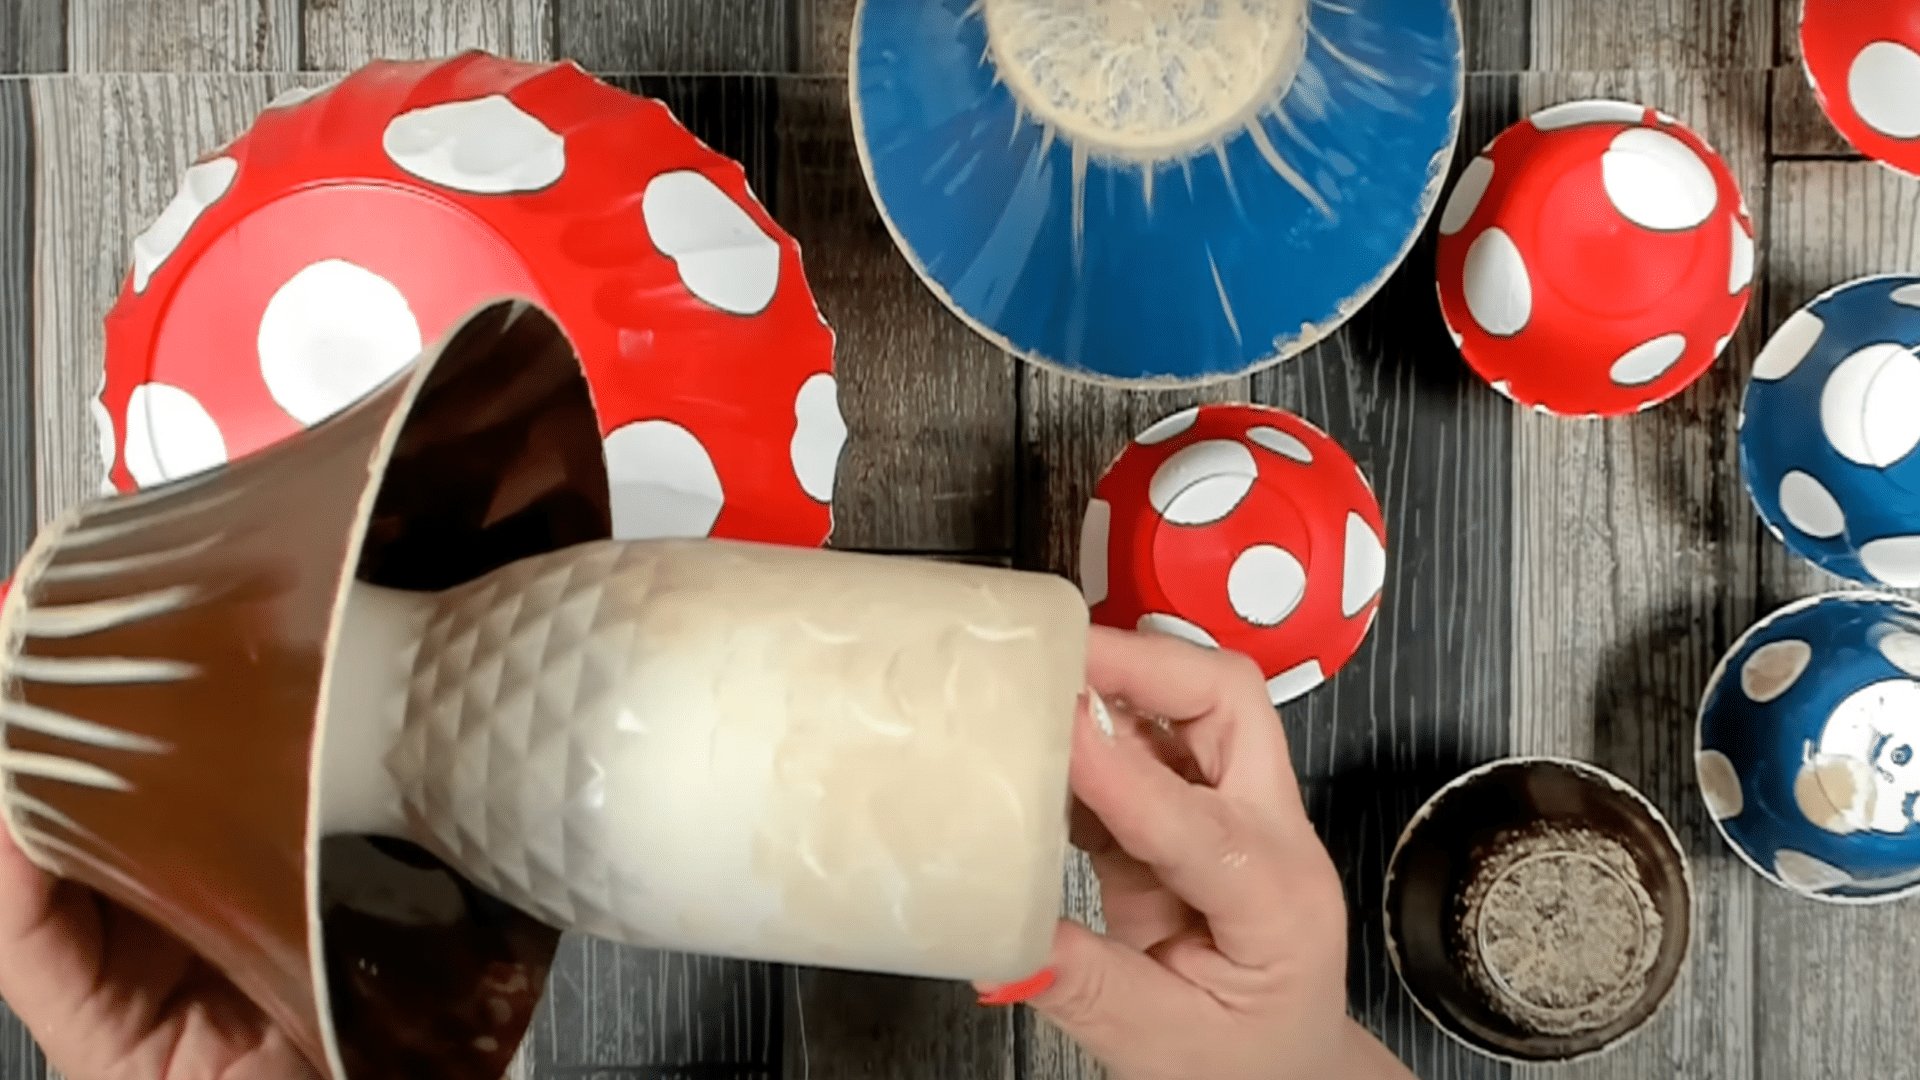
Apply a strong glue like E6000 or Fix All around the sanded rim of each stem. Add a few dots of hot glue as well – this helps hold everything in place while the stronger glue dries. Press the cap onto the stem, making sure it’s centered and level.
Hold for a minute to let the hot glue set. The strong glue needs 24-48 hours to cure fully, so be gentle with your mushrooms during this time.
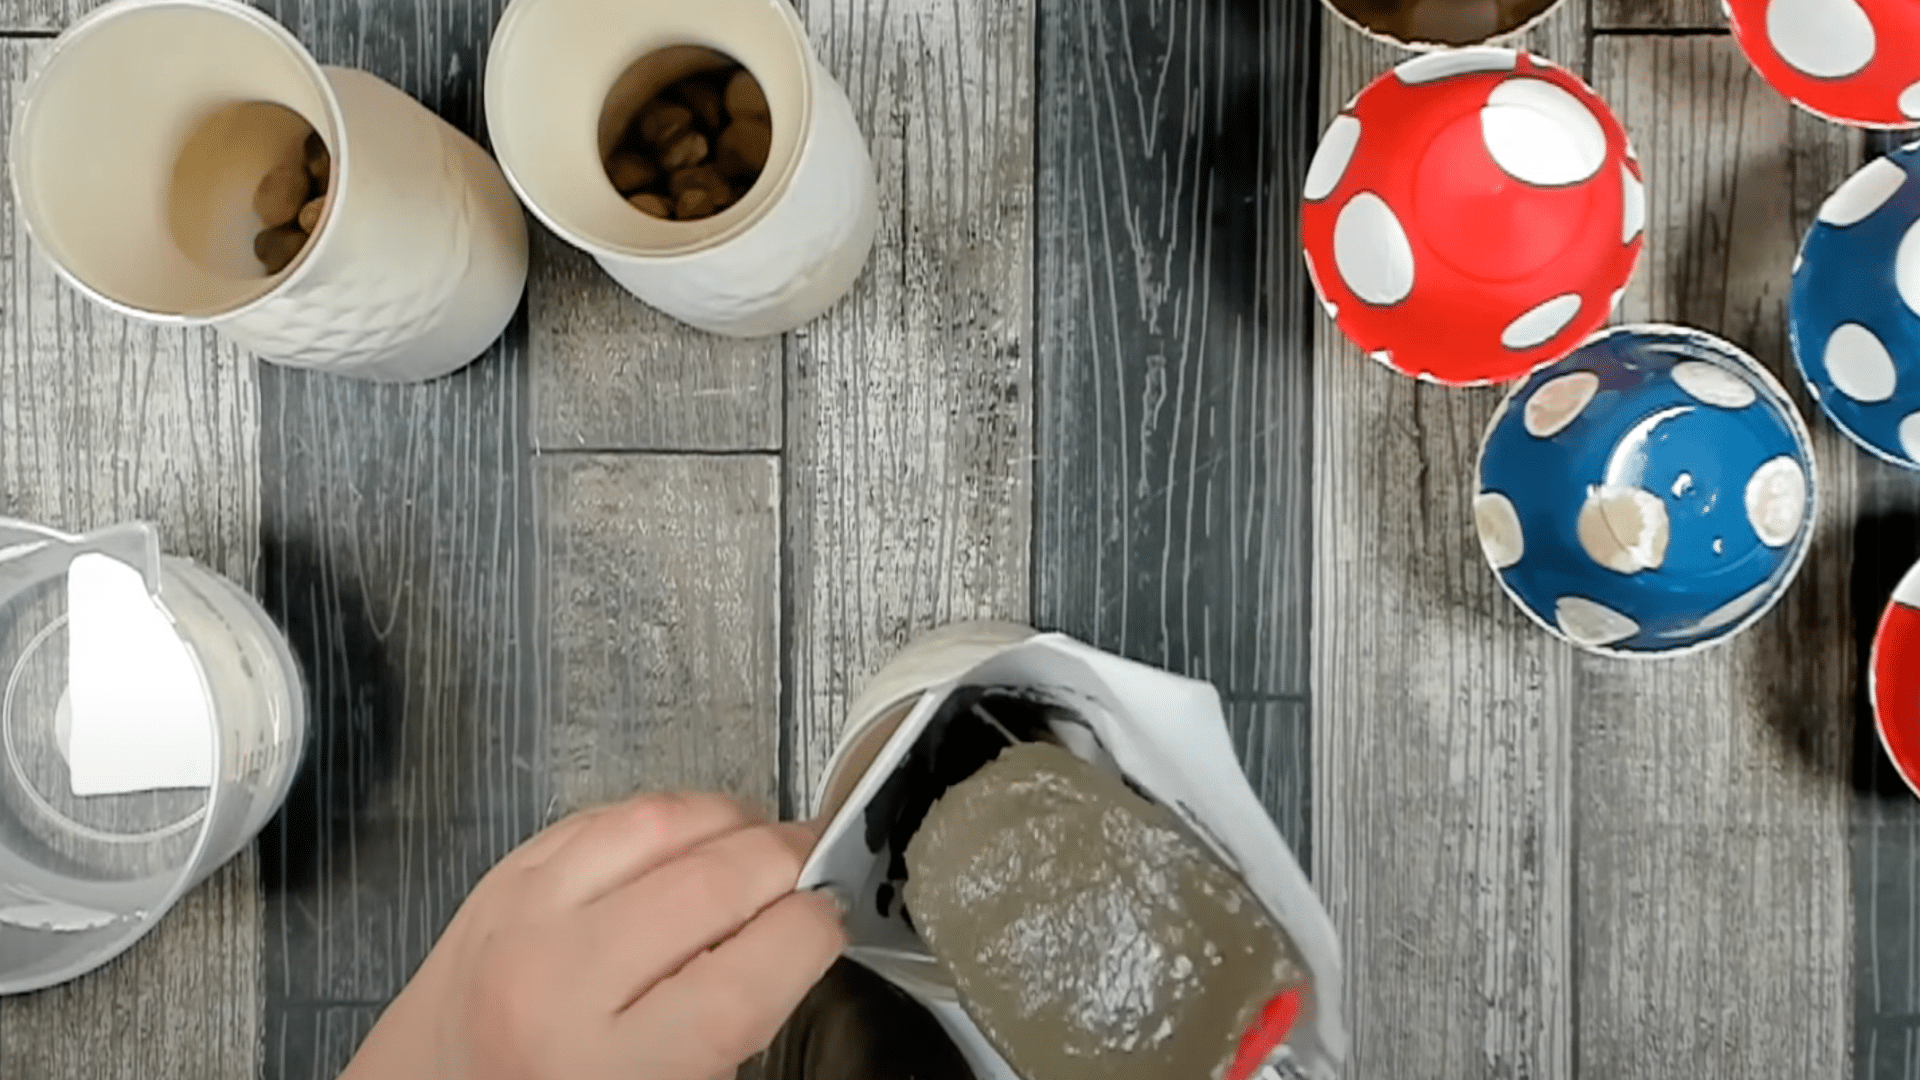
Step 7: Add Weight to Outdoor Mushrooms
For mushrooms that will live outside, add weight so they don’t blow over. Pour small stones into the base of each large stem. Mix some mortar or quick-set cement and carefully add it to the base, covering the rocks.
The cement will hold the stones in place and add even more weight. Let the cement dry fully (at least 30 minutes, but overnight is better) before moving your mushrooms. Finish by spraying outdoor pieces with a clear glaze for added safety from rain and sun.
Video Tutorial
Check out this YouTube video for a detailed step-by-step Tutorial on Diy mushroom decor.
Creating and Caring for Mushroom Decor: Expert Tips
1. Choosing the Right Colors
When picking colors for your mushroom caps, think about where they’ll go. For garden use, reds and browns blend well with plants while adding a pop of color. Blues and purples make your yard feel like a fairytale setting. For indoor use, match your home style.
Soft whites and beiges work in most rooms, while bold reds draw the eye. For a tied-together look, you can even try making a set in the same color family but with slight tone shifts.
2. Sealing for Longevity
Outdoor mushrooms need good sealing to last through rain and sun. Apply at least two coats of clear glaze, letting each dry fully. Make sure to cover all painted areas, not just the tops. For indoor mushrooms, a single clear coat helps with dust and keeps colors bright.
You might skip sealing indoor ones if they won’t be touched much, but a quick spray extends their life by months and keeps them looking fresher longer.
3. Creative Placement Ideas
Your mushroom decor works in more spots than you might think. Try making a fairy ring in your garden by placing several in a circle. Add them to potted plants for instant charm—group three varied heights on a coffee table as art.
Line them up on a windowsill where the sun will make them glow. Place them by your front door to greet guests with a smile. For a magical effect, even try hanging small ones from a thin wire in a child’s room.
4. Size Variations
Don’t limit yourself to just one size. Making mushrooms in various heights adds more visual pull. Try mini ones (under 3 inches) for terrariums and fairy gardens. Medium ones (4-6 inches) work well in most houseplants.
Large ones (over 8 inches) make strong garden focal points. Grouping one large, two medium, and three small mushrooms gives you a full set that works in many spots around your home and yard.
5. Seasonal Updates
Your mushroom decor can change with the seasons. In the fall, add some orange and yellow caps to match autumn leaves. For winter, try white caps with silver spots for a snowy look. Spring calls for bright colors, while summer might mean more natural tones.
You can even paint on small hearts for Valentine’s Day or add green spots for St. Patrick’s Day. This keeps your decor fresh all year round without requiring new pieces each season.
What Not to Do When Making DIY Mushroom Decor
| Common Mistakes | Why to Avoid |
|---|---|
| Skipping the sanding step | Caps will fall off when the glue fails to bond |
| Spraying thick paint coats | Causes drips and an uneven finish |
| Using regular glue | Not strong enough for plastic-to-plastic bonding |
| Forgetting to weigh outdoor pieces | The wind will knock them over |
| Using food containers later for food | Paint chemicals are not food-safe |
| Rinsing mortar down home drains | Will clog pipes and cause damage |
| Rushing drying time | Paint will smudge, and glue won’t set properly |
| Placing indoor mushrooms in direct sunlight | Colors will fade quickly |
Conclusion
Creating your mushroom decor adds a touch of magic to your space at a minimal cost. With just a few hours of work and some dollar-store finds, you’ve created items that look like they came from a fancy shop.
The beauty of this project is that you can change it to fit your needs—make them small for indoor pots or large for garden spots. The steps are simple enough for first-time crafters, yet fun enough that even long-time makers will enjoy the process.
Now your yard or home has sweet fungus friends that will last for years with proper care.
When friends ask where you found such cute decor, you’ll feel good saying, “I made these myself!” So gather your supplies, set aside a little time, and start crafting these charming mushroom pieces that are sure to bring a smile to everyone’s face.
Frequently Asked Questions
1. How Long Do These Mushroom Decorations Last Outdoors?
With proper sealing and placement in partial shade, they can last 1-2 years before needing touch-ups.
2. Can I Use Different Containers than Those Mentioned?
Yes, any plastic or glass containers with suitable shapes will work for this project.
3. Will These Mushrooms Fade in Sunlight?
Sun exposure can dull colors over time, so use UV-resistant spray for outdoor pieces.
4. How Do I Clean My Indoor Mushroom Decor?
Just wipe gently with a damp cloth to remove dust without harming the paint finish.