
Are you looking to make the most of your sunny days?
Summer brings endless opportunities for creativity and outdoor projects that can transform your living space.
Whether you’re a seasoned DIY enthusiast or just starting, these 30 creative summer projects offer something for everyone.
From crafting beautiful garden additions to creating functional outdoor spaces, each project is designed to be enjoyable and rewarding.
I’ve selected these projects to suit different skill levels, time commitments, and budgets.
Some can be completed in an afternoon, while others might become engaging weekend projects for the whole family.
The best part? Many of these projects use materials you might already have or can easily find at local stores.
Let’s explore these exciting summer projects, which will help you create lasting memories while adding beauty and functionality to your space.
Project Ideas to Try This Summer
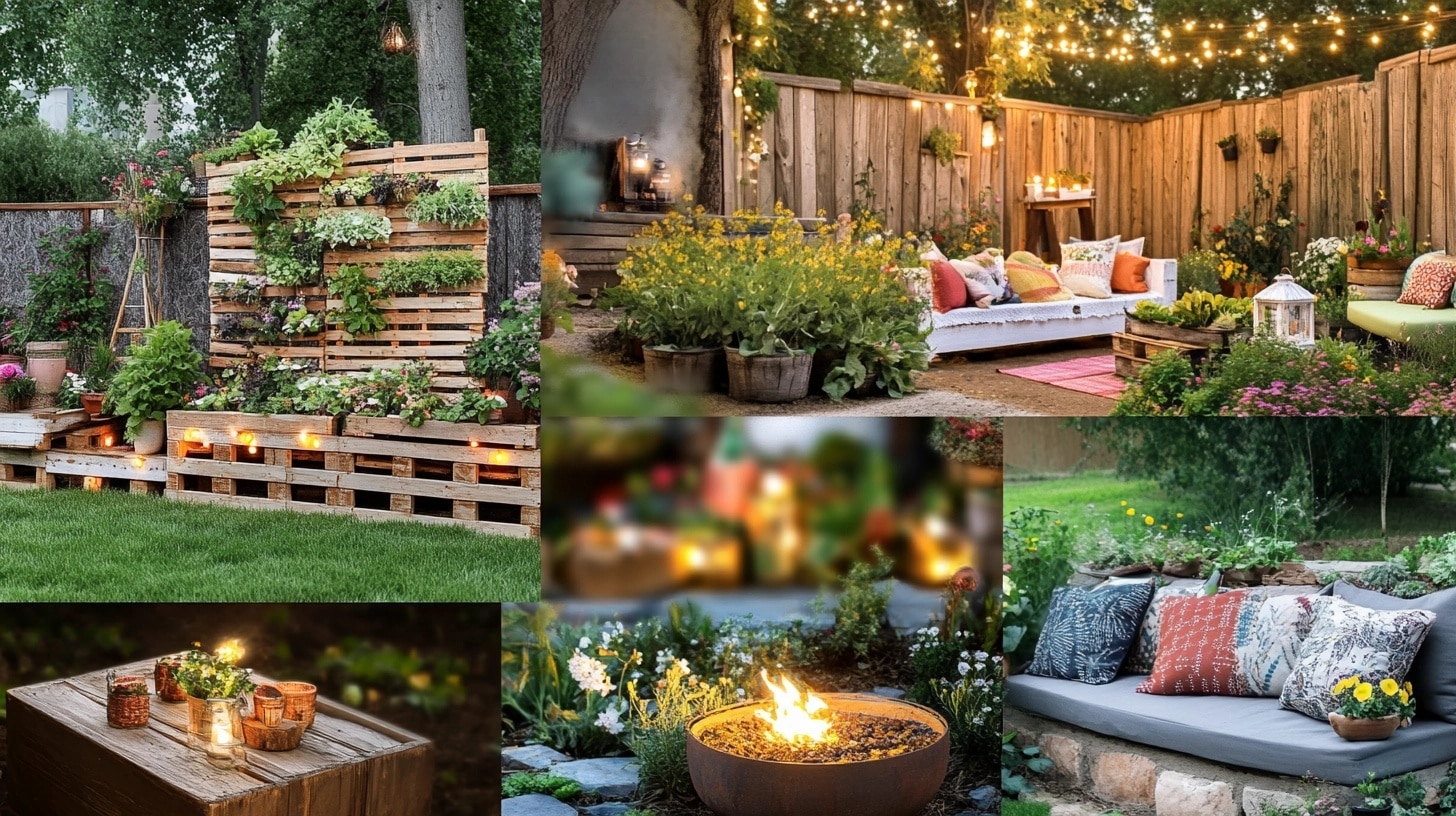
1. DIY Outdoor Planters
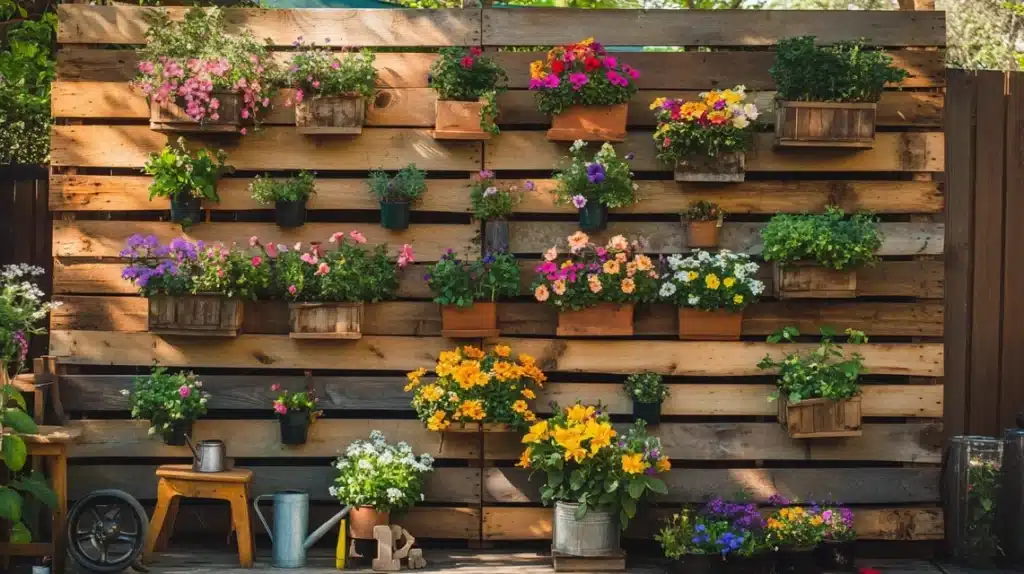
I transformed my outdoor space by creating unique planters from materials I had lying around.
My favorite project was turning old wooden pallets into vertical garden walls that now burst with colorful flowers.
The weathered wood adds a rustic charm to my patio, while the different levels of plants create visual interest.
I added wheels to some larger planters, making rearranging my garden layout easier whenever I wanted.
The best part is that these planters cost almost nothing but gave my outdoor space a complete makeover.
DIY Steps:
- Clean and sand pallets thoroughly to remove splinters and dirt.
- Treat wood with weather-resistant sealant for longevity.
- Install a sturdy backing board for soil retention.
- Add landscape fabric to prevent soil from falling through.
- Create individual planting pockets at different heights.
- Install proper drainage holes in each planting section.
- Add wheels to larger planters for mobility.
- Paint or stain wood for extra protection and style.
- Install an irrigation system for easy watering.
- Add soil moisture meters to monitor plant health.
- Create dividers between different plant sections.
- Install vertical support for climbing plants.
- Add plant labels for the organization.
- Create a maintenance schedule for plant care.
- Install LED lights for the evening ambiance.
2. Backyard Movie Night Setup
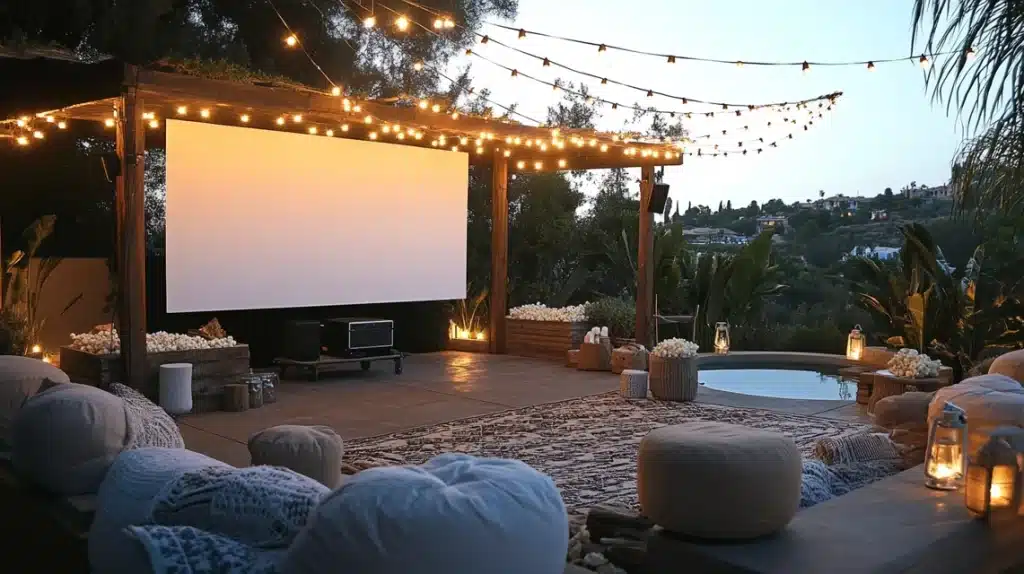
I created a cozy outdoor cinema space that’s perfect for summer nights.
The large white screen hangs between two sturdy poles, making setup and storage simple.
I arranged comfortable seating with weather-resistant cushions and plenty of throw pillows.
String lights overhead create the perfect ambiance when the sun sets.
My projector sits on a portable cart that I can easily move around for the perfect picture angle.
DIY Steps:
- Install two 8-foot posts securely in the ground with a concrete base.
- Create a frame for the screen using PVC pipes or sturdy wood.
- Attach grommets to a white canvas or professional screen material.
- Install a pulley system for easy screen raising and lowering.
- Set up a weatherproof storage box for the projector and equipment.
- Create tiered seating using wooden pallets or outdoor furniture.
- Install proper electrical outlets with weather protection.
- Add string lights around the viewing area for ambient lighting.
- Create a snack station with covered storage.
- Install bug-repellent devices around the seating area.
- Add weatherproof speakers for surround sound.
- Create a storage solution for blankets and cushions.
- Install a small fan system for air circulation.
- Add cup holders to seating arrangements.
- Create a rain cover system for quick protection.
3. Create a Fairy Garden
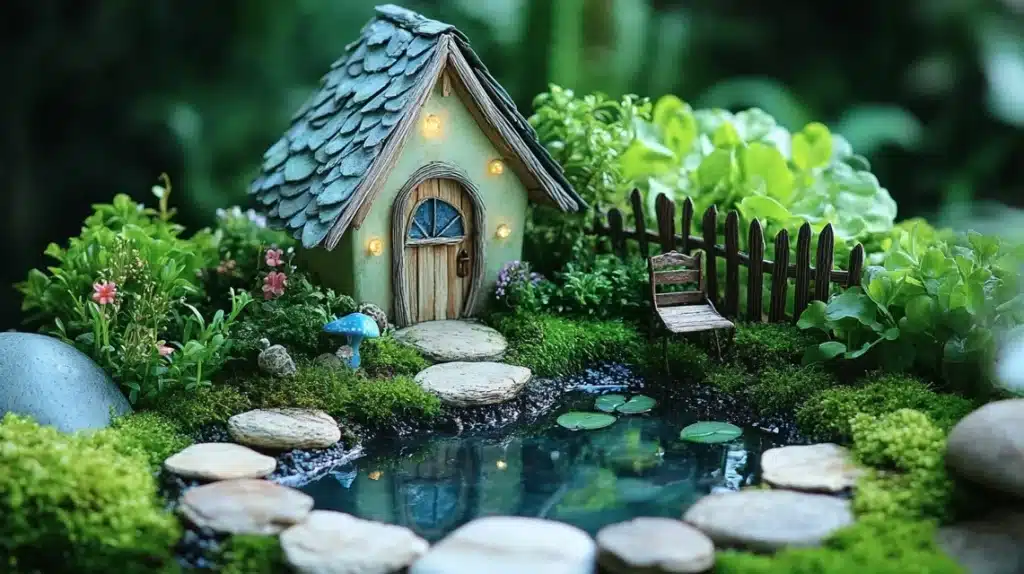
I designed a magical miniature garden that brings whimsy to my outdoor space.
The tiny houses nestle among small plants and moss-covered stones.
Solar-powered fairy lights create an enchanting glow at night.
I added a small water feature using a buried container that creates a perfect fairy pond.
The various levels and hidden pathways make it exciting to discover new details each time you look.
DIY Steps:
- Select a suitable container with proper drainage holes.
- Create different soil levels for visual interest.
- Install tiny pathways using small gravel or crushed shells.
- Add miniature plants ideal for small spaces.
- Create tiny furniture using natural materials.
- Install micro solar lights for evening illumination.
- Build small structures using weatherproof materials.
- Create a water feature using sealed containers.
- Add moss for ground cover between elements.
- Install tiny fencing around the garden.
- Create hidden spots for fairy doors and windows.
- Add small mirrors for depth illusion.
- Install proper drainage system.
- Create seasonal decoration storage.
- Add protective covering for harsh weather.
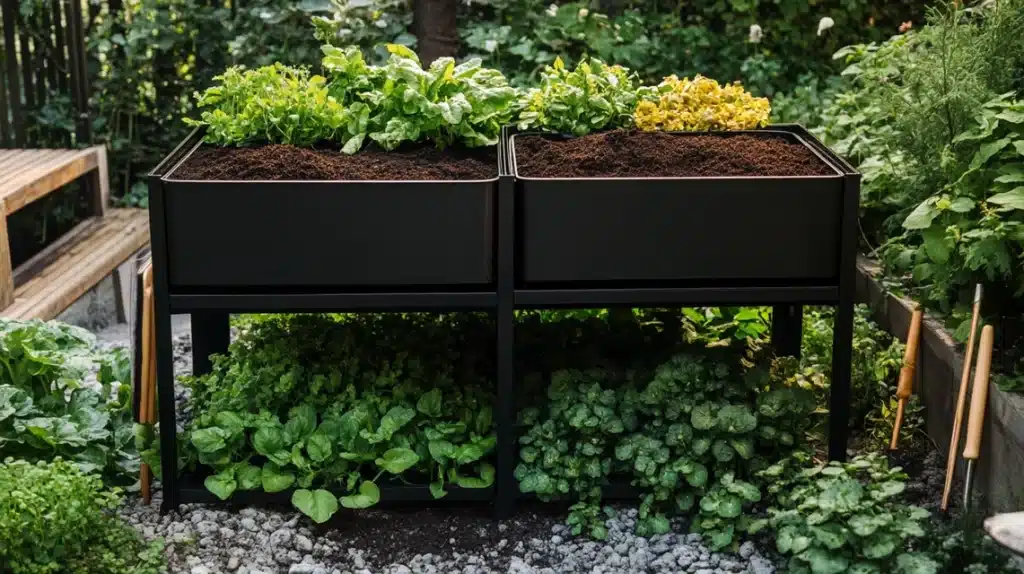
4. Build a Raised Garden Bed
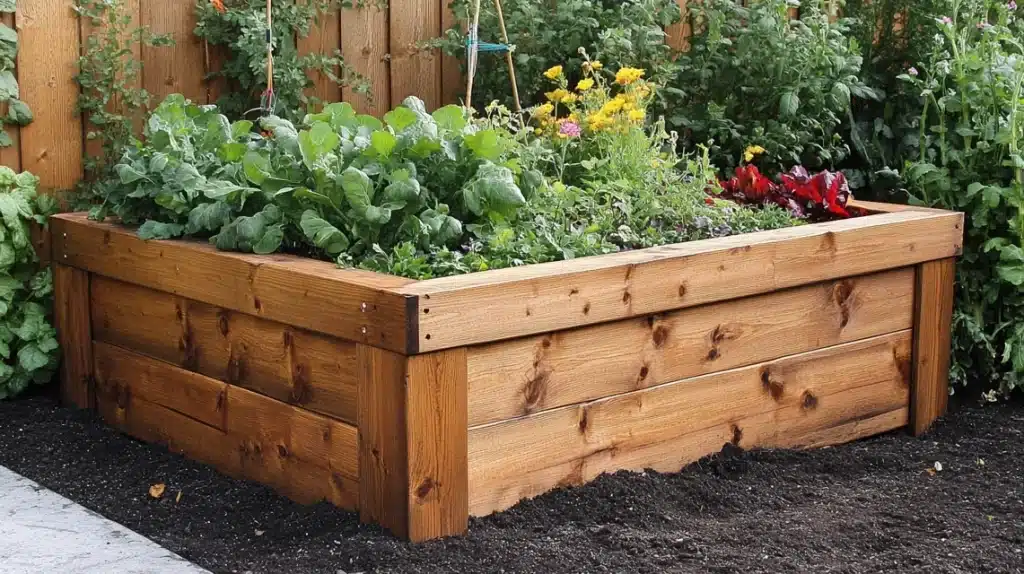
I built a sturdy raised bed perfect for growing my favorite vegetables and herbs.
The height makes it easy to tend to plants without straining my back.
I included a built-in irrigation system that makes watering effortless.
The cedar wood I chose naturally resists decay and looks beautiful in my yard.
The multiple sections let me rotate crops and keep different plants separated.
DIY Steps:
- Choose weather-resistant lumber like cedar or pressure-treated wood.
- Cut boards to size for desired bed dimensions.
- Create corner supports for structural integrity.
- Install landscape fabric at the bottom to prevent weeds.
- Add hardware cloth to protect against burrowing animals.
- Create layers of drainage material and soil mixture.
- Install drip irrigation system with timer.
- Add vertical supports for climbing plants.
- Create paths between multiple beds for access.
- Install soil temperature monitors.
- Add plant markers for the organization.
- Create a compost area nearby for easy access.
- Install a protective netting system.
- Add cold frame attachments for season extension.
- Create a tool storage solution near the beds.
5. Outdoor Pallet Furniture
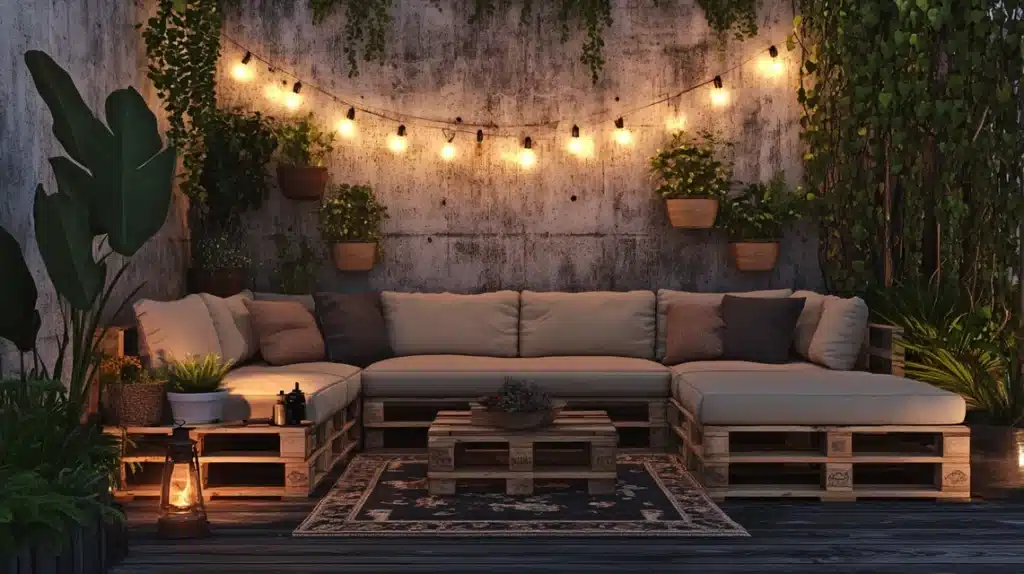
I turned several discarded wooden pallets into a complete outdoor living room set that’s become the highlight of my backyard entertaining space.
The main piece is a comfortable L-shaped sofa with deep cushions that can comfortably seat six people. I added a matching coffee table with a glass top that is perfect for holding drinks and snacks.
The entire set is mounted on heavy-duty wheels, making it easy to move when I need to clean the patio or follow the shade throughout the day.
The natural wood grain shows through the weatherproof stain, adding character to each piece.
DIY Steps:
- Source clean, chemical-free pallets for furniture construction.
- Disassemble pallets carefully to preserve wood quality.
- Sand all wood surfaces thoroughly to prevent splinters.
- Apply wood preservatives to protect against weather damage.
- Create a sturdy base frame for weight distribution.
- Install heavy-duty wheels with locking mechanisms.
- Add extra support beams for seating stability.
- Create storage compartments under seating areas.
- Install weather-resistant cushion attachments.
- Add armrests with built-in cup holders.
- Create a modular design for flexible arrangements.
- Install proper drainage holes in seat bases.
- Add protective feet for non-wheeled sections.
- Create matching side tables with storage.
- Install solar-powered accent lighting in furniture details.
6. DIY Birdhouse or Feeder
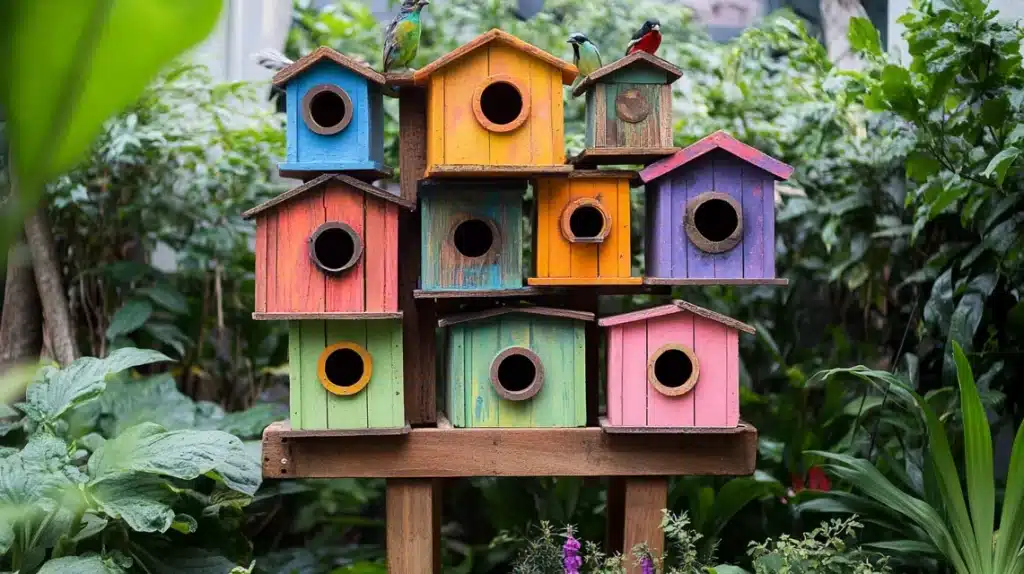
I crafted a multi-level birdhouse complex that has attracted an amazing variety of local birds to my backyard.
The main structure features three different-sized entry holes to accommodate different bird species, while the feeding stations are designed to keep squirrels out.
I included small perches and landing areas near each entrance, and the sloped roof ensures proper drainage during rainstorms.
The weatherproof paint I chose complements my garden colors while protecting the wood from the elements.
DIY Steps:
- Select weather-resistant cedar or pine boards for construction.
- Cut wood pieces according to specific bird species requirements.
- Create proper ventilation holes for air circulation.
- Install drainage holes in the base for water runoff.
- Add a removable bottom panel for easy cleaning.
- Install predator guards around entrance holes.
- Create an overhanging roof for weather protection.
- Add perches at appropriate distances from entrances.
- Install squirrel baffles for feeder protection.
- Create multiple feeding stations at different heights.
- Add clear panels for monitoring bird activity.
- Install proper mounting brackets for stability.
- Create seed storage compartments in feeders.
- Add water collection system for bird bath.
- Install maintenance access panels for easy repairs.
7. Handmade Wind Chimes
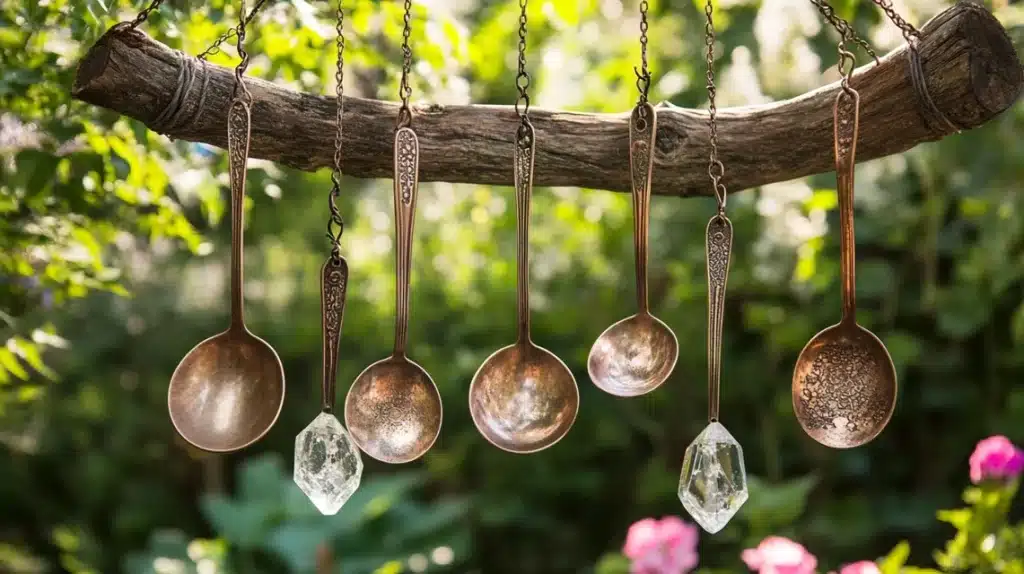
I created a series of musical wind chimes using a collection of vintage silver spoons and copper pipes that create beautiful melodies in the breeze.
The centerpiece is a piece of weathered driftwood that I found on the beach, carefully drilled and arranged to hold each chime at the perfect length for optimal sound.
I added small crystal beads between each chime that caught the sunlight and created sparkles throughout the day.
The entire piece moves gently in the wind, creating a peaceful atmosphere in my garden.
DIY Steps:
- Select materials with different tonal qualities for varied sounds.
- Test each piece for musical pitch before assembly.
- Create precise measurements for proper sound spacing.
- Drill holes carefully to maintain material integrity.
- Install a sturdy hanging system with appropriate support.
- Add weather-resistant coating to prevent tarnishing.
- Create decorative elements that won’t affect sound.
- Install wind catches at appropriate angles.
- Add reinforcement to hanging points.
- Create a backup support system for heavy winds.
- Install sound dampeners for stormy weather.
- Add decorative beads or crystals for visual interest.
- Create proper spacing between elements.
- Install an easy-removal system for maintenance.
- Add protective coating for UV resistance.
8. Personalized Beach Totes

I designed a collection of unique beach bags that combine style with practical features for summer adventures.
The main bag features hand-painted tropical motifs and insulated compartments for chilly drinks.
I also added waterproof pockets for wet swimsuits and reinforced the bottom with water-resistant material.
The shoulder straps are padded for comfort, and I included a matching smaller bag for valuable items.
Each bag has a built-in key holder and multiple organizing pockets.
DIY Steps:
- Select durable canvas material with a tight weave.
- Create pattern pieces for the desired bag size and style.
- Reinforce all stress points with extra stitching.
- Install waterproof lining for wet item storage.
- Create multiple internal compartments for the organization.
- Add an insulated section for temperature control.
- Install heavy-duty zippers with pull tabs.
- Create a reinforced bottom with protective feet.
- Add comfortable shoulder strap padding.
- Install key clips and safety pockets.
- Create water bottle holders on the sides.
- Add reflective strips for evening visibility.
- Install sand-release mesh bottom panel.
- Create matching accessory pouches.
- Add personalized identification tags.
9. Outdoor Fire Pit
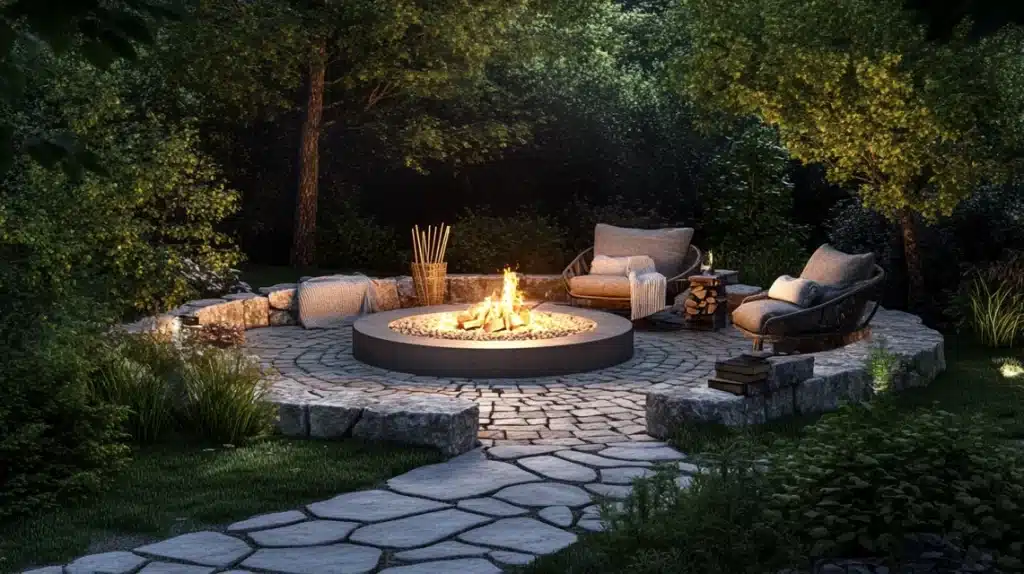
I built a custom fire pit that became the focal point of my backyard gatherings.
The circular design features natural stone blocks arranged in a perfect circle, creating a rustic yet refined look.
Each stone was carefully selected and placed to ensure stability and proper airflow.
I added a wide ledge around the top that was perfect for setting drinks or roasting supplies.
The base includes a drainage system to prevent water accumulation, while the surrounding paver patio provides a safe, level surface for seating.
DIY Steps:
- Mark out the perfect circle using spray paint and string.
- Dig the foundation to the proper depth for stability.
- Install gravel base for the drainage system.
- Layer fire-rated bricks for the inner wall.
- Add concrete blocks for the outer structure.
- Install a metal ring for heat protection.
- Create drainage channels beneath the structure.
- Add ventilation holes at the base level.
- Install capstones for the seating ledge.
- Create a spark screen for safety.
- Add lighting around the perimeter.
- Install a fireproof barrier beneath.
- Create a wood storage area nearby.
- Add safety equipment storage box.
- Install a protective cover for wet weather.
10. Build a Tree Swing

I created a sturdy tree swing that’s brought endless joy to my backyard.
The wide wooden seat is made from polished cedar planks that comfortably fit two people.
The rope system includes double braids for extra security and special knots that prevent fraying.
I added cushioned rope covers where the lines touch the tree branch to protect the tree and the rope.
The height is perfect for gentle swaying or more adventurous swinging, depending on your mood.
DIY Steps:
- Select the appropriate tree branch for strength and height.
- Test branch weight capacity thoroughly.
- Choose marine-grade rope for weather resistance.
- Create comfortable seat dimensions.
- Install proper rope protection at contact points.
- Add stabilizing cross supports under the seat.
- Create a safety backup support system.
- Install height adjustment mechanism.
- Add a non-slip surface to the seating area.
- Create a rope maintenance schedule.
- Install motion control system.
- Add cushioned rope covers.
- Create a storage solution for wet weather.
- Install safety signs and instructions.
- Add decorative elements that don’t compromise safety.
11. Design a Vertical Herb Garden
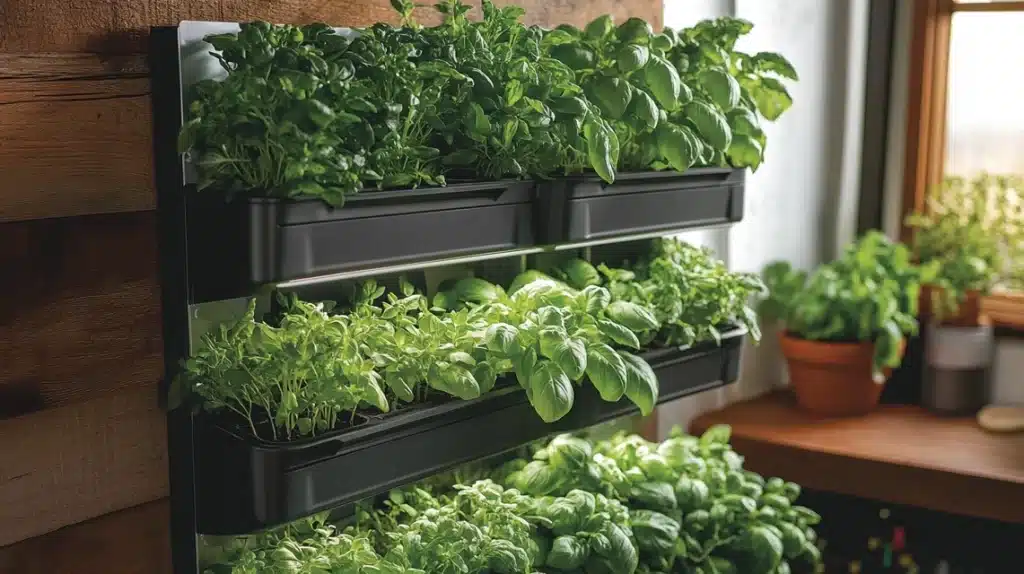
I transformed my blank wall into a living tapestry of herbs and edible plants.
Each tier features different herbs arranged by sunlight needs and growing patterns.
The automatic watering system ensures each plant gets the perfect amount of moisture.
I included small LED grow lights for darker corners, extending the growing season.
The modular design allows me to swap out plants or rearrange sections as needed easily.
DIY Steps:
- Create a sturdy wall mounting system.
- Install proper waterproofing behind the structure.
- Build individual planting pockets with drainage.
- Install automatic irrigation system.
- Add grow lights for each section.
- Create soil depth variations for different plants.
- Install moisture monitors for each zone.
- Add plant identification system.
- Create maintenance access points.
- Install proper ventilation between layers.
- Add fertilizer delivery system.
- Create a seasonal rotation plan.
- Install temperature monitoring system.
- Add pest protection screens.
- Create a harvest collection system.
12. Paint Terracotta Pots
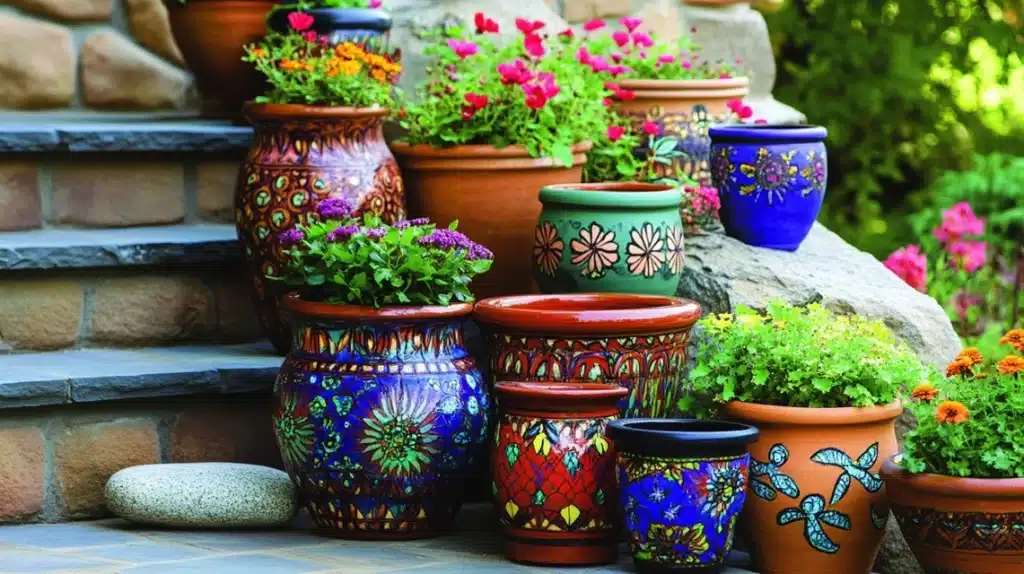
I transformed plain terracotta pots into vibrant works of art for my garden display.
Each pot features a unique pattern inspired by different cultural designs worldwide.
The weather-resistant paints ensure the designs stay bright through all seasons.
I created a special drainage system in each pot using decorative rocks that complemented the designs.
The various sizes create an eye-catching display when grouped on my patio steps.
DIY Steps:
- Clean pots thoroughly with vinegar solution.
- Apply proper sealant base coat.
- Create design templates for consistent patterns.
- Apply weather-resistant primer.
- Paint base colors in sections.
- Add detailed design elements.
- Create adequate drainage holes.
- Install self-watering systems.
- Add a protective clear coat finish.
- Create matching saucers for each pot.
- Install plant support systems.
- Add moisture control layers.
- Create seasonal decoration options.
- Install pot feet for air circulation.
- Add identification tags for plants.
13. Make a Summer Photo Book
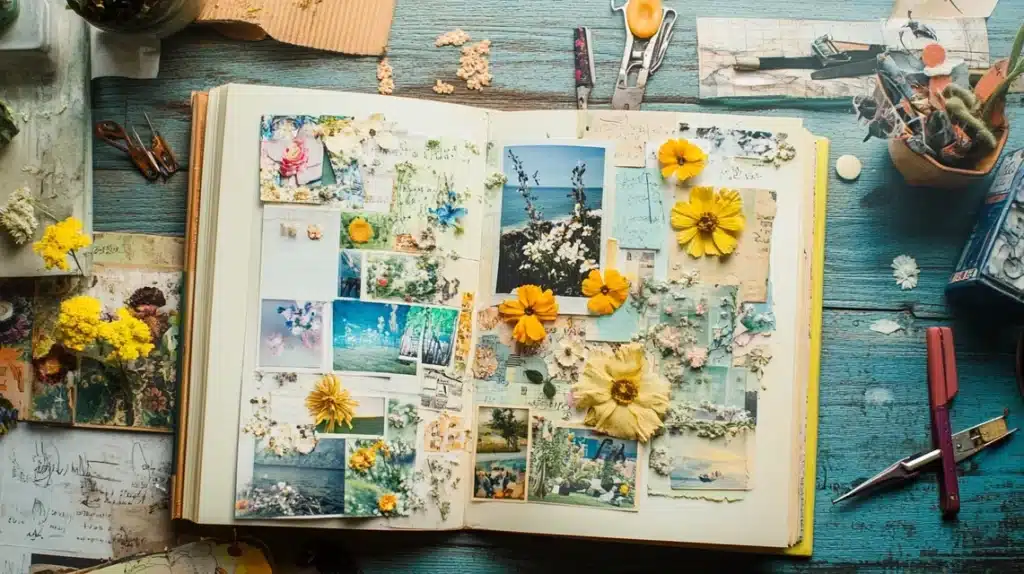
I designed a personalized photo album that captures all my favorite summer memories.
Each page features a unique layout with photos arranged to tell different stories from my adventures.
The handmade paper covers are decorated with pressed flowers from my garden.
I included special pockets for storing ticket stubs and small mementos from each trip.
The binding allows me to add new pages as more memories are made throughout the season.
DIY Steps:
- Select acid-free paper for photo preservation.
- Create template layouts for each page.
- Install photo mounting corners for flexibility.
- Add protective sleeve layers between pages.
- Create decorative dividers for different events.
- Install an expandable binding system.
- Add memory card pockets throughout.
- Create caption areas under photos.
- Install date marking system.
- Add protective cover coating.
- Create storage pouches for memorabilia.
- Install page reinforcement strips.
- Add decorative corner protectors.
- Create an index system for easy reference.
- Install a closure system to protect contents.
14. Build a DIY Water Fountain
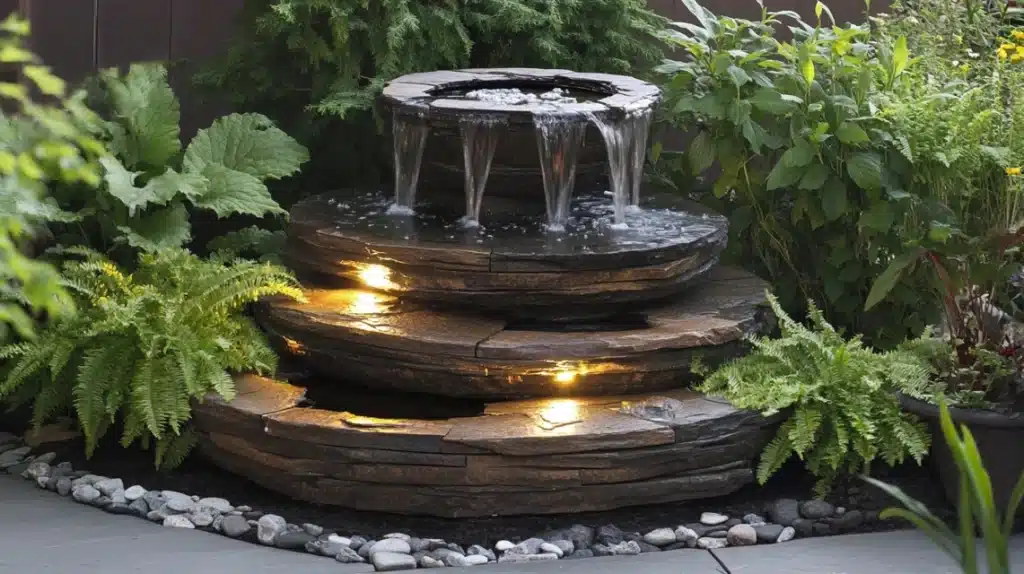
I constructed a serene water fountain using natural stone and copper elements.
The three-tiered design creates a gentle cascading effect that produces a soothing sound.
Solar-powered pumps keep the water flowing without increasing energy costs.
I added special lighting that creates beautiful water reflections at night.
The base includes a hidden reservoir that minimizes water loss through evaporation.
DIY Steps:
- Create a stable foundation with proper leveling.
- Install waterproof basin liner correctly.
- Add a submersible pump with a filter system.
- Create water flow patterns with rocks.
- Install LED lighting around the edges.
- Add a water level monitoring system.
- Create an easy-access pump maintenance panel.
- Install proper electrical connections.
- Add a water treatment system.
- Create an overflow drainage system.
- Install winter protection components.
- Add decorative stone arrangements.
- Create cleaning access points.
- Install automatic refill system.
- Add protective grating for safety.
15. Outdoor Lighting with Mason Jars
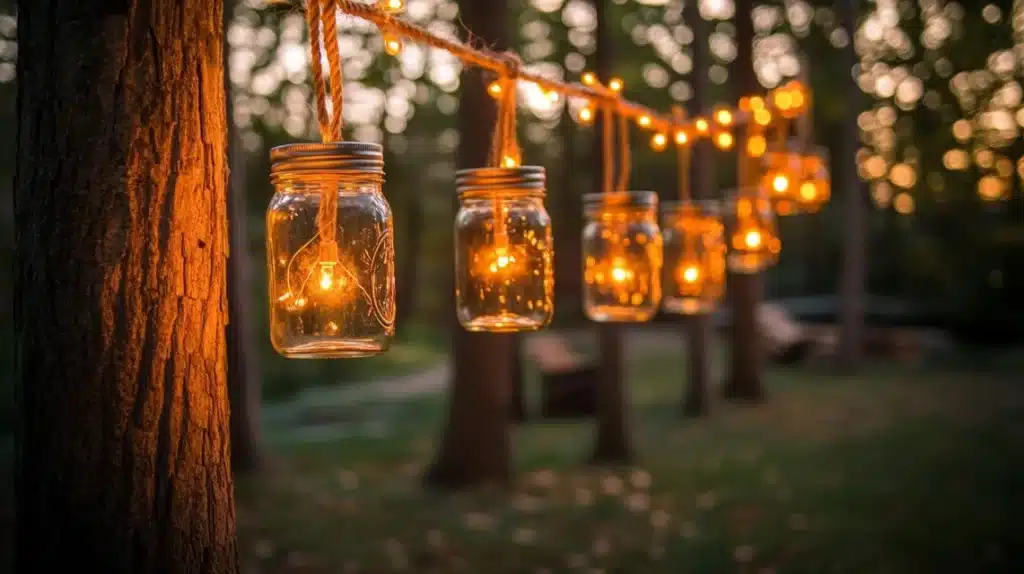
I created a magical lighting system using vintage mason jars suspended at different heights.
Each jar contains a unique arrangement of battery-operated fairy lights that create a warm glow.
The hanging system uses sturdy marine-grade rope that withstands all weather conditions.
I added special weather-proof seals to keep moisture out of the jars.
The arrangement creates beautiful light patterns on the ground below.
DIY Steps:
- Select various sizes of mason jars.
- Create weather-proof seals for each jar.
- Install hanging hardware in jar lids.
- Add drainage holes for condensation.
- Create a power supply system for lights.
- Install timer controls for automation.
- Add decorative elements inside jars.
- Create a proper spacing template.
- Install support cable system.
- Add backup safety cables.
- Create easy access for battery changes.
- Install motion sensor options.
- Add protective covers for storms.
- Create a storage system for winter.
- Install light diffusers for a softer glow.
16. Paint an Outdoor Mural
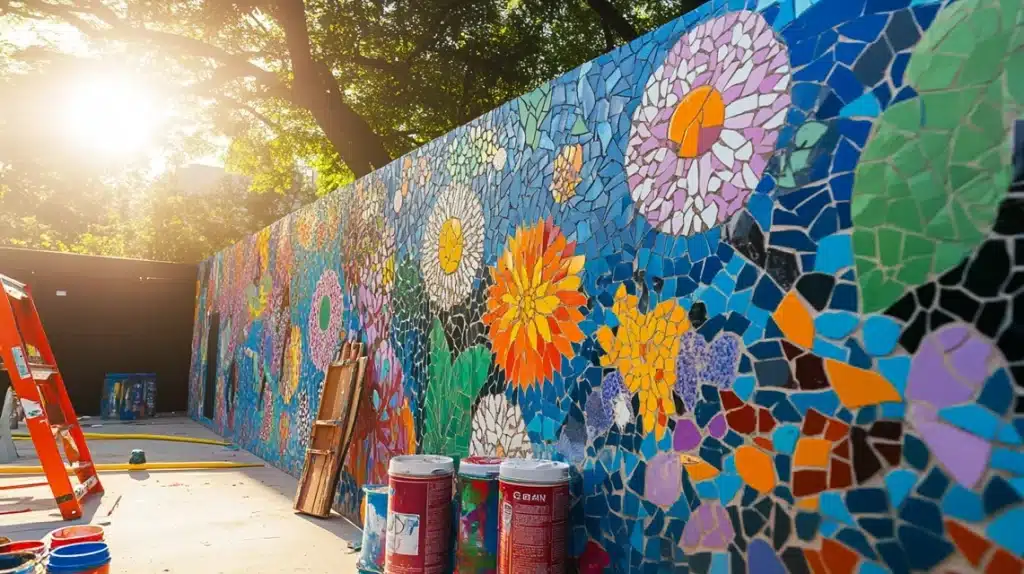
I transformed my plain garden wall into a stunning piece of outdoor art.
The design incorporates local flora and fauna, creating a scene that complements my garden.
I used special exterior paints that resist fading and weathering over time.
The colors change subtly throughout the day as the sun moves across the sky.
Small mosaic elements add sparkle and texture to key areas of the design.
DIY Steps:
- Prepare the wall surface with proper cleaning.
- Apply weather-resistant primer coat.
- Create a full-size design template.
- Transfer the design to the wall carefully.
- Apply base colors in sections.
- Add detail layers progressively.
- Install protective coating layers.
- Create a maintenance schedule.
- Add mosaic elements securely.
- Install proper drainage around the base.
- Create a color touch-up kit.
- Add lighting to highlight artwork.
- Install anti-graffiti coating.
- Create a seasonal cleaning routine.
- Add informational plaque about the artwork.
17. Design a Kids’ Obstacle Course
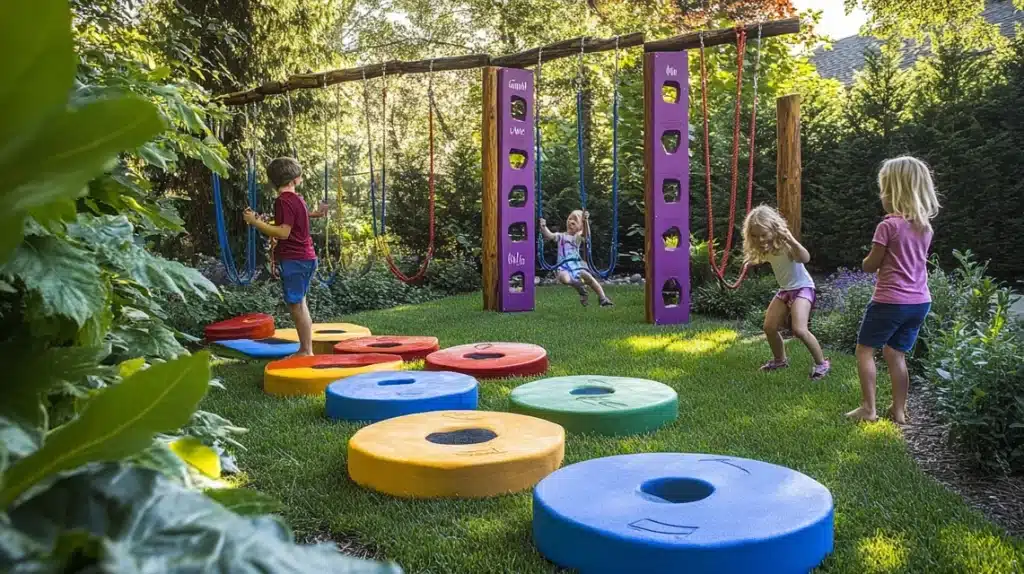
I built an exciting backyard obstacle course that keeps children active and entertained.
The course includes balance beams made from weather-treated lumber at different heights.
I created climbing walls with various difficulty levels using colorful climbing holds.
The rope swing section lands safely in a cushioned area filled with rubber mulch.
Each station has clear instructions and safety guidelines painted in bright colors.
DIY Steps:
- Create a detailed safety-first course layout.
- Install proper ground padding throughout.
- Build weather-resistant equipment frames.
- Add non-slip surfaces to all elements.
- Install safety netting where needed.
- Create clear directional markers.
- Add difficulty level indicators.
- Install proper drainage under equipment.
- Create maintenance inspection points.
- Add shade structures for sun protection.
- Install emergency stop points.
- Create parent supervision stations.
- Add equipment cleaning system.
- Install safety signage at each station.
- Create storage for removable elements.
18. Build a Backyard Greenhouse
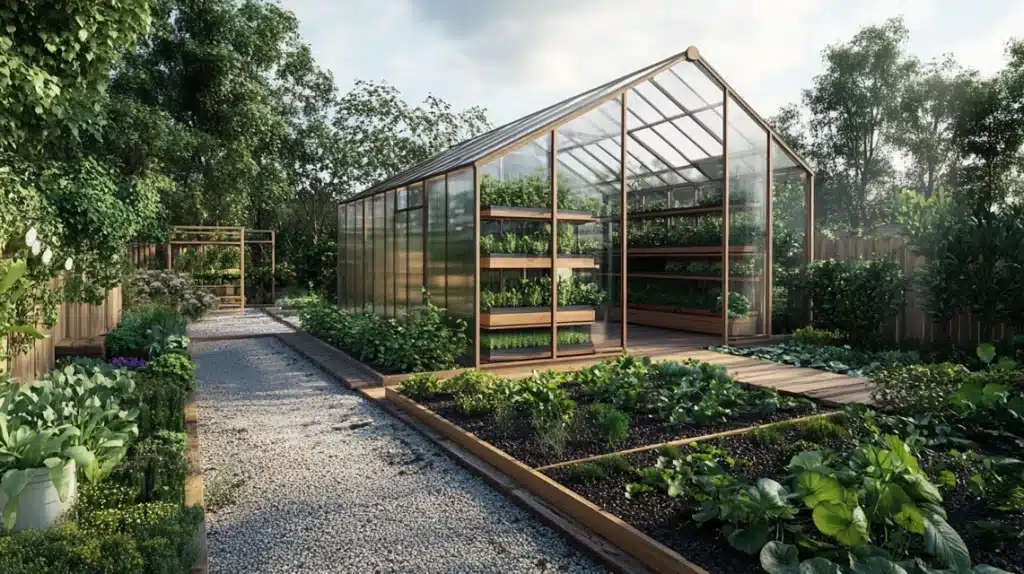
I constructed a compact greenhouse that extends my growing season year-round.
The polycarbonate panels allow perfect light transmission while maintaining heat efficiency.
I installed an automated ventilation system that maintains ideal growing conditions.
The shelving system maximizes vertical space while providing proper air circulation.
A rainwater collection system provides sustainable irrigation for all my plants.
DIY Steps:
- Create a stable foundation with proper drainage.
- Install frame with precise angle calculations.
- Add polycarbonate panels with UV protection.
- Create a ventilation system with automatic controls.
- Install temperature monitoring system.
- Add an irrigation system with timers.
- Create multiple growing zones.
- Install proper electrical connections.
- Add a humidity control system.
- Create a storage area for supplies.
- Install shade cloth system for summer.
- Add a heating system for winter use.
- Create pest prevention barriers.
- Install proper lighting system.
- Add a workbench for potting.
19. DIY Summer Wreath
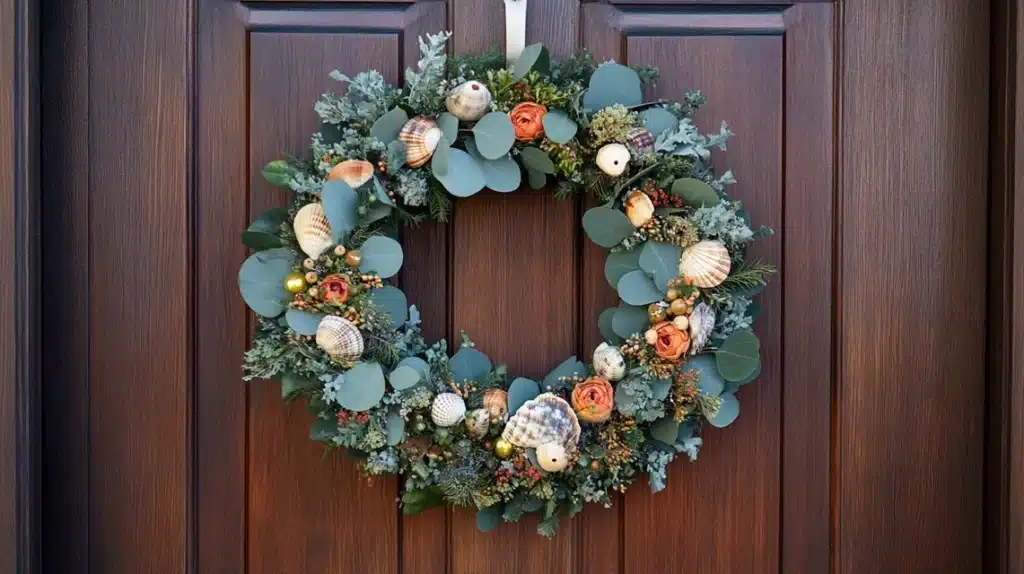
I created a stunning door wreath that captures the essence of summer using preserved materials.
The base features a mix of dried hydrangeas and eucalyptus that maintain their color all season.
I wove in authentic seashells collected from beach trips, adding coastal charm.
Small solar-powered lights are hidden among the foliage for evening ambiance.
The weather-resistant bow changes with different summer holidays.
DIY Steps:
- Select a sturdy grapevine wreath base.
- Create proper attachment points for decorations.
- Add preserved floral elements securely.
- Install weather protection coating.
- Create seasonal accent sections.
- Add appropriate hanging hardware.
- Install a small lighting system.
- Create a protective storage bag.
- Add scent diffuser packets.
- Install humidity indicators.
- Create replacement part inventory.
- Add protective door backing.
- Install a wind security system.
- Create seasonal accent pieces.
- Add UV protection spray.
20. Build a Treehouse
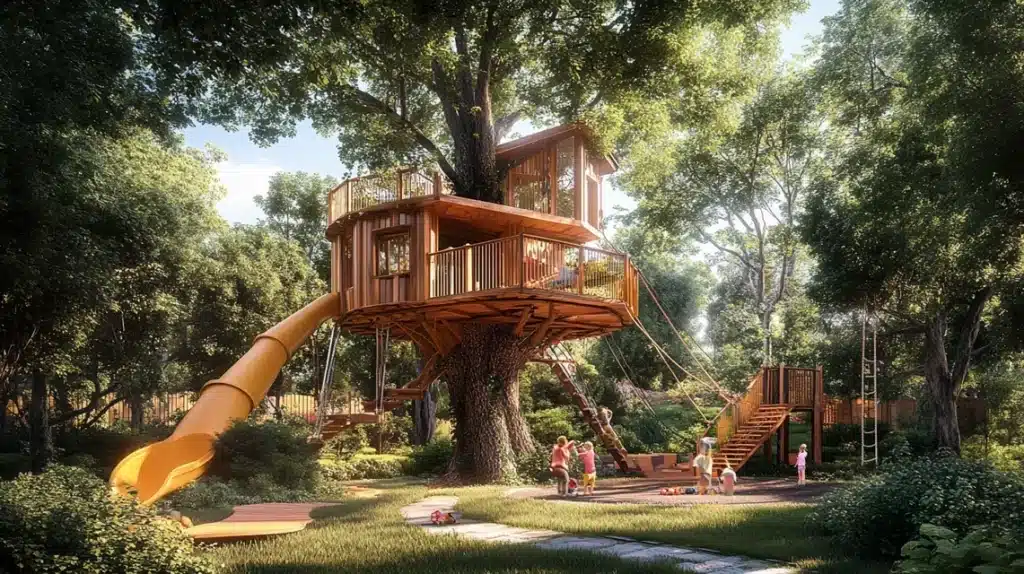
I designed a magical treehouse as a children’s playground and an adult retreat.
The multi-level structure includes a covered main room and an open observation deck.
I installed safety railings with extra security features for peace of mind.
The rope ladder can be pulled up for privacy, while a pulley system helps transport supplies.
Special brackets allow the tree to grow without damaging the structure.
DIY Steps:
- Conduct professional tree health assessment.
- Create a detailed structural support plan.
- Install specialized tree attachment bolts.
- Add proper waterproofing throughout.
- Create multiple access points.
- Install safety railings at all levels.
- Add a proper lighting system.
- Create ventilation points.
- Install a weather monitoring station.
- Add an emergency escape route.
- Create a supply pulley system.
- Install proper insulation.
- Add security features.
- Create a maintenance schedule.
- Install a lightning protection system.
21. Tie-Dye Shirts
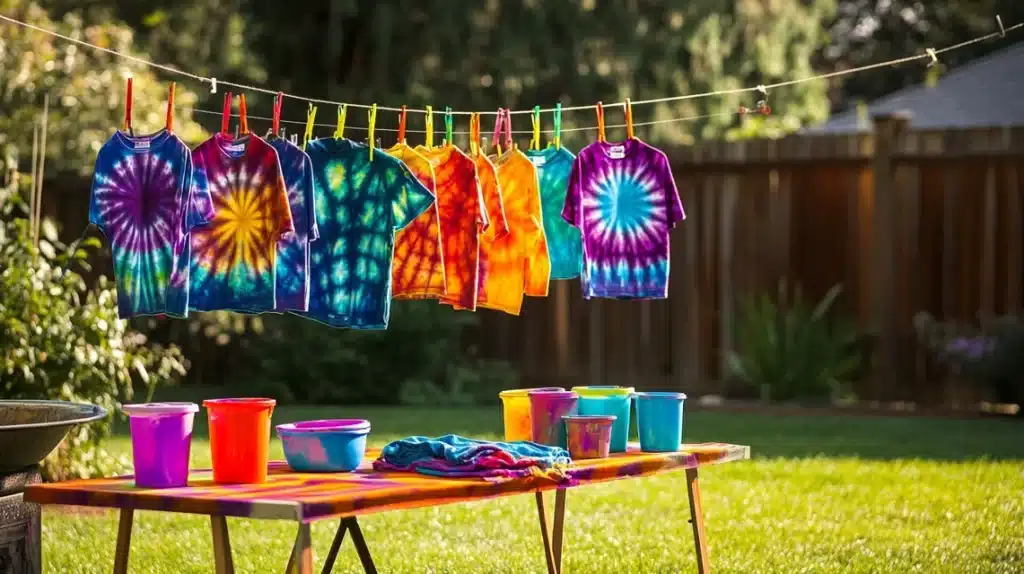
I transformed plain white clothing into vibrant works of art using professional-grade dyes.
Each piece features unique patterns created through careful folding and binding techniques.
The color combinations were carefully selected to maintain vibrancy even after multiple washes.
I created a dedicated dyeing station in my backyard containing splashes or spills.
The finished pieces include everything from t-shirts to beach cover-ups and pillowcases.
DIY Steps:
- Pre-wash all fabrics to remove manufacturing chemicals.
- Create a soda ash soaking solution for better dye absorption.
- Prepare dye mixtures in separate containers.
- Set up a protected work area with proper drainage.
- Create folding templates for consistent patterns.
- Install rubber band organization system.
- Add proper ventilation for the dye area.
- Create a drying station with adequate airflow.
- Install color testing station.
- Add measurement system for dye mixtures.
- Create a rinse station with adequate drainage.
- Install heat setting equipment.
- Add pattern documentation system.
- Create storage for finished items.
- Install safety equipment station.
22. Make Your Ice Cream
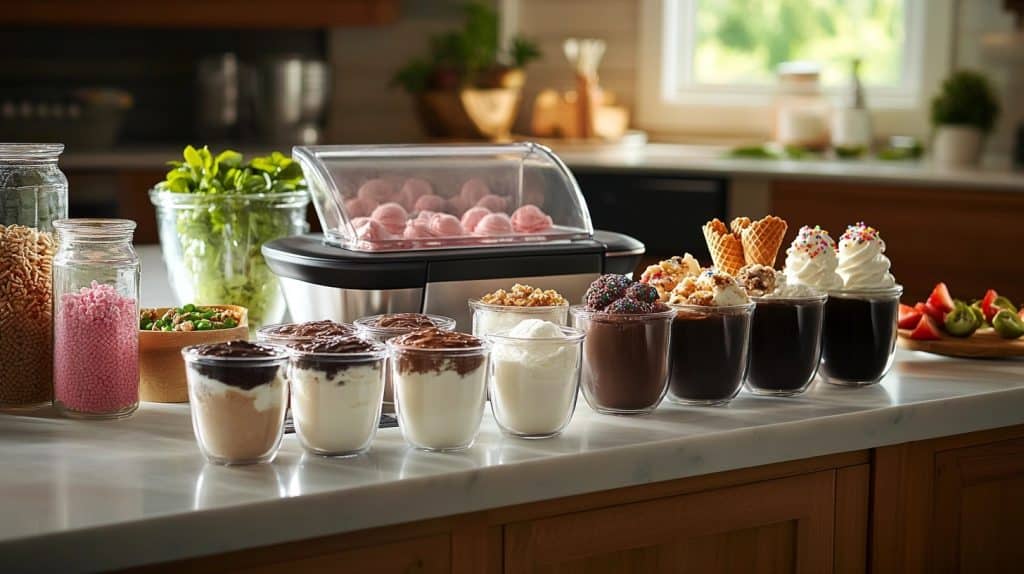
I set up a complete ice cream-making station in my kitchen with all-natural ingredients.
The base recipes use my garden’s organic cream and fresh fruits for authentic flavors.
I created a special cooling system that helps the ice cream achieve the perfect consistency.
The mix-in station includes homemade toppings and sauces stored in glass jars.
Each batch is stored in special freezer containers that prevent ice crystals from forming.
DIY Steps:
- Create a sanitary prep station for ingredients.
- Install temperature monitoring system.
- Add ingredient measurement station.
- Create flavor combination charts.
- Install a proper freezer storage system.
- Add tasting station setup.
- Create a recipe documentation system.
- Install cleaning station for equipment.
- Add ingredient storage organization.
- Create temperature control logs.
- Install mix-in preparation area.
- Add serving size guides.
- Create a packaging station.
- Install quality control checkpoints.
- Add photography setup for documentation.
23. Outdoor Games Station
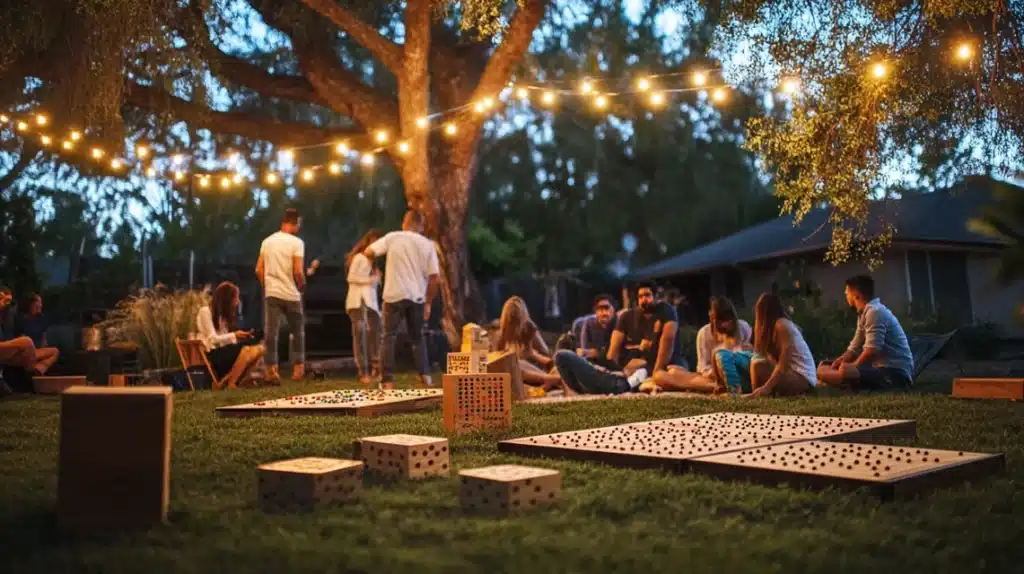
I built a dedicated gaming area that houses multiple yard games for entertainment.
The cornhole boards feature interchangeable tops for different games and skill levels.
I created a giant Jenga set using treated lumber to withstand outdoor conditions.
The storage solution keeps all game pieces organized and protected from weather.
LED lighting around the gaming area extends play time into the evening hours.
DIY Steps:
- Build a weather-resistant game storage unit.
- Create level playing surfaces for each game.
- Install proper lighting for evening play.
- Add a score-keeping station.
- Create equipment maintenance schedule.
- Install player safety guidelines.
- Add weather protection covers.
- Create game rule displays.
- Install proper drainage system.
- Add spectator seating areas.
- Create equipment check-out system.
- Install shade structures.
- Add a cleaning station.
- Create tournament bracket boards.
- Install a first aid station.
24. DIY Hammock
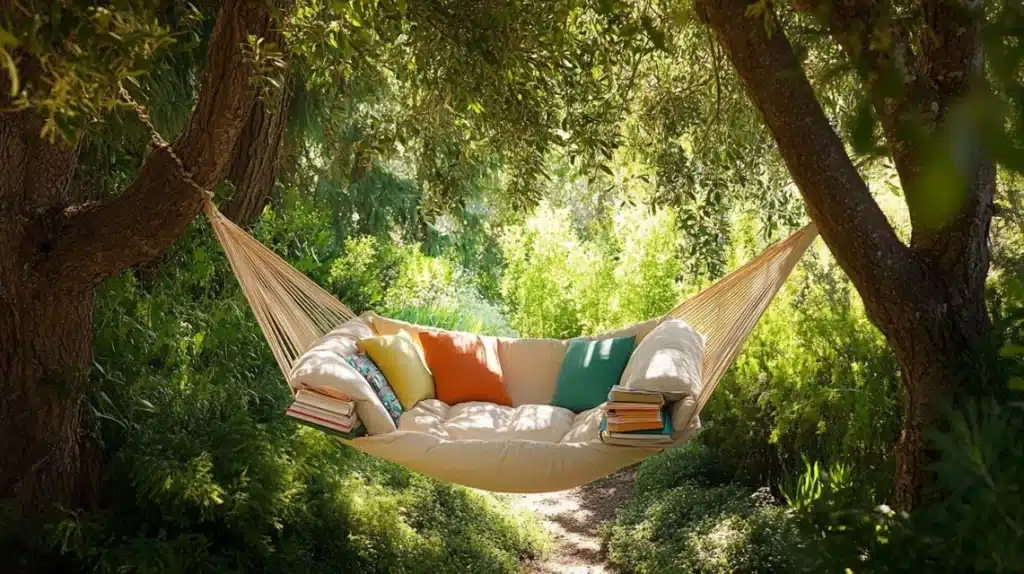
I crafted a comfortable hammock using high-quality, weather-resistant materials.
The design features a double-layered fabric for extra durability and comfort.
I created a unique spreader bar system that prevents the hammock from tipping.
The hanging system includes safety backup chains for peace of mind.
A built-in storage pocket holds books and refreshments within easy reach.
DIY Steps:
- Select marine-grade rope and weather-resistant fabric.
- Create a proper knot system for support.
- Install heavy-duty mounting points.
- Add stability control features.
- Create a quick-release system.
- Install weight distribution supports.
- Add protective covers for storage.
- Create a maintenance check schedule.
- Install a safety testing system.
- Add comfort padding layers.
- Create a storage solution for accessories.
- Install weather monitoring alerts.
- Add decorative elements.
- Create an emergency release mechanism.
- Install a side pocket storage system.
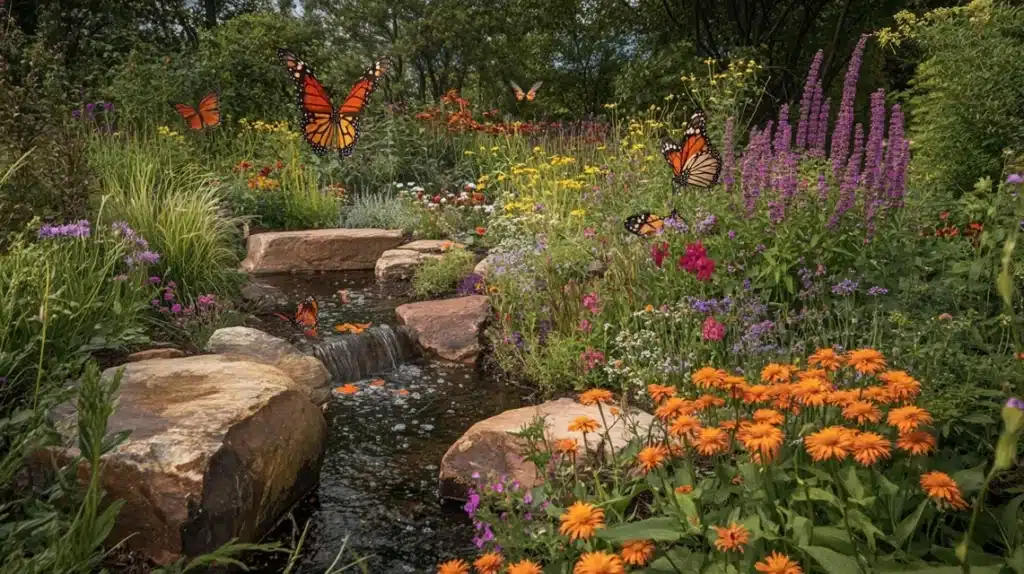
25. Install a Butterfly Garden
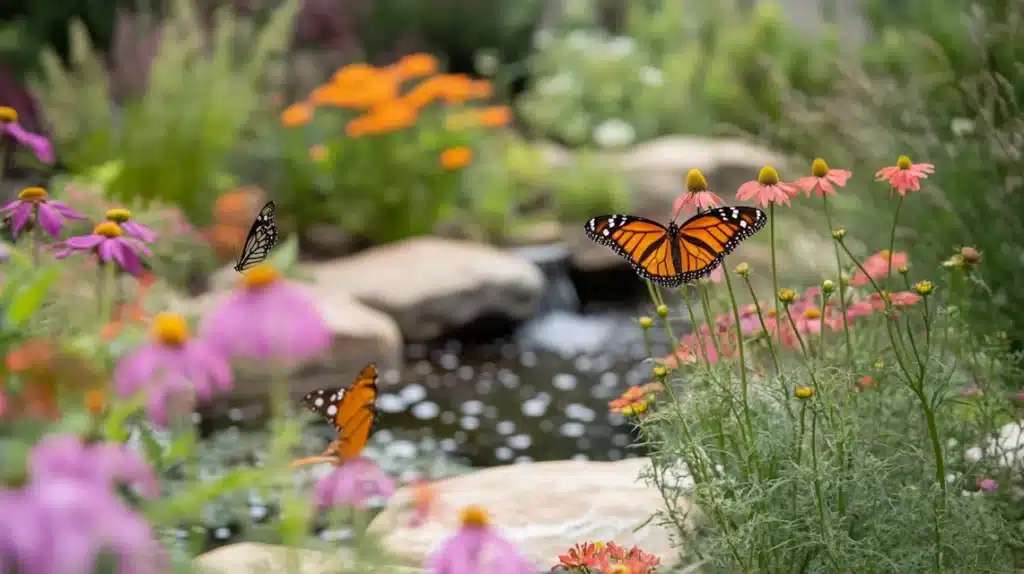
I designed a garden space specifically to attract and support local butterfly populations.
Each plant was carefully selected to provide food and shelter for different butterfly species.
The garden includes shallow water features where butterflies can safely drink and rest.
I created multiple sun-warming spots using flat stones arranged throughout the space.
The plants are arranged in height to create natural windbreaks and protection.
DIY Steps:
- Create a plant selection guide for local species.
- Install proper soil drainage system.
- Add water features with safe landing areas.
- Create sunbathing stone arrangements.
- Install wind protection barriers.
- Add educational identification signs.
- Create a maintenance schedule calendar.
- Install proper mulching system.
- Add native plant sections.
- Create photography stations.
- Install seasonal bloom planning.
- Add pest-free zones.
- Create plant propagation area.
- Install appropriate irrigation system.
- Add monarch waystation certification.
26. Summer Scrapbook
I created an interactive memory book that captures every special moment of summer.
The pages include hidden pockets and fold-out sections for storing larger memorabilia.
Each spread features a unique theme with hand-drawn borders and decorative elements.
I incorporated natural elements like pressed flowers and leaves from various adventures.
The binding allows for easy addition of new pages as summer progresses.
DIY Steps:
- Create archival-quality page layouts.
- Install an acid-free photo mounting system.
- Add hidden pocket construction.
- Create a proper binding mechanism.
- Install page protector sheets.
- Add journaling space sections.
- Create timeline documentation.
- Install a memorabilia preservation system.
- Add decoration station setup.
- Create index system tabs.
- Install UV protection covers.
- Add expandable sections.
- Create a proper storage solution.
- Install label-making station.
- Add photo editing workspace.
27. Create a Zen Garden
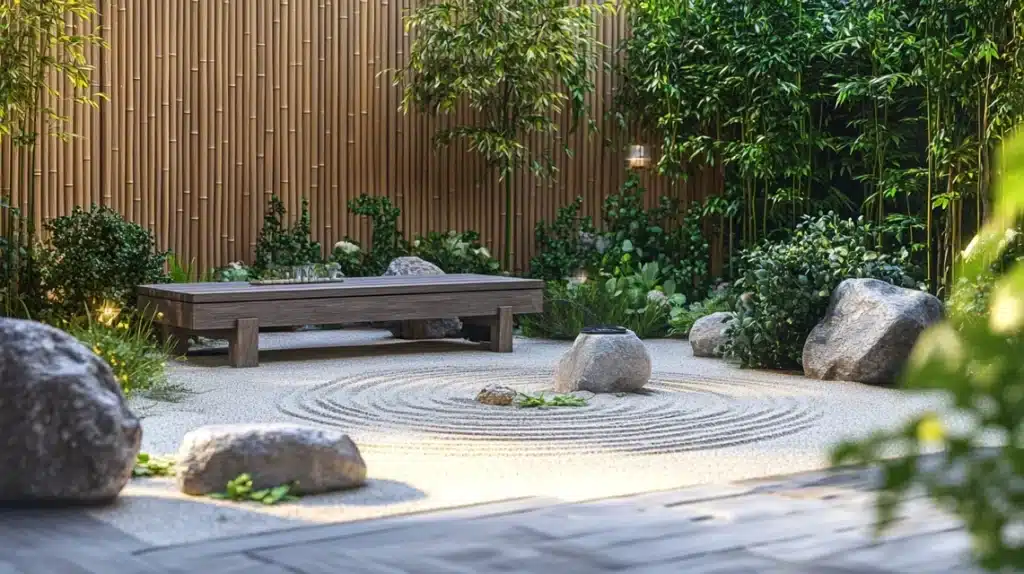
I designed a peaceful meditation space using traditional Japanese garden elements.
The raking patterns in the sand create different designs for various meditation practices.
Small rocks and boulders are positioned according to ancient arrangement principles.
I included a bamboo water feature that creates a gentle, rhythmic sound.
The space is enclosed with natural screening plants for privacy.
DIY Steps:
- Create a proper sand base foundation.
- Install rock arrangement patterns.
- Add a bamboo water feature system.
- Create a meditation seating area.
- Install adequate drainage layers.
- Add rake storage solution.
- Create pattern guide templates.
- Install mood lighting system.
- Add privacy screen plantings.
- Create maintenance tools station.
- Install weather protection covers.
- Add sound-dampening features.
- Create seasonal adaptation plans.
- Install comfort additions.
- Add traditional element markers.
28. Paint Outdoor Rocks
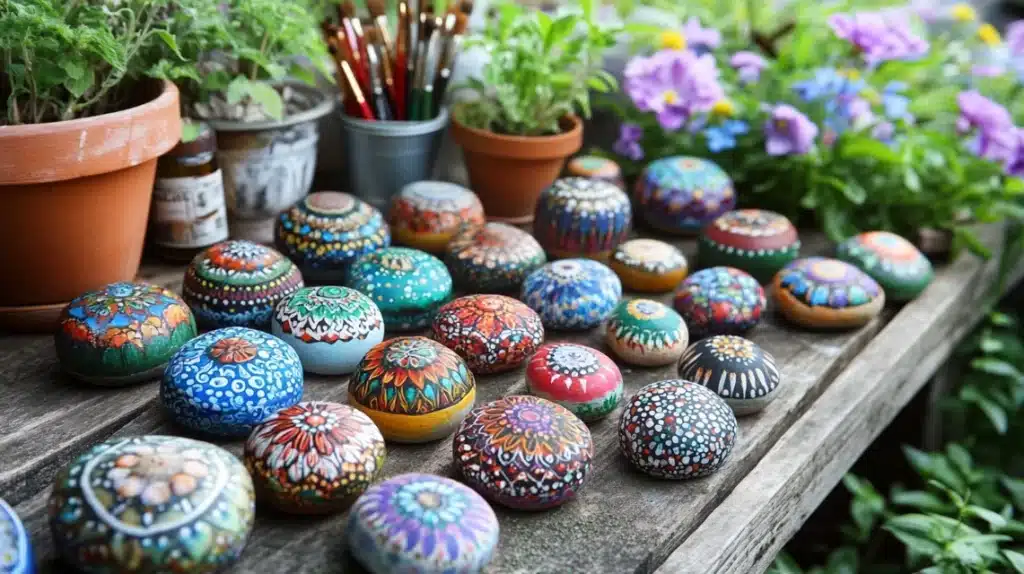
I transformed ordinary garden rocks into colorful art pieces that brighten the landscape.
Each rock features unique designs ranging from mandalas to wildlife scenes.
The special outdoor paints are sealed with UV-resistant coating for longevity.
I created themed collections that tell stories throughout the garden paths.
The rocks are placed strategically to catch sunlight at different times of the day.
DIY Steps:
- Select appropriate rocks for painting surfaces.
- Create a proper cleaning station setup.
- Install painting preparation area.
- Add design template system.
- Create color palette organization.
- Install proper drying racks.
- Add weather protection coatings.
- Create a placement planning map.
- Install rock storage system.
- Add painting tool organization.
- Create touch-up kit assembly.
- Install project documentation area.
- Add theme planning section.
- Create a seasonal rotation plan.
- Install lighting enhancement system.
29. Build a Compost Bin
I constructed a three-bay composting system that efficiently turns yard waste into garden gold.
The rotating design allows for different stages of decomposition to happen simultaneously.
I added temperature probes in each section to monitor the composting process.
The screening system helps separate finished compost from materials still breaking down.
Special vents in the structure ensure proper airflow for faster decomposition.
DIY Steps:
- Create a proper foundation with drainage.
- Install divider wall system.
- Add ventilation hole patterns.
- Create turning fork storage.
- Install temperature monitoring probes.
- Add screening system setup.
- Create a material sorting station.
- Install weather protection roof.
- Add proper signage for materials.
- Create a maintenance schedule.
- Install pest prevention measures.
- Add tool cleaning station.
- Create a ratio measurement guide.
- Install an odor control system.
- Add moisture monitoring setup.
30. Upcycled Outdoor Rug
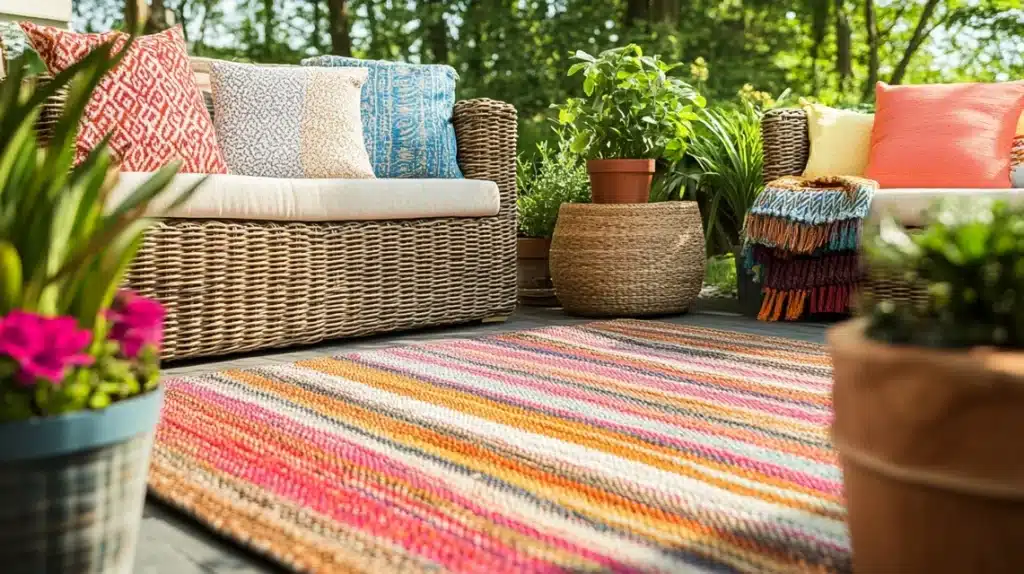
I transformed old fabric into a durable outdoor rug that adds color to my patio space.
The interwoven pattern creates a sturdy surface that withstands heavy foot traffic.
I treated the finished rug with a waterproof sealant to protect it from rain and moisture.
The design incorporates different texture elements for visual interest.
Special non-slip backing keeps the rug secure on various outdoor surfaces.
DIY Steps:
- Create a fabric preparation station.
- Install cutting template system.
- Add weaving frame setup.
- Create a pattern design board.
- Install binding system tools.
- Add a waterproofing station.
- Create a measurement tracking system.
- Install drying area setup.
- Add a non-slip backing application.
- Create a cleaning instruction guide.
- Install storage solution.
- Add repair kit assembly.
- Create a seasonal protection plan.
- Install color testing station.
- Add finishing tool organization.
Tips for Success in Summer Projects
1. Planning and Organization
I always start my summer projects by creating a detailed plan.
For each project, I map out the materials needed, estimated time frames, and potential challenges.
Setting realistic goals helps me avoid feeling overwhelmed—I break larger projects into manageable daily tasks.
My time management system includes dedicated morning hours for complex tasks when it’s cooler, and I maintain a project journal to track progress.
2. Budgeting
I’ve learned to make the most of my project budget through smart planning. Before starting, I scout local thrift stores and yard sales for materials.
My best cost-saving strategy involves buying supplies in bulk for multiple projects.
I keep a collection of recyclable materials, such as glass jars, wooden pallets, and fabric scraps, which often become perfect project materials.
For specialized tools, I connect with neighbors to share resources.
3. Safety Considerations
Safety comes first in all my projects. I maintain a well-organized tool station with proper storage and clear usage guidelines.
When working with power tools, I wear appropriate safety gear, including eye protection and work gloves.
For projects involving children, I create clear supervision zones and safety rules.
I keep a first aid kit readily available and ensure proper ventilation for painting or staining projects.
Final Thoughts
As summer unfolds, these 30 DIY projects offer more than just activities – they provide opportunities to learn new skills, enhance your living space, and create lasting memories.
Each project brings rewards and satisfaction, from the simple rock painting to the more complex treehouse building.
Remember, the key to successful DIY isn’t perfection but the joy of creating something with your hands.
Whether you tackle these projects solo, with family, or with friends, they’re designed to make your summer more creative and fulfilling.
Don’t be afraid to modify these ideas to suit your style and needs.
As you complete each project, you’ll improve your DIY skills and create unique additions to your home that you can enjoy for years to come.
Frequently Asked Questions
What Are Some Easy DIY Summer Projects?
Start with painting garden rocks, creating mason jar lanterns, or designing simple bird feeders.
These projects require minimal tools and can be completed in the afternoon.
How Can I Do a Summer Project at Home?
Begin with materials you already have. Try tie-dyeing old shirts, creating a herb garden in window boxes, or making wind chimes from kitchen items.
What Are Fun Summer Activities for Teenagers?
Build an outdoor movie screen, create a backyard obstacle course, or start a small gardening project. These activities combine creativity with physical activity.
What Outdoor Projects Can I Do with My Family?
You can create a butterfly garden, build a simple fire pit, or design an outdoor game station. These projects encourage family cooperation and outdoor time.
How Can I Start a Small Business Project During the Summer?
Start by making and selling crafts like painted pots, custom beach bags, or garden decorations. Begin small and use social media for marketing.