Create a Secure, Stylish Sliding Gate for Your Deck Today
Want to know how to build a sliding gate that works well and looks good? You’re not alone. Many people try to make one, but end up with gates that stick, sag, or look incorrect.
I once spent an entire weekend building a sliding gate. I measured twice, cut once, and still ended up with a gate that scraped the ground. Not fun.
The good news? You can avoid my mistakes. With the right steps and tips, you can build a sliding gate that slides smoothly every time.
What if I told you that most gate problems come from just three common errors? And that fixing them is easier than you might think?
Why Choose a Sliding Gate for Your Deck?
A sliding gate serves many uses for homeowners. Unlike swing gates, sliding gates move to the side rather than swinging inward or outward. This makes them ideal for spaces with limited room for a swing gate.
When you have limited space in your driveway or yard, a sliding gate offers a smart option. They work well on slopes where swing gates might scrape or get stuck. Additionally, they don’t require as much space to open and close.
Sliding gates also withstand the wind well. While strong winds can stress the hinges of swing gates, sliding gates remain firm and steady. This makes them a better choice for open areas that get a lot of wind.
Building your sliding gate allows you to meet your exact needs. You control the size, appearance, and functionality of your content. You also get to choose materials that match your home and withstand your local weather conditions.
Choosing the Right Materials for a Long-lasting Sliding Gate
When building a sliding gate, picking the right materials makes all the difference. High-quality materials help your gate last longer and function more effectively. Here’s what you’ll need for a sturdy, good-looking gate:
| Material | Purpose | Why It’s Good | Cost Range |
|---|---|---|---|
| Cedar Planks | Main gate body | Weather-resistant, looks nice with age | $30-50 per board |
| Galvanized Wire Mesh | Strength & security | Won’t rust, adds support | $20-40 per roll |
| Stainless Steel Pipes | Frame structure | Strong, won’t bend or rust | $15-25 per pipe |
| Metal Track | Guides the gate movement | Smooth sliding, long-lasting | $40-60 |
| Concrete Mix | Secure posts | Holds everything firmly in place | $5-10 per bag |
| Wood Sealer | Weather protection | Extends wood life by years | $20-30 per gallon |
| Metal Primer | Rust prevention | Keeps metal parts from rusting | $10-15 per can |
Essential Tools for the Job
Having the right tools on hand makes building your sliding gate much easier. Here’s what you’ll need to get the job done right:
| Tool | Purpose | Estimated Cost |
|---|---|---|
| Drill with Bits | Making holes, driving screws | $50-100 |
| Circular Saw | Cutting wood planks | $60-120 |
| Level | Ensuring the gate is straight | $10-20 |
| Tape Measure | Accurate measurements | $5-15 |
| Eye Screws | Part of the sliding mechanism | $5-10 |
| Casters | Help the gate roll smoothly | $10-20 per caster |
| Post Hole Digger | Digging holes for posts | $30-50 |
| Wrench Set | Tightening bolts | $20-40 |
| Safety Glasses | Eye protection | $5-15 |
| Work Gloves | Hand protection | $10-20 |
| Hammer | General use | $10-20 |
| Square | Right-angle marking | $10-20 |
Step-by-Step Guide to Building Your Sliding Gate
Follow these four main steps to build a sliding gate that looks good and works well for years to come.
Step 1: Preparation Before You Start
Start by checking your space. Look for any bumps, slopes, or items that might block your gate’s path. Make sure the ground is flat and firm where the gate will slide.
Next, measure the opening width and height where your gate will go. Add 4-6 inches to the width for overlap on each side. For height, allow 2-3 inches of ground clearance to prevent your gate from scraping.
Pro Tip: Take photos of your space from multiple angles before you begin. This helps you spot issues that might be missed and provides a reference point during the building process.
Step 2: Constructing the Gate Frame
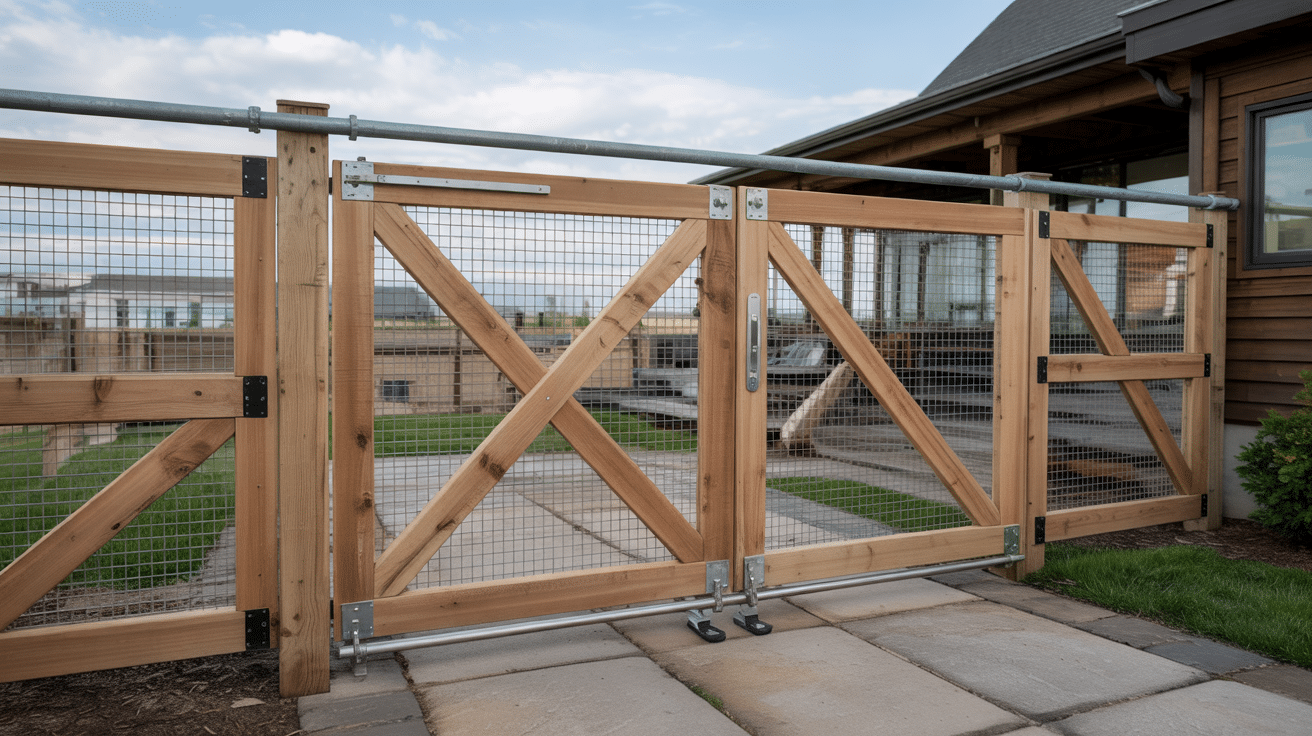
Cut your cedar planks to the measured size for the frame. Make the top and bottom rails first, then add vertical supports every 2 to 3 feet. Join them with screws at each corner and junction point.
After the frame is built, attach the galvanized mesh wire to one side of the frame. Stretch it tight across the frame and secure it with staples or small screws every few inches around the edge.
Pro Tip: Pre-drill holes before putting in screws to prevent the wood from splitting. Use weather-resistant screws, like stainless steel or hot-dipped galvanized, to avoid streaks of rust on your cedar.
Step 3: Installing the Sliding Mechanism
Mount the galvanized pipes to create your sliding track. The track should be level and firmly attached to a stable surface, such as a wall or sturdy post. Check the level multiple times during the installation process.
Attach the casters to the bottom of your gate frame. Position them so the gate’s weight is evenly spread across all casters. Test the rolling action before final mounting to ensure smooth movement.
Pro Tip: Add a small guide at the top of the gate to keep it from swinging out. This can be as simple as a metal loop that goes around the top pipe, with enough room to slide but not enough to wobble.
Step 4: Securing the Gate in Place
Dig holes for your gate posts at least 2 feet deep. Mix the concrete according to the package directions and pour it around the posts. Use a level to ensure posts are perfectly straight, and allow the concrete to cure fully.
Install a latch mechanism that can be locked. Place it at a height that’s easy for adults to reach but high enough to keep small children from opening it. Test the latch several times to ensure it catches properly.
Pro Tip: Add a rubber stopper where the gate closes to prevent it from sliding too far. This protects both the gate and the post from damage and helps the latch line up perfectly every time.
Video Tutorial
Special thanks to BYOT for providing valuable insights in their video, which I referenced while creating this guide.
Troubleshooting Common Problems During Installation
Even with careful planning, you may encounter some issues when building your sliding gate. Here’s how to solve the most common problems:
| Problem | How It Affects | How to Fix it |
|---|---|---|
| Track Misalignment | Makes the gate hard to open/close | Use a level to check the track, adjust the mounting brackets, and ensure the track is perfectly straight. |
| Caster Issues | Creates wear on the track and casters | Check caster alignment; tighten loose casters; replace damaged wheels; add more casters for heavier gates. |
| Ground Obstacles | Blocks smooth operation | Clear path of rocks, roots, or debris; fill in dips or holes; create a smooth concrete path if needed |
| Post Movement | Affects security and function | Add more concrete around the posts; use bracing to stabilize them; and check for erosion around the post bases. |
| Rust Formation | Shortens the lifespan of metal parts | Apply rust converter; clean and repaint affected areas; use protective coatings on metal parts. |
| Weather Damage | Change gate dimensions | Apply water sealant yearly; use quality outdoor wood; design with slight gaps between boards. |
| Latch Problems | Compromises security | Adjust the strike plate position, tighten hardware, and add weather stripping for better alignment. |
| Weight Distribution | Causes uneven wear | Redistribute weight; add more support to the frame; check for and fix any sagging. |
| Seasonal Changes | Creates periodic issues | Build with slight clearances and use flexible weather stripping. Adjust casters as needed to accommodate seasonal changes. |
Wrapping Up
Building a sliding gate isn’t as hard as it might seem. With the right materials, tools, and steps, you can create one that perfectly fits your needs.
We covered the importance of choosing cedar and steel for their durability, utilizing the right tools such as drills and casters, and following a simple four-step process. We also examined common problems and their solutions.
The main points to remember are: measure carefully, check levels often, use weather-resistant materials, and test the gate as you build it. These steps help you avoid most issues.
When you finish your gate, you’ll have something useful that you made yourself, for less money than buying one pre-made.
Ready to try it? Grab your tools and get started this weekend.


