Replacing old laminate flooring can feel like a huge task. Most homeowners worry about costs, time, and if they have the skills to do it right. I know this feeling all too well from my first flooring project.
Good news – you can swap out your worn floors without calling a pro. With the right steps and tools, this job becomes much more manageable.
In this guide, I’ll walk you through the complete process of removing old laminate and installing new flooring.
You’ll learn which tools you need, how to prep your space, and the basic steps to get perfect results that will last for years.
Why is Replacing a Floor Board Important?
Getting that creaky or damaged floorboard fixed matters more than you might think. When a single plank goes bad, it can hurt nearby boards and even what’s underneath. I’ve seen small issues turn into big problems when left alone too long.
Fixing just one bad spot keeps your floors looking nice and even. Plus, it stops water from getting where it shouldn’t. Water is the enemy of any floor – once it gets in, trouble follows fast. I learned this the hard way in my own home.
The best part?
Fixing one board costs way less than redoing the whole floor. It’s like fixing a small hole in your shirt instead of buying a new one. When you take care of small floor problems quickly, the rest of your floor stays strong and works the way it should.
Steps to Replace Laminate Flooring
Swapping out your old floor isn’t as tough as it looks. With some basic tools and a bit of patience, you can transform your room without calling in the pros.
Let me walk you through the steps I’ve used to replace flooring in my own home. It’s a project you can tackle over a weekend with results you’ll enjoy for years.
Tools Required :
| Tool | Use |
|---|---|
| Vacuum cleaner | Clean up dust and debris |
| Mallet and tapping block | Gently tap planks into place without damage |
| Putty knife or pry bar | Pry up and remove the old board |
| Utility knife | Score and cut underlayment or planks |
| Saw | Cut out the damaged plank |
| Rag | Clean surfaces and remove excess glue |
Materials Required :
| Material | Use |
|---|---|
| Blue painter’s tape | Protect adjacent planks from glue or damage |
| Floating floor tongue and groove glue | Secure the replacement plank to adjacent planks |
| Super glue (optional) | Quick setting to hold the plank temporarily |
| Filler (for any gaps) | Fill gaps to maintain a watertight seal |
Step 1: Preparing the Damaged Board for Removal
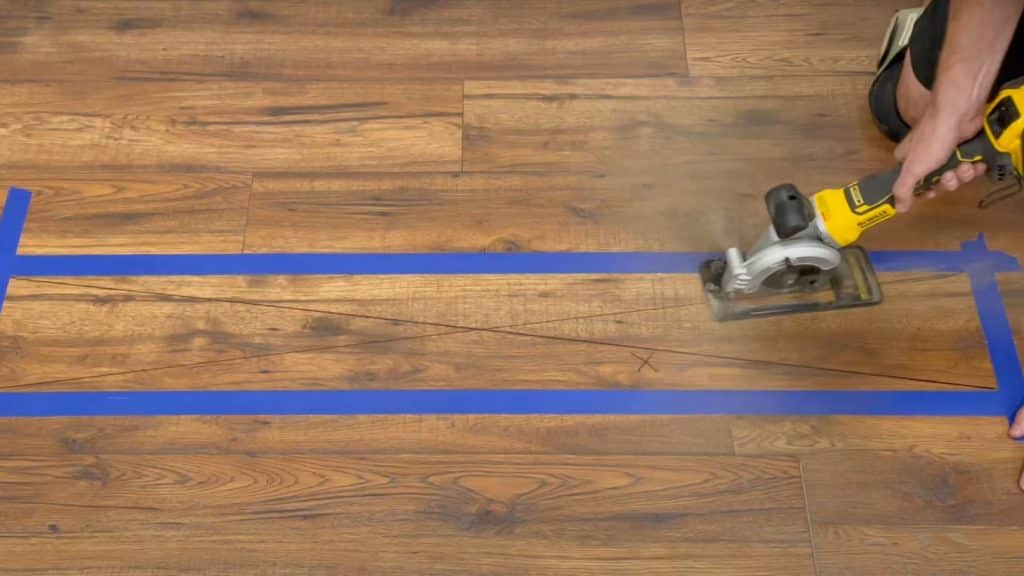
Before you can put in something new, you need to carefully remove the old board without damaging the rest of your floor.
- Make sure your replacement board matches in color and size
- Mark an X on the damaged board to show where to cut
- Place blue tape along the edges to protect the good boards
- Adjust the saw depth to only cut through the board
- Slice through the underlayment with a razor if needed
- Take your time – rushing causes more problems
Pro Tip: Take photos of the floor before starting. This helps you match the grain direction of your new board and serves as a reference throughout the repair process.
Step 2: Taking Out the Old Board
Getting the damaged board out needs a gentle touch. Most folks rush this part, but going slow here saves time later by keeping the good parts in good shape.
- Slide the pry bar under the board edge at a slight upward angle
- Loosen each side gradually, working around all four edges
- Lift from corners where the board breaks easiest
- Remove all loose pieces completely
- Vacuum out dust and small debris
- Check for any remaining chips that could create bumps
- Clean the exposed floor edges before continuing
Pro Tip: Heat the board slightly with a hair dryer before removal. This softens old adhesive and makes the board more flexible, reducing the chance of damage to nearby boards.
Step 3: Getting the Floor Ready for the New Board
Once the old board is gone, you need to make sure the space is just right for the new piece. A few minutes of care here makes the rest of the job much easier and neater.
The pull bar method can save you lots of work if you have room to use it. Just slip the pull bar between the boards in the same row and tap gently. This creates a small gap that helps when fitting the new board.
Remember to press down on the floor while using the bar; this keeps the gaps even and helps the locking parts line up better.
If you skip this step, you might need to cut off parts of the locking edges, which can make your floor less stable. Taking time with the prep work pays off with a stronger, better-looking repair that lasts longer.
Pro Tip: Clean the subfloor thoroughly after removal. Even tiny bits of old adhesive or wood can create bumps that prevent your new board from sitting flush with others.
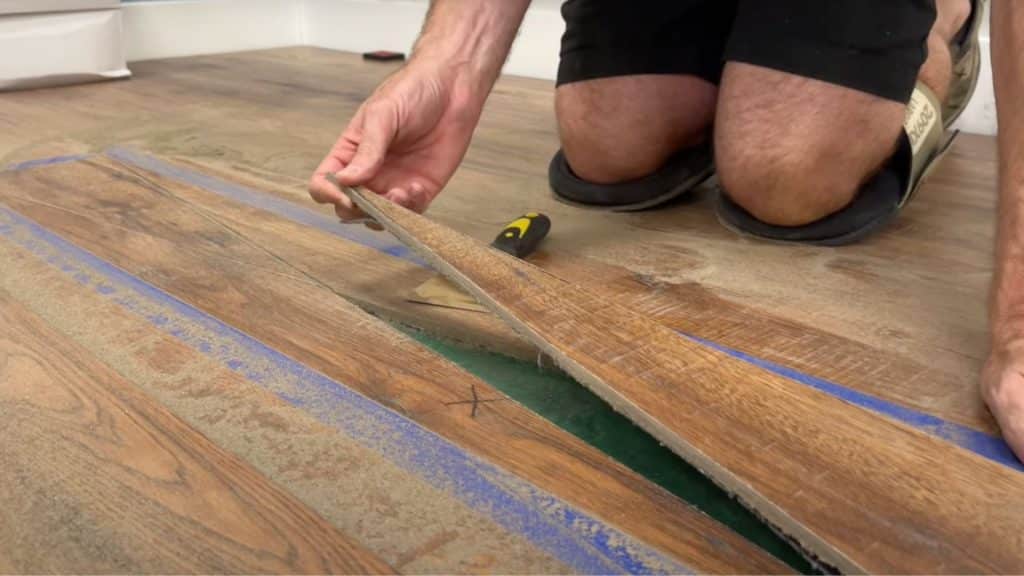
Step 4: Fitting Your New Board for Perfect Placement
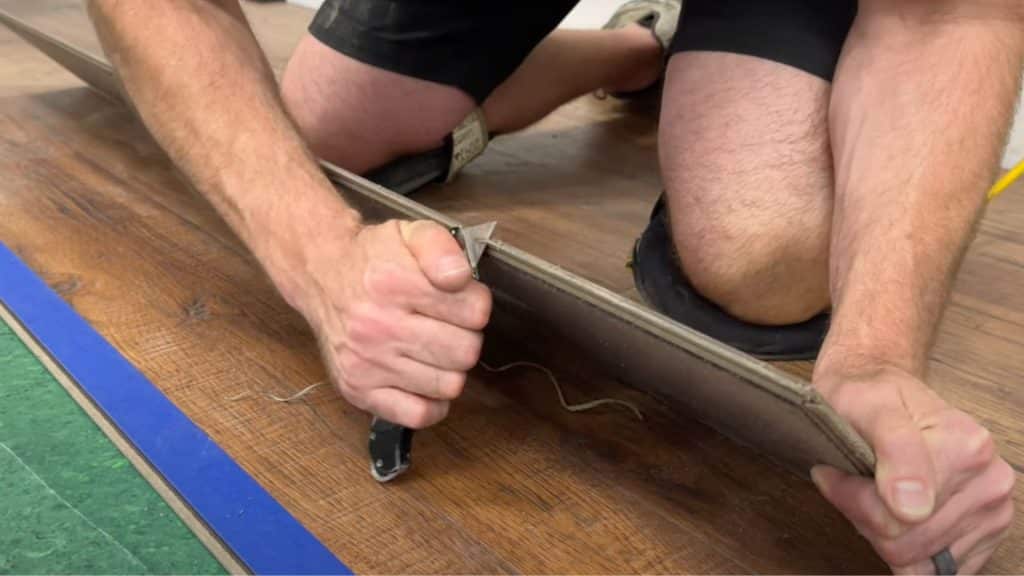
Many people make mistakes at this step. Your new board needs small adjustments to fit the space without being forced, which could damage your whole floor system.
- Keep the bottom locking edge intact for floor stability
- Trim only the top lip with a sharp utility knife
- Cut side edges only if necessary
- Use a straight edge guide for precise cutting
- Test against opening frequently – you can cut more but not less
- Avoid cutting into the waterproof seal area
- Do a complete test fit before applying any adhesive
Pro Tip: Use sandpaper on test pieces first to practice your cutting technique. This builds confidence and helps you learn how the laminate material responds to different cutting angles.
Step 5: Testing the Fit Before Final Installation
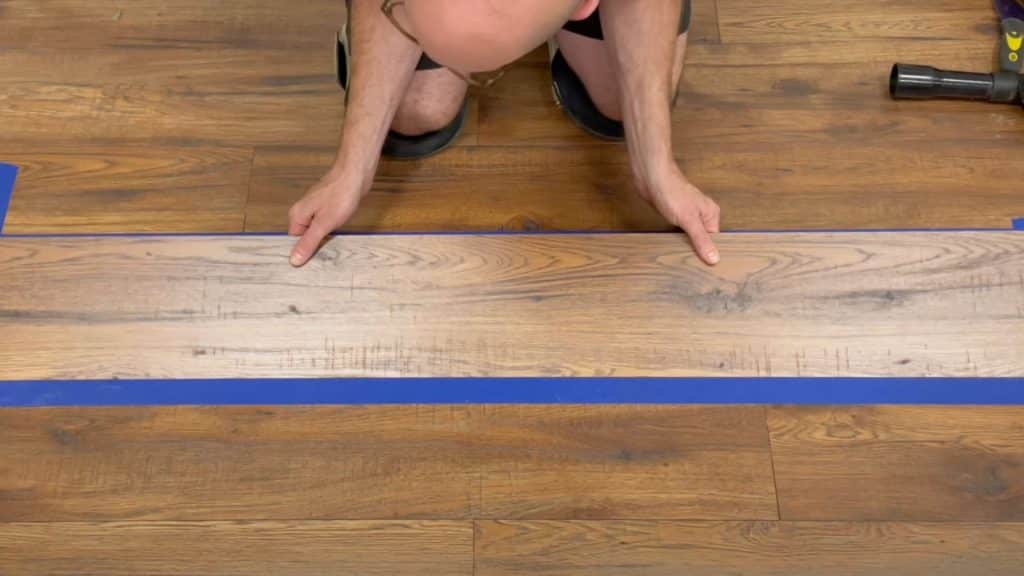
Always test how your new board fits before adding glue. This trial run prevents a sticky mess and allows you to make final tweaks while everything is still clean.
- Hold the new board at a 20-30 degree angle with the tongue under the existing board
- Slide the bottom lock under the adjacent board’s groove
- Press down until the board sits level with the surrounding floor
- Check all edges for proper alignment
- Look for gaps between boards
- Test stability by pressing on the board
- Remove the board once the fit is confirmed
- Clean the installation area before final placement
Pro Tip: Mark the board’s position with small pencil lines on the subfloor. This ensures you place it in exactly the same spot during final installation when glue limits adjustments.
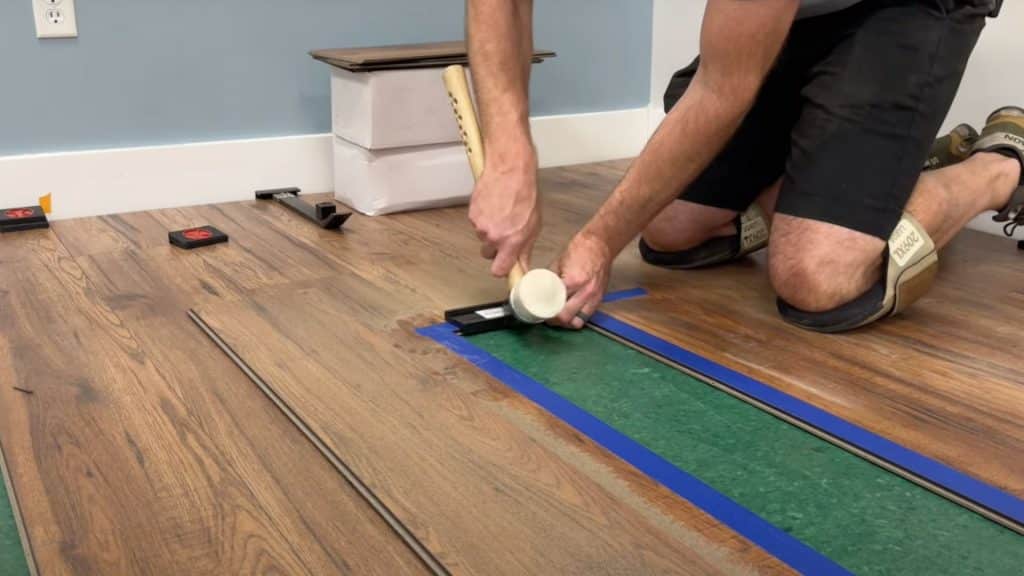
Step 6: Securing Your New Board Permanently
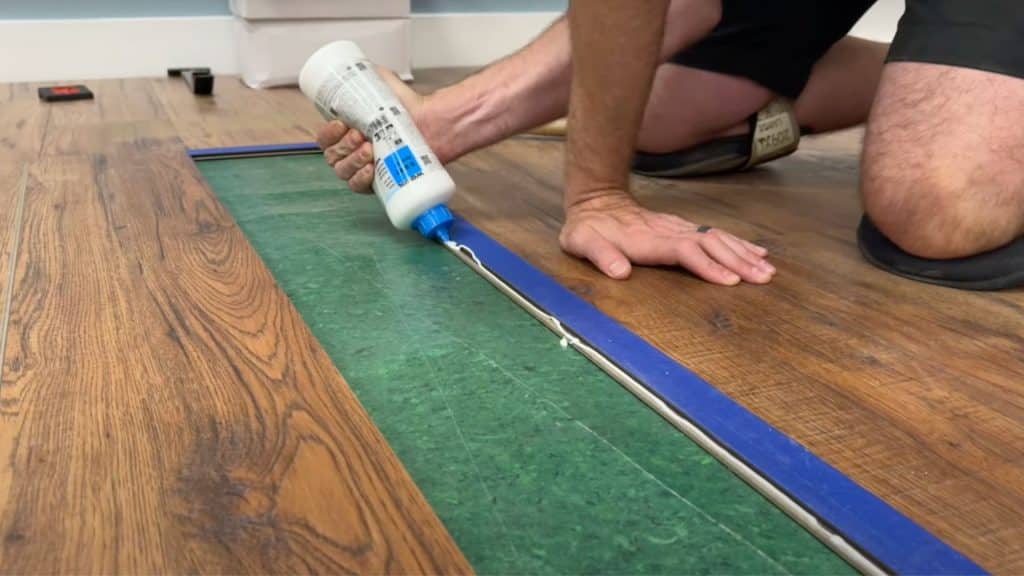
- Apply floating floor glue along the groove edges of the surrounding boards
- Add dots of super glue in corners for quick bonding
- Hold the board at the same test-fit angle (20-30 degrees)
- Slide the tongue under the existing board’s groove
- Press down firmly to click the board into position
- Hold with even pressure for 30 seconds
- Place a weight on the board for 15 minutes
- Remove all blue tape
- Clean excess glue with a damp cloth
Pro Tip: Apply glue in a zigzag pattern rather than straight lines. This ensures more even coverage and prevents excess glue from squeezing up through seams.
Step 7: Adding the Final Touches
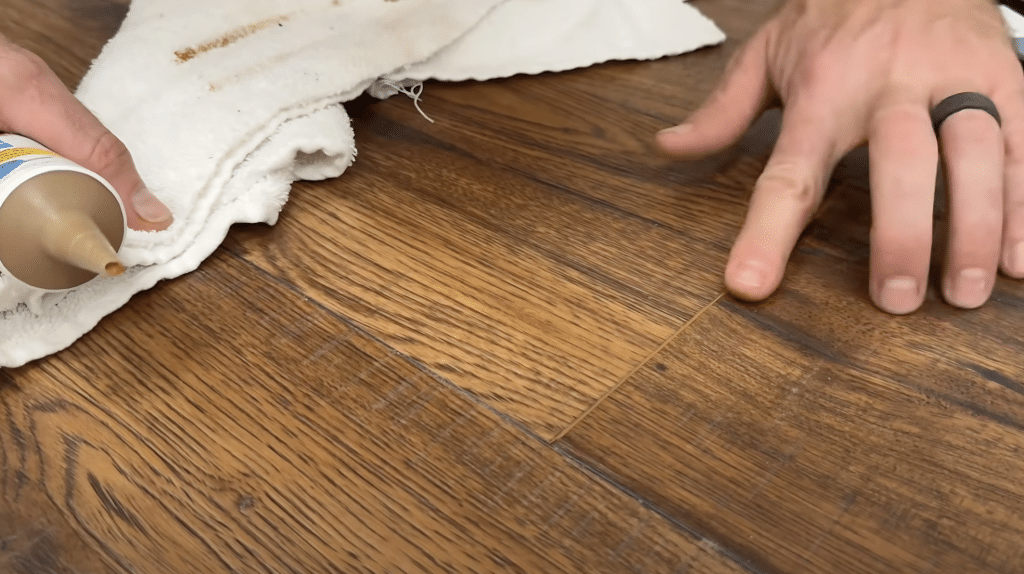
Now, for those last little details that make your repair look professional instead of homemade.
Check all seams around your new board by running your finger along them. If you find small gaps, apply matching laminate filler and wipe away any extra. Small gaps might seem harmless, but they can allow water to seep through and damage your subfloor over time.
Wipe the whole area with a damp cloth to remove dust and glue spots. Look at the floor from different angles to spot any smudges or marks that might need cleaning. Let the repair dry completely for 24 hours before moving furniture back over it, which gives all adhesives time to create the strongest possible bond.
Pro Tip: Check your repair at different times of day. Morning and evening light hits floors at different angles, which can make minor flaws more visible when not properly fixed.
I’d like to acknowledge RW Supply+Design for the insightful video, which was a key reference in putting this guide together.
Conclusion
Replacing a broken floor board might seem small, but it makes a big difference in your home’s look and value. By following the steps in this guide, you’ve learned how to fix boards without calling expensive pros.
Remember that careful preparation is key – from matching colors to proper cutting and gluing. Taking time with each step prevents bigger problems later.
Why does this matter? Because small fixes today prevent costly full floor replacements tomorrow. Your floors are an investment worth protecting.
What’s your next step? Try repairing that creaky board that’s been bothering you! Take photos of your project and share them in the comments below.
Frequently Asked Questions
Is it Easy to Replace One Piece of Laminate Flooring?
Yes, with basic tools and careful steps, you can swap out a single board in about two hours.
What Goes Underneath Laminate Flooring?
Most laminate needs an underlayment foam layer that blocks moisture and muffles sound when walking on the floor.
Is it Easy to Replace Laminate?
For small fixes, yes. Large areas need more skill, but the click-lock system makes single board changes fairly simple.