Blank walls can make any home feel cold and lifeless. Finding fresh ways to display your photos and art often feels tiring when you’ve tried the same old methods.
I know the struggle of standing in front of a wall with a hammer in hand, wondering where to put that next nail.
I promise there are simple solutions that will turn those empty walls into spaces full of life and character. There is no need for fancy tools or expert skills.
In this post, I’ll share practical picture-hanging ideas you can try today. From using shelves and clips to creating unique groupings, these tips will help you showcase your favorite memories and artwork in ways that match your style.
Flexible and Creative Ways to Hang Your Pictures
Looking for fresh ways to display photos at home? Bare walls hold so much hidden promise.
Let me suggest some practical, tested methods that turn empty spaces into personal galleries. These ideas work with many budgets and skill levels, from quick weekend fixes to thoughtful design plans.
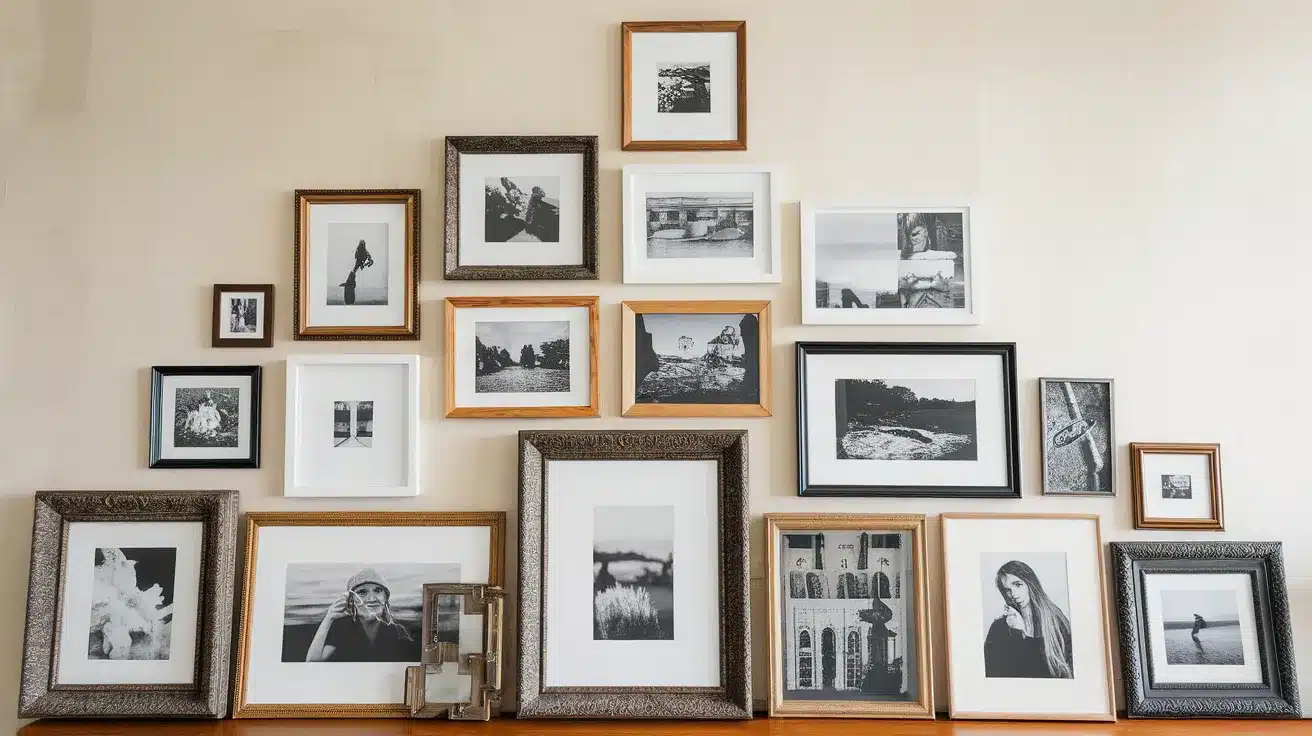
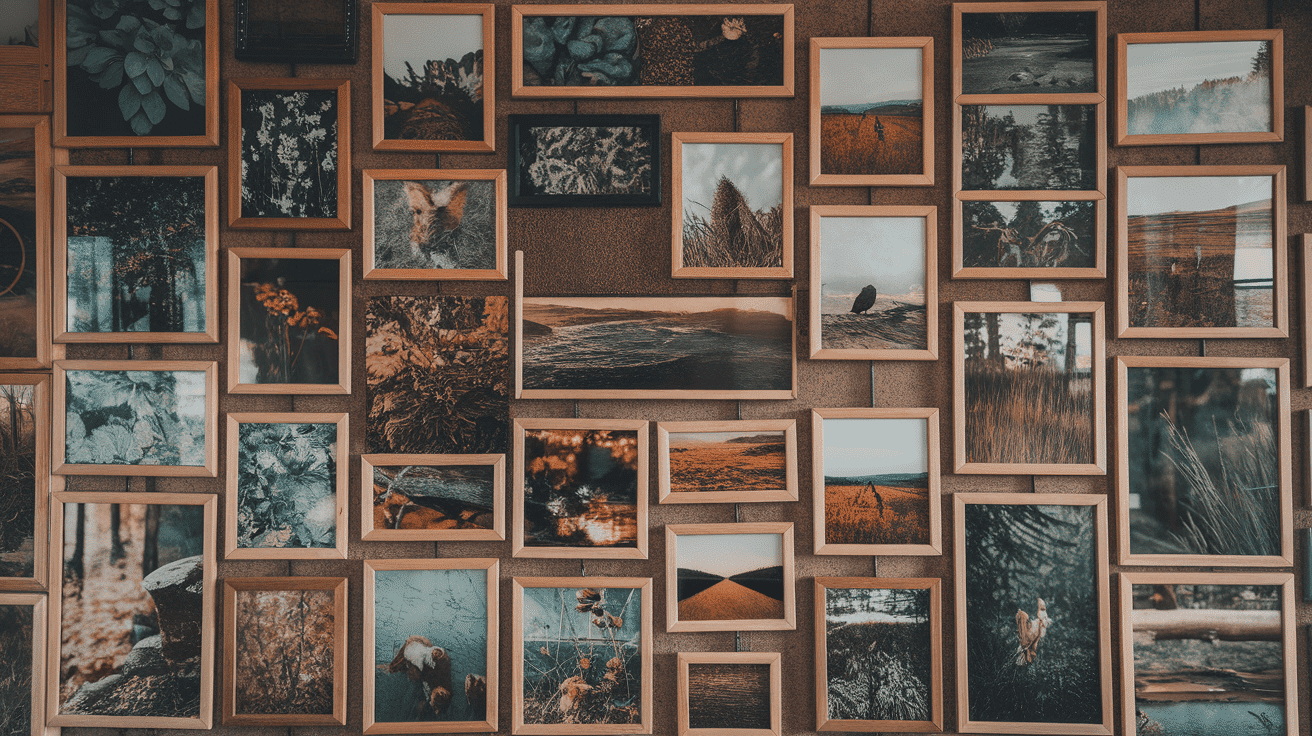
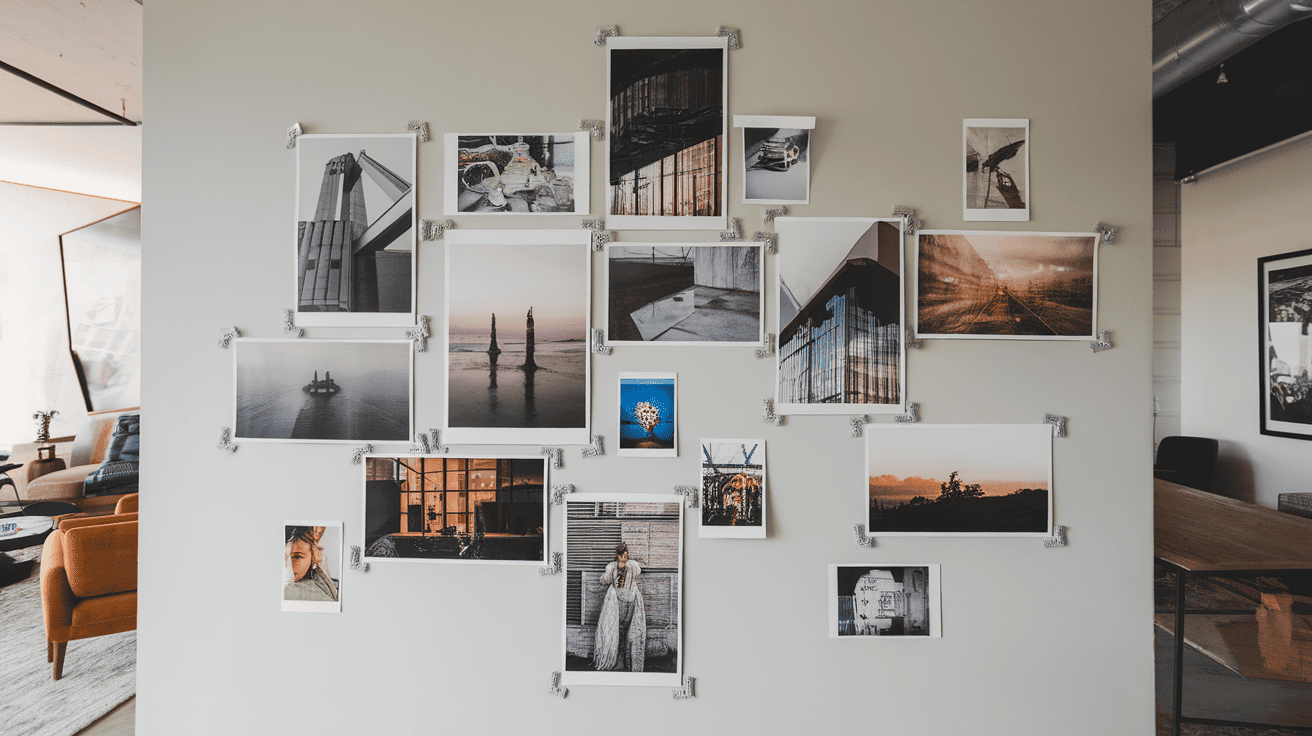
1. Gallery Wall
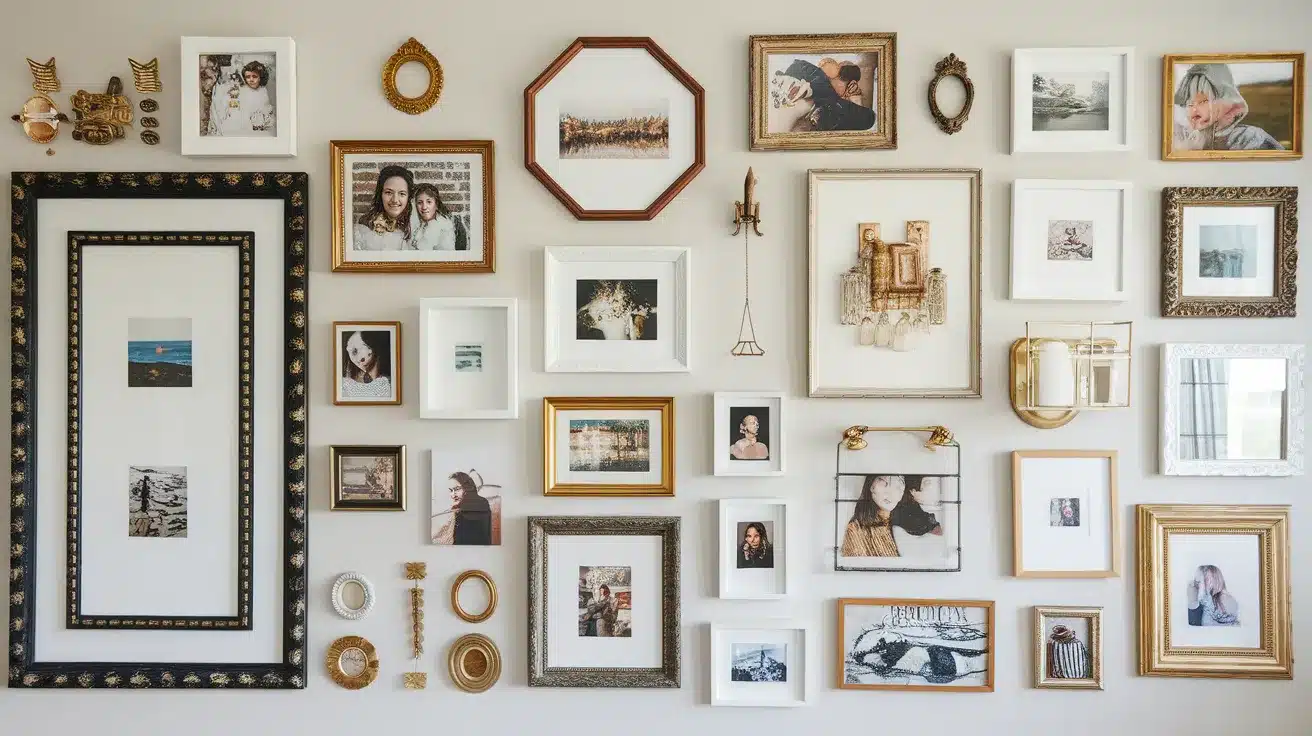
A gallery wall brings multiple pictures together in one spot. Mix frame sizes, colors, and styles to create a personal collection that tells your story.
Plan your layout on the floor first before hanging. Trace each frame on paper, then tape these templates to the wall to avoid making extra holes.
Start with a central piece and build outward. Leave 2-3 inches between frames for a clean look that lets each picture stand out properly.
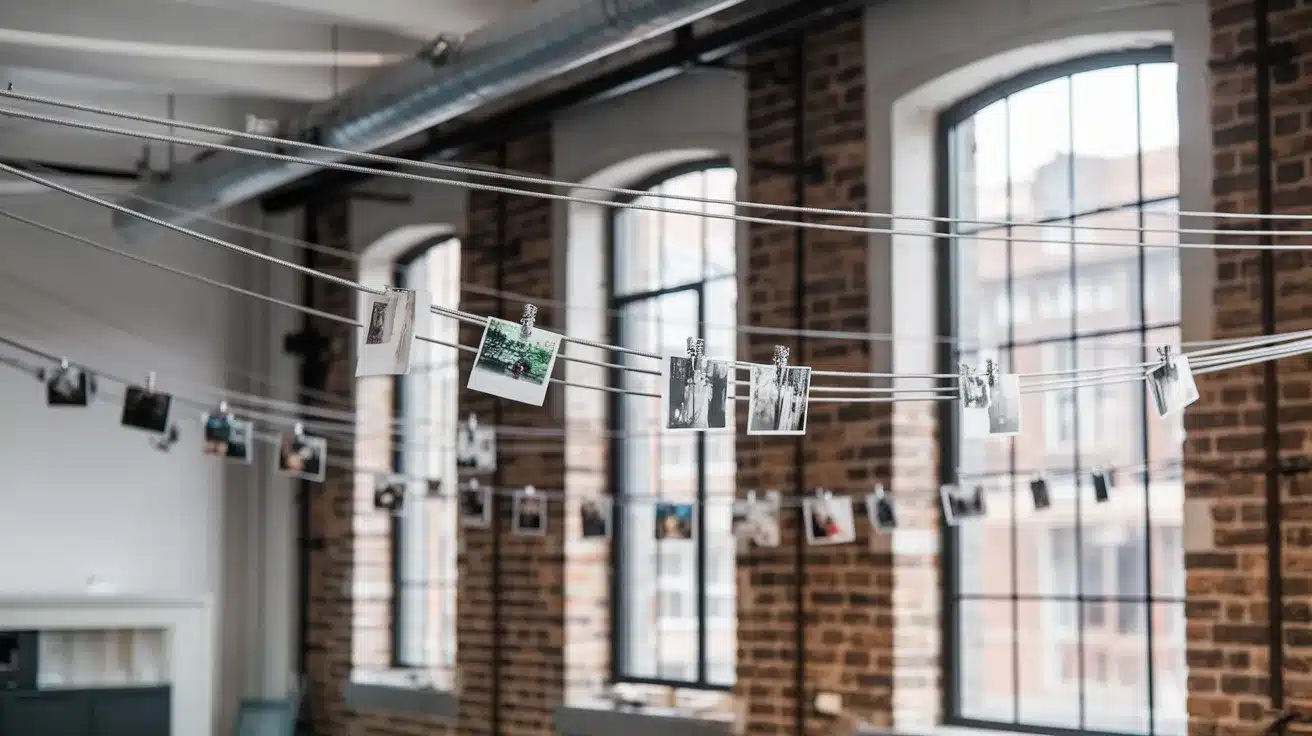
2. Wire & Clips
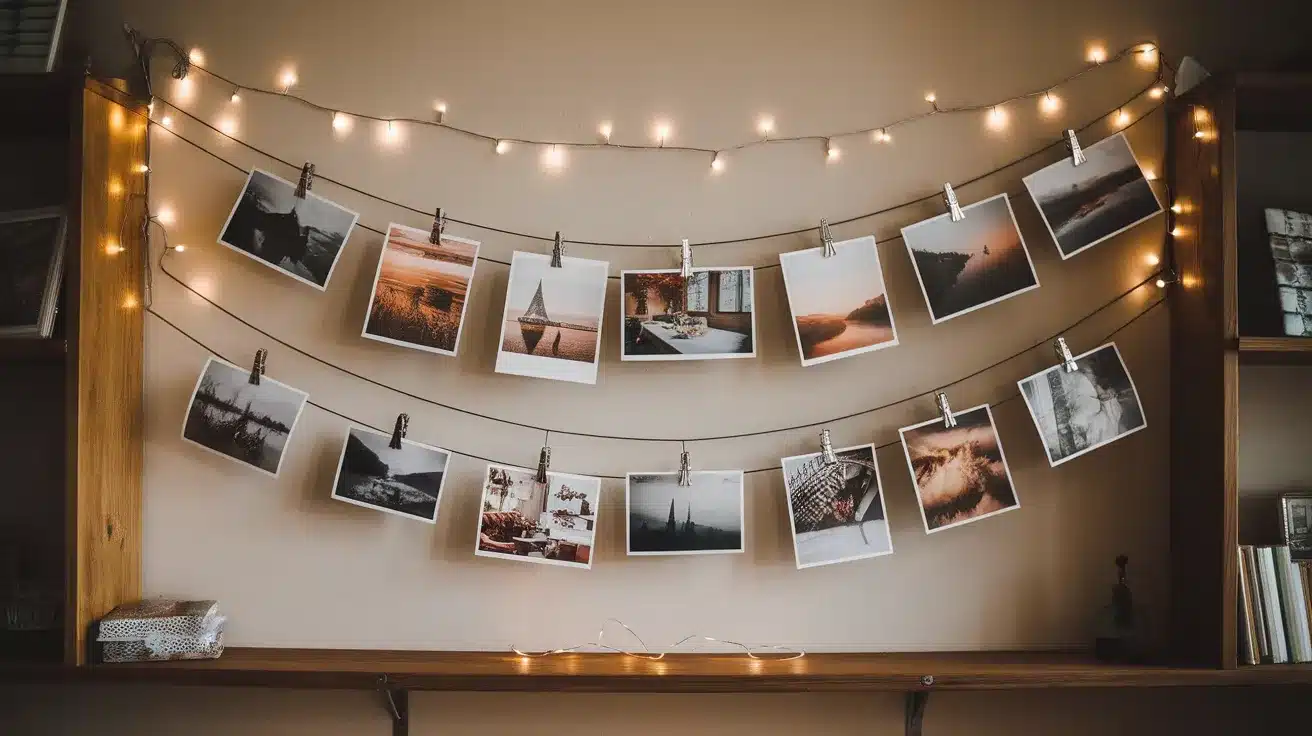
Hang a sturdy wire across your wall and attach photos with small clips. This method lets you swap pictures without making new nail holes.
The casual, slightly unfinished look works well in kitchens, home offices, or kids’ rooms. Choose clips in colors that match your room’s style.
You can update this display for seasons or events. String fairy lights along the wire for a warm glow that makes your pictures pop at night.
3. Floating Shelves
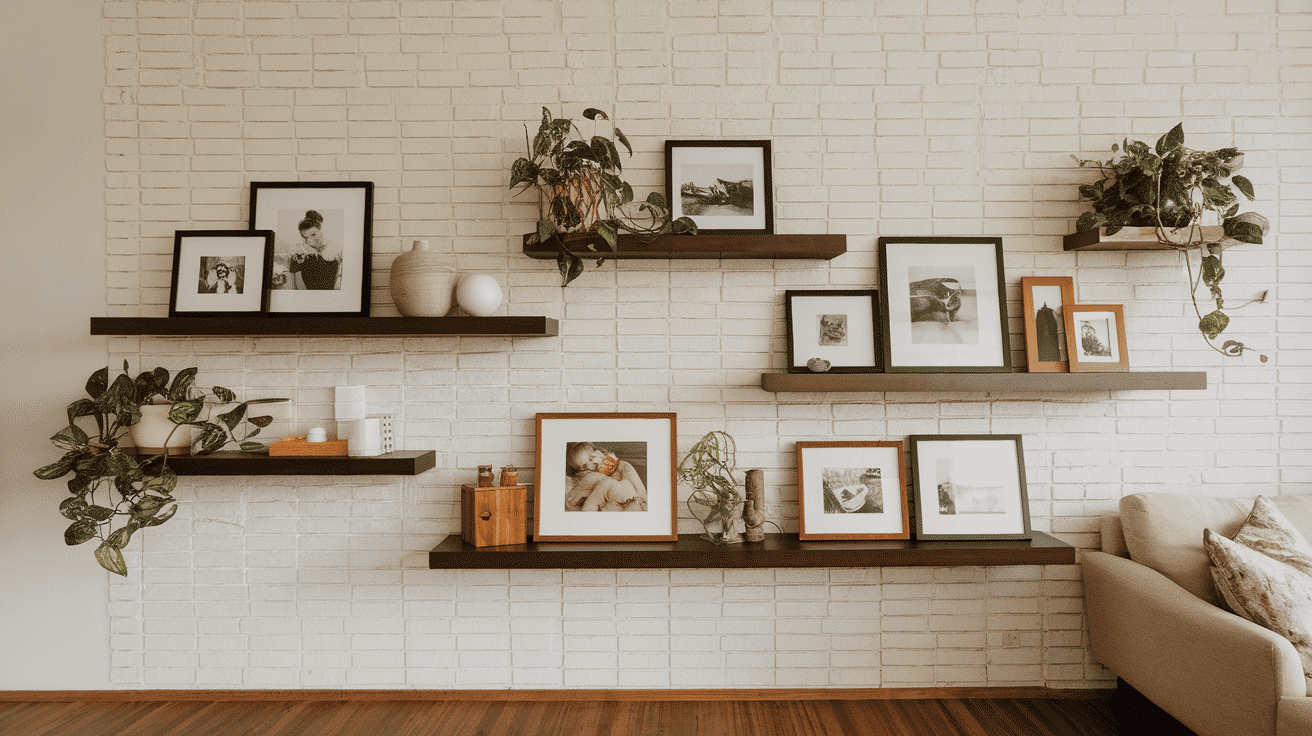
Mount slim shelves on your wall to hold framed photos. This method allows you to change your display without new holes in the wall.
Layer frames at different depths on the shelf. Add small plants or objects between photos to create more life and movement in your display.
White shelves fade into the background, while wood tones add warmth. The key is picking a shelf depth that securely fits your largest frame.
4. Grid Layout
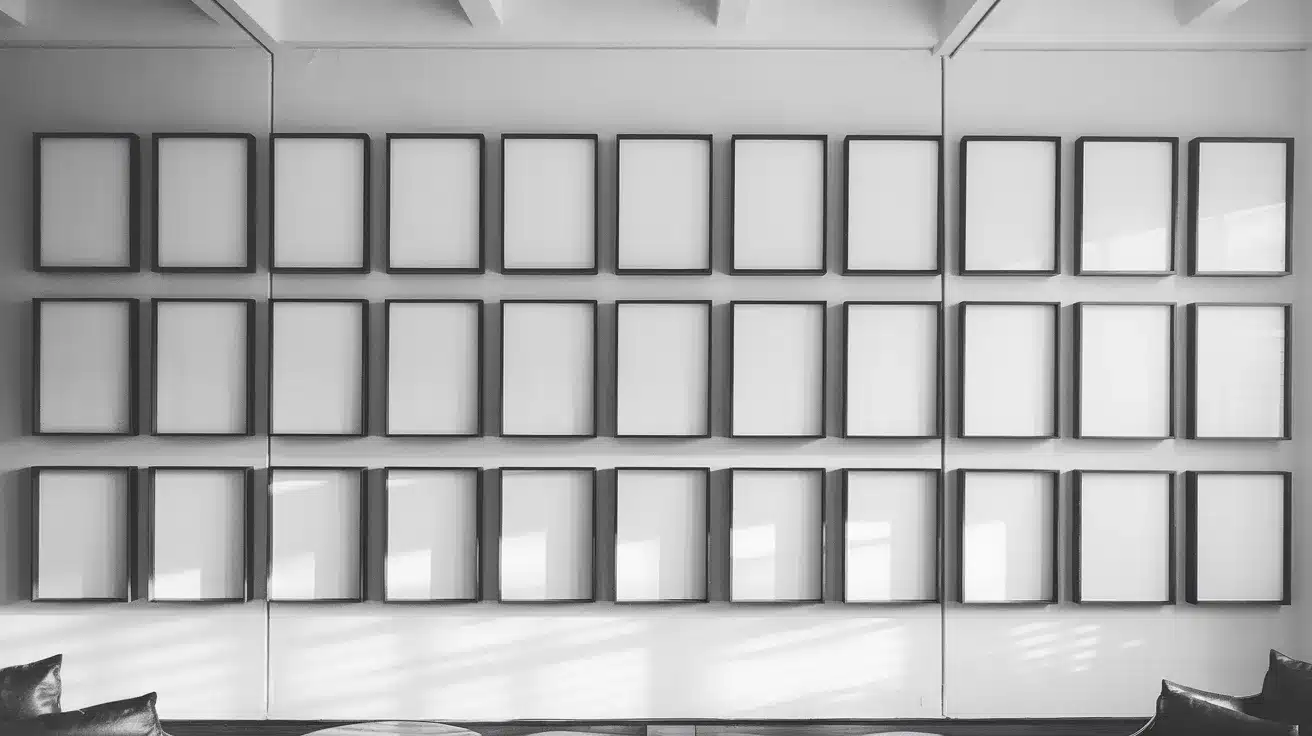
A grid pattern creates a clean, orderly look with strong visual impact. To build this structured display, use the same-sized frames with equal spacing.
Measure carefully and mark your wall with a pencil before hanging. Even minor differences in spacing will stand out and ruin the effect.
Black-and-white photos work well in grid displays. The uniform format makes your subject matter—faces, places, or themes—the main focus.
5. Asymmetrical Hanging
Break free from perfect rows with frames placed at different heights and widths. This casual style feels more lived-in and less formal.
Start with your largest piece as an anchor, then build around it. Keep some edges lined up to maintain a sense of order in the free-form group.
Step back often while creating this display. The key is finding balance without perfect symmetry, like a well-played game of Tetris.
6. Hanging from the Ceiling
Suspend frames from the Ceiling using clear fishing line or thin rope. This works well in rooms with high ceilings or limited wall space.
The floating effect catches attention and creates movement. When air flows, frames might turn slowly, adding a gentle, mobile-like quality.
This method works best with lighter frames and smaller sizes. To ensure safety and visual weight balance, keep heavier items at lower heights.
7. Hanging Mobile Photo Display
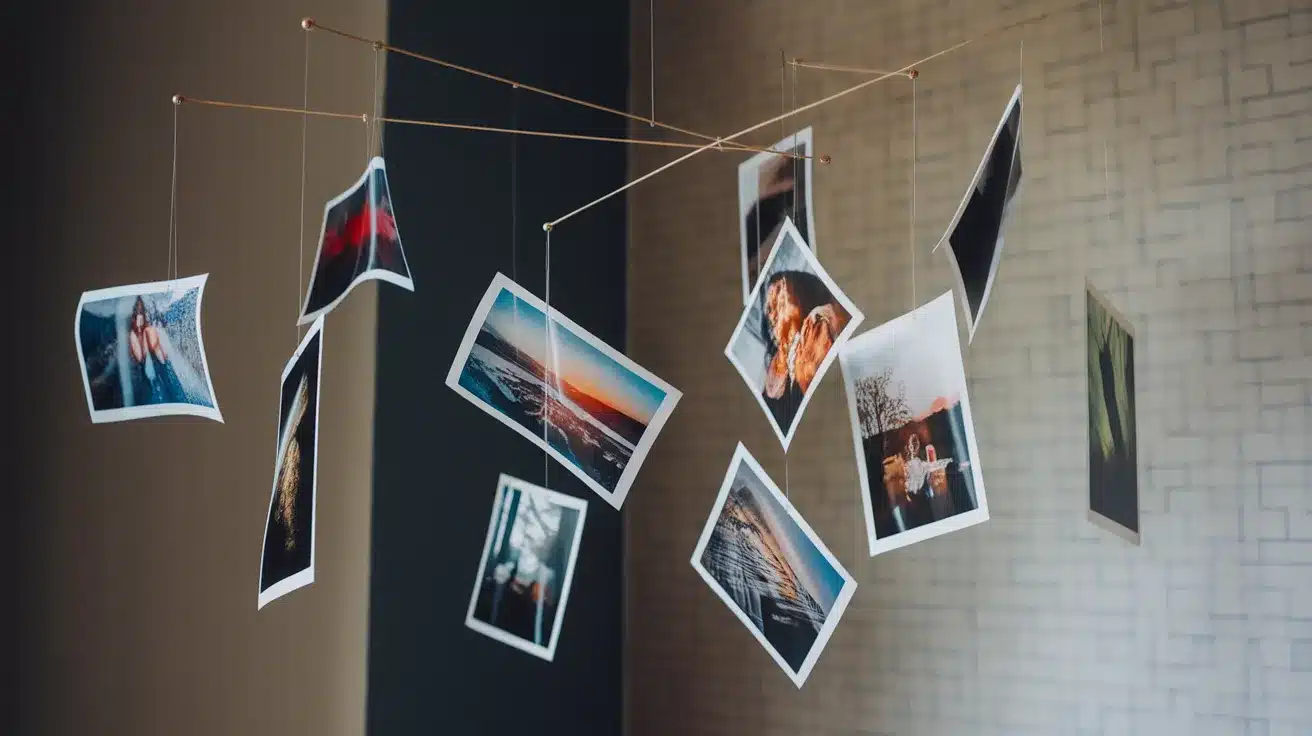
Create a ceiling-hung mobile with photos that move gently with air currents. Use thin fishing line and small wooden dowels to construct a balanced structure.
Hang photos at different heights and angles to create interesting layers and movement. The mobile can expand horizontally across a room while taking up minimal visual space.
This aerial display works exceptionally well over dining tables or in corners of rooms. The slight movement adds a kinetic element that draws the eye upward and makes photos feel lively.
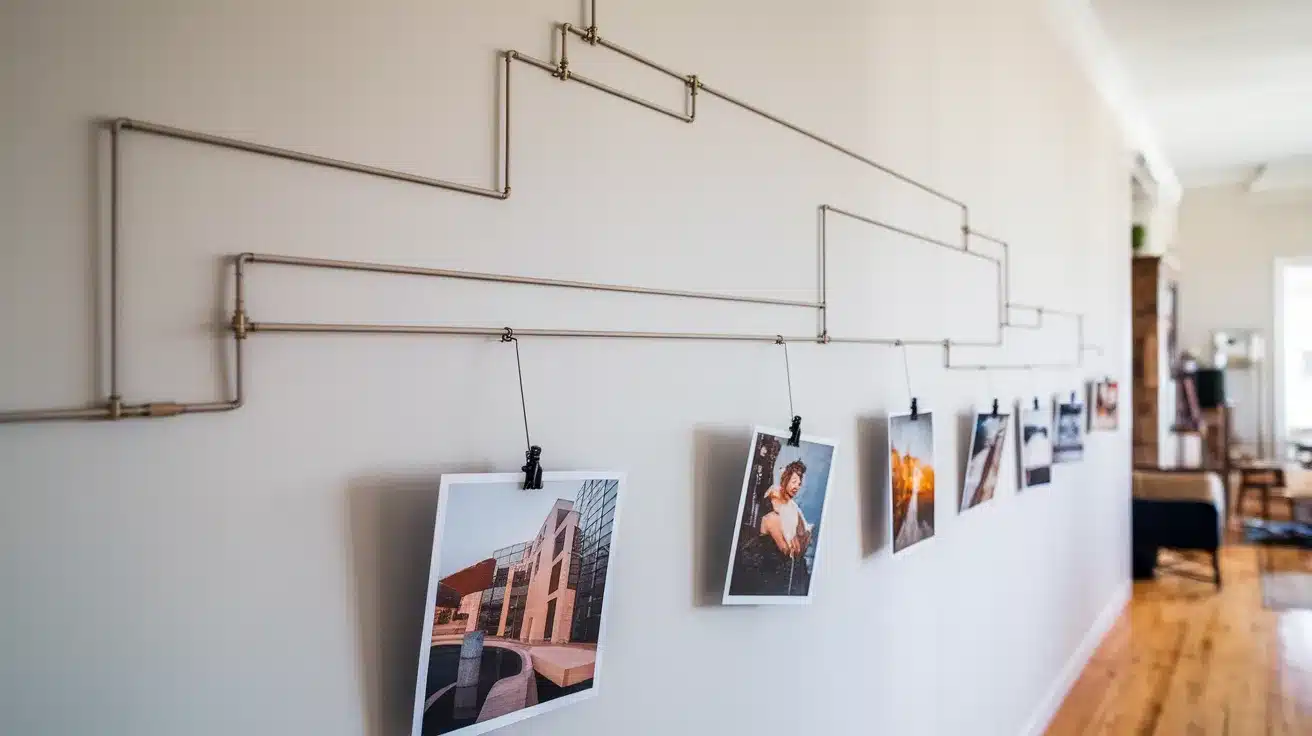
8. Suspended Cable System
Install thin steel cables that stretch across a room or between walls, creating a linear display path for hanging photos mid-air in your space.
Use small clamps or clips that grip the cable without damaging it. This allows photos to slide and reposition along the line as needed.
This system works well for dividing open spaces or spanning across windows where wall hanging isn’t possible. The industrial look pairs well with modern and loft-style homes.
9. Magnetic Photo Strips
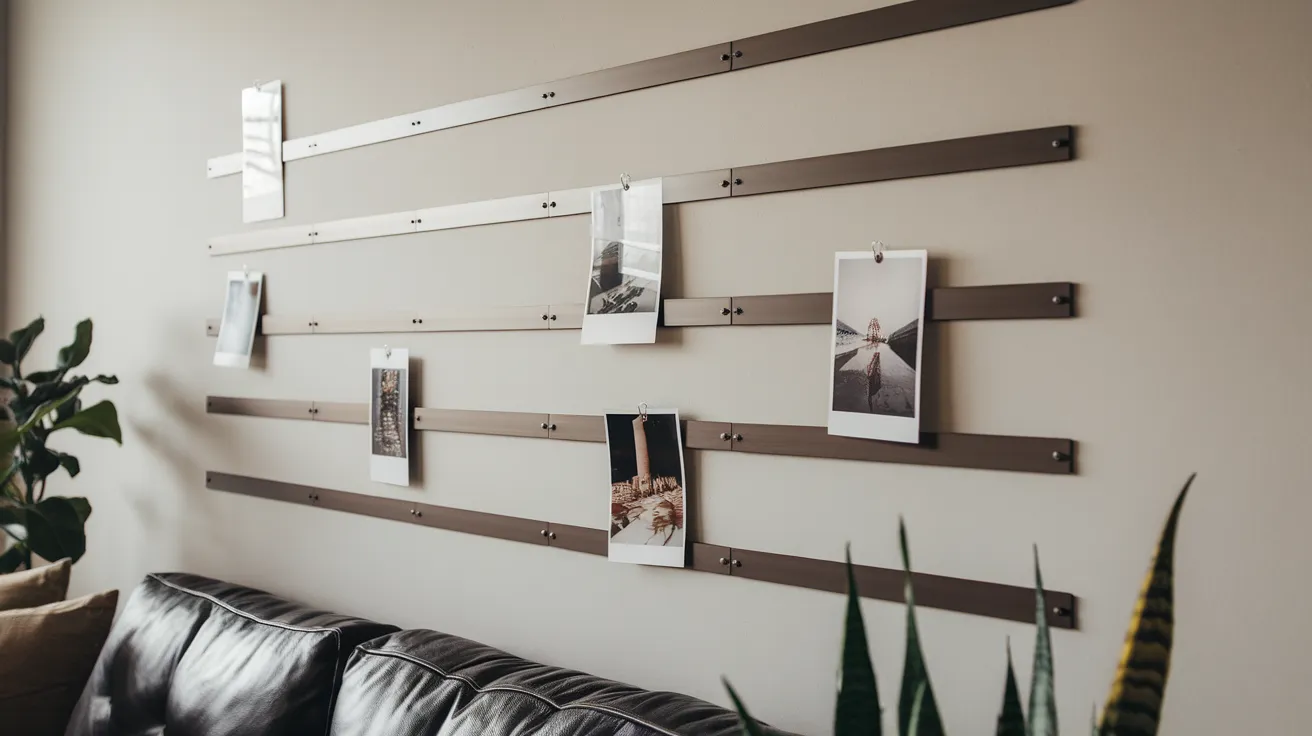
Install thin metal strips on your wall and use small magnets to hold photos in place. This creates a clean, hardware-free look while allowing for quick changes.
Paint the metal strips to match your wall color so they blend in and become nearly invisible. The photos will appear to float against the wall with no visible support.
This method works well for lighter prints and photos without frames. Group several strips at different heights to create zones for different photo themes or periods.
10. Vertical Gallery
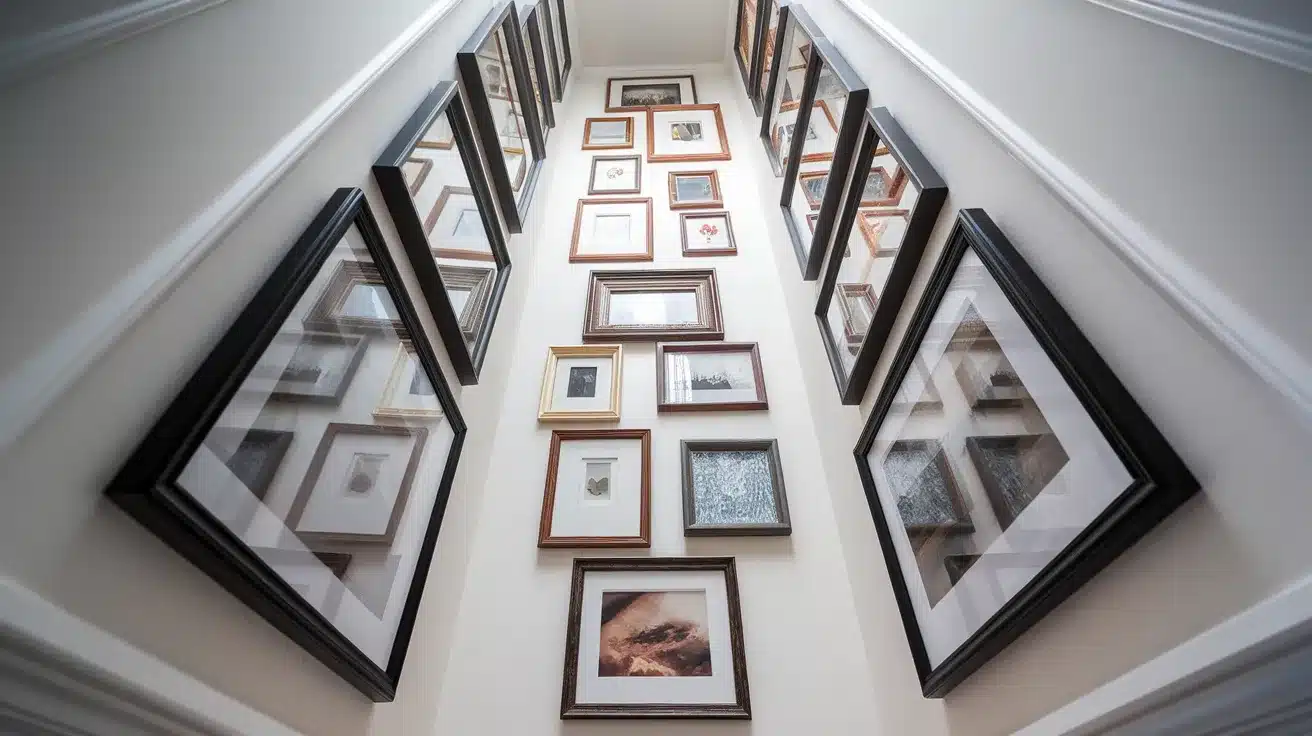
Line up frames in a tall, narrow grouping that draws the eye upward. This layout makes ceiling heights seem taller in small rooms.
Vertical displays bring stairwells and slim wall sections to life. Keep frames a similar width, while heights can vary for interest.
This layout naturally guides visitors through a story. Consider arranging photos in time order or by theme from bottom to top.
11. Nature-Inspired Walls
Fill your walls with outdoor scenes, plant close-ups, or animal photos. Natural wooden frames add to the organic, outdoorsy mood.
These images bring calm feelings to busy homes. Green tones are known to reduce stress and create a sense of peace in any room.
Group photos by season or location for a cohesive story. Mix professional shots with your nature photos for a more personal collection.
12. Travel Gallery
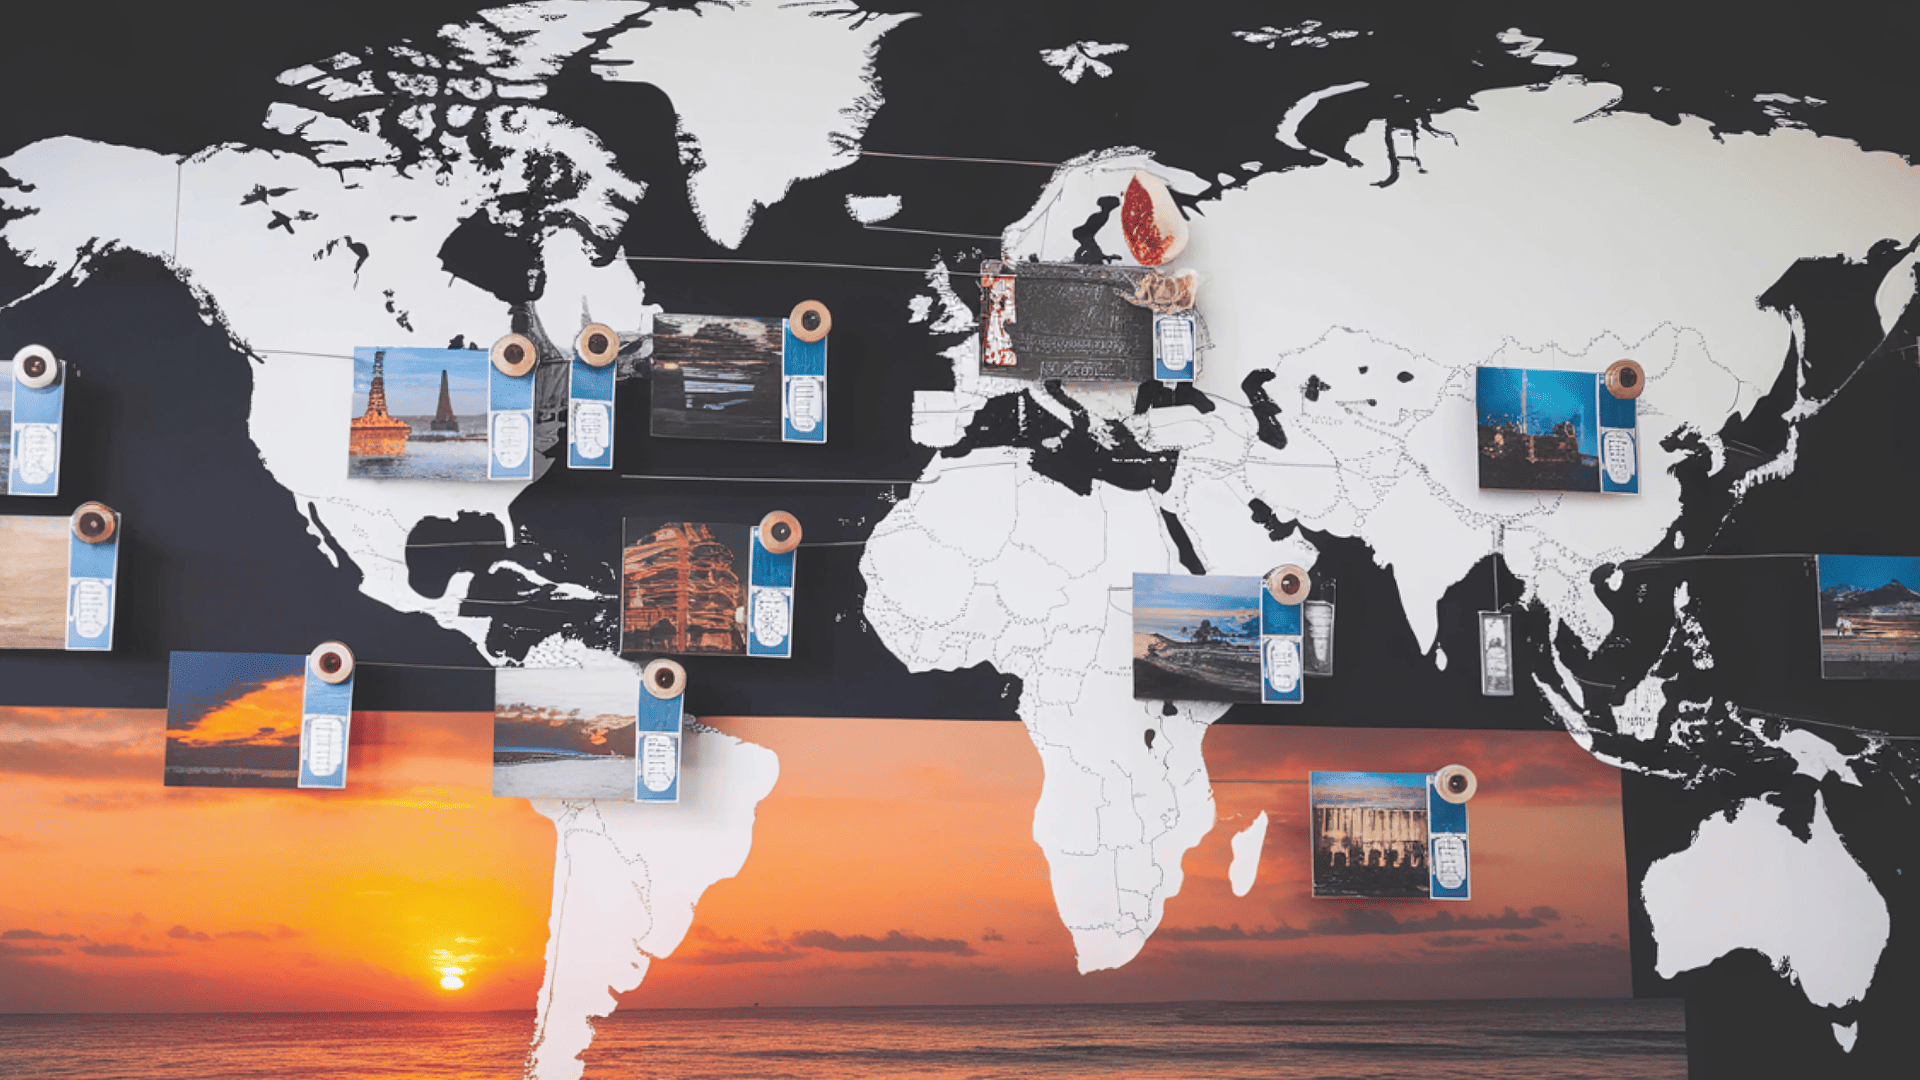
Show off places you’ve visited through photos and maps. This daily reminder of past trips brings happy thoughts to ordinary days.
Group images by trip or region. Adding small items like tickets or coins near related photos creates a museum-like display of your travels.
Use simple frames in one or two colors to unify diverse travel scenes. The photos themselves provide plenty of color and visual interest.
13. Hinged Panel Display

Mount hinged wooden panels to your wall that swing open like cabinet doors, with photos attached to both the wall and panel surfaces for a layered display.
When closed, the panels show one set of images, but swing them open to reveal hidden photos behind. This creates an interactive element that visitors can explore.
This method doubles your display space while adding a fun, surprising component. The panels can be painted or wallpapered to blend with your decor when closed.
14. Ribbon Suspension System
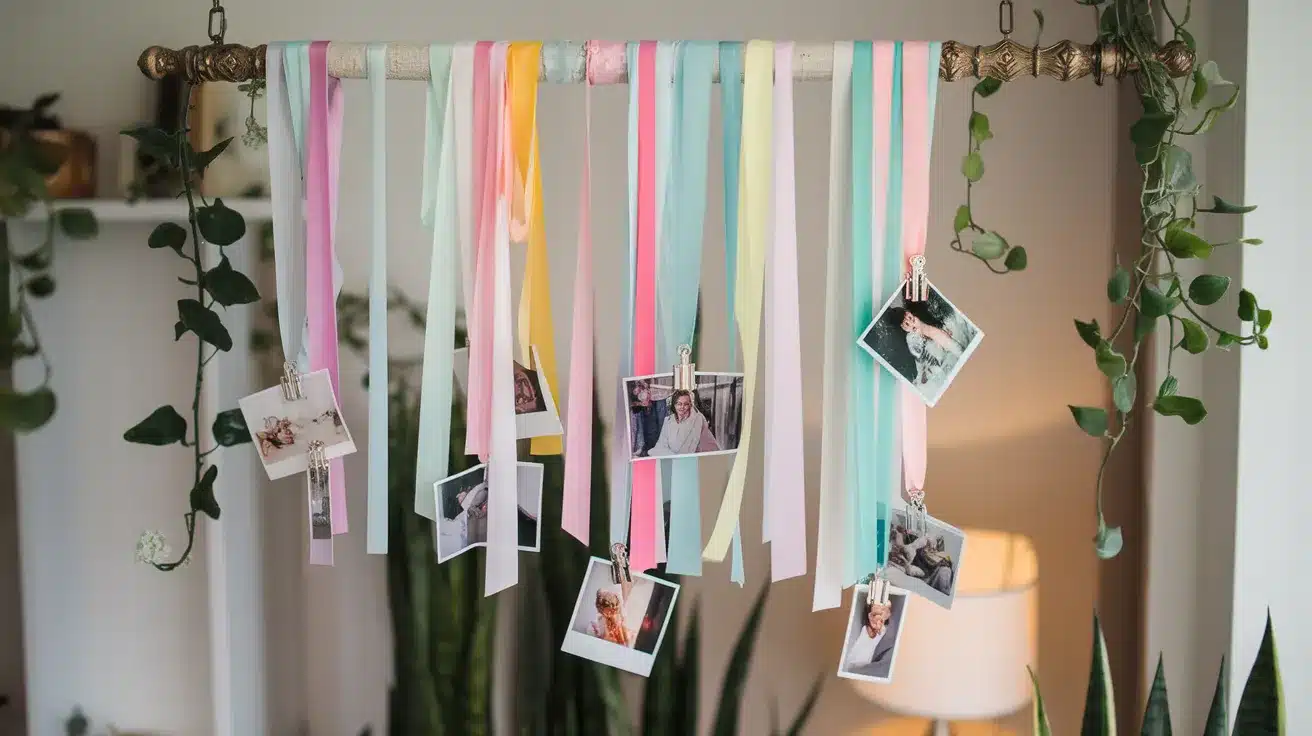
For a soft, flowing display, hang photos from colorful ribbons of varying lengths attached to a decorative rod or crown molding near your ceiling.
Secure photos to ribbons using small clips, decorative pins, or by threading the ribbon through small holes at the top of each print.
This feminine, whimsical approach adds movement and color to your display. The ribbons can be changed seasonally, and the varying heights create visual interest across the wall.
15. Corner Bracket Display
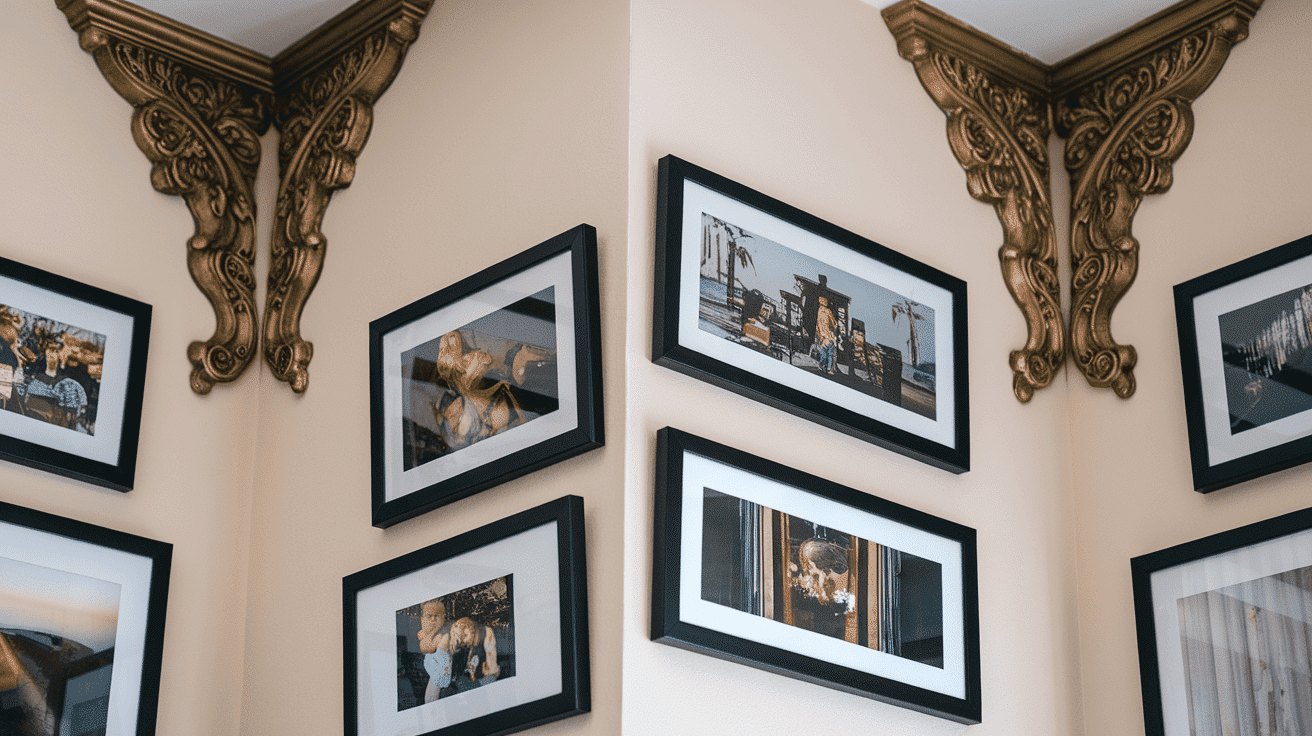
Install decorative corner brackets to support your framed photos at angles where walls meet, creating a three-dimensional display that wraps around room corners.
Position photos to face different directions based on the main viewing areas in your room. This method turns often-unused corner spaces into focal points.
This approach works particularly well in small rooms where wall space is limited. The brackets themselves can become part of the display with ornate or colorful designs.
16. Above the Sofa
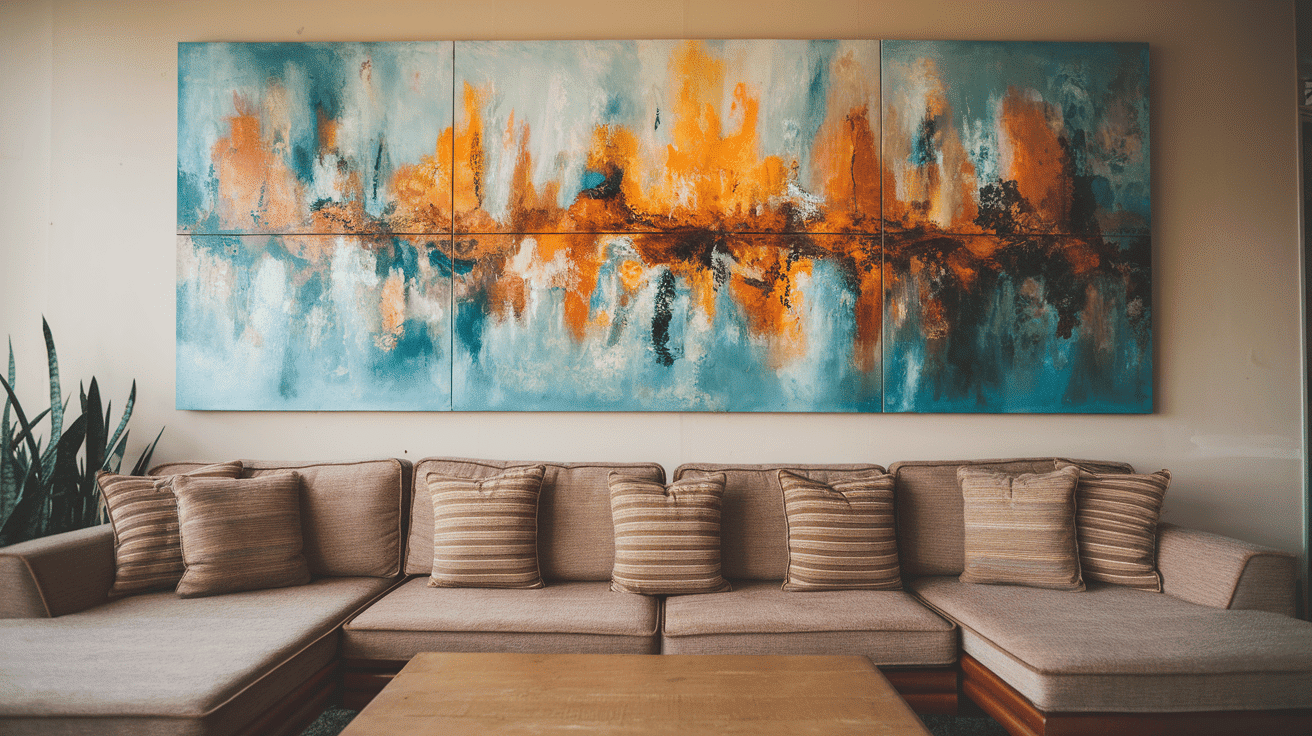
The wall space over your couch needs properly scaled art. A good rule is to choose pieces that fill about two-thirds of the sofa’s width.
Hang art at eye level when seated on the sofa. Too high placement is a common mistake that makes rooms feel off-balance.
Frame lightweight pieces for safety above seating areas. Heavy frames or glass could cause injury if they fell from this busy household spot.
17. Hallway Wall Art

Long hallways provide perfect gallery space. The natural path gives viewers time to see each piece as they walk by.
Keep frames smaller in narrow halls to avoid a crowded feeling. The goal is to add interest without making the space feel smaller.
Light these areas well so art can be seen clearly. Small spot lights or picture lights work well in halls that may lack natural light.
18. Bedroom Picture Wall
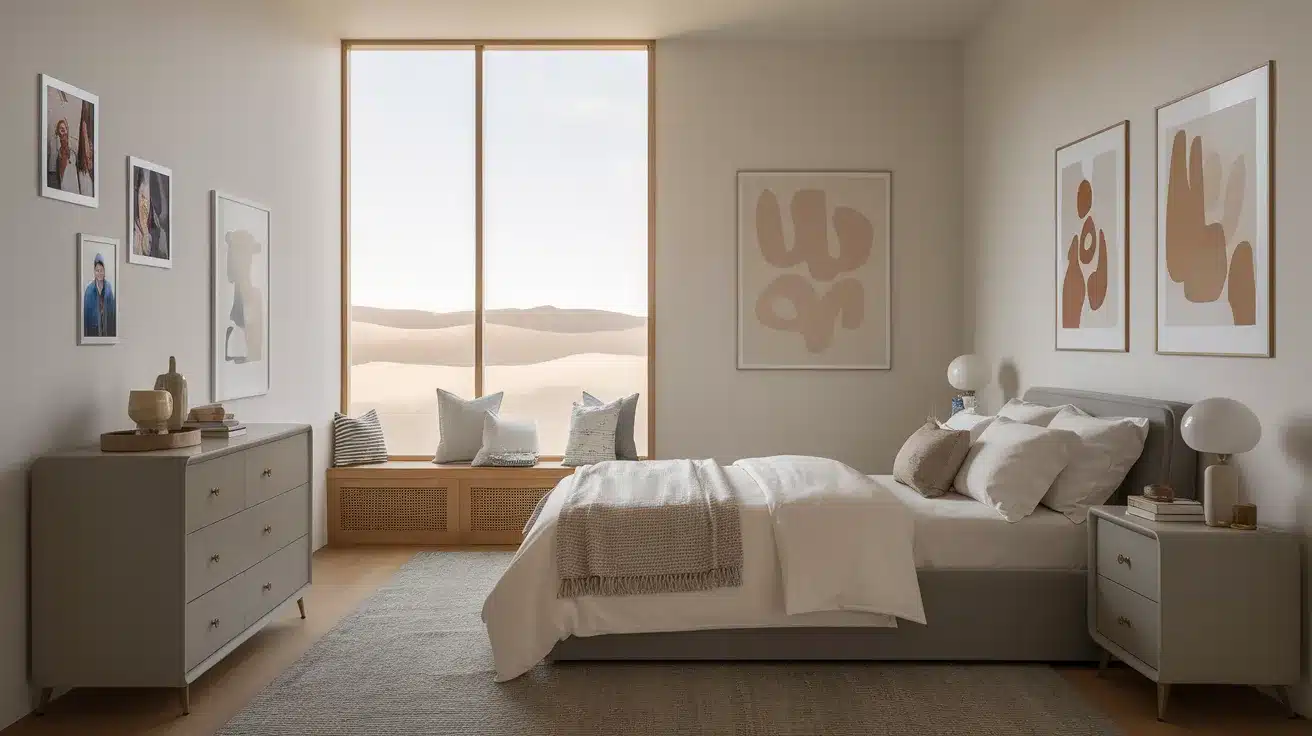
Choose calming images for rooms where you sleep. Soft landscapes, family photos, or abstract pieces in cool colors work well here.
Keep bedroom art simple and not too busy. This space needs a restful mood, so avoid images that might feel too active or loud.
Place special photos where you’ll see them first thing in the morning. Waking up to loved faces or happy memories sets a good tone for the day.
19. Kitchen Art
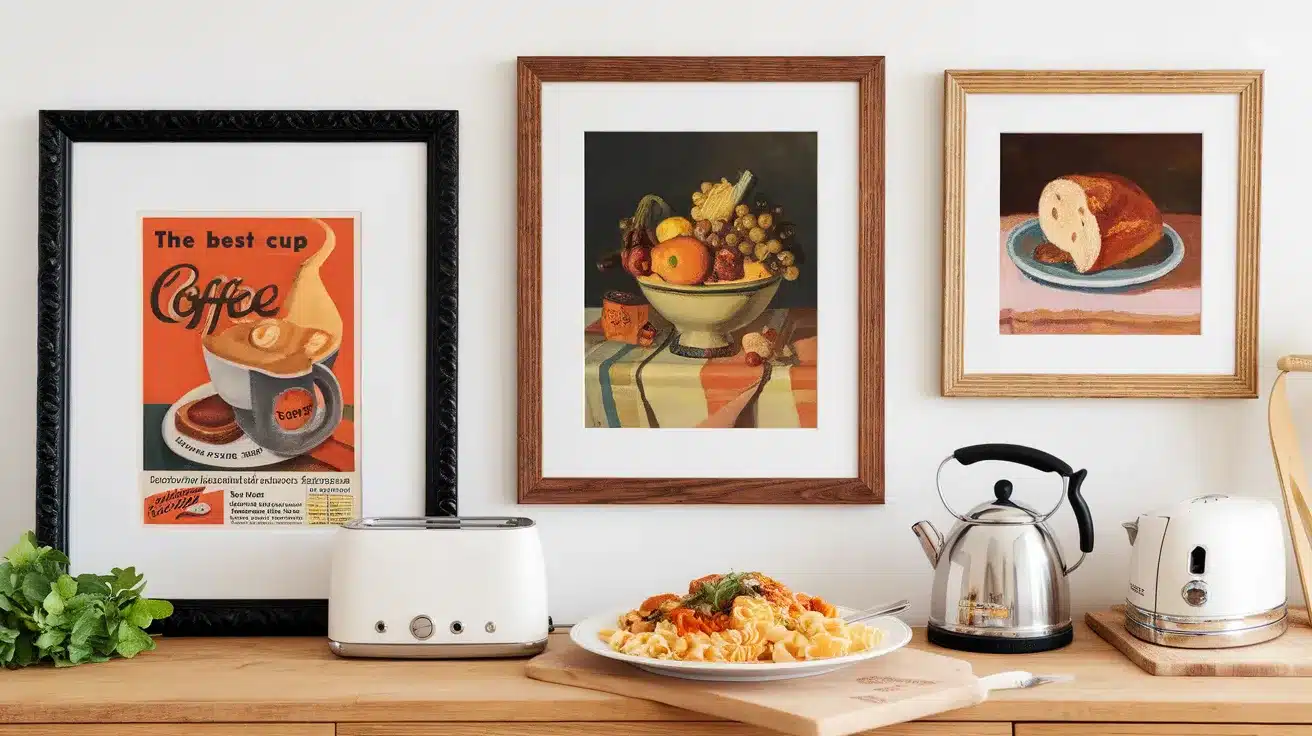
Food photos, herb prints, and market scenes are well-suited to cooking spaces. They add color without looking out of place in a busy kitchen.
Choose frames that can withstand moisture and heat. Avoid placing paper prints without glass near sinks or stoves.
Kitchen art should make you hungry or happy. This room’s practical nature means its art can be fun rather than serious.
20. Home Office Gallery
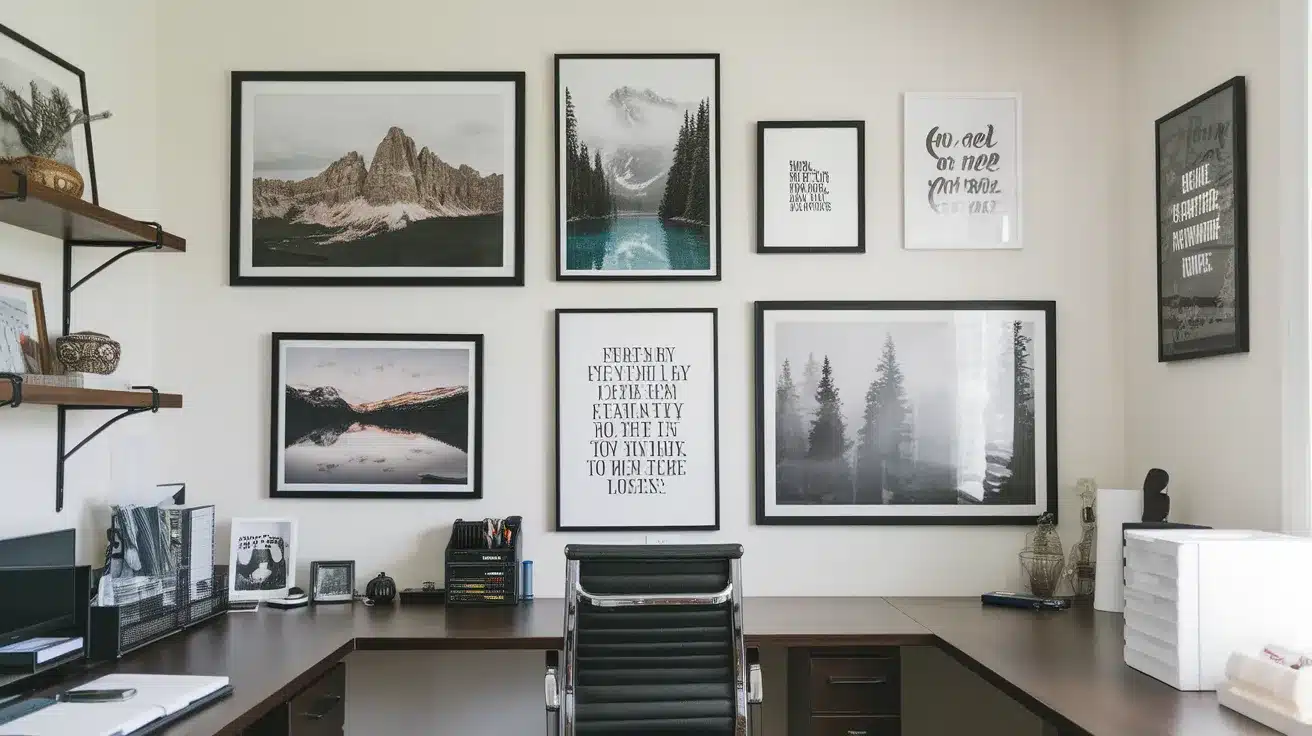
Fill your workspace with images that boost focus and good feelings. Think forest views, success quotes, or photos of goals achieved.
Keep the display neat and not too busy. Your brain needs some visual rest while working, so allow space between frames.
Put your most meaningful pieces where you’ll see them during video calls. They’ll serve as talking points and show your personality to others.
21. Hanging Art with Washi Tape
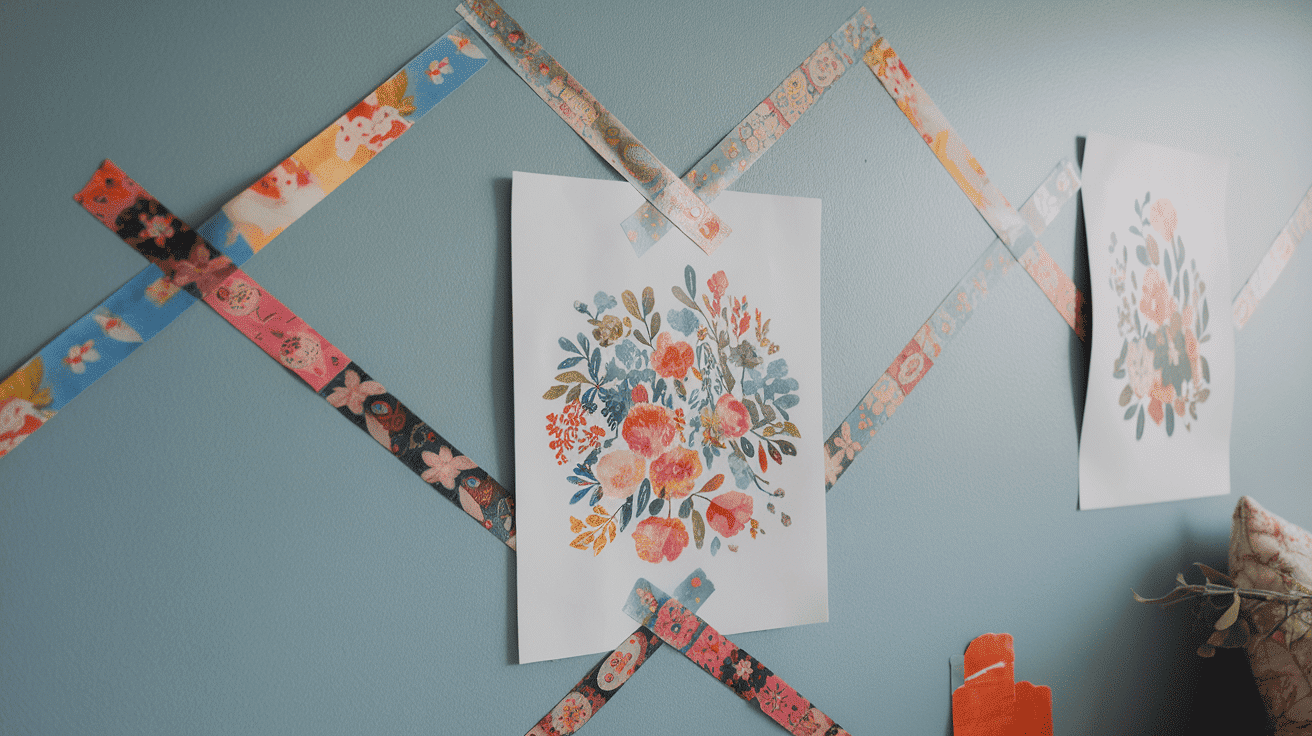
Colored paper tape holds lightweight prints without wall damage. This renter-friendly option comes in countless patterns and hues.
Create frames using the tape around unframed prints. The pop of color adds extra visual interest to simple black and white images.
You can change your display with the seasons or your mood. The low cost and easy removal make this perfect for people who like frequent changes.
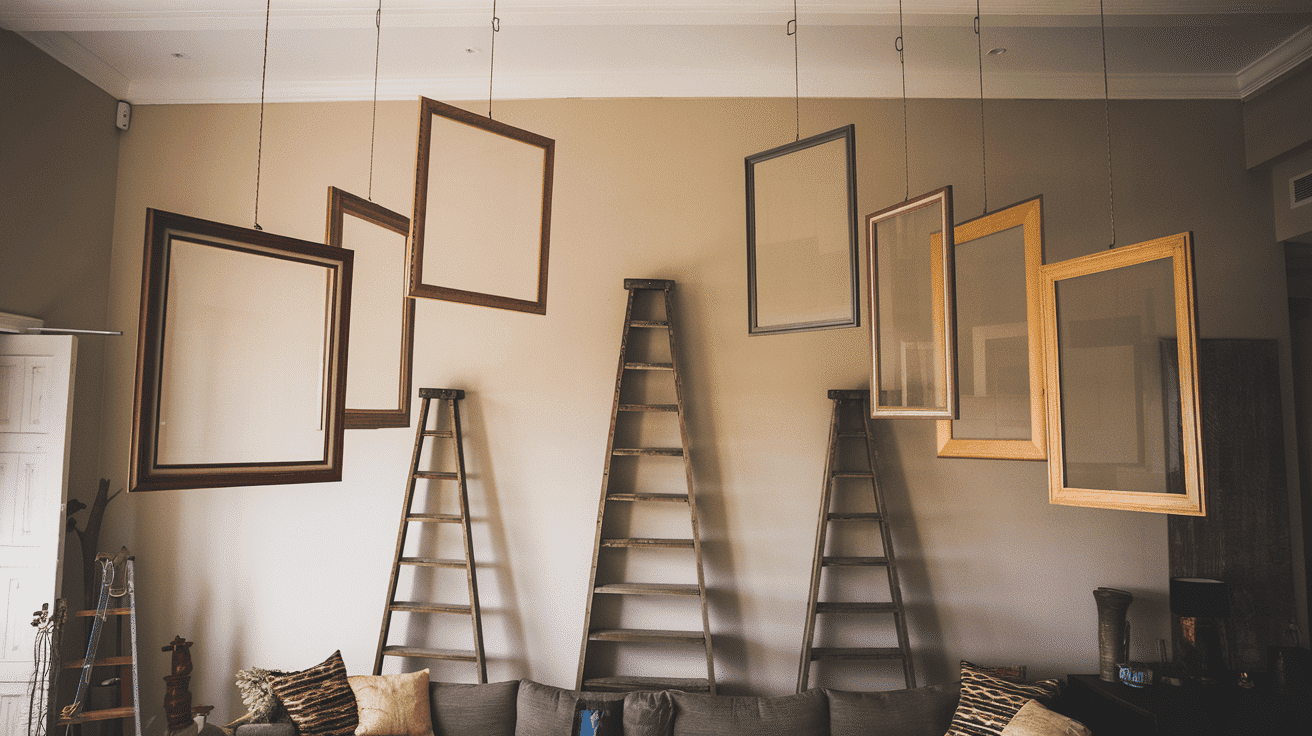
22. Repurposed Materials
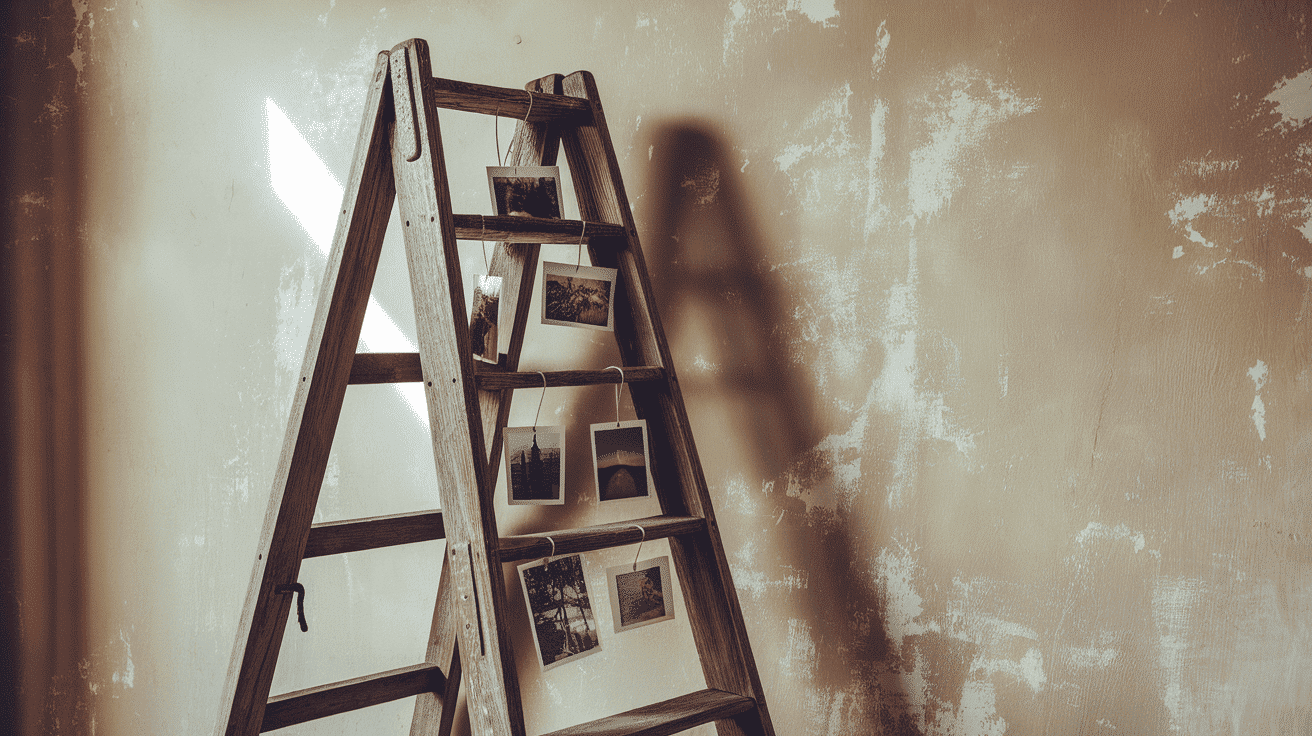
Turn old wooden items into unique frames or hanging systems. Ladder rungs, window frames, and wooden trays make great photo holders.
The worn look of these items adds character to plain rooms. Each scratch and mark tells a story alongside the photos they display.
This approach is well-suited to casual, rustic home styles. The unfinished quality pairs nicely with both color and black-and-white images.
23. Photo Rails
Install thin, track-like rails along your walls from which you can hang photos using clear cords. This method creates a floating look while keeping pictures firmly in place.
The rails mount at the ceiling line or at any height you prefer. The hanging cords allow you to adjust picture heights without making new holes.
This system is often used in art galleries due to its clean look and flexibility. Adding new photos or changing their order becomes quick and simple.
24. Creating a DIY Pegboard Wall
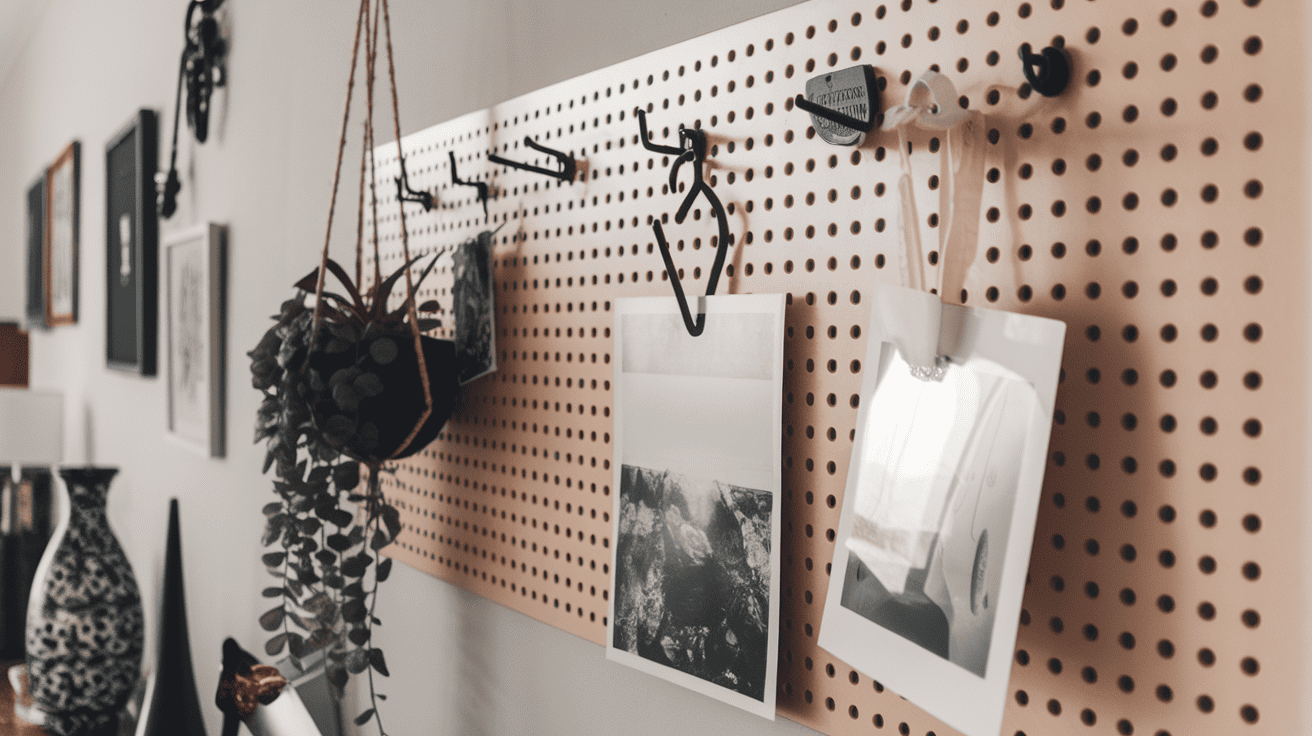
Mount a perforated board and add hooks for frames. This system allows for endless layout changes without new wall holes.
Paint the pegboard to match your wall or pick a bold color. The tiny hole pattern adds subtle texture even in spots without frames.
Add small shelves, plant holders, or other items among your frames. The system holds more than just pictures for a truly useful display.
25. Frameless Art Display
You can skip frames completely and stick photos right to your wall. Special mounting strips hold pictures safely without damaging paint.
This clean look focuses on the images themselves. Without frame borders, you can place pictures closer together for a bigger impact.
The money saved on frames lets you print more photos. For the cost of just a few framed pieces, you can fill an entire wall.
Conclusion
Filling your walls with photos and art turns empty spaces into personal stories. The methods in this guide offer something for every style, space, and skill level.
Whether you choose gallery walls for impact, floating shelves for flexibility, or washi tape for rental-friendly options, the right display method makes your home feel truly yours.
Try starting with one idea that suits your current needs. For example, you could create a simple wire display in your kitchen or arrange family photos in your hallway. Small changes can make big differences.
Ready to give your walls new life? Pick your favorite method and hang just one picture today. Your walls and your mood will thank you.
What picture hanging idea will you try first? Share in the comments below!