Do you have a sloped yard that makes outdoor living hard? Many homeowners struggle with uneven ground that limits how they can use their space.
Water pools in low spots, furniture wobbles, and the whole area feels wasted.
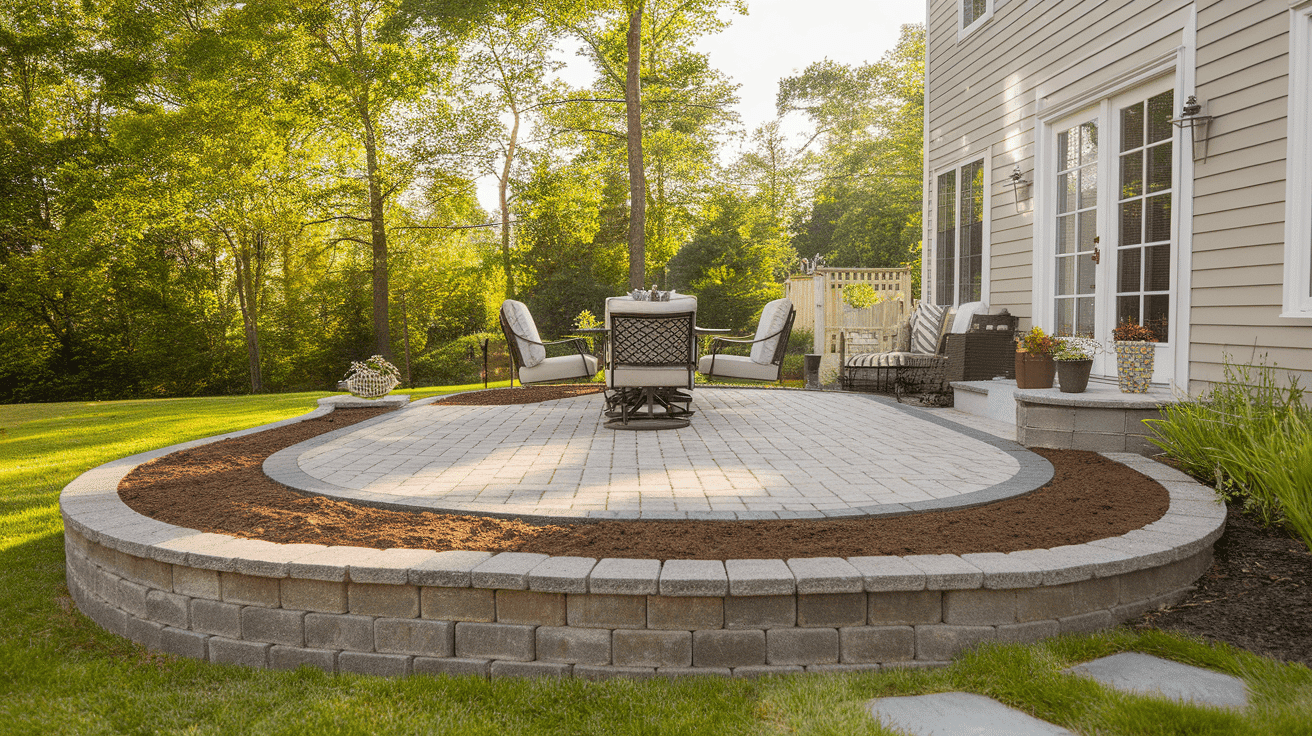
A raised paver patio solves these problems by creating a flat, useful surface that looks great.
This guide will show you exactly how to build one in a single weekend, from marking your space on Friday evening to enjoying your new patio by Sunday night.
Read on to learn how just two days of work can give you years of outdoor living space.
For a detailed walkthrough on extending your patio with pavers, check out this comprehensive guide on DIY Paver Patio Extension: A Complete Step-by-Step Guide, which covers everything from planning to execution.
Steps to Create a Raised Paver Patio
To make a raised paver patio, gather these items first:
| Material | Description |
|---|---|
| Pavers in your chosen color | Main field pavers for the patio surface |
| Border pavers in a darker color | For edging the patio |
| Wall blocks for the raised sections | To build raised areas or walls |
| Capstones for the top of the walls | To finish the top of the raised walls |
| Gravel (3/4-inch size works well) | For the base layer |
| Paver base sand | To level the pavers |
| Poly sand for joints | To fill the gaps between pavers |
| String and stakes for marking | To outline and mark your patio layout |
| Level tool | To ensure the surface is level |
| Shovel and rake | For digging and leveling materials |
| Plate compactor (can be rented) | To compact the gravel and sand layers |
| Rubber mallet | To gently tap pavers into place |
| Landscape fabric | To prevent weed growth underneath the patio |
Pro Tip: Buy about 10% extra pavers to allow for cuts and breaks. This saves you from running out during your weekend work.
1. Friday Evening: Planning and Prep
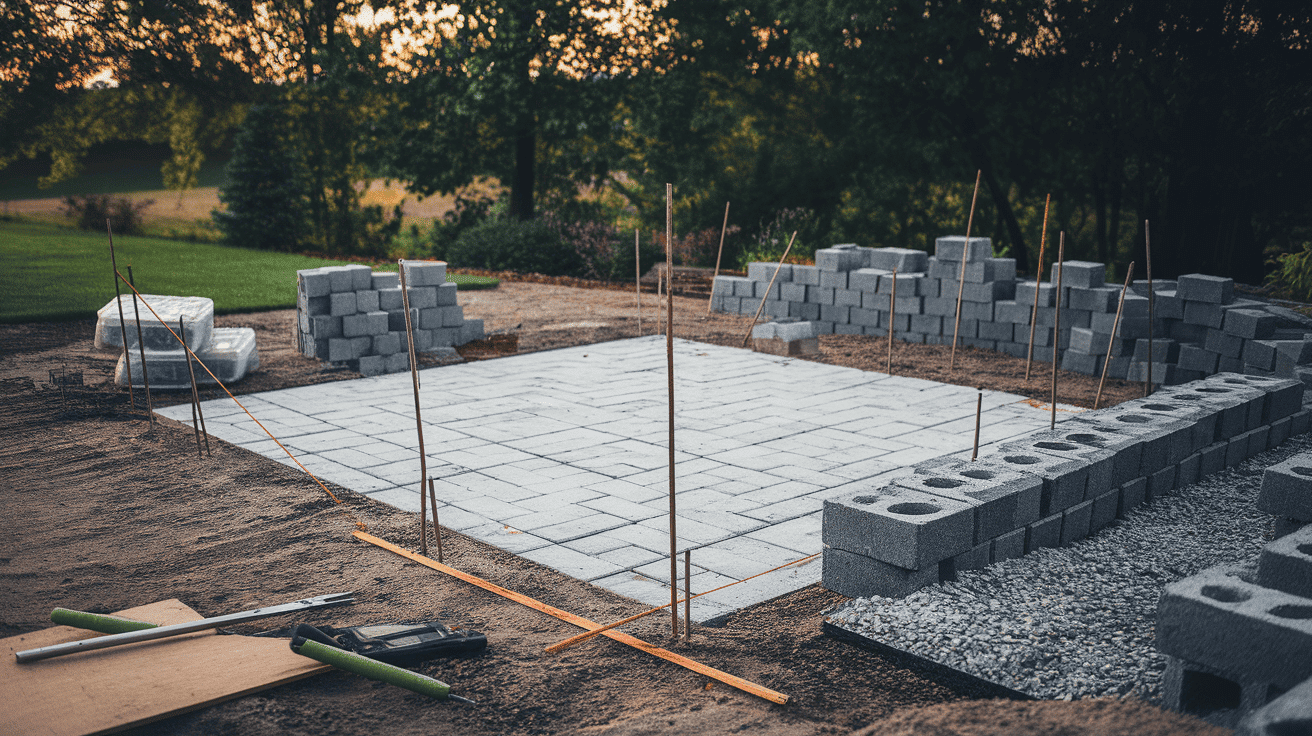
Start your project on Friday evening with these steps:
Mark the outline of your patio using stakes and string. Make sure the corners are square by measuring diagonally from corner to corner. Both measurements should be equal.
Call your local utility company to mark any underground lines before you dig. This is a safety step you can’t skip. Unload all your materials and place them close to your work area. Sort the pavers, wall blocks, and other items so they’re ready for the morning.
2. Saturday Morning: Site Work
Begin early on Saturday with the heavy digging work:
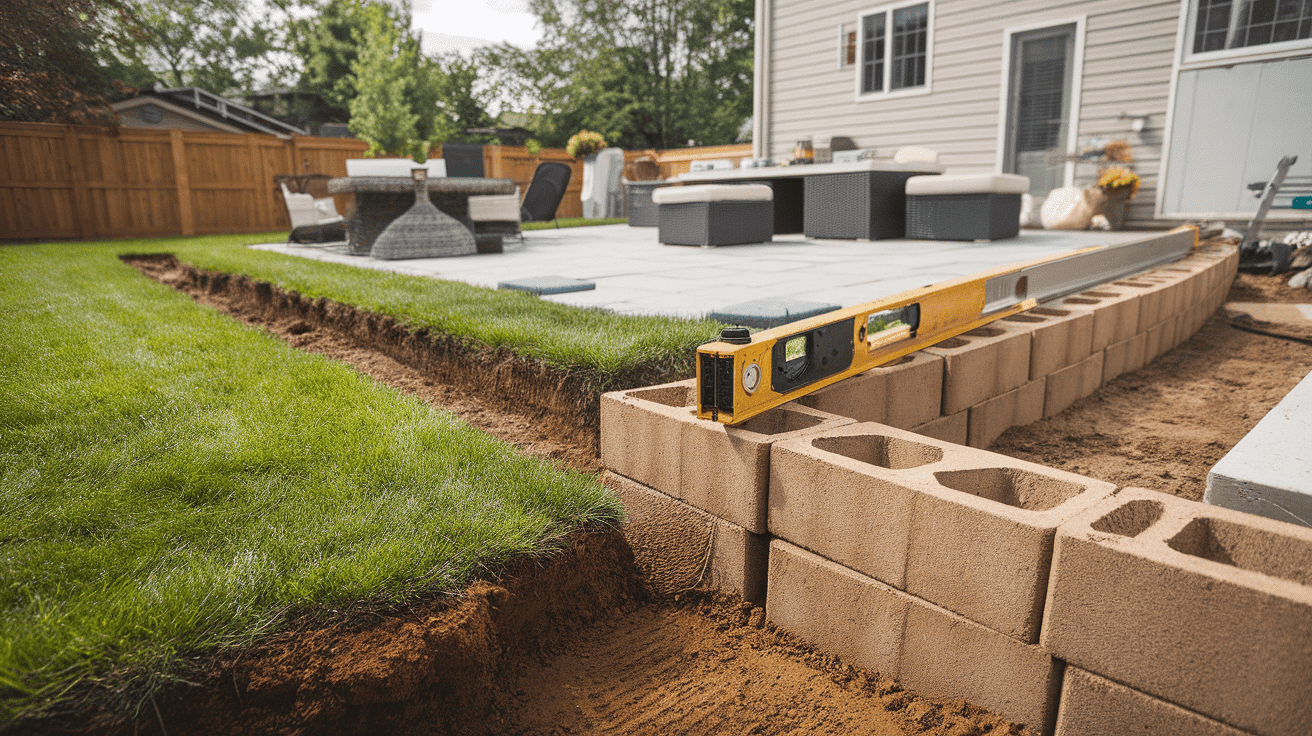
Remove all grass and topsoil from your marked area. Dig about 8 inches deep for the patio base. Save good topsoil for later use in garden beds. For a raised patio, you’ll need to build a small wall first.
Start by digging a trench about 6 inches deep where the wall will go. Make it level and firm. Place your first row of wall blocks in this trench. Use a level to make sure they’re even. This base row is very important – take your time to get it right.
3. Saturday Afternoon: Building the Wall
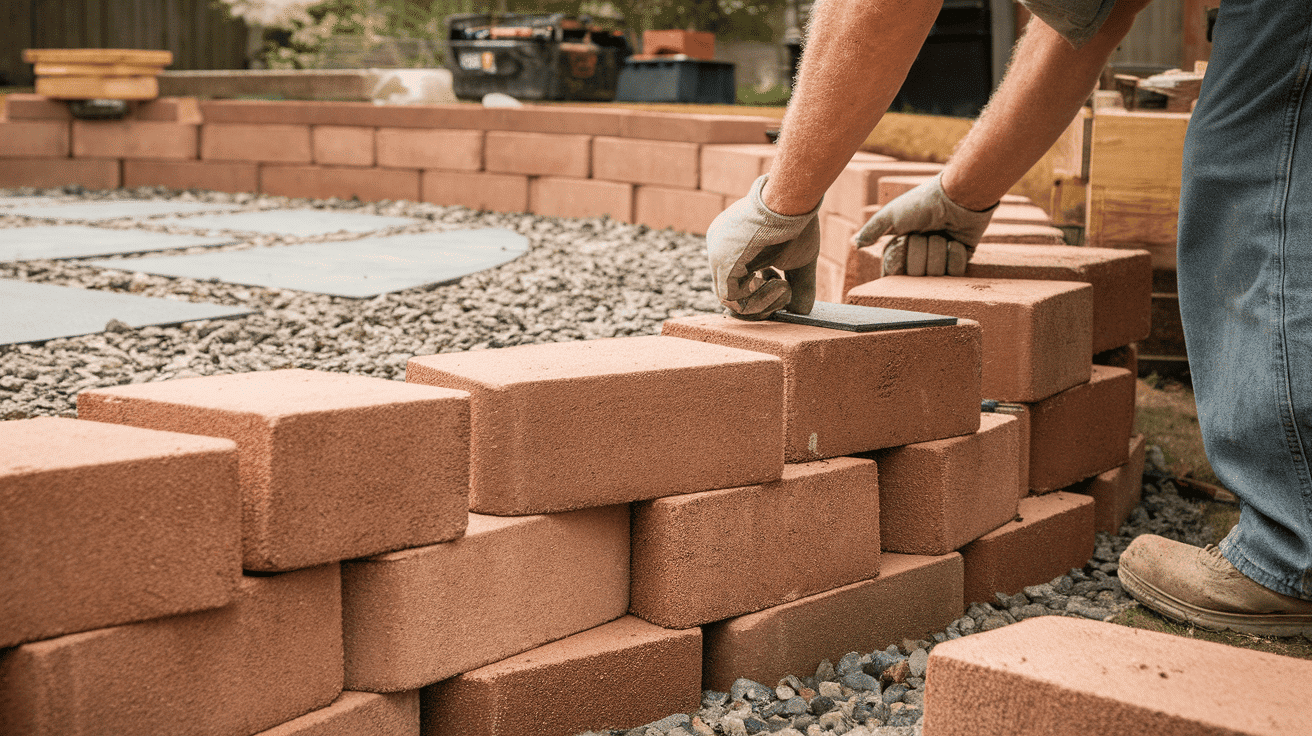
Continue with the wall work:
Stack the next rows of blocks, making sure to stagger the joints for strength. Most wall systems are made to stack easily with a slight setback for each row. As you build the wall higher, add gravel behind it for drainage. This helps prevent water from pushing against your wall.
When the wall reaches your desired height, add cap stones on top for a clean look. You may need to glue these in place with outdoor masonry glue.
4. Sunday Morning: Patio Base Prep
Start fresh on Sunday with base work:
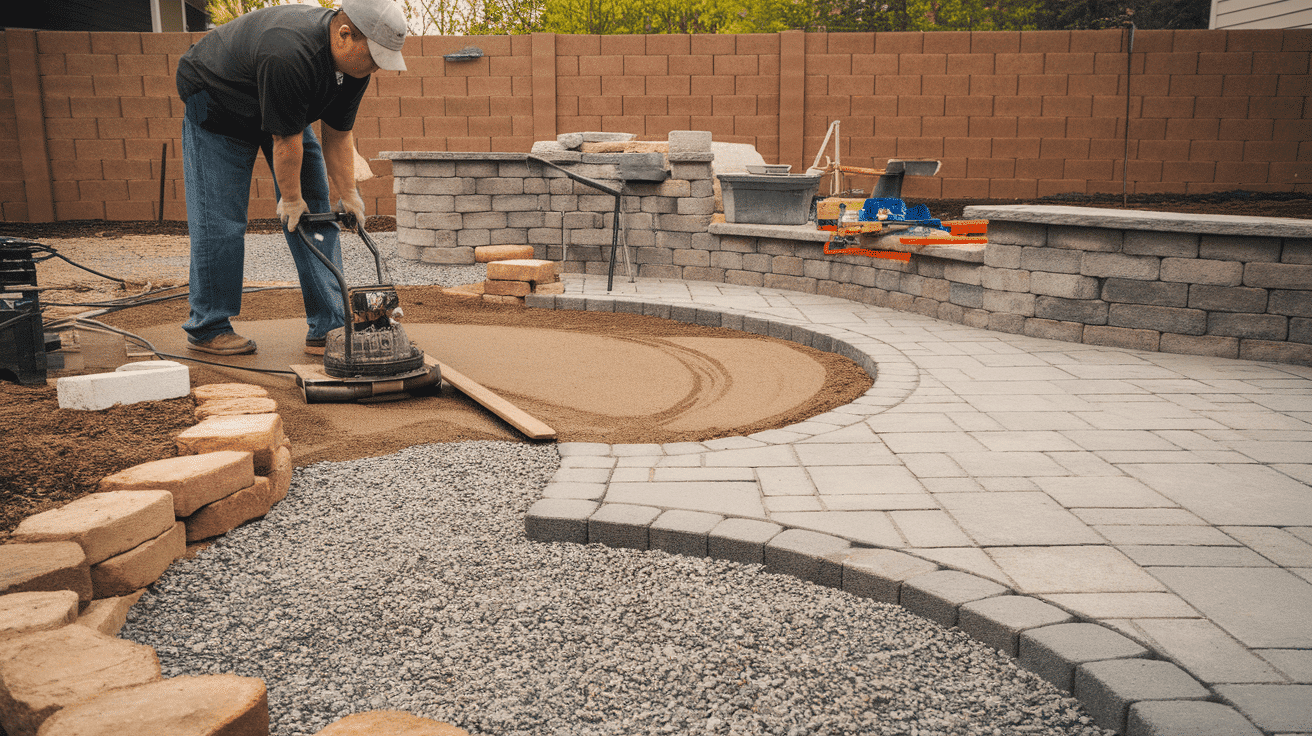
Fill the area inside the walls with layers of gravel. Add about 4 inches, then use the plate compactor to pack it down firmly. Add a 1-inch layer of paver sand on top of the gravel.
Make it smooth using a long, straight board. This is called “screeding” the sand. The sand should be perfectly level. Take time on this step – it affects how even your final patio will be.
5. Sunday Afternoon: Laying Pavers and Finishing

Now for the most satisfying part:
Start laying pavers from one corner, following a pattern you like. Place each paver firmly in the sand, using a rubber mallet to tap it into place. Use border pavers around the edges to create a nice frame. These often come in a darker color to make the edge stand out.
Once all pavers are placed, spread poly sand over the entire patio. Sweep it into the gaps between pavers. The poly sand hardens when wet and keeps pavers from moving. Spray the patio lightly with water to activate the poly sand. Be careful not to wash it out of the joints.
6. Final Touches
Add these finishing touches to complete your weekend project:
Clean up any extra sand or dirt from the patio surface. Add soil around the edges of your patio, leaving it about half an inch below the pavers so grass won’t grow over them. Set up your outdoor furniture and enjoy your new raised patio right away!
I’d like to acknowledge The Christian Hardscaper for the insightful video, which was a key reference in putting this guide together.
Care Tips for Your New Patio
Keep your weekend project looking good:
- Sweep your patio often to prevent dirt from settling into the joints.
- Pull any weeds that try to grow between pavers right away.
- Wash your patio once a year with plain water from a garden hose.
- Check the walls yearly for any blocks that might have shifted and fix them quickly.
Why Choose Pavers?
Pavers eliminate gravel’s mess and instability, offering a polished, low-maintenance outdoor area. Refer to these tables for a detailed comparison:
Raised Paver Patio vs. Gravel Patio
| Aspect | Raised Paver Patio | Gravel Patio |
|---|---|---|
| Cleanliness | Stable surface; joints lock materials in place. | Shifting gravel creates debris. |
| Comfort | Smooth, even surface for seating and walking. | Uneven texture; uncomfortable. |
| Maintenance | Minimal upkeep; polymeric sand prevents weeds. | Frequent raking and top-ups. |
| Longevity | Lasts decades with proper installation. | Degrades quickly; washes away. |
Raised Paver Patio vs. Brick Patio
| Aspect | Raised Paver Patio | Brick Patio |
|---|---|---|
| Aesthetic Appeal | Modern or rustic styles with varied colors/textures. | Classic, uniform look; may fade over time. |
| Durability | Resists shifting; handles freeze-thaw cycles well. | Prone to cracking in extreme cold; mortar joints weaken. |
| Maintenance | Replace individual pavers; joints filled with sand. | Requires repointing mortar; weeds grow in gaps. |
| Installation | Modular design; DIY-friendly with minimal tools. | Labor-intensive, skilled work for alignment/mortar. |
| Drainage | Permeable sand joints allow water flow. | Mortar joints trap water, risking erosion. |
While brick patios offer classic appeal, pavers provide easier repairs, better weather resistance, and modern versatility without relying on mortar. For a balance of durability and design freedom, raised pavers edge out traditional brick patios in most outdoor settings.
Why This Project Works?
This weekend’s patio project gives you big results in a short time. The raised design makes even sloped yards useful and adds eye-catching height to your outdoor space.
Using pavers means you don’t have to mix concrete or wait for it to dry. The wall blocks stack without mortar, making the work much faster.
The small size of this project – perfect for a sitting area with a few chairs – makes it easy to finish in one weekend while still making a big change to how your yard looks and works.
By Sunday evening, you’ll be sitting on your new patio, proud of what you built in just one weekend!
The Bottom Line
Building a raised paver patio in just one weekend gives you a quick way to make your outdoor space more useful. By following these steps, you’ve turned a plain or sloped area into a spot where you can relax and enjoy your yard.
Remember to check your patio after heavy rain to make sure water drains well. Keep the surface clean with basic sweeping and yearly washing.
The best part? You can start using your new patio right away – no waiting for concrete to dry or plants to grow.
So, what comes next? To make your weekend creation even better, maybe add some outdoor lighting, comfortable seating, or potted plants.
Let us know in the comments how your patio project turned out!