Wood is becoming increasingly common in home design as people look for ways to make their spaces feel warm and natural.
When you put wood on your walls, you get three big plus points: it never goes out of style, works with many different looks, and is good for the earth.
If you want to change how your rooms look without big building work, stick-on wood panels are a great fix. Anyone can use these to turn plain walls into something special.
This guide explores various woods, designs, and ideas for every room. From rustic boards to sleek styles, wood walls can transform your home.
Types of Wood Wall Designs
You can choose from several design styles when planning a wood wall in your home. Each type creates a different mood and works well with specific home styles.
| Design Style | Description | Best for |
|---|---|---|
| Rustic | Weathered, reclaimed wood with visible age signs like knots, splits, and color changes. | Farmhouses, cabins, spaces seeking warmth and history. |
| Modern | Minimalist designs with smooth finishes, using wood with even color and few knots. | Modern homes, spaces with a simple and uncluttered look. |
| Industrial | Raw, unfinished wood showcasing visible grain and natural patterns, often with a matte finish. | Loft-like spaces, homes with metal, concrete, or brick elements. |
| Contemporary | A mix of wood finishes, blending different wood types, colors, and patterns for an up-to-date look. | Homes that want versatility, from bold to subtle designs. |
A List of Ideas for Wall Design with Wood
Looking for ways to use wood on your walls in different rooms? Here’s a room-by-room guide with specific ideas to help you find the perfect wood wall design for every space in your home.
Kitchen
1. Sleek and Modern with Horizontal Wood Slat Wall Design

A modern kitchen with a clean, minimalist design featuring horizontal wooden slats on the walls. The wooden slats are light in color, adding texture and warmth to the space.
2. Weathered Wood Gray

Soft gray reclaimed wood creates a calm, modern farmhouse feel, offering a subtle texture that blends perfectly with the surrounding neutral tones of the kitchen.
3. Cobblestone Wall Planks
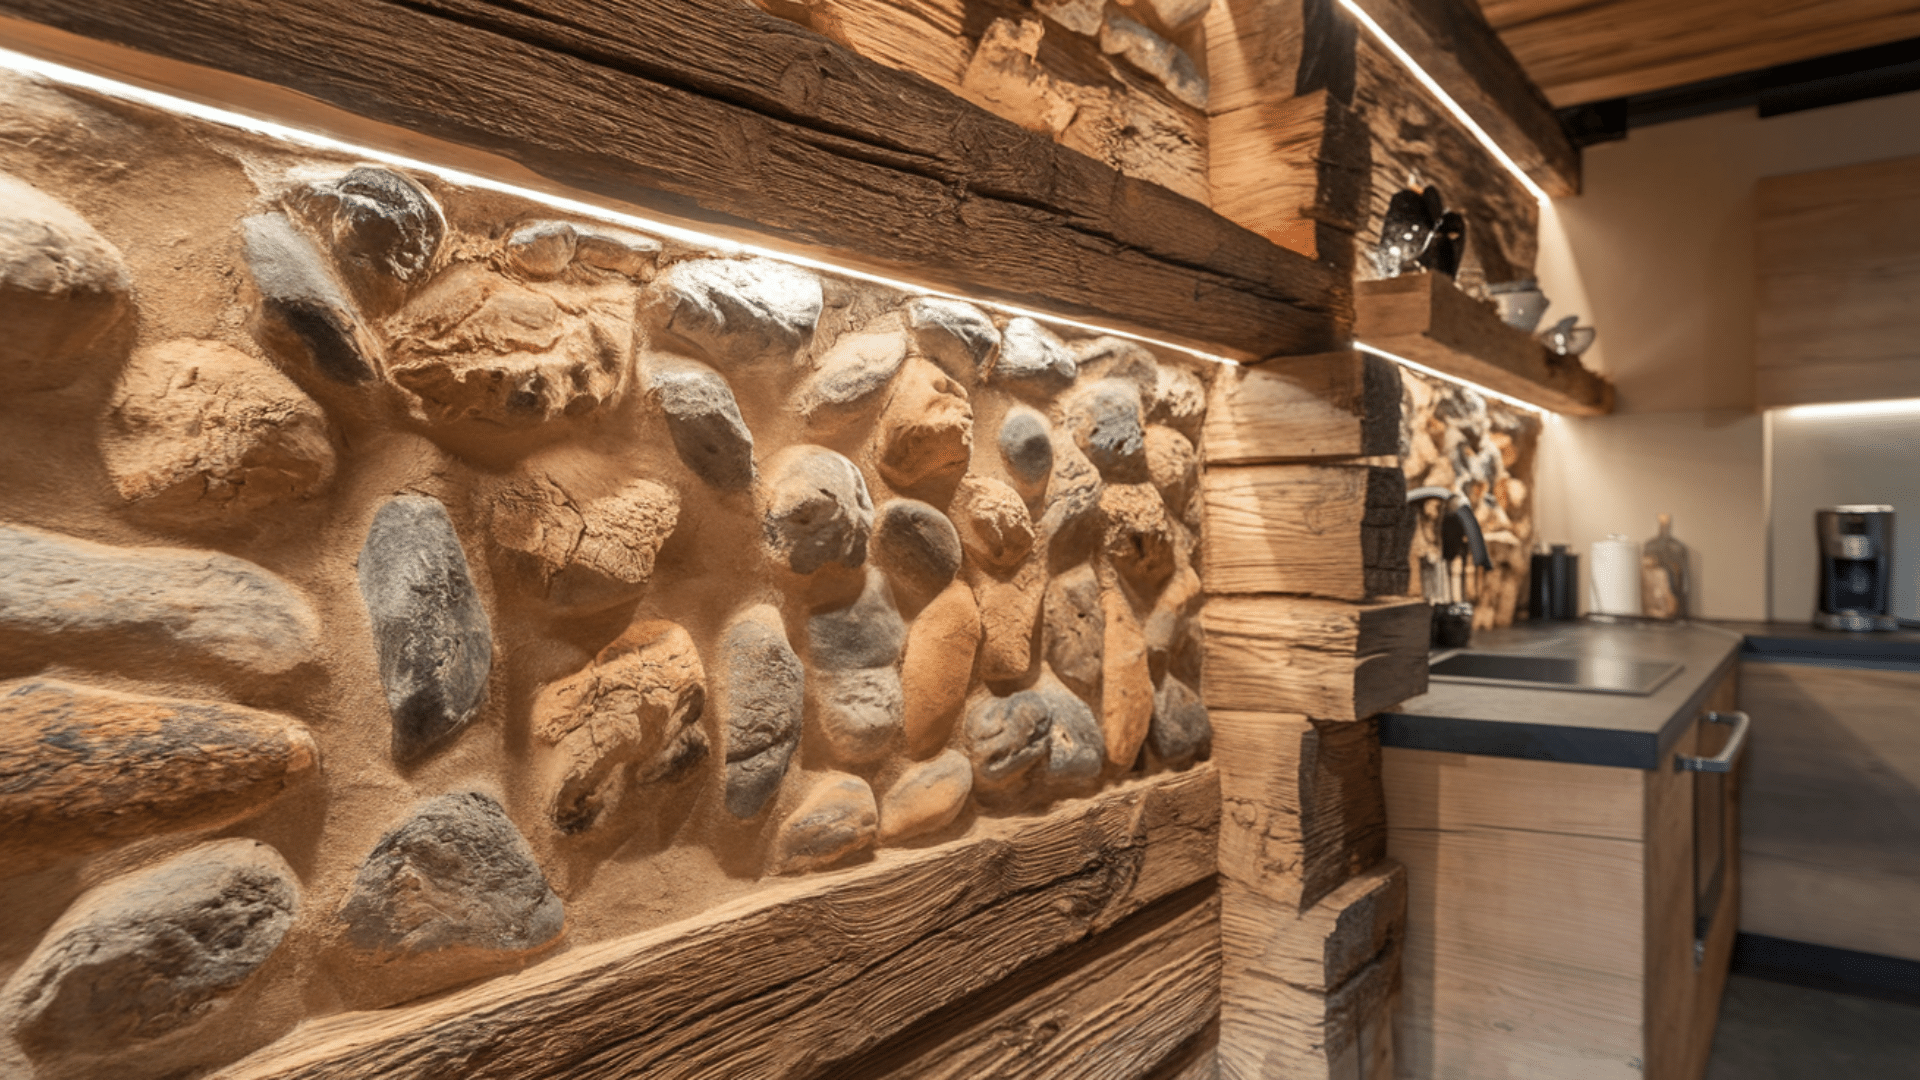
Rustic cobblestone-inspired wood planks bring texture and earthy charm to the kitchen, combining the warmth of wood with a unique stone-like appearance.
4. Re-claimed Barrel Oak

Reclaimed barrel oak planks add rich, deep tones to the kitchen, with natural imperfections that tell a story, making the space feel both vintage and inviting.
5. Hamptons Plank Wall

Light-colored Hamptons planks create an airy, coastal vibe, transforming the kitchen with their soft tones and breezy, fresh feel that enhances the space.
6. Reclaimed Weathered Wood White

Whitewashed reclaimed wood adds subtle texture and brightness to the kitchen, offering a natural, rustic feel with a clean and modern twist.
7. Minimalist Fir

Clean, light fir wood planks create a minimalist design, bringing natural warmth and simplicity to the kitchen with straight, smooth grains and a serene tone.
Living Room
8. Hamptons Plank Details

Subtle Hamptons wood details add coastal charm to the living room, with light-colored planks that bring brightness and airiness to the space.
9. Reclaimed Sierra Silver

Reclaimed silver-toned wood beams bring an upscale, rustic touch to the living room, offering sophisticated contrast against modern, sleek furnishings.
10. Charcoal Wood Planks

Deep, dramatic charcoal wood planks create a bold statement in the living room, contrasting beautifully with light furniture and bright accents.
11. Reclaimed Weathered Wood Gray

Soft gray reclaimed wood adds texture and warmth to the living room, providing a neutral, calming backdrop that enhances modern décor.
12. Golden Oak around the Fireplace

Rich golden oak wood surrounds the fireplace, adding warmth and elegance while becoming the living room’s focal point.
Bedroom
13. Golden Oak Bedroom Feature Wall

A golden oak feature wall in the bedroom brings warmth and natural beauty, creating a cozy, inviting space for relaxation.
14. Reclaimed Rustic Slate

Reclaimed rustic slate wood brings multi-tonal texture and earthy charm to the bedroom, creating a cozy, rustic atmosphere with a touch of history.
15. Minimalist Fir behind the Bed

Light fir wood planks behind the bed create a calm, minimalist ambiance, offering a clean, serene backdrop for a modern bedroom.
16. Vertical Wood Slat Accent Wall

A modern bedroom featuring a stunning vertical wooden slat accent wall behind the bed. The slats’ rich, warm wood tones create a cozy, inviting atmosphere.
17. Charcoal Planks

Deep charcoal planks create a bold accent wall in the bedroom, offering dramatic contrast against soft bedding and bright furniture.
Bathroom
18. Hazelnut Wood Planks
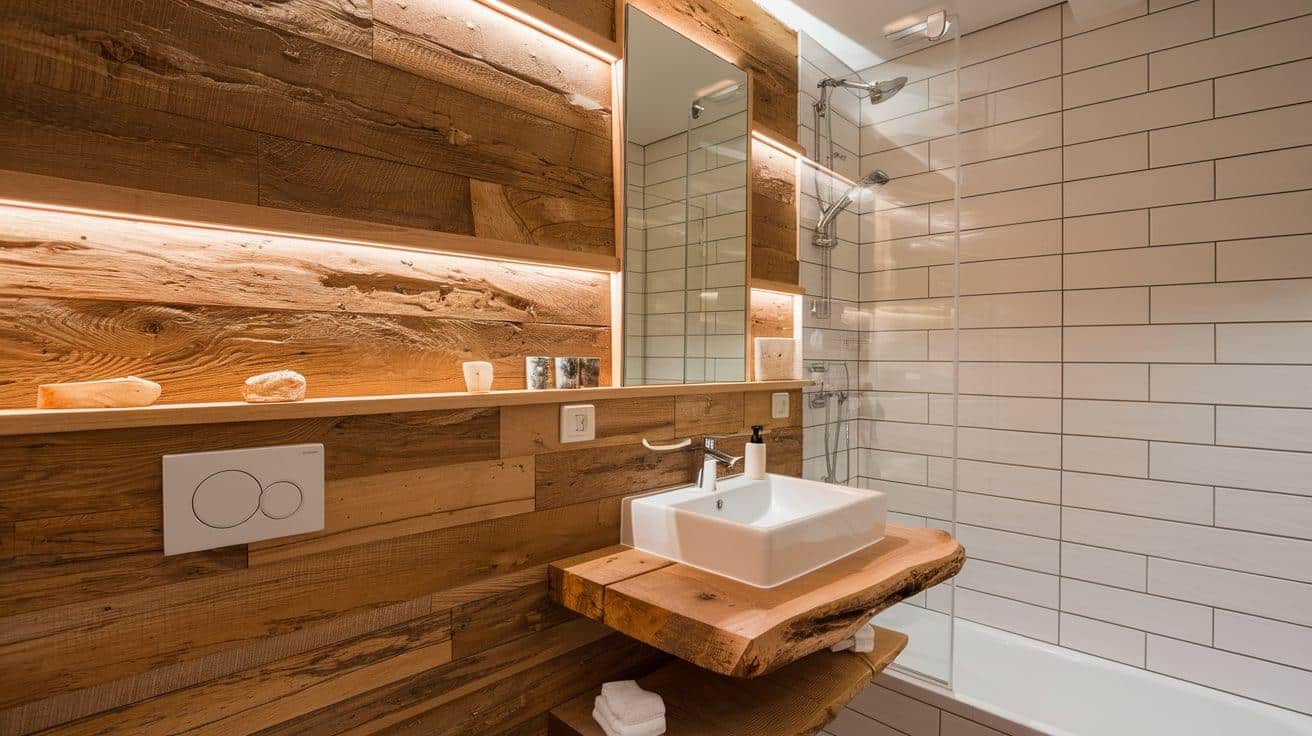
Rich hazelnut wood planks bring warmth and natural beauty to the bathroom, adding depth and texture while keeping the space inviting and cozy.
19. Reclaimed Barrel Oak Bathroom Wall

Reclaimed barrel oak wood creates a timeless, rustic appeal in the bathroom, adding unique character and warmth to the walls.
20. Minimalist

Sleek, straight-grained fir wood creates a modern, minimalist vibe in the bathroom, offering clean lines and subtle natural texture.
21. Reclaimed Weathered Wood Gray
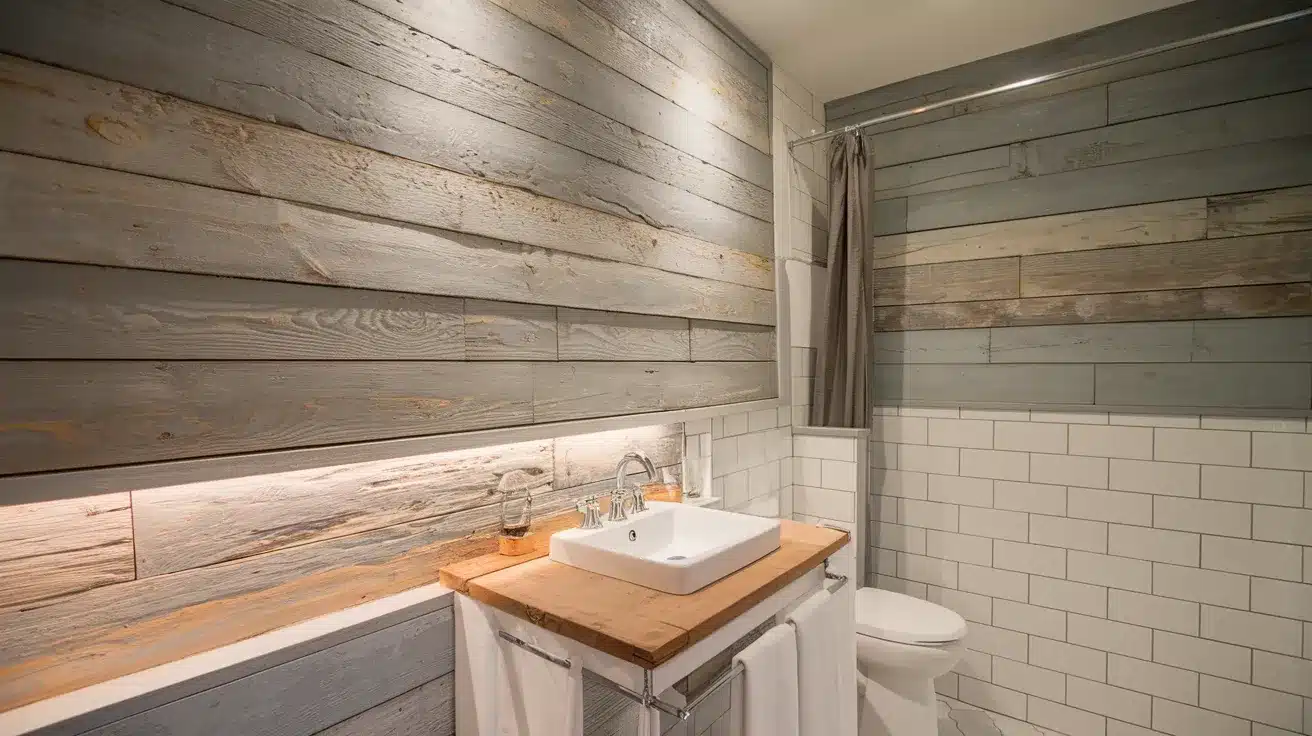
Soft, gray reclaimed wood brings rustic charm and texture to the bathroom walls, enhancing the space with natural beauty and warmth.
22. Reclaimed Sierra Silver

Silver-toned reclaimed wood adds a chic, modern edge to the bathroom, reflecting light and adding a sophisticated, natural touch.
Nursery
23. Hamptons Nursery Planks

Light-colored Hamptons planks create a peaceful, airy vibe in the nursery, providing a calming backdrop for a serene baby space.
24. Minimalist Fir in Soft Rose

Soft rose-toned fir wood adds warmth and subtle color to the nursery, creating a gentle, cozy atmosphere with minimalist design.
25. Reclaimed Weathered Wood Gray

Reclaimed gray wood brings a rustic, calming feel to the nursery, adding texture and natural charm to the soft, light-filled space.
26. Golden Oak

Warm golden oak wood brings natural beauty and a soothing vibe to the nursery, creating a welcoming space with timeless appeal.
Dining Room
27. Hamptons Wood Planks

Light, airy Hamptons wood planks create a fresh, coastal-inspired dining room, offering a breezy, serene backdrop for family meals.
28. Reclaimed Sierra Silver Beams

Reclaimed Sierra Silver beams add rustic elegance to the dining room, with silver-toned wood that contrasts beautifully with modern furnishings.
29. Reclaimed Weathered Wood Gray

Soft gray reclaimed wood adds subtle texture and warmth to the dining room, balancing rustic charm with modern style.
30. Charcoal Residential Dining Room Planks

Charcoal wood planks create a striking, modern look in the dining room, with bold tones that add sophistication and contrast.
31. Reclaimed Weathered Wood White

Whitewashed reclaimed wood brings a rustic yet clean feel to the dining room, offering texture and warmth without overwhelming the space.
Hallway
32. Onyx Wood Wall

Dark, dramatic onyx wood creates a luxurious, modern focal point in the hallway, offering a bold contrast against lighter flooring and ceiling.
Installing Wall Designs with Wood
Getting your wood wall right means being well-prepared before you start. Here are the key things to know when putting up wood wall panels.
Tools and Materials Needed for Installation
Before you begin, gather these basic supplies:
| TOOLS/MATERIALS | PURPOSE |
|---|---|
| Measuring tape | Used to measure the dimensions of the wall and wood planks. |
| Level | Ensures the wood planks are installed straight and even. |
| Pencil | Marks measurements and placement on the wall or wood. |
| Saw (hand saw, circular saw, or miter saw) | Used to cut the wood planks to the desired size. |
| Hammer or nail gun (for non-peel-and-stick options) | Used to secure the wood planks to the wall. |
| Utility knife | For cutting peel-and-stick wood planks or trimming edges. |
| Sandpaper | Smoothens the edges of the wood and removes rough surfaces. |
| Wood cleaner | Cleans the wood before installation to ensure good adhesion. |
| Clear finish (optional) | It provides a protective coating for the wood, enhancing its appearance and durability. |
How to Install Wood Wall Designs?

Step 1: Prepare Your Wall
Clean your wall surface thoroughly, removing all dust, dirt, and loose paint. Use a mild cleaner and let the wall dry completely for at least 24 hours. Check for uneven spots and fill them with spackling compound if needed.
For best results, paint the wall a dark color similar to your wood tone to hide small gaps between planks. Remove switch plates, outlet covers, and wall hangings before starting.
Step 2: Plan Your Layout
Measure the wall’s height and width to find the needed planks. Choose a pattern: horizontal, vertical, herringbone, or random. Roughly sketch your plan on paper. Test your layout by arranging pieces on the floor before applying them to the wall.
This helps you see how the colors and grains will work together. Mix planks from different boxes to vary the colors and patterns for the most natural look.
Step 3: Install the Wood Planks
For peel-and-stick planks, start at the bottom of the wall and work upward. Remove the backing as you go (not all at once) and press firmly from the center outward to avoid air bubbles.
For standard wood, apply construction adhesive in a zigzag pattern on each piece’s back and secure with nails if needed. Work row by row, checking with a level regularly to keep lines straight.
Leave a small gap (about 1/8 inch) around the room’s edges for wood expansion.
Step 4: Finish the Edges
Measure and cut pieces to fit around outlets, switches, and corners using a saw or utility knife. Take your time with these cuts, as they’re the most noticeable if done poorly.
Turn off power near outlets and use a cardboard template for a perfect fit. Apply wood trim around doors, windows, and where the wall meets the ceiling or floor for a clean, professional finish.
Step 5: Final Touches
After installing all planks, wipe the surface with a dry cloth to remove any cutting dust. Check for loose pieces and secure them. Apply a clear finish for unfinished wood to enhance protection and highlight the grain’s natural beauty.
Wait 48 hours before hanging heavy items on your new wood wall. Take photos from different angles to appreciate your newly transformed space!
Conclusion
Wood wall designs add beauty and appeal to any home. This guide shows how various wood types transform your rooms—from reclaimed timber to maple.
We cover styles from rustic to modern, offering ideas for each space. Wood provides endless options, whether you prefer the warmth of Golden Oak in your bedroom or the bold impact of Charcoal Planks in your dining area.
With the right tools and steps, you can install these walls yourself, creating a warmer, more personal connection to nature.
Choose a room to start and enjoy the timeless charm wood brings to your space.