
Painting interior doors often seems like a simple task, but without knowing the right rules for painting interior doors, you can end up with sticky, streaky, or peeling finishes.
Many people get frustrated when their carefully painted doors look amateur or need to be redone within months.
Good news! You can get professional-looking results by following a few key steps. This guide will walk you through exactly what to do—and what not to do—when painting your doors.
In this article, you’ll learn how to properly prepare doors for painting, the step-by-step process for applying paint, common mistakes to avoid, tips for a professional finish, and solutions for fixing painting issues.
Making your doors look better is just one part of home changes; check out our Top Interior Paints Tested blog for more ideas.
Why do Rules for Painting Interior Doors Matter?
Most homeowners think painting doors is straightforward – just grab a brush and start painting. This approach often backfires in ways that cost time and money.
- Doors face unique challenges: Unlike walls, doors constantly move and get handled. They need paint that can flex without cracking and finishes that resist fingerprints and scuffs. Regular wall paint simply won’t hold up.
- Wrong techniques create lasting headaches:Thick paint coats can make doors stick in their frames. Poor surface prep causes paint to bubble or peel within weeks. Using flat paint makes cleaning impossible when kids leave handprints.
- Professional results require specific steps: Painters follow proven methods because they work. The order matters – primer before paint, sanding between coats, and removing hardware first. Skipping steps shows in the final result.
- Your investment deserves protection: Quality doors aren’t cheap to replace. Good paint jobs preserve the wood underneath and maintain your home’s value. Bad paint jobs can actually damage door surfaces.
- Time spent correctly pays off: A properly painted door can look fresh for 5-7 years. Rush jobs might need fixing within months. The extra hour spent on prep work saves days of redoing the project later.
The Dos: Preparing Interior Doors for Painting
The most important rules for painting interior doors start with good prep work. This step decides how your final result will look.
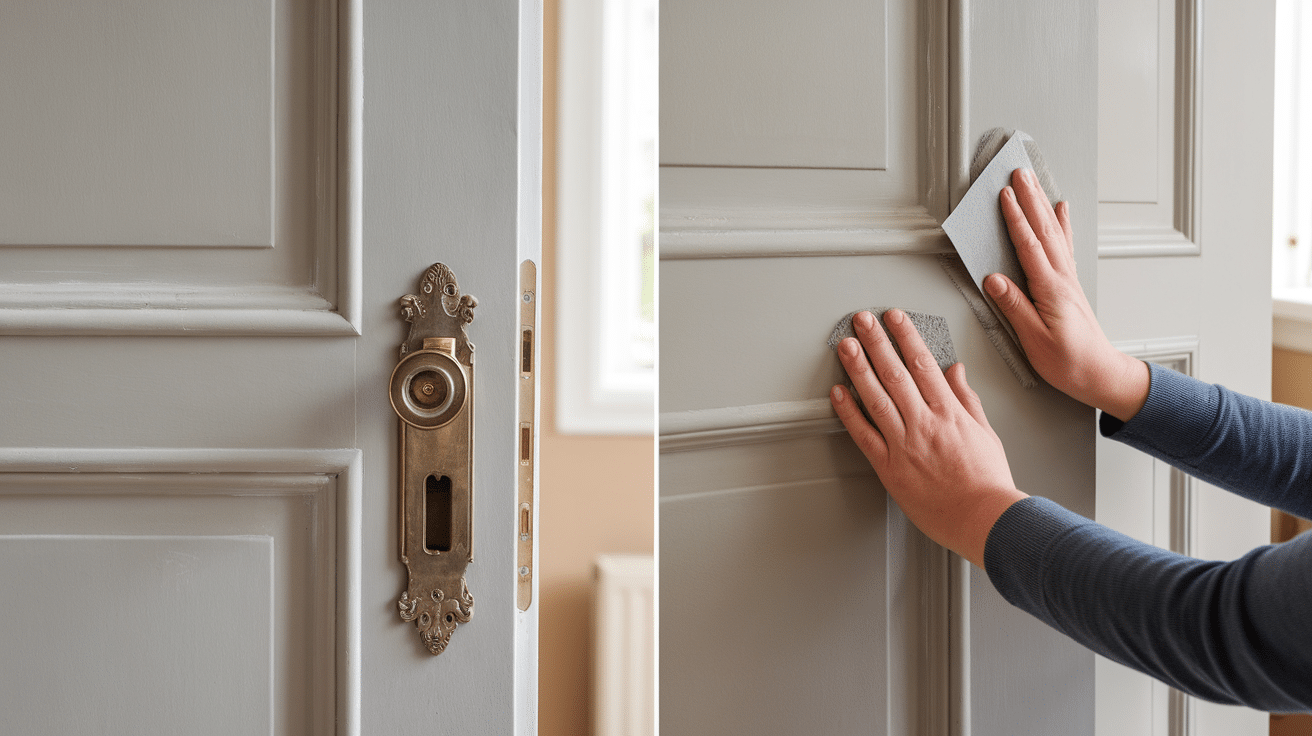
1. Remove Hardware and Clean the Door
Start by taking off all knobs, hinges, and locks from your door. Put these small metal parts in a labeled bag so you don’t lose them during the project.
Next, protect your work area by covering nearby walls and floors with painter’s tape and drop cloths – this saves cleanup time later. Once everything is protected, clean the entire door surface with mild soap and warm water.
This step removes dirt, grease, and fingerprints that would prevent paint from sticking properly. Let the door dry completely before moving to the next step. A clean surface is the foundation of any long-lasting paint job.
2. Sand and Smooth the Surface
Use 150-220 grit sandpaper to lightly sand the entire door surface, always following the direction of the wood grain. This creates small scratches that help the new paint grip better. Look for any holes, dents, or damaged spots and fill them with wood filler using a putty knife.
Press the filler firmly into each hole and smooth it level with the surrounding surface. After the filler dries completely (check the package for timing), sand those patched areas until they feel flush with the rest of the door.
Finish by wiping the entire door with a damp cloth to remove all sanding dust. Any dust left behind will create bumps in your final paint finish.
Pro Tip: Run your hand over the door after sanding. If you feel rough spots, sand those areas again.
The Dos: Start the Painting Process
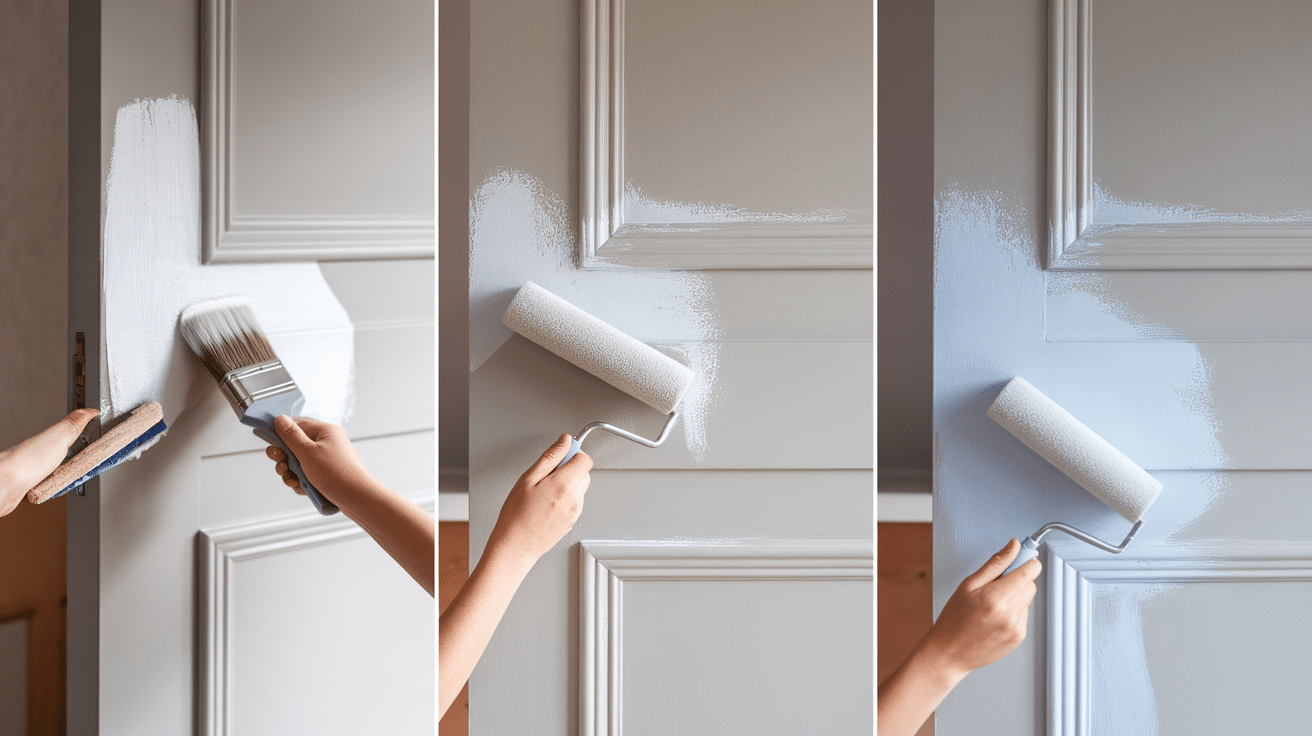
1. Apply Primer Before Paint
- Use the right primer: Match primer to your paint type.
- Cover evenly: Brush edges, roll flat areas.
- Let it dry: Follow drying times on the can.
2. Use a Roller for Large Surfaces
- Choose foam rollers: They give the smoothest finish.
- Roll top to bottom: Keep a wet edge for even color.
3. Use a Brush for Edges and Panels
- Use a 2-inch angled brush: Perfect for corners and edges.
- Paint in order: Do edges, panels, then flat areas.
4. Apply Thin Coats and Sand Between Layers
- Go thin: Two thin coats beat one thick coat.
- Sand lightly: Use fine paper between coats.
- Wipe clean: Remove dust before the next coat.
The Dos: For a Professional Finish
1. Clean your tools right away after finishing. Don’t let paint dry on brushes or rollers – use water for water-based paints and paint thinner for oil-based ones. Hang brushes to dry or lay them flat to maintain their shape.
2. Time your tape removal carefully for clean edges. Take the tape off when the paint is still slightly wet, pulling slowly at a 45-degree angle. Keep a small brush nearby for immediate touch-ups if needed after removing tape.
3. Always check your work in good lighting before considering the job complete. Look for missed spots or thin areas that need attention. View the door from different angles to spot any issues.
4. Fix small problems immediately rather than waiting – these touch-ups are easier while your tools are still out and paint is mixed.
The Don’ts: Common Mistakes to Avoid
1. Don’t Skip the Prep Work
- Never skip cleaning your door before painting. Paint won’t stick well to dirty or oily surfaces, leading to peeling and bubbling later.
- Don’t rush sanding – Taking time with this step creates a smooth final look that’s worth the effort.
- Avoid painting over problem areas, such as peeling paint or damage. Fix these issues first, or they’ll show through your new paint job. Skipping proper prep work almost always leads to a shorter-lasting paint job that you’ll need to redo sooner.
2. Don’t Use Flat Paint
- Avoid flat finishes for your doors. They show marks easily and are much harder to clean when smudged. Better options exist – choose semi-gloss or satin finishes for doors instead. These finishes resist stains and stand up to regular touching.
- Don’t use the wrong paint type for this high-traffic area. Interior doors need durable paint that can handle daily use without showing wear too quickly.
3. Don’t Rush Between Coats
- Avoid painting too soon between coats. Let each layer dry fully before applying the next one. Don’t ignore drying times listed on the paint can – they’re there for a reason. Check the instructions for exact timing based on your specific paint.
- Be patient with curing even after the paint feels dry to the touch. Full curing can take days, during which the paint is still setting up its final hardness and durability.
Troubleshooting Common Painting Issues
- For wet drips, smooth them out right away with your brush. If drips have dried, sand the area and apply a fresh thin coat. Fix streaks by lightly sanding and adding another even coat. Uneven color needs an extra coat after proper drying time.
- For a rough texture, sand the area smooth before repainting. Visible brush marks can be fixed by adding paint conditioner to your next coat. Keep a small amount of your paint stored for future touch-ups – this saves time when small fixes are needed.
Conclusion
Following these dos and don’ts for painting interior doors will help you achieve results that look good and last for years. Remember that proper preparation sets the foundation for everything that follows. Taking time to clean, sand, and prime your doors isn’t extra work—it’s essential work.
Your choice of paint matters just as much as how you apply it. Semi-gloss or satin finishes will serve you better on doors than flat options. Apply multiple thin coats rather than rushing with one thick layer.
Patience truly pays off when painting doors. Allow proper drying time between steps. Fix small issues as they appear instead of hoping they’ll blend in later.
Want to share your door painting stories? Have questions about a current project? Let us know in the comments below!
Frequently Asked Questions
Should I Use a Brush or Roller on Doors?
Use both tools for the best results. Apply paint with a high-quality brush for edges, corners, and panels, and use a small foam roller for large flat sections to avoid brush marks.
Do I Need to Prime an Already-Painted Door?
Yes, priming is still important when changing colors drastically, covering stains, or working with a door that has peeling or worn paint. It creates a strong base for your new paint.
How Many Coats of Paint Do Doors Need?
Most doors need one coat of primer plus two coats of paint. Dark colors covering light ones or major color changes might need a third coat for even coverage.
Can I Paint Over Varnished Doors Without Sanding?
No, always sand varnished surfaces before painting. Sanding creates texture for the new paint to grip onto. Skipping this step will cause peeling and poor adhesion later.