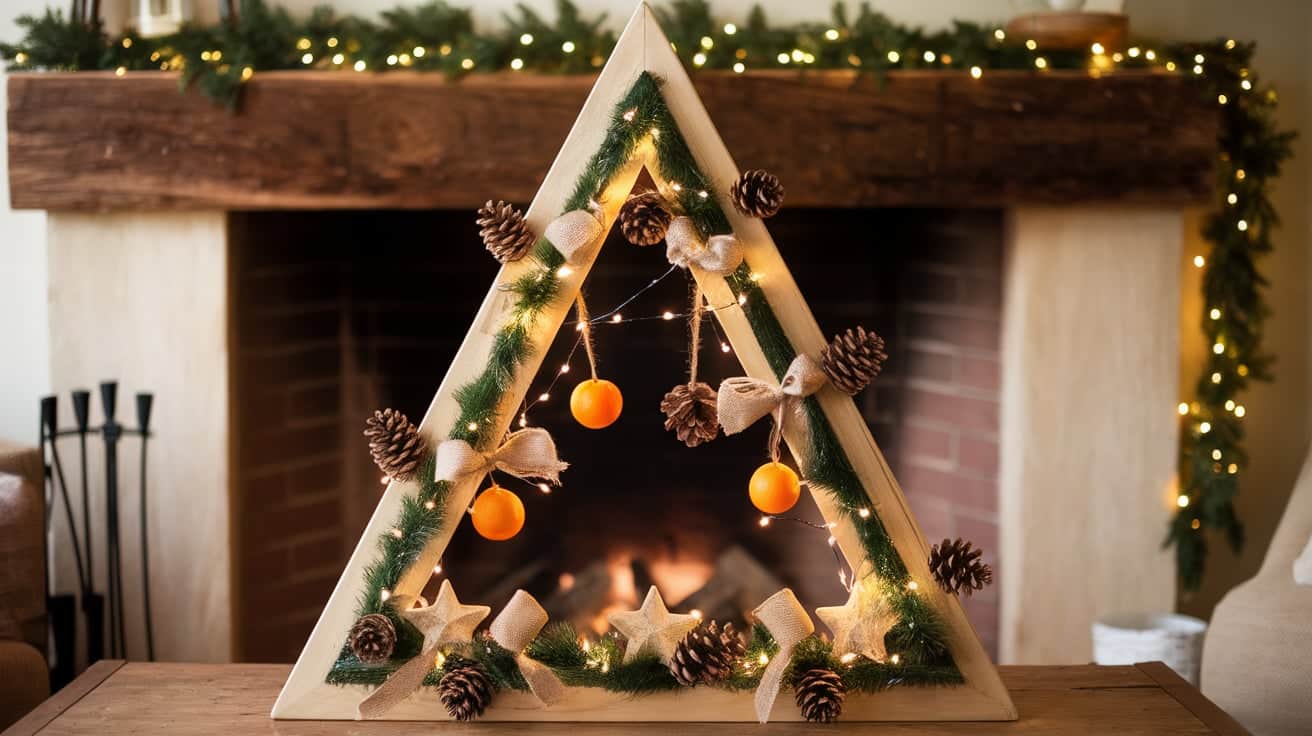
As someone who loves making holiday decorations, I want to share my favorite triangle Christmas tree project.
This design fits perfectly in small spaces and brings a fresh look to seasonal decor.
I’ve made several of these trees over the years, and they’ve become my go-to gift for friends who want something different from the usual plastic or real trees.
In this guide, I’ll show you how to build and decorate these wooden triangles step by step.
You’ll need basic tools and materials, but the process is simple enough for beginners.
Guide for Making Wooden Triangle Christmas Trees
Materials Required
- Wooden Pieces: For the sides of the triangle (size based on your desired dimensions).
- Saw: For cutting the wood at specific angles (e.g., chop saw or hand saw).
- Wood Glue: For assembling and securing the triangle sides.
- Small-Sized Eye Hooks: For hanging ornaments and string lights.
- String Lights: Battery-operated string lights to decorate the tree.
- Invisible Picture-Hanging Cord: To loop around the hooks for hanging ornaments.
- Ornaments: For decoration (choose based on your theme or preference).
- Drill and Drill Bits: These are used for pre-drilling holes for the eye hooks.
- Wood Conditioner (Optional): To prepare the wood for staining.
- Wood Stain (Optional): To give the wood a colored finish (e.g., True Brown).
- Spray Paint (Optional): Metallic colors like rose gold or copper for an alternative finish.
- Sandpaper: To smooth the wood edges before assembly.
- Measuring Tape and Protractor: For accurate measurements and angles.
Step 1: Prepare Materials
- Gather wooden pieces, a saw, wood glue, eye hooks, string lights, ornaments, wood conditioner (optional), stain (optional), and tools for drilling and cutting.
- Choose your desired measurements for the triangle trees. Angles used in this project are 70°, 70°, and 40°.
Step 2: Cut the Wooden Pieces
- Cut the straight side of one end of the wooden piece at an angle of 70°.
- Follow the measurements for the length of each side and ensure accuracy for a proper fit.
- Repeat for both triangle trees, adjusting the lengths as necessary.
Step 3: Assemble the Triangles

- Glue the wooden pieces together to form the triangles.
- For a natural wood look, leave the wood unstained before gluing.
- Allow the glue to dry completely.
Step 4: Prepare for Hanging Hooks
- Use small-sized eye hooks for hanging ornaments and lights.
- Pre-drill holes for the hooks to avoid difficulty and ensure precise placement.
- Screw in the hooks in a zigzag pattern along the sides of the triangle.
Step 5: Add the Hanging Cord
- Use an invisible picture-hanging cord to loop around the hooks.
- Tie tiny knots at regular intervals along the cord for hanging ornaments.
Step 6: Stain or Paint the Triangle (Optional)
- If staining, apply a thin layer of wood conditioner first to ensure even application.
- Once the conditioner dries, use a stain (e.g., True Brown) to coat the wood.
- Let the stain dry before proceeding.
Step 7: Add Lights and Decorations
- Wrap a battery-operated string light around the hooks in a random pattern.
- Hang ornaments using the prepared cord or hooks.
Step 8: Finishing Touches
- Repeat the steps for additional triangle trees, experimenting with sizes, stains, or spray paint (e.g., metallic colors like rose gold or copper).
- Place the finished trees on mantles, side tables, or other decorative spots.
Step 9: Display Your DIY
- Arrange the triangles creatively in your space to enhance your Christmas decor.
- Make multiple trees and vary their sizes or colors for a cohesive look.
Optional Tips
- Experiment with different finishes, such as natural wood, stain, or paint.
- Use larger or smaller hooks depending on the size of the ornaments and lights.
Benefits of Triangle Christmas Trees
- Space-Saving Design: Ideal for small living spaces, apartments, or corners where a traditional tree might not fit.
- Modern and Minimalist Aesthetic: This is perfect for contemporary decor styles, adding a sleek and trendy touch to your holiday decorations.
- Versatility in Decoration and Placement: It is easily customizable with various ornaments, lights, or paint finishes to match your theme. For unique displays, it can be placed on mantles, side tables, or walls.
- Durable and Reusable: Made from sturdy materials like wood, these trees can be reused yearly, reducing waste.
- DIY Customization: Offers creative freedom to personalize size, color, and decorations, making each tree unique.
- Cost-Effective: A budget-friendly alternative to purchasing large, traditional Christmas trees.
- Eco-Friendly Option: Encourages sustainable materials and eliminates the need to cut down live trees.
- Lightweight and Portable: Easy to move and rearrange, allowing for flexible holiday setups.
- Safe for Children and Pets: It’s safer for households with kids or animals, with no sharp needles or fragile glass.
- Unique Focal Point: Creates a standout feature in your holiday decor, leaving a lasting impression on guests.
Decorating Your Triangle Christmas Tree

Style Inspiration
- Rustic Charm: For a cozy, earthy vibe, incorporate natural wood finishes, burlap ribbons, pinecones, and dried oranges.
- Scandinavian Elegance: Use neutral tones, white and silver ornaments, and simple geometric decorations to create a clean and serene look.
- Modern Flair: For a contemporary aesthetic, experiment with metallic paints (e.g., rose gold, copper), monochromatic ornaments, and sleek lighting.
- Traditional Joy: Add red and green decorations, tinsel garlands, and classic baubles to evoke nostalgia.
DIY Ornaments and Embellishments
- Wooden stars, snowflakes, and mini triangles can enhance the design’s geometric appeal.
- Felt or paper cutouts shaped like bells, stockings, or trees add charm.
- Garlands: Create simple garlands using twine and beads or thread cranberries and popcorn for a rustic look.
- Tree Topper: Craft a star or an angel using cardboard, glitter, and paint.
- Personal Touch: Hand-paint wooden ornaments or use family photos in small frames for unique embellishments.
Lighting Options
- Wrap lights along the tree’s frame or hang them in a zigzag pattern using the hooks for an even glow.
- Use warm white lights for a cozy feel or colorful LED strings for a festive touch.
- LED Lights: Long-lasting and energy-saving, they are perfect for minimizing power usage.
- Solar-Powered Lights: Eco-friendly and ideal for outdoor settings.
- Battery-Operated String Lights: These are convenient for trees without access to power outlets.
Quick Tips for a Balanced Look
- Layer decorations from largest to smallest.
- Keep heavier ornaments closer to the base for stability.
- Experiment with asymmetrical designs to add a modern twist.
Summing Up
Each time I create one, I learn something new about working with wood and try different ways to make it special.
I love how these trees fit any space and style – from small apartments to large homes.
You can make them with paint, stains, or decorations that match your taste.
I hope this guide helps you create beautiful trees that bring joy to your home during the holidays and become treasured pieces you’ll use year after year.
Frequently Asked Questions
Can I Create a Triangle Christmas Tree without Power Tools?
Yes, you can use a hand saw and manual drill. Pre-cut wood from hardware stores also works well. Just ask them to cut pieces at the angles you need.
What are Some Modern Decoration Ideas for Triangle Trees?
Try alone white and silver balls, simple wooden shapes, or string lights. A single-color theme with matte finishes looks clean and current.
How Do Triangle Christmas Trees Fit into Nordic or Minimalist Decor Styles?
They match perfectly with these styles. Use natural wood or white paint, add simple white lights and a few decorations. Keep the look clean and basic.
Are There Outdoor-Friendly Triangle Christmas Tree Designs?
Yes, use weather-resistant wood like cedar or pressure-treated pine. Add outdoor sealant and waterproof lights. Place under covered areas for best results.


