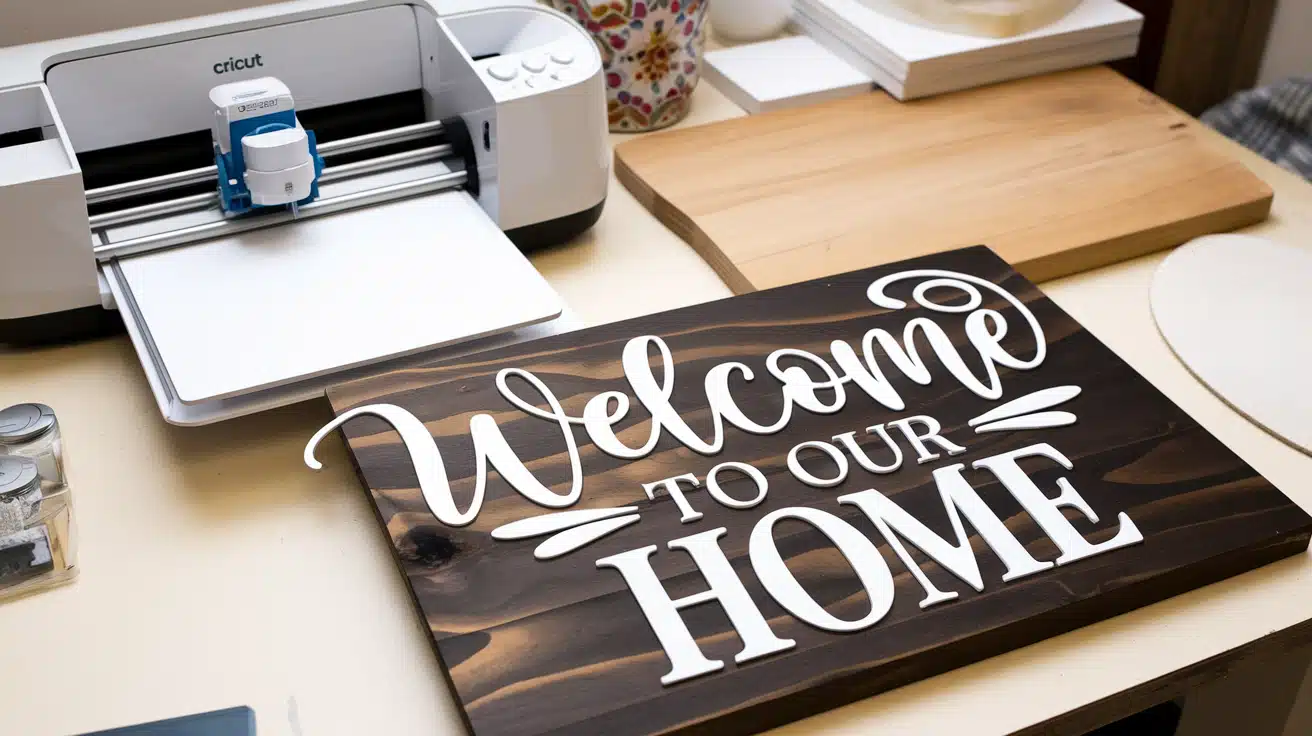

Making wood signs with a Cricut can be tricky at first. I know the fear of measuring the wood incorrectly, picking incorrect settings, or wasting expensive materials.
I spent hours trying to figure it out through trial and error.
But here’s the good news: creating beautiful wood signs is simpler than you think.
You can make professional-looking signs at home with the right steps and proper setup.
In this guide, I’ll walk you through my tested method – picking your wood and prepping your surface to set up your design and make the perfect cut.
I’ll share all the tips I wish I’d known when I started, plus the common mistakes to avoid along the way.
Essential Materials & Tools
| Material | Purpose | Essential/Optional |
|---|---|---|
| Cricut machine | Cutting vinyl designs | Essential |
| Wood board | Base surface for design | Essential |
| Vinyl | Main design material | Essential |
| Transfer tape (with grid) | Apply vinyl to wood | Essential |
| Sandpaper | Smooth wood surface | Essential |
| Wood stain/paint | Finish wood surface | Essential |
| Scraper tool | Remove air bubbles/smooth vinyl | Essential |
| Measuring tape | Ensure accurate placement | Essential |
| Cutting mat | Protect the surface while cutting | Essential |
| Decorative rope | Add finishing touch | Optional |
A Step-by-Step Guide to Making Wood Signs Using Cricut
Step 1: Preparing Your Wood
Before cutting vinyl or opening your Cricut, let’s prepare your wood. This step makes all the difference in your final result.
Measuring and Cutting
- Get your measurements right the first time – I suggest marking your wood with a pencil before cutting.
- Double-check your numbers – I like to write them down
- Use a sharp saw for clean edges
- Remember to account for any frame or border in your final size
Surface Preparation
- Start with coarse-grit sandpaper (80-grit) to remove rough spots
- Move to medium-grit (120-grit) for smoother results
- Finish with fine grit (220-grit) for a perfect surface
- Wipe the wood with a tack cloth to remove dust
Pro tip: Always sand in the direction of the wood grain to avoid scratches.
Step 2: Setting Up Your Design
Starting in Design Space
- Open Cricut Design Space on your computer
- Click “New Project” to start fresh
- Choose your canvas size to match your wood dimensions
- Select inches or centimeters based on your preference
Working with Your Design
- Upload your SVG file using the upload button
- Click ‘Simple’ for most text designs
- Save your design in your uploads folder
- Insert the design onto your canvas
Size and Position
- Click the design to select it
- Type exact measurements in the size boxes at the top
- Use the lock icon to keep proportions correct
- Check your design fits within your wood dimensions
Quick Tip: Make your design slightly smaller than your wood piece to leave room for error around the edges.
Step 3: Making Your Design Perfect
Customizing Dimensions
- Click the lock icon to adjust the width and height freely
- Make your design fit comfortably on your wood
- Leave at least 1/2 inch space on all sides
- Group similar elements by selecting and clicking “Attach.”
Final Design Checks
- View your design at 100% size
- Check all letters and shapes connect properly
- Look for any tiny elements that might be hard to weed
- Save your project with a clear name
Step 4: Cutting Your Vinyl
Material Setup
- Place vinyl shiny side up on your mat
- Press down firmly with your hands to secure it
- Load the mat into your Cricut with the arrow aligned
- Use the guides to keep the vinyl straight
Machine Settings
- Pick “Vinyl” from your materials list
- Use “Less” pressure for regular vinyl
- Select “More” pressure for thicker vinyl
- Do a small test cut if you’re unsure
Step 5: Weeding Made Simple
Basic Weeding Steps
- Start from a corner
- Pull the vinyl away slowly
- Keep your workspace well-lit
- Use a weeding tool for small spots
Common Problem Fixes
- Use a light pad if you have trouble seeing lines
- Keep small pieces organized as you remove them
- Fix any torn spots before moving on
- Clean your design with a lint roller if needed
Real Talk: Take your time with weeding. It’s better to go slow than to rush and make mistakes. If you mess up, you can always cut another piece.
Step 6: Making Your Wood Look Good
Staining Tips
- Test your stain on a scrap piece first
- Apply thin, even coats
- Work in small sections
- Remember to stain edges, too
Paint Application
- Use a foam brush for smooth results
- Paint with light strokes
- Let each coat dry fully
- Sand lightly between coats
Time-Saving Tip: Prepare your transfer tape for the next step while your wood dries.
Step 7: Transfer Tape Technique
Getting Ready
- Cut transfer tape larger than your design
- Remove the backing paper carefully
- Avoid touching the sticky side
- Keep your workspace dust-free
Application Process
- Line up your grid lines with the design
- Start from the middle and work outward
- Use your scraper with medium-pressure
- Look for air bubbles and smooth them out
Step 8: Putting It All Together
Placing Your Design
- Clean your wood surface with rubbing alcohol
- Mark the center point on your wood
- Line up your transfer tape carefully
- Use painter’s tape to make a straight-line guide
Securing the Design
- Press down firmly with your scraper
- Work from center to edges
- Remove transfer tape at a 45-degree angle
- Go slow and watch for lifting vinyl
Important Note: If part of your design starts lifting, press it back down and keep going slowly.
Step 9: Adding Final Details
Hardware Installation
- Mark spots for hanging hardware
- Pre-drill holes to prevent wood splitting
- Install D-rings or sawtooth hangers
- Check they’re level with each other
Decorative Elements
- Add rope or twine if desired
- Keep knots tight and even
- Trim ends neatly
- Secure loose ends with clear glue
Clean-Up
- Remove any pencil marks
- Wipe off fingerprints
- Clear away dust or debris
- Polish wood areas if needed
Step 10: Quality Control Check
Overall Inspection
- Stand back and look at your work
- Check-in good lighting
- View from different angles
- Look for any loose vinyl edges
Stability Testing
- Test hanging hardware
- Make sure decorative elements are secure
- Check all vinyl is firmly stuck
- Ensure edges are sealed properly
Personal Tip: Take a photo of your sign – it often helps spot things you might have missed with just your eyes.
Before You Call It Done
- Check all corners are secure
- Look for any missed protective backing
- Test stability once more
- Clean any remaining smudges
Final Note: Give your sign 24 hours to fully set before hanging it up or packaging it. This lets everything settle properly and ensures your hard work lasts longer.
Video Tutorial
Check out this YouTube video for a detailed step-by-step tutorial on Cricut wood signs
Making Your Wood Signs Last: Tips & Best Practices
1. Keeping Your Signs Looking Good
Daily Care
- Use a soft, dry cloth to remove dust
- Keep signs out of direct sunlight to prevent fading
- Avoid placing in areas with high moisture
- Check vinyl edges regularly for any lifting
Storage Tips
- Store signs flat when possible
- Keep in a cool, dry place
- Place wax paper between stacked signs
- Don’t lean signs against walls for long periods
2. Making Signs More Durable
Add a clear coat after the vinyl is fully set to protect your vinyl signs. It’s important to apply thin layers of the clear coat rather than one thick one, ensuring each layer dries completely before applying the next.
Before you begin, test your sealants on a scrap piece to ensure compatibility.
Weather Protection
For weather protection, use outdoor-rated vinyl for exterior signs, and consider adding silicone backing for hanging signs.
A water-resistant sealant can further protect the signs from moisture. Lastly, be mindful of the type of wood used for outdoor signs, as some materials may require additional treatment to withstand the elements.
3. Fixing Common Issues
| Category | Care Instructions |
|---|---|
| Vinyl Care | Press down loose edges with a scraper |
| Clean with a slightly damp cloth | |
| Avoid harsh cleaners | |
| Fix peeling corners right away. | |
| Wood Care | Watch for warping signs. |
| Fix small scratches with touch-up markers. | |
| Keep away from heat sources. | |
| Check hanging hardware monthly. |
Time-Saving Tip: Keep basic cleaning supplies near your display area for quick touch-ups.
Common Mistakes to Avoid in Sign-Making

1. Design Problems to Watch For
Size Issues
When designing projects, there are common issues to be aware of. One key problem is size, such as making text too small to cut cleanly or forgetting to measure twice to ensure accuracy.
It’s also important not to overlook borders, as they can affect the overall look. Spacing letters too closely together can result in legibility issues.
Layout Mistakes
Layout mistakes like off-center designs or uneven margins should be avoided. Additionally, placing text too close to the edges can disrupt the balance of the design.
Finally, considering the wood grain direction is crucial for consistency in the final product.
2. Application Setbacks
Transfer Tape Problems
- Pulling transfer tape too quickly
- Not burnishing vinyl properly
- Using old or weak transfer tape
- Removing transfer tape at the wrong angle
Vinyl Application Issues
- Air bubbles under the vinyl
- Wrinkles in the design
- Misaligned placement
- Not cleaning wood surfaces first
3. Finishing Goofs
Paint and Stain Issues
- Staining wood after vinyl placement
- Not letting the paint dry fully
- Uneven coating application
- Rushing between coats
Quick Fix Tip: Keep extra vinyl on hand for quick repairs if you make a mistake during application.
Creative Ways to Make Your Signs Stand Out
Different Materials to Try
| Material Category | Options | Best For |
|---|---|---|
| Wood Varieties | • Pallet boards | Rustic, farmhouse-style projects |
| • Bamboo boards | Contemporary, minimalist designs | |
| • Cedar planks | Outdoor signage, weather-resistant needs | |
| • Pine boards | Projects requiring paint, budget-friendly | |
| Accent Materials | • Rope | Adding borders, nautical themes |
| • Metal elements | Industrial or modern touches | |
| • Cork | Background texture, bulletin boards | |
| • Burlap | Farmhouse style, textural interest |
Making Signs Your Own
| Category | Style | Ideal Dimensions | Best Uses |
|---|---|---|---|
| Personal Elements | • Family names | 12″ x 24″ | Entryway, living room |
| • Special dates | 8″ x 10″ | Anniversary displays | |
| • Map coordinates | 10″ x 10″ | Home location markers | |
| • Meaningful quotes | 16″ x 20″ | Inspirational wall art | |
| Size Options | • Mini desk signs | 4″ x 6″ | Office, workspace |
| • Long porch signs | 6″ x 36″ | Front porch, garden | |
| • Square welcome signs | 12″ x 12″ | Entry doors | |
| • Tiny shelf decor | 3″ x 5″ | Bookshelf, mantel |
Conclusions
Making wood signs with your Cricut doesn’t have to be overwhelming. The key is taking it one step at a time and focusing on the basics first.
Remember to prep your wood properly, test your design size before cutting, and take your time with the vinyl application.
Start with simple designs as you build your confidence. Each sign you make will teach you something new about what works best.
Keep your tools clean, maintain your workspace, and don’t forget to save your successful designs in Cricut Design Space for future use.
Ready to start your first sign? Gather your materials, follow my shared steps, and don’t worry if it’s imperfect.
The joy is in creating something by hand.