Want to fill your home with the warm scent of citrus this season? Orange garlands add a touch of natural beauty to any space.
Many people think making fruit decorations is hard or costly. The truth is, you can create a stunning orange garland with just a few basic items from your kitchen.
This simple craft brings warmth to your home decor and makes a perfect weekend project. Plus, the fresh citrus smell will lift your mood all season long.
In this guide, I’ll walk you through each step to make your own orange garland. You’ll learn the best way to slice oranges, how to dry them properly, and tips for putting together a beautiful display that lasts.
Let’s get started!
Why an Orange Garland is the Lively Touch Your Home Needs?
Orange garlands bring a fresh, bright feel to any home. The mix of color and scent can change a plain room into a cozy spot. When you hang dried orange slices, you add a bit of nature to your walls or mantel.
These fruit chains work well in many styles of homes. They fit in country homes, modern flats, and classic houses too. The warm orange tone adds cheer during cold months and blends with most color plans.
Here’s why orange garlands make sense for your home:
- They cost very little to make – just oranges and string
- They give off a light, sweet smell that lasts for weeks
- They work in all four seasons with small tweaks
- They bring a pop of color to dull spaces
- They can be made in one afternoon
- They help use fruit that might go to waste
Making an orange garland costs very little, making it much less costly than store-bought items. The dried fruit also gives off a light, sweet smell, adding a nice touch without the need for sprays or plug-ins.
Your guests will notice this small but smart change to your space. It shows care and skill without big costs or work.
Gather Your Goods: What You’ll Need for Your Citrus Craft
| Tools & Materials | Description |
|---|---|
| Oranges | Main ingredient for creating the slices |
| Wooden beads | Used for spacing between orange slices on the garland |
| Jute twine | String to thread the orange slices and beads |
| Cutting board | Used to slice the oranges |
| Knife | For slicing the oranges |
| Paper towel | To absorb juice from the oranges before drying |
| Parchment paper | To line baking sheets for drying the orange slices |
| Baking sheets | Used to place orange slices in the oven for drying |
| Pointy tool (wooden skewer) | For poking holes into the orange slices |
| Scissors | To cut the jute twine |
| Simple knot | Used to secure the ends of the garland |
| Hooks (optional) | To hang the finished garland |
How to Create a Stunning Orange Garland from Start to Finish
Convert simple oranges into a beautiful, fragrant garland with this easy step-by-step guide. From drying the fruit to stringing it all together, you’ll create a unique decor piece that adds warmth and charm to any space.
Let the Drying Begin: Preparing Your Oranges for Garland Glory
The first step in making an orange slice garland is setting up your workspace and tools. Start by warming your oven to 200 degrees. For this part of the process, you’ll need fresh oranges, a sharp knife, and a cutting board.
Step 1: Slice the Oranges
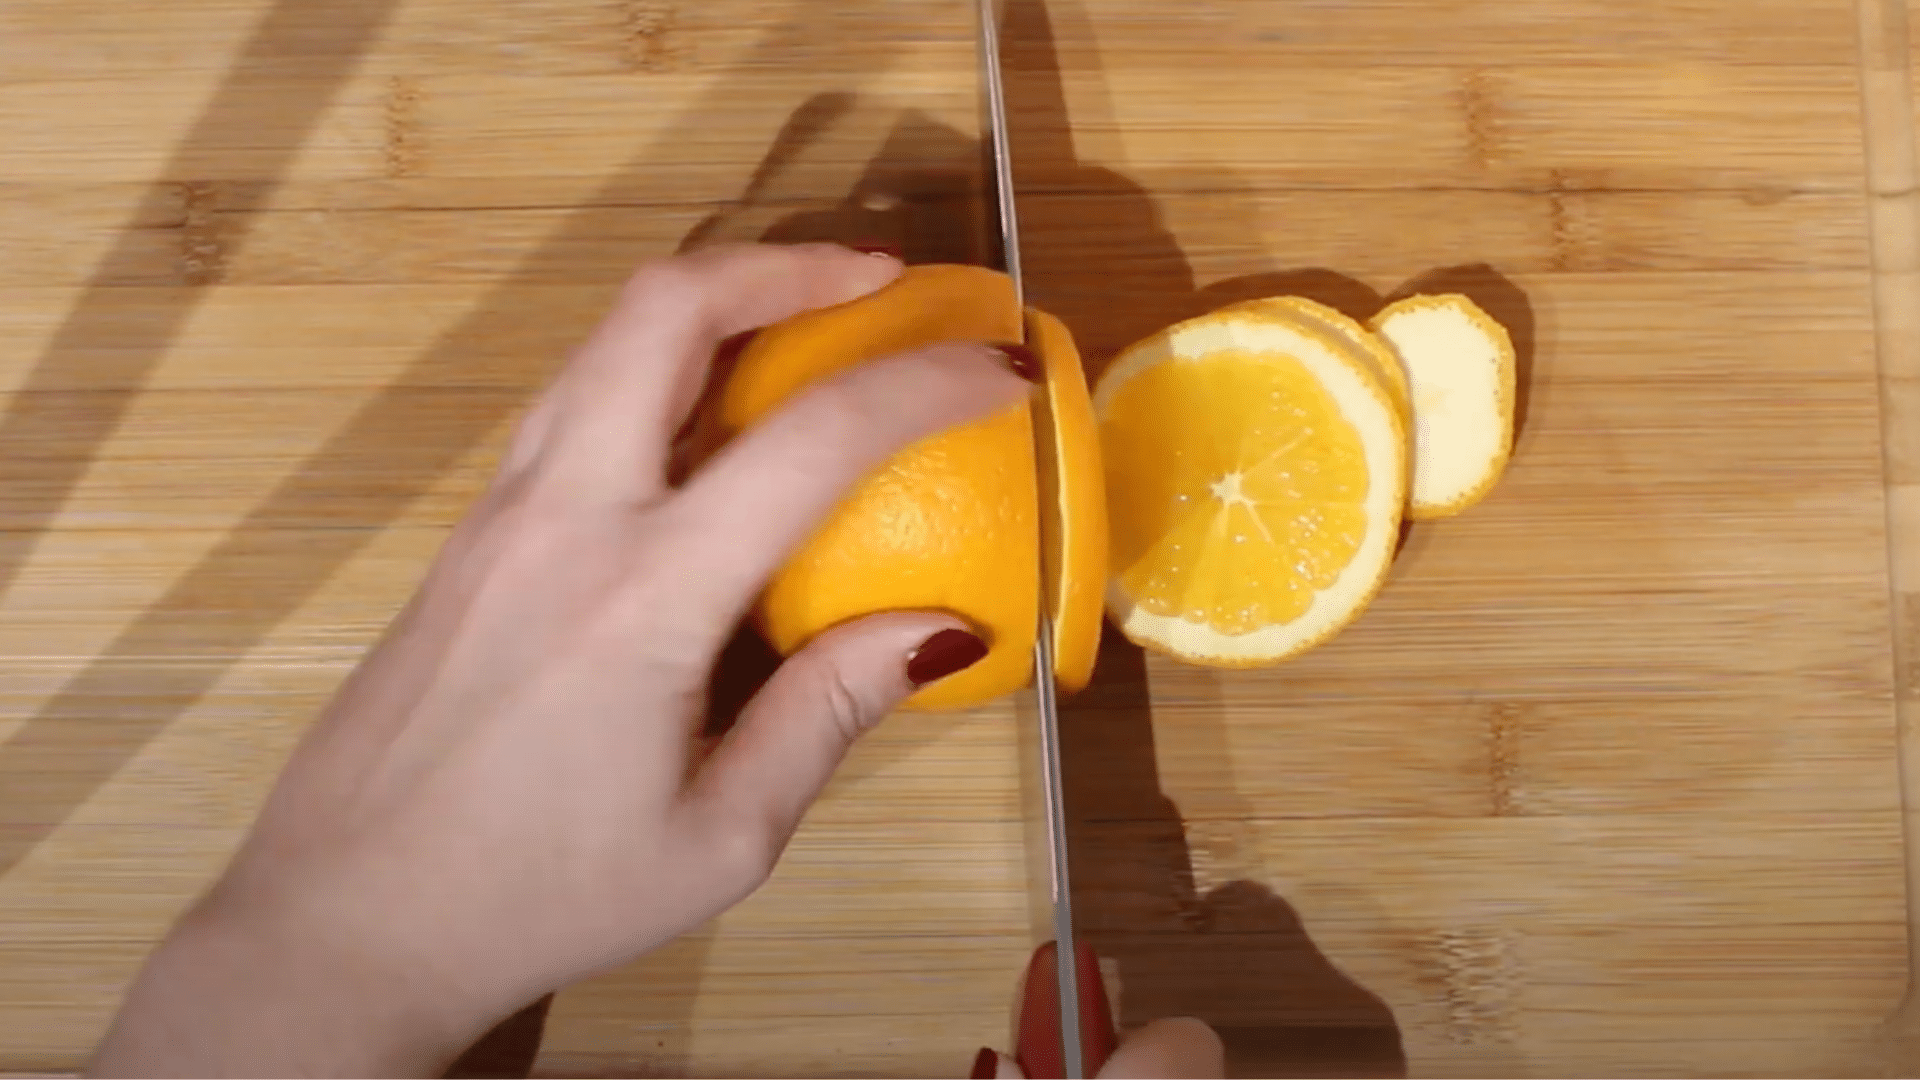
Cut your oranges across the sections, not with the grain. This shows the star pattern inside each slice. Make each slice about a quarter inch thick. Too thin and they might burn; too thick and they won’t dry well.
Step 2: Remove Extra Moisture

Place the orange slices on paper towels. Put another paper towel on top and press gently to soak up juice. This makes the drying time shorter.
Step 3: Arrange and Bake

Line baking sheets with parchment paper and lay out the slices flat. Put the trays in the oven for two hours at 200 degrees. After two hours, take out the trays and flip each slice over. Return to the oven for another two hours.
Step 4: Check for Dryness

After four hours total baking time, check if the slices still feel moist. If so, flip them once more and bake for one more hour. Watch them closely during this final hour to prevent burning.
Step 5: Cool Before Stringing

Let the orange slices cool fully before handling them. Once cool, gather them in a bowl and prepare for the stringing process.
Stringing It All Together: A Step-by-Step Citrus Masterpiece
Once your orange slices are dry and cool, gather them in a bowl and find a comfy spot to work on your garland.
Step 1: Gather Your Supplies
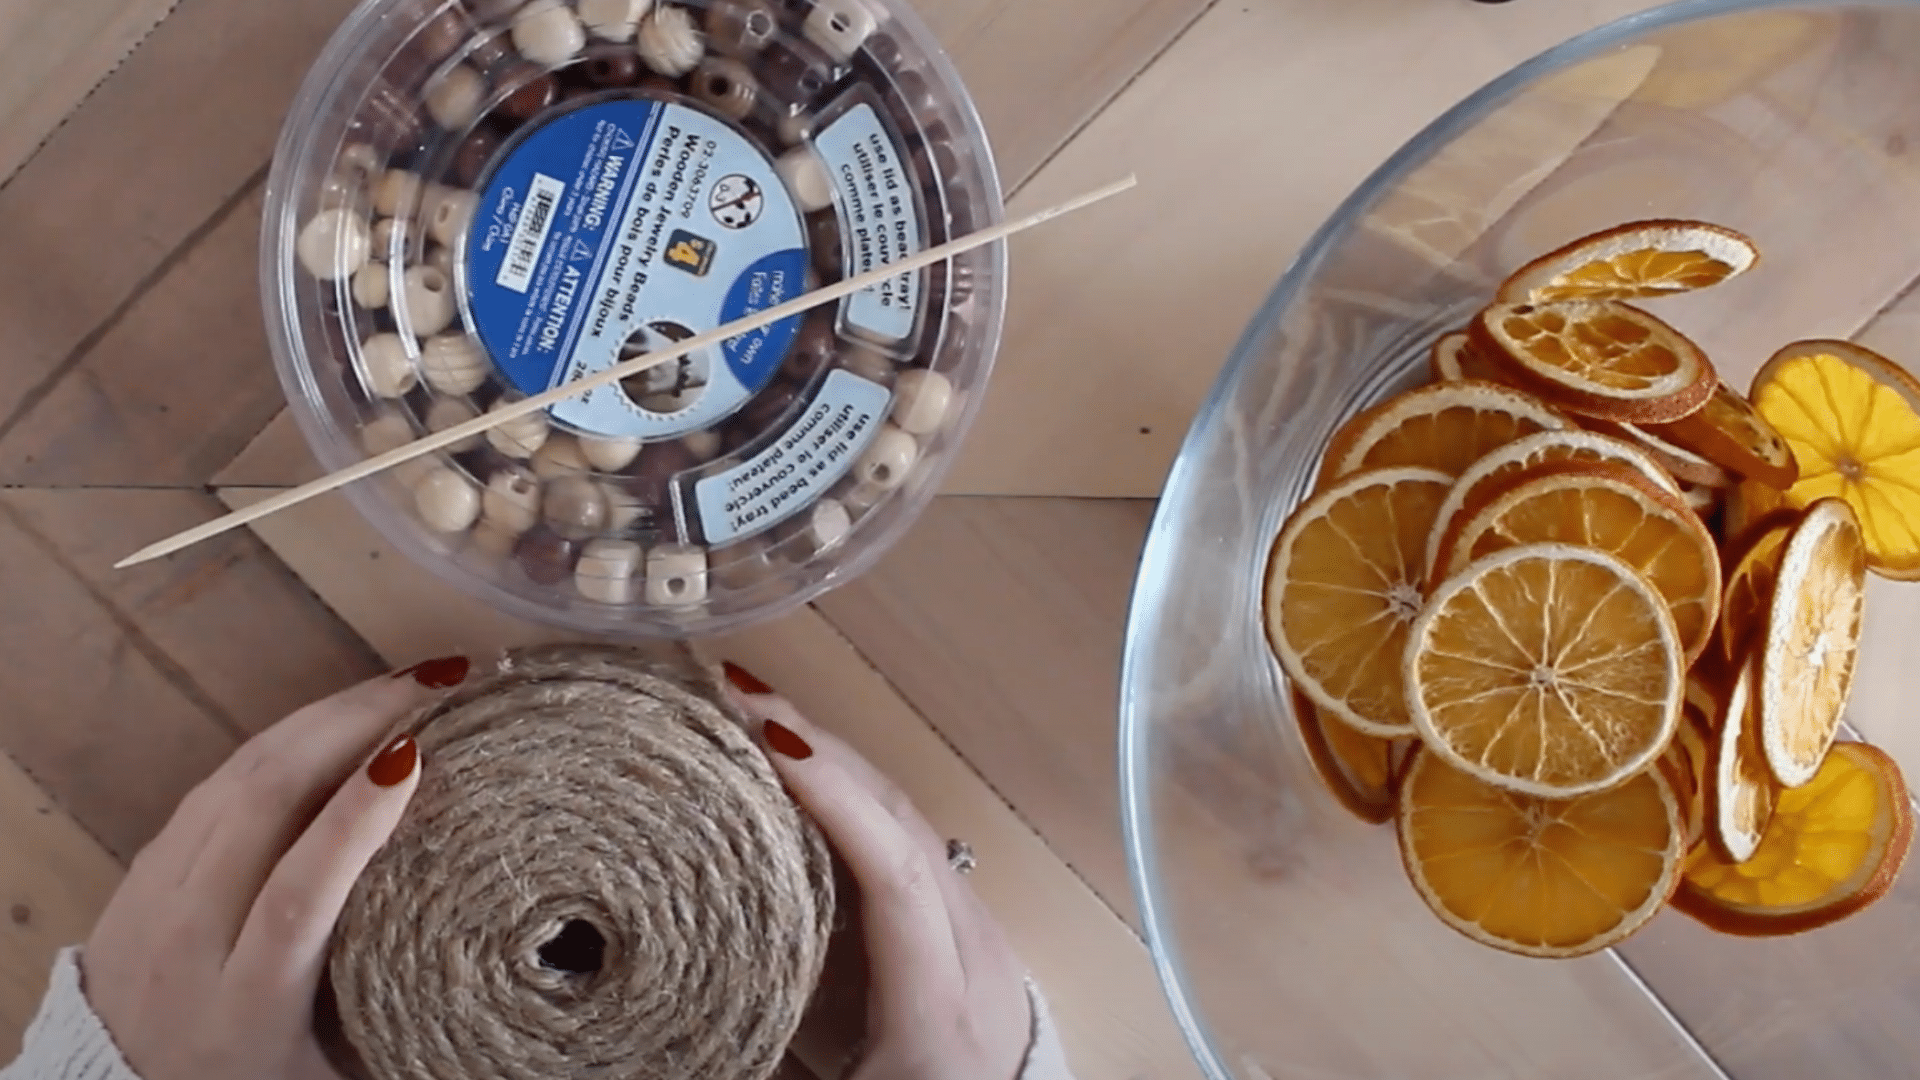
You’ll need your dried orange slices, jute twine, wooden beads (optional), and something pointy like a wooden skewer to poke holes.
Step 2: Prepare and Thread

Begin by twisting the end of your twine to make it easier to thread. Take a smaller orange slice for the beginning. Use your skewer to poke two holes on opposite sides of the slice. Push your twine through one hole and back up through the opposite hole.
Step 3: Create Your Pattern

Add beads between orange slices to create a pattern. Try one bead after the first slice, then an orange, then two beads, then another orange. The sticky residue helps keep your twine pointed for easier threading.
Step 4: Continue and Complete

Keep following your pattern until the garland reaches your desired length. For balance, use smaller slices at both ends of the garland. The sticky juice from the oranges will help with threading.
Step 5: Finish the Ends

Finish with three wooden beads at each end. Tie a simple knot to secure, leaving about a foot and a half of extra twine at both ends. Form these ends into loops for easy hanging.
For a visual tutorial, refer to this video by The Creative Glow
Where to Hang Your Orange Garland for Maximum Wow Factor
Looking for the perfect spot to show off your handmade orange garland? The right placement can turn this simple craft into a standout feature in your home. Here are some ideal spots to display your citrus creation.
1. On the Mantelpiece

Drape your orange garland across your fireplace mantel for a warm, festive look. The oranges catch the light beautifully, adding a soft glow to your living space. Pair with pine branches or plain candles for a classic feel.
2. Around Door Frames

Frame your doorways with orange garland to welcome guests with a hint of scent and color. This works well for both inside doors and front entrances, bringing charm to often overlooked areas.
3. Along Stair Railings

Wind your garland up stair banisters for a striking visual that connects different levels of your home. The vertical display lets people enjoy your handiwork from multiple angles as they move through the house.
4. Across Window Frames

Hang the garland along the top of windows where sunlight will shine through the translucent slices, creating a stained-glass effect. This placement is most striking during morning and afternoon hours when the sun is strongest.
5. As a Table Runner

Lay your orange garland down the center of a dining table as an unexpected runner. Add small tea lights between the slices for a gentle glow during evening meals. Just be sure to place heat-resistant mats under any hot dishes.
Keep It Fresh: Simple Hacks for Garland Longevity
- Store your orange garland in a cool, dry place when not in use. Heat and moisture can cause mold to form on the dried slices.
- Add a few drops of cinnamon oil to your dried orange slices before stringing. This gives a nice scent and acts as a natural preservative.
- Avoid placing your garland in direct sunlight for long periods. The sun can fade the bright orange color over time.
- Spray a light coat of clear acrylic sealer on both sides of each slice after they’ve fully dried. This creates a barrier against humidity.
- Keep pets away from your garland. Cats especially may be tempted to play with or chew on the dangling pieces.
- Check your garland weekly for signs of moisture or softening. If slices begin to feel damp, lay them out to dry again.
- When the season ends, wrap your garland loosely in acid-free tissue paper before storing in a box with a tight lid.
- Add a small silica gel packet to your storage container to absorb any moisture that might get trapped inside.
- Make a new garland each year instead of trying to save old ones. Fresh garlands look best and you can compost the old ones.
- Keep indoor humidity levels below 60% in rooms where your garland is displayed to extend its life.
Conclusion
Orange slice garlands bring a touch of natural beauty to your home without much cost or effort. We’ve walked through how to dry the slices, string them together, and find the best spots to show them off. We’ve also shared tips to keep your garland fresh throughout the season.
What makes these simple decorations so special is their link to holiday customs of the past, when people used what they had on hand to bring joy to their homes. The soft glow of light through the dried fruit creates a warm feeling that plastic decorations just can’t match.
Next time you want to add something unique to your home décor, remember that sometimes the most basic items—like a bag of oranges—can become something truly special.
Frequently Asked Questions (FAQs)
1. What String to Use for Orange Garland?
For orange garland, jute twine works best. It’s strong enough to hold the weight, has a natural look, and the rough texture grips the dried slices well.
2. How Long Does Orange Garland Last?
A well-dried orange garland typically lasts one season when kept in dry conditions. With proper storage between uses, it may remain good for up to two years before needing replacement.
3. Do Dehydrated Orange Slices Smell Good?
Dehydrated orange slices have a mild, sweet citrus smell. The scent isn’t strong but offers a subtle, fresh hint of orange that adds to their charm.