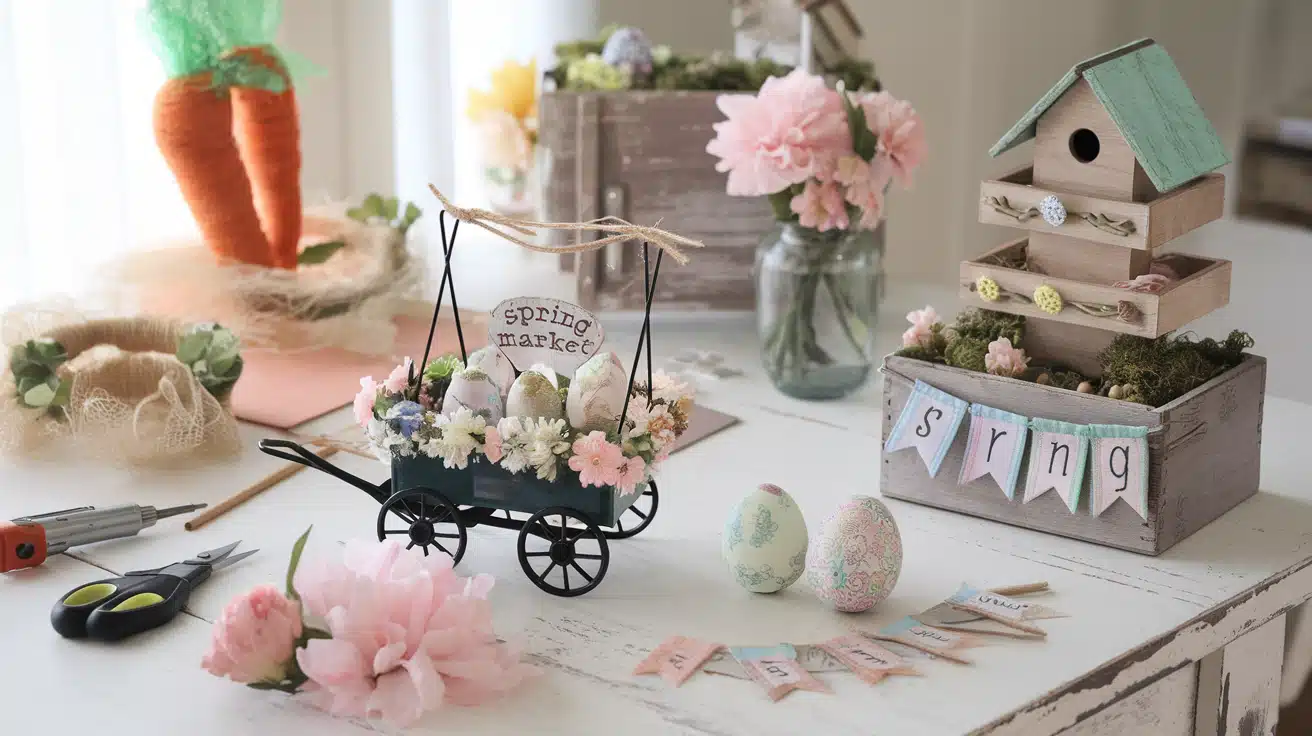

Spring is the perfect time to refresh home decor without breaking the bank. One of the best crafting secrets is utilizing supplies already tucked away in craft rooms and storage spaces.
Why purchase new materials when forgotten treasures await finding? This collection features five stunning DIY projects that convert existing craft supplies into beautiful seasonal decorations.
From a whimsical carrot wreath to a charming bird condo, each step-by-step guide helps crafters create eye-catching pieces with minimal investment.
These projects are ideal for anyone seeking Easter crafts, spring home decorations, or thoughtful Mother’s Day gifts. Convert cluttered craft spaces into organized creativity hubs while bringing fresh spring energy into the home.
Ready to turn forgotten supplies into showstopping decor? Let’s look at these delightful spring crafts!
1. Whimsical Carrot Wreath: A Perfect Spring Wreath DIY
Nothing says spring quite like a charming carrot-themed wreath. This eye-catching door decoration combines multiple textures for a professional look that’s surprisingly easy to create.
Materials Needed
- 2 wire wreath forms (approximately 18″)
- Burlap ribbon
- Spanish moss
- Raffia (or a hula grass skirt from Dollar Tree)
- Faux carrots (3 packs from Dollar Tree, with approximately 6 carrots each)
- Twine
- “Carrots” sign (optional)
- Paper hole punch
- Hot glue gun and glue sticks
- Decorative ribbon for bow (burlap and patterned)
- Decorative buttons
Step-by-Step Instructions
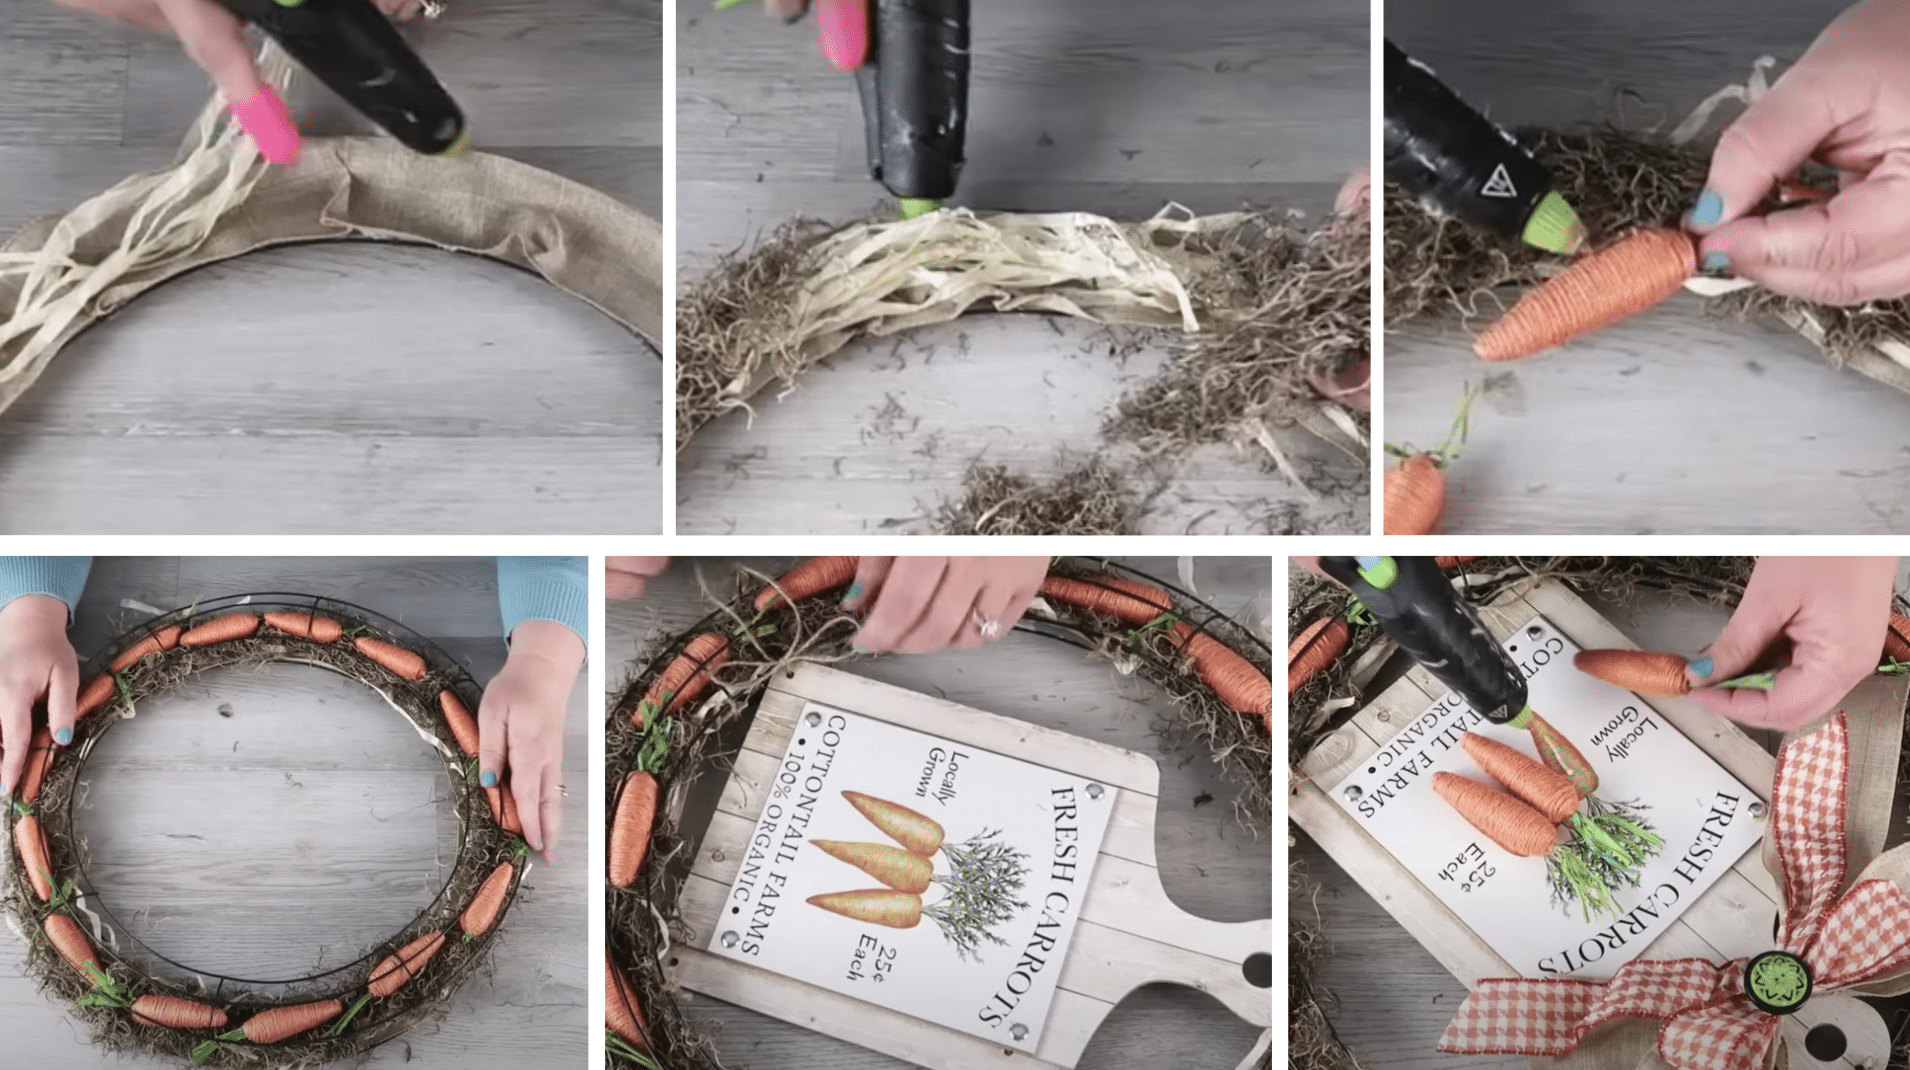
- Prepare the base – Take one wreath form and glue burlap ribbon into the inner curve of the wreath form. This creates a foundation to catch the moss and raffia.
- Add texture layers – Glue down raffia in sections around the wreath form. This step is optional but adds wonderful texture. Next, apply a line of hot glue in a zigzag pattern over the raffia and press Spanish moss into the glue.
- Attach the carrots – Glue the faux carrots around the wreath form, positioning them underneath the wire structure. You should use about 14-15 carrots, saving 3 for the sign.
- Connect the wreaths – Take the second wreath form and place it on top. Secure the two forms together by tying twine around both forms at regular intervals (approximately every 4 inches) on both the inside and outside rings.
- Attach the sign – Use a hole punch to create three holes in your carrot sign – one at the top and two at the bottom corners. Thread twine through the holes and tie to secure the sign to the wreath.
- Add finishing touches – Create a decorative bow using burlap and patterned ribbon. Glue it to the top of the wreath. Embellish the bow center with decorative buttons in complementary colors. For extra dimension, glue three of your remaining carrots directly onto the carrot image on the sign.
This wreath brings a playful garden feel to your front door or interior wall. The combination of natural textures and vibrant orange creates the perfect spring statement piece.
2. Spring Market Wagon: A Charming Garden Decoration
This adorable miniature wagon planter is perfect for displaying spring florals and adds a touch of farmhouse charm to any tabletop or shelf.
Materials Needed
- Small decorative wagon (from Target’s Bullseye section or Dollar Tree)
- Piece of foam
- Wood plank piece (from craft section)
- Long craft stick, cut in half
- Florals
- Spanish moss
- Stamps and ink pad
- Hot glue gun and glue sticks
- Ticking stripe ribbon
Step-by-Step Instructions
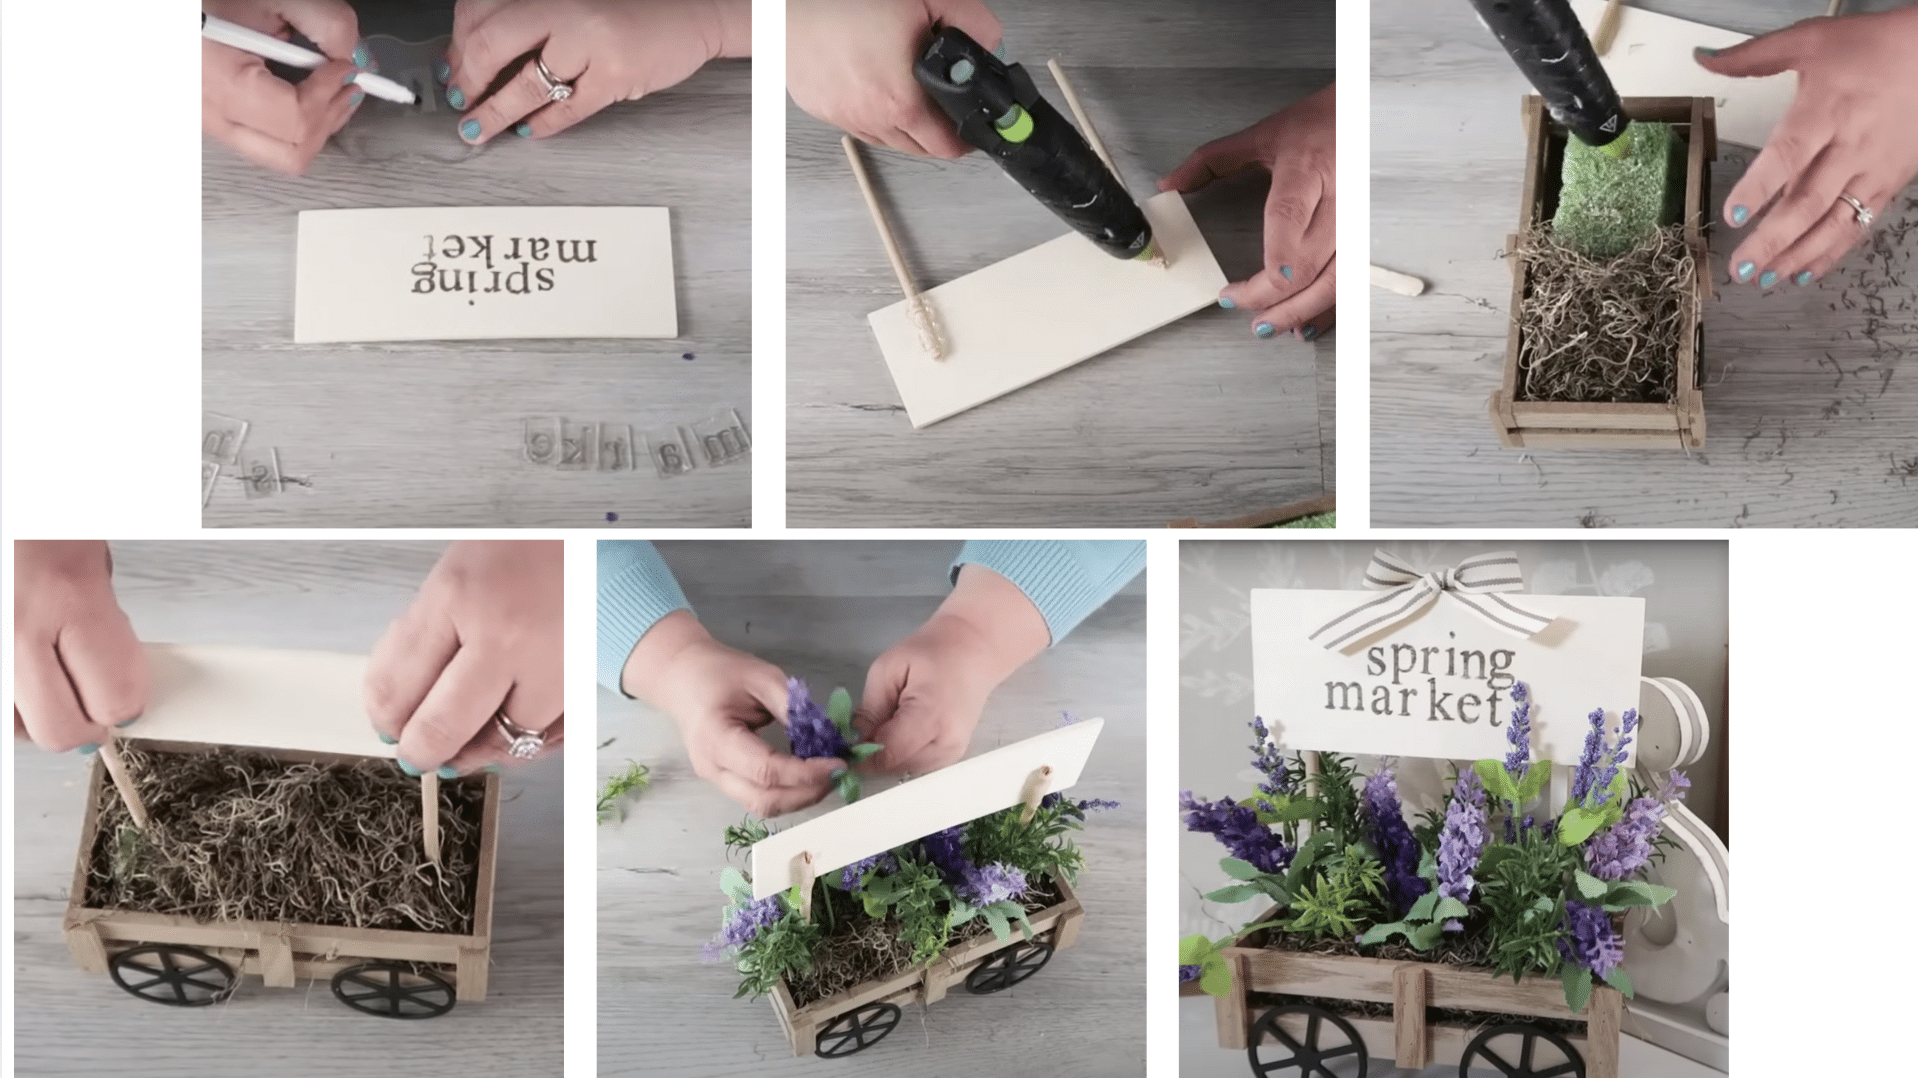
- Prepare your sign – Use stamps to add “Spring Market” (or your phrase of choice) onto the wooden plank piece. Clean your stamps thoroughly after use.
- Create the stand – On the back of your stamped sign, glue the craft sticks (cut in half) vertically to create a stand.
- Prepare the wagon – Place foam in the wagon, leaving space on the sides for moss. Use a popsicle stick to tuck Spanish moss around the edges of the foam to conceal it completely.
- Attach the sign – Once the glue on the craft sticks is dry, insert the sign into the foam and secure with hot glue.
- Add florals – Arrange your choice of spring florals in the foam around the sign.
- Finishing touch – Tie a small bow with ticking stripe ribbon and attach it to the top of the sign.
This versatile piece works beautifully as part of a spring vignette, on a mantel, or as a sweet Easter decoration when filled with pastel-colored flowers.
3. Decoupage Egg Art: Upcycled Easter Crafts
This lavish wall art piece uses wooden eggs and scrapbook paper to create a suave spring decoration that celebrates the season with style.
Materials Needed
- Wooden eggs (from Dollar Tree)
- 11″ x 8″ canvas board
- White burlap (or fabric of choice)
- Scrapbook paper in coordinating spring patterns
- Hot glue gun and glue sticks
- Scissors
- Spanish moss
- Scrapbook embellishments (tags, stickers, buttons, ribbons, etc.)
- Eyelet and setting tool (optional)
- Paint (optional, for distressing)
- Wire or beaded wreath form (optional, for purse handle)
- Ribbons for decoration
Step-by-Step Instructions
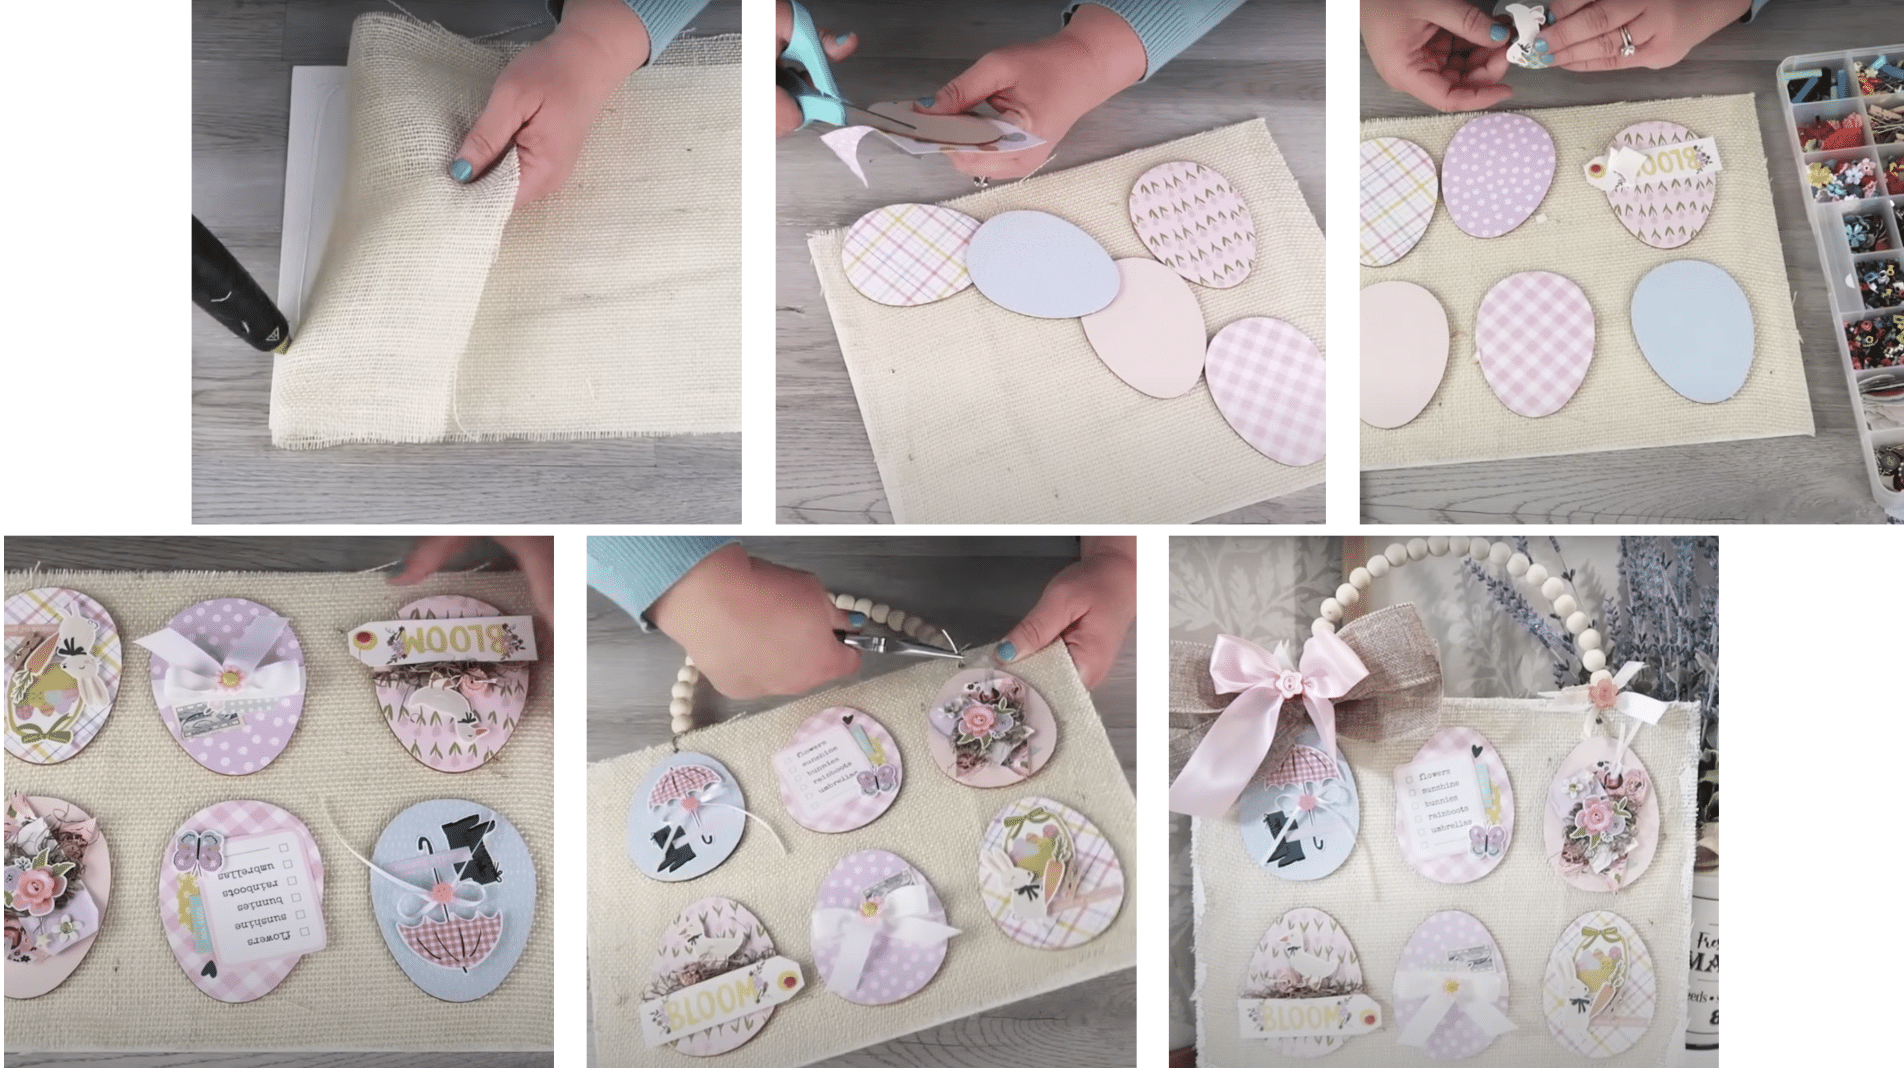
- Prepare the canvas – Cover the canvas board with white burlap (or fabric of choice), pulling it tight and securing with hot glue on the back.
- Decorate the eggs – Cut pieces of scrapbook paper to fit each wooden egg. Apply hot glue to the egg, press on the paper, then trim around the edges with scissors. Repeat for all eggs.
- Embellish – Decorate each egg with different scrapbook embellishments like tags, stickers, ribbons, and buttons. For dimension, use foam tape to pop up certain elements. Each egg should have its own unique design.
- Arrange and attach – Position the decorated eggs on the fabric-covered canvas and glue them in place.
- Add texture – Glue Spanish moss around the eggs to create a nest-like effect.
- Optional purse design – To convert this into a decorative “purse”: Punch holes at the top of the canvas, insert a wire or beaded wreath form as a handle, add distressing paint around the edges, and attach decorative ribbon bows at both ends of the handle.
This versatile piece works beautifully in a girl’s room, as part of a spring display, or as a Mother’s Day gift. Its scrapbook elements make it especially meaningful if you use paper from your personal collection.
| Egg Decoration Ideas | Materials | Effect |
|---|---|---|
| Nature-Inspired | Green ribbons, small flower embellishments, “Bloom” tag | Garden-fresh look |
| Polka Dot | Spotted paper, small buttons, twine bow | Playful, cheerful style |
| Elegant | Solid pastel paper, pearl embellishments, small lace | Sophisticated, delicate appearance |
| Vintage | Text-patterned paper, aged tags, small keys | Nostalgic, timeworn charm |
| Whimsical | Striped paper, small animal stickers, bright buttons | Playful, child-friendly design |
4. Garden Box with Banner: Perfect Spring Home Decoration
This charming garden box with a fabric banner combines rustic elements with springtime freshness for a versatile piece that can be adapted for any season.
Materials Needed
- 2 wooden boxes (from Dollar Tree)
- 2 thick painter sticks or yardsticks (cut to 12″)
- Wooden dowel
- Drop cloth fabric
- Stamps and ink pad
- Sharpie marker
- Hot glue gun and glue sticks
- White paint
- Brown and black paint for distressing
- Twine
- Scissors
- Foam squares
- Florals
- Spanish moss
- Small decorative bows
Step-by-Step Instructions
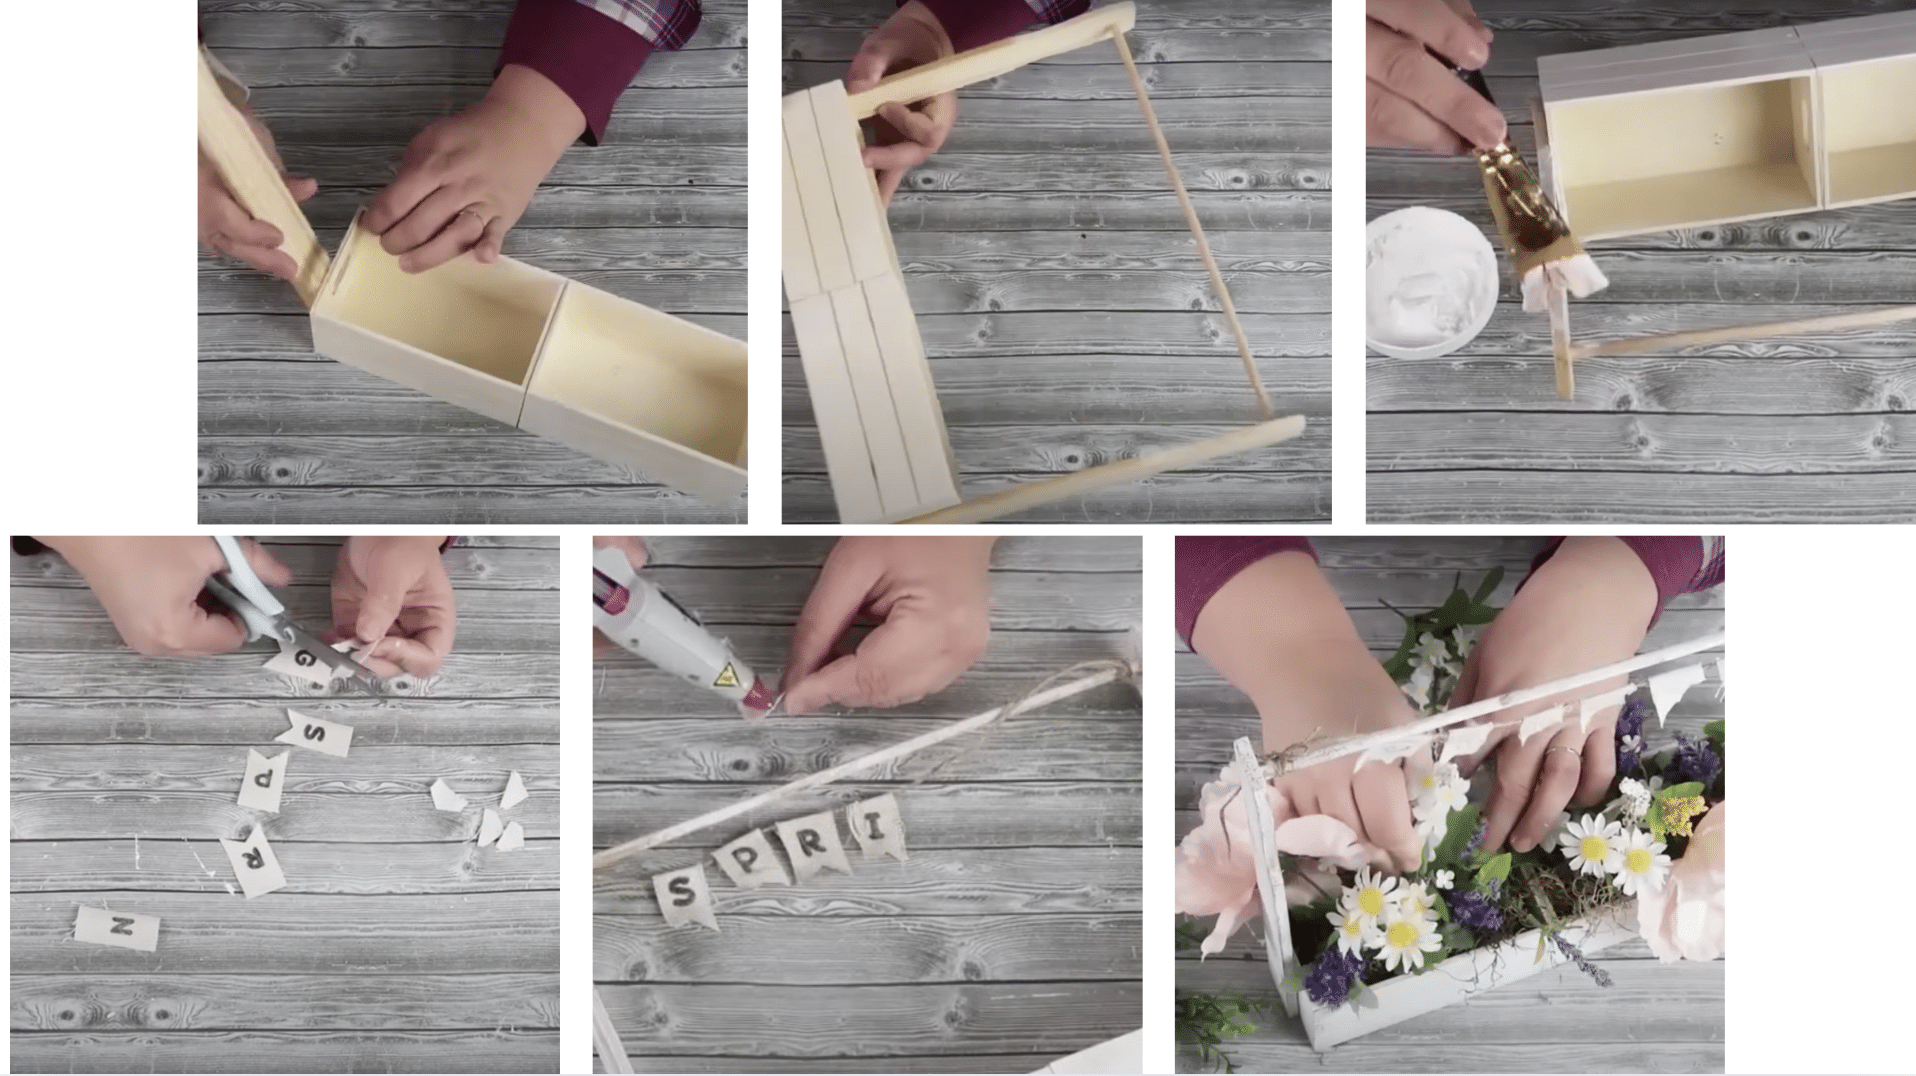
- Build the box – Glue two wooden boxes together side by side. Attach the painter sticks to the sides of the boxes (these will be the legs of your garden box).
- Add the dowel – Insert the wooden dowel between the boxes at the top, creating a space to hang your banner. Secure with hot glue.
- Paint – Paint the entire structure white, then distress with brown and black paint for a farmhouse look.
- Create the banner – Cut strips of drop cloth fabric. Stamp the word “SPRING” with one letter on each strip. Go over the letters lightly with a Sharpie to make them more visible. Cut a dovetail (V-shape) at the bottom of each strip and distress the edges by rubbing between your fingers.
- Hang the banner – String twine through the dowel. Glue each letter strip to the twine to spell “SPRING”.
- Add decoration – Glue small decorative bows to the ends of the dowel. Place foam squares inside the boxes to serve as a base for flowers.
- Fill with florals – Add Spanish moss and spring florals to the boxes.
This versatile garden box can be customized for any season by changing the banner text and swapping out the florals. Try “FALL” with pumpkins or “NOEL” with mini Christmas trees for year-round use.
5. Bird Condo: A Charming Outdoor Spring Craft
This whimsical multi-level birdhouse decoration brings cottage charm to your spring decor. It’s perfect for shelves, mantels, or as part of a garden-themed display.
Materials Needed
- 3 small wooden birdhouses (from Dollar Tree)
- 1 wooden round
- Small wooden squares
- Spanish moss
- Wooden stakes/craft sticks
- Scrapbook paper in coordinating patterns
- Hot glue gun and glue sticks
- Scissors
- X-acto knife
- Popsicle sticks
- Paint and water for staining
- Drill (optional)
- Printer (for small sign)
- Lace ribbon
- Buttons
- Small bows
Step-by-Step Instructions
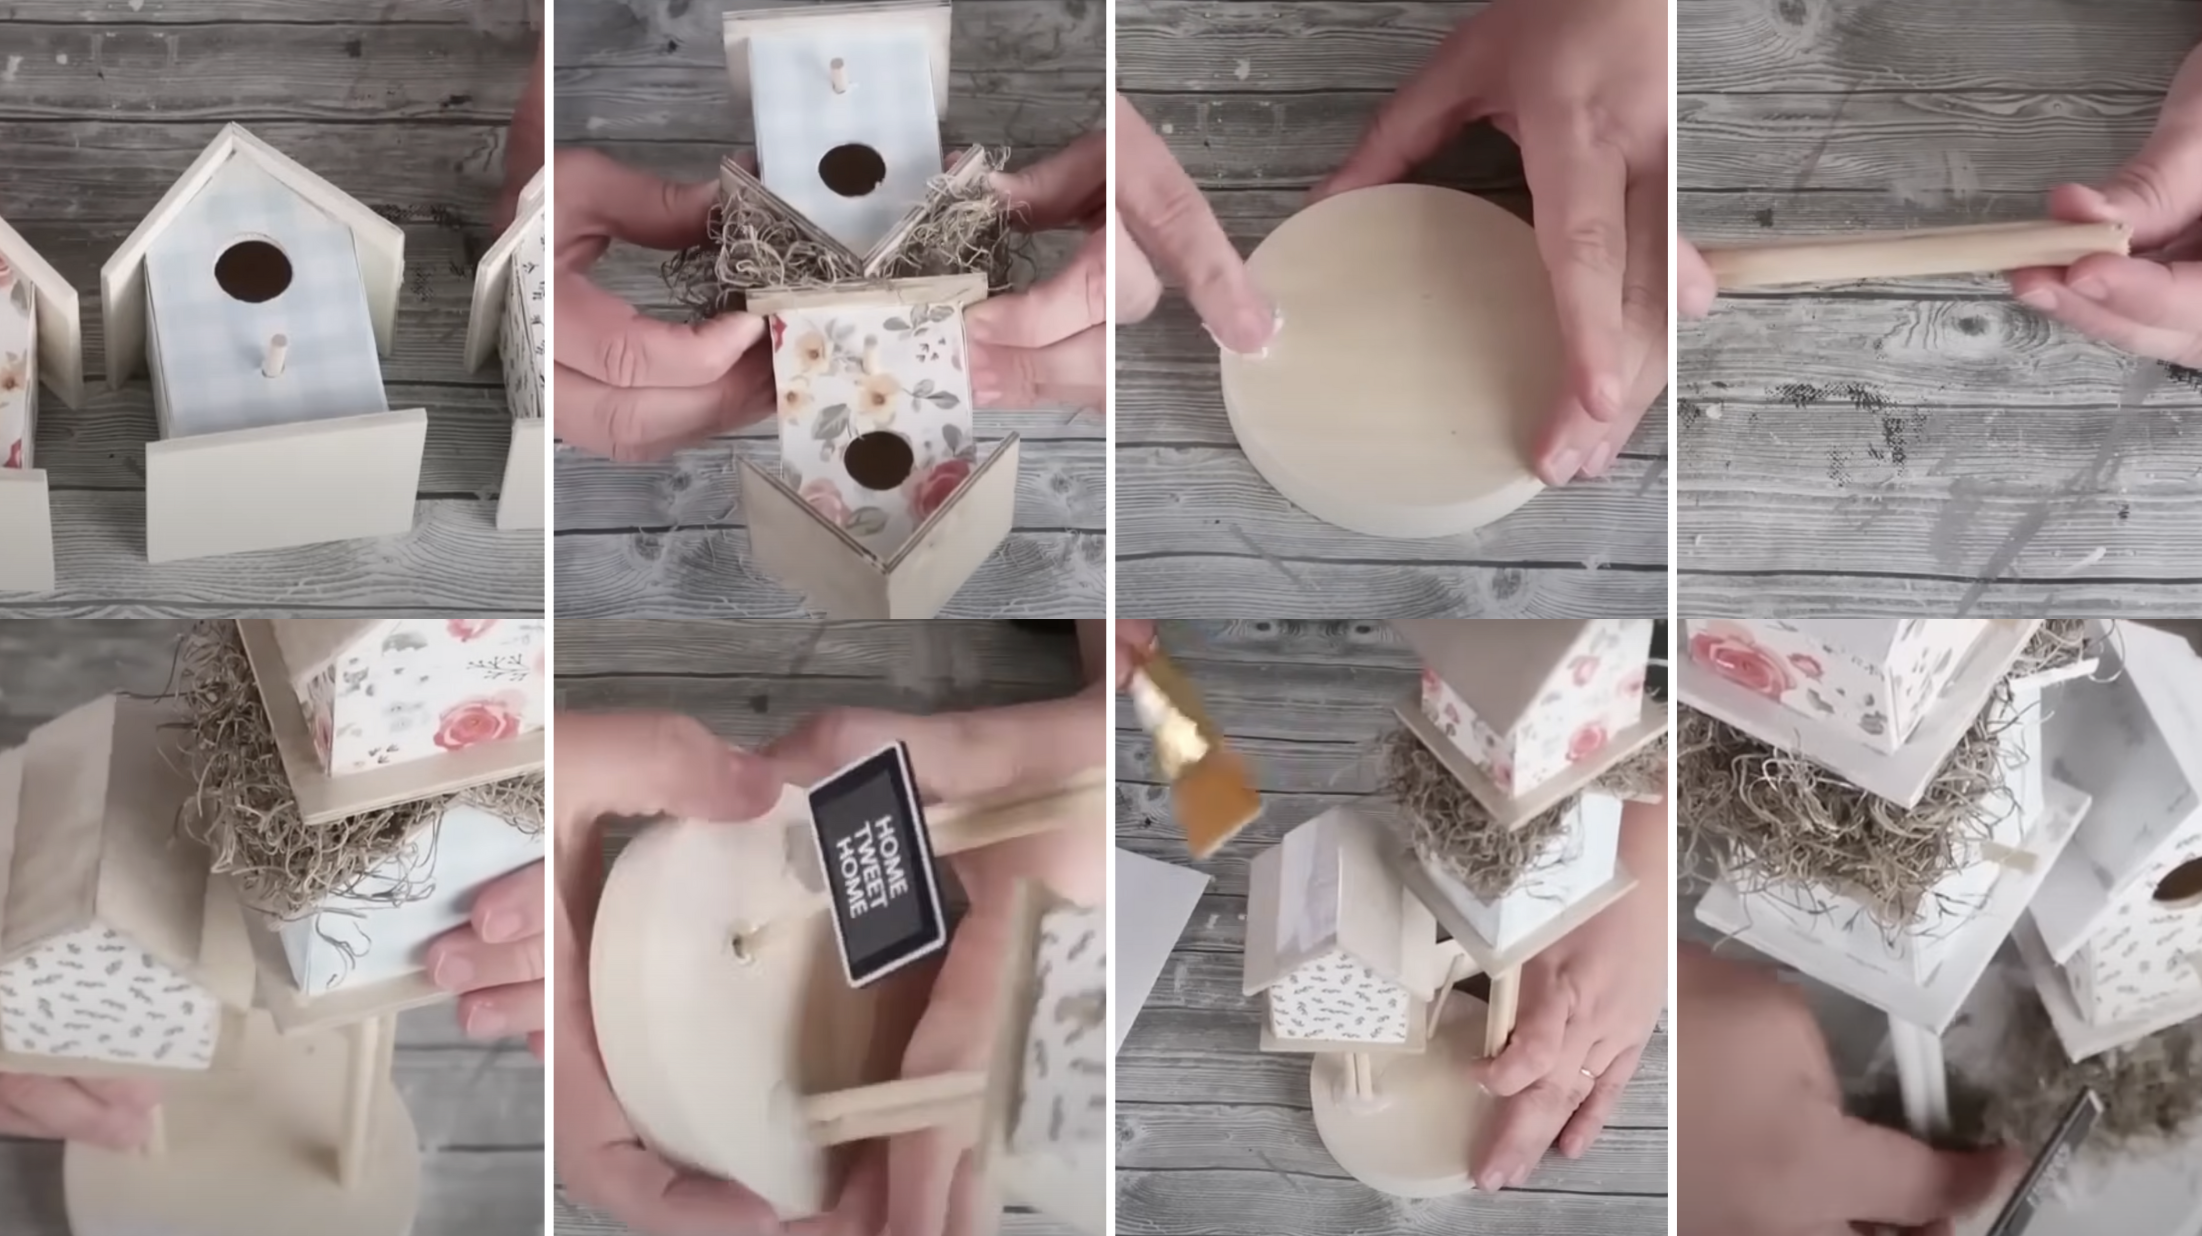
- Cover the birdhouses – Measure and cut scrapbook paper to fit the back, front, and sides of each birdhouse. For the front, cut out the circular hole for the bird entrance. Use hot glue to attach the paper, working quickly and using a popsicle stick to smooth out the glue.
- Create the structure – Glue four small wooden squares to the top of one birdhouse to create a platform for the second house. Cover these squares with Spanish moss. Position and glue the second birdhouse on top of the first.
- Prepare the base – Cover the hole in the wooden round with a patch of scrapbook paper. Paint the wooden round with white paint.
- Create the stands – Cut wooden stakes to different lengths. Glue three stakes together to form a tripod stand for the third birdhouse.
- Assemble – Drill holes in the wooden round (optional, or simply use hot glue). Insert and glue the tripod stand into the base, then attach the third birdhouse to the stand. Glue the stacked birdhouses to the base as well.
- Add details – Create a small “Home Tweet Home” sign using a computer and printer. Attach it to a garden stake and insert it into the wooden base. Add moss to the bird entrances for a nested look.
- Distress – Create a farmhouse look by lightly dragging a barely-damp paintbrush with white paint across the rooftops and floors of the birdhouses.
- Finishing touches – Add Spanish moss around the base to conceal glue. Attach small decorative bows and buttons to the fronts of the birdhouses. Wrap lace ribbon around the wooden base and secure with glue.
This charming bird condo creates a whimsical focal point for spring decor and makes an excellent Mother’s Day gift for bird lovers.
Making the Most of Your Craft Supplies
These projects are perfect examples of how to use what you already have to create beautiful spring decorations. By shopping your own craft room first, you’ll not only save money but also reduce clutter and give those forgotten supplies a new purpose.
Pro Tips for Using Up Craft Supplies:
- Organize by project type rather than by supply type to see creative possibilities
- Mix unexpected materials (like hula skirts for raffia!)
- Challenge yourself to use items that have been in your stash the longest
- Think seasonally but design for versatility (like the garden box that works year-round)
- Batch similar projects to use up more of one type of supply
Conclusion
Spring crafting doesn’t require expensive shopping trips or new materials. The five projects showcased here demonstrate how creativity flourishes when working with existing supplies.
Each project offers a unique way to celebrate spring while decluttering craft spaces. From the textured carrot wreath to the whimsical bird condo, these decorations bring seasonal charm to any home.
The beauty of these DIY crafts lies in their versatility and personalization options. Adjust colors, patterns, and embellishments to match individual style preferences and home décor.
Remember that crafting serves dual purposes – creating beautiful decorations while finding joy in the creative process itself. When crafters look at their collection of supplies with fresh eyes, possibilities multiply.
Happy crafting and happy spring!