I used to think mending clothes was just about fixing holes. Then I found a torn jacket in my grandmother’s closet, covered in the most beautiful blue stitching I’d ever seen. Those weren’t just repairs, they were tiny works of art that told stories of resourcefulness and care.
This is sashiko, Japan’s traditional stitching technique that turns necessary repairs into something beautiful. What started as a practical way to extend the life of clothing has become a meditative craft that connects us to centuries of skilled hands and sustainable living.
In this guide, I’ll show you how to master this ancient art form. You’ll learn the basic techniques, explore traditional patterns, and follow step-by-step instructions to create your own sashiko pieces. By the end, you’ll see every worn garment as an opportunity for artistic expression.
Ready to turn your mending into something magical? Let’s start stitching.
What Is Sashiko?
Sashiko is a traditional Japanese sewing technique that’s both beautiful and practical. The word “sashiko” means “little stabs” in Japanese, which perfectly describes the small, even stitches used in this craft.
Originally, people used sashiko to repair torn clothes and make fabric stronger by layering pieces together. The stitching creates gorgeous geometric patterns using simple running stitches, usually with white or blue thread on indigo fabric.
Have you ever seen those cool geometric patterns on clothing or home decor? That might be sashiko! Today, crafters worldwide love using this technique to decorate quilts, bags, and clothing. What would you like to decorate with sashiko stitching?
Key Features of Sashiko
- Simple running stitch – Creates straight lines and geometric shapes
- Functional purpose – Originally used to mend tears and reinforce weak areas
- Geometric patterns – Features waves, mountains, arrows, and traditional motifs
- Indigo tradition – Classic blue thread on white fabric, though modern versions use various colors
- Sustainable practice – Extends clothing life through creative repair methods
Sashiko has evolved beyond its original use as a repair work into a popular decorative art form. Crafters use these techniques for quilting, home decor, and fashion accessories.
The meditative quality of repetitive stitching makes it appealing to modern makers seeking mindful handwork activities.
Types of Sashiko
- Functional Sashiko: Basic repair technique using simple running stitches to mend tears, strengthen worn areas, and extend garment life through practical reinforcement.
- Decorative Sashiko: Purely ornamental stitching, creating beautiful geometric patterns like hemp leaves, ocean waves, and seven treasures for artistic expression only.
- Boro Sashiko: Combines multiple fabric scraps with visible mending techniques and layering patches to create unique patchwork textiles from necessity and resourcefulness.
- Kogin Sashiko: Northern Japan regional style using counted thread techniques on even-weave fabric to create intricate, symmetrical patterns and dense geometric designs.
- Hishizashi: Diamond-focused patterns featuring interlocking diamonds, armor scales, and nested grids representing strength, protection, and spiritual significance in Japanese culture.
- Linear Sashiko: Emphasizes directional stitching with Tatezashi (vertical lines) and Yokozashi (horizontal lines), creating movement, stability, and visual flow in designs.
Origin of Sashiko – Historical Timeline
Trace sashiko’s evolution from practical necessity to artistic expression through Japan’s major historical periods.
| PERIOD | DEVELOPMENT | PURPOSE | SOCIAL CONTEXT |
|---|---|---|---|
| Heian Period (794-1185) | Early forms of reinforcement stitching | Strengthen clothing and household items | Court nobility and the emerging merchant class |
| Kamakura Period (1185-1333) | Basic running stitch techniques develop | Repair torn garments and extend fabric life | The growing warrior class needs durable clothing |
| Edo Period (1603-1868) | Sashiko becomes a widespread practice | Mending clothes, creating warmth layers | Common people face fabric shortages, strict sumptuary laws |
| Meiji Period (1868-1912) | Techniques become more refined and decorative | Both functional repair and visual appeal | Modernization brings new materials and methods |
| 20th Century | Traditional craft preservation begins | Cultural heritage and artistic expression | Post-war revival of traditional Japanese arts |
| Modern Era (1980s-present) | Global recognition and adaptation | Contemporary art form and sustainable fashion | International interest in Japanese culture and eco-friendly practices |
Today, sashiko continues to inspire makers worldwide who value both its timeless beauty and sustainable approach to textiles. This ancient technique proves that necessity truly is the mother of invention, changing simple mending into a magnificent art form.
Step-by-Step Sashiko Stitching Guide
Follow this complete tutorial to create your first sashiko project, from fabric preparation to finishing touches.
Materials
- Large fabric piece (cotton recommended)
- Sashiko thread (traditional indigo or colored)
- Template/pattern guide
Tools
- Sashiko needles (longer than regular needles)
- Tailor’s chalk for marking
- Pins for securing
Step 1: Prepare Your Fabric and Pattern
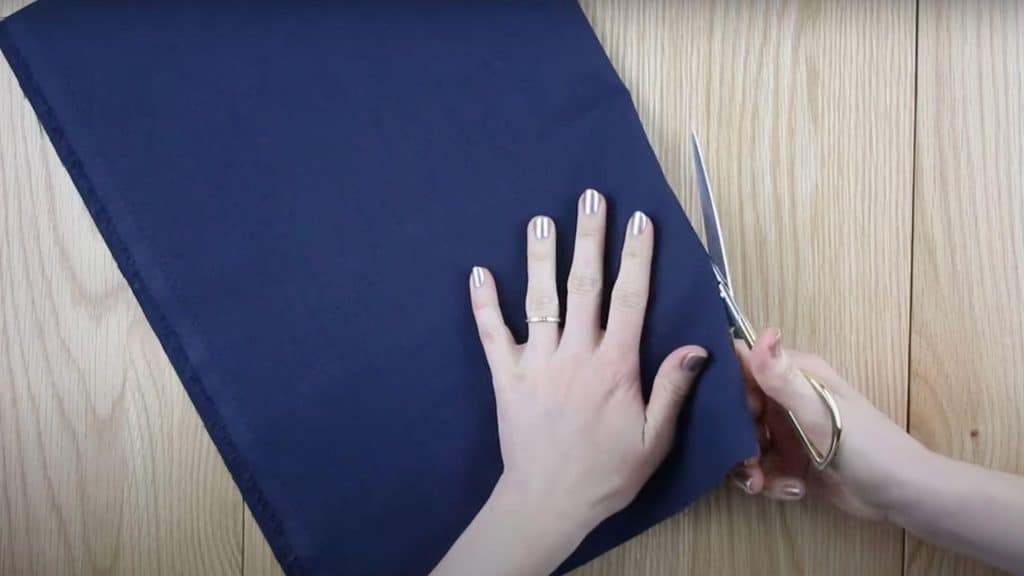
Cut your large fabric piece in half to create two matching rectangles for placemats. Fold over the edges where the template dashes appear, keeping them visible on all four sides. Place your full-size pattern template centrally on the fabric.
Use tailor’s chalk to mark all around the template where the dashes are located. Make slightly longer marks where dashes cross horizontally. This preparation ensures accurate stitching lines and proper handling of the fabric throughout the project.
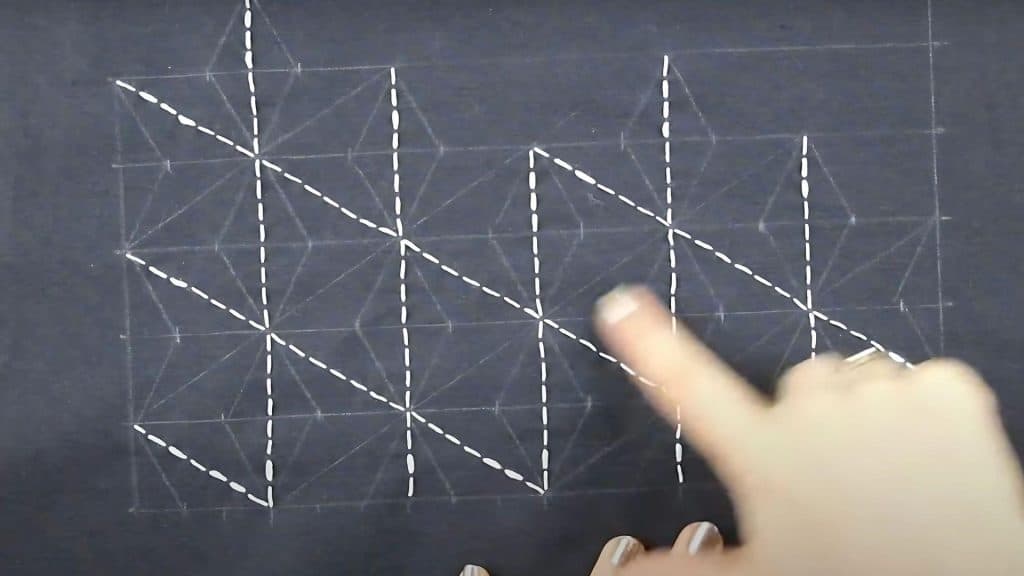
Step 2: Draw Your Grid Lines
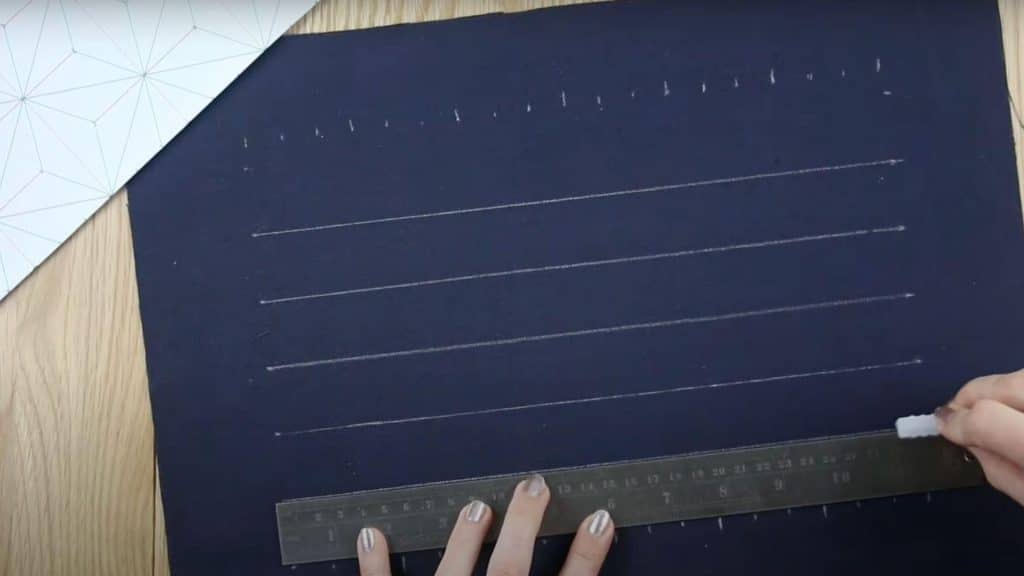
Remove the template and use a ruler with tailor’s chalk to draw horizontal lines across the fabric, using the horizontal dashes as your guide.
Next, draw vertical lines using the longer marks as reference points. Notice there’s an allotted space at the top right of your design; leave this area empty when drawing your pattern.
From right to left, draw four sections high, then follow the sequence: five, four, five, six, and five sections to complete your basic grid structure.
Step 3: Add Diagonal and Diamond Lines
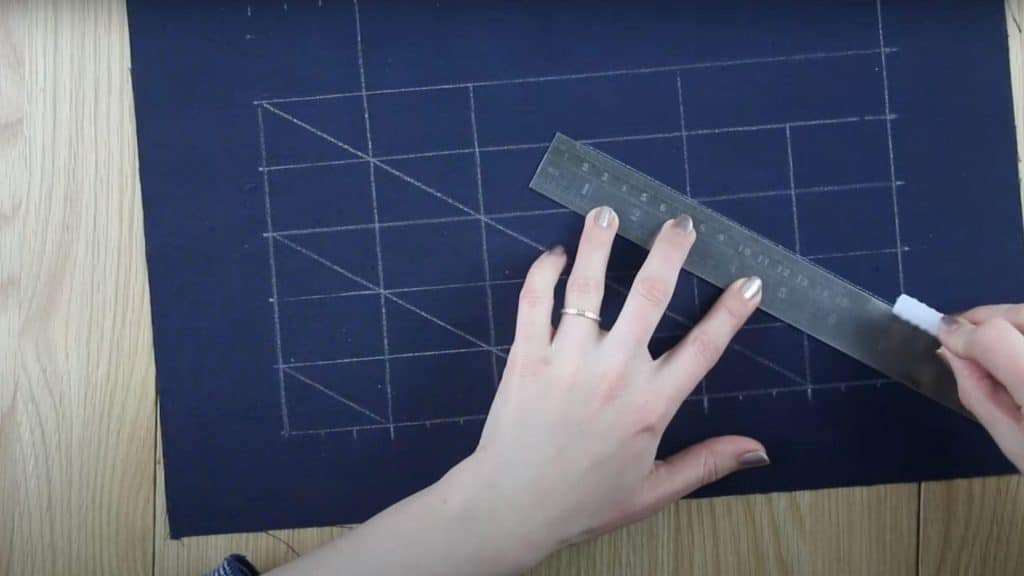
Draw diagonal lines marked in blue on your pattern template, leaving gaps between lanes as shown. Start each diagonal two lanes up from the previous one. Mark connection points where diamond lines (green on the template) will meet, looking for small black dashes as guides.
Use your ruler to connect smaller chalk marks at the fabric’s top and bottom, marking dashes on horizontal lines. Draw all green lines in one direction first, then complete lines in the opposite direction.
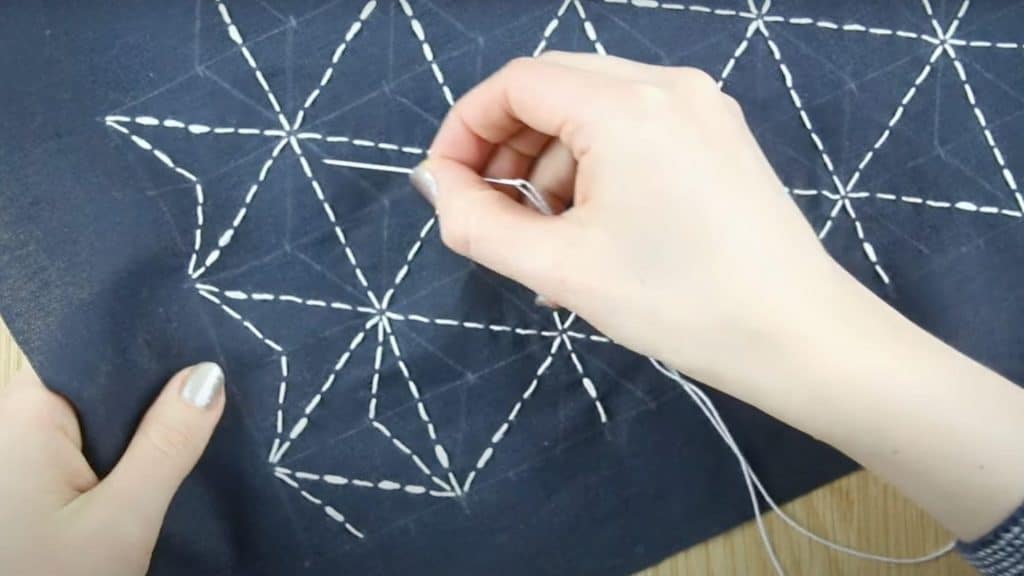
Step 4: Prepare Your Thread and Begin Stitching
Remove paper from your sashiko thread and cut it where threads are tied together, creating one long strand. Thread your longer sashiko needle with one strand. Begin with vertical lines, following the traditional method where front stitches are longer than back stitches.
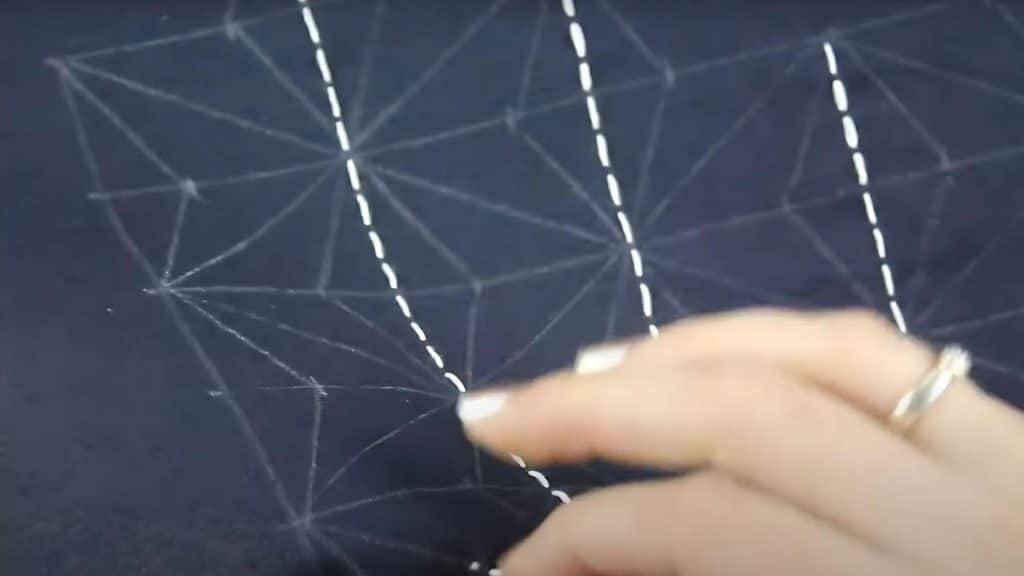
Load multiple stitches onto your needle at once. Start two stitches from the center of the last section, working back toward the line end. Leave small spaces where chalk lines cross to create the signature starburst effect.
Step 5: Complete Vertical and Diagonal Lines
Secure the thread by going over stitches at the beginning and end rather than tying knots. Pull fabric gently to remove ripples after each row.
Complete all vertical lines first, ensuring you have enough thread for each entire line. Next, stitch diagonal lines in one direction (seven stitches per section for this pattern), then complete diagonals in the opposite direction. Leave outside boundary lines for the final step, focusing on interior pattern completion first.
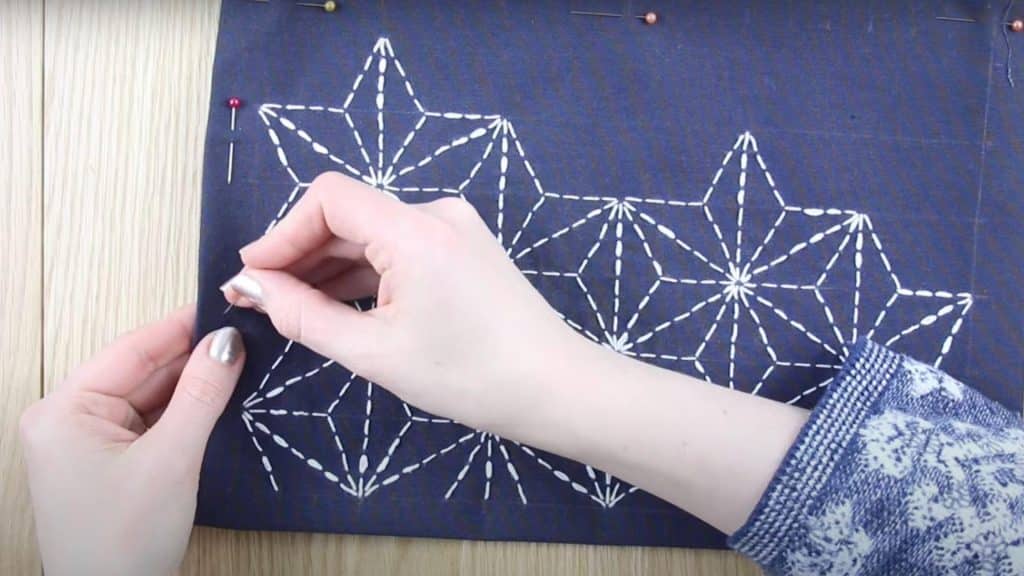
Step 6: Stitch Diamond Patterns and Horizontal Lines
Work on diamond lanes marked green on your template. For half-diamonds at ends, stitch one direction with a slight thread give at the back, then continue along the line.
For central diamonds, stitch along street lanes over intersections, turn back across the next intersection to the top, then back down. Complete the opposite side similarly.
Add horizontal lines by stitching across sections, taking thread across gaps at the back with a slight give, then continuing along each row.
Step 7: Finish Edges and Complete Your Project
Fold fabric edges and iron on cotton settings for all four sides to create neat edges. Fold edges again, ensuring overlap covers perimeter lines, then iron the second fold. At corners, trim diagonal overlaps and pin-folded fabric in place.
Use chalk to draw outside boundary lines, including top and side lines. Stitch around the perimeter one stitch at a time through three fabric layers, leaving small gaps at intersections. Secure the corner overlaps with small stitches, then iron your completed sashiko piece on the backside.
Video Tutorial
I’d like to acknowledge Craftiosity for the insightful video, which was a key reference in putting this guide together.
What Are the Different Types of Sashiko Patterns?
Explore the main sashiko and their signature patterns, from practical repairs to decorative art.
| PATTERN NAME | MEANING | DESIGN |
|---|---|---|
| Asanoha | Hemp leaf | Six-pointed star pattern |
| Seigaiha | Ocean waves | Overlapping curved lines |
| Shippo | Seven treasures | Interlocking circles |
| Gintama | Silver coins | Circular prosperity symbols |
| Yabane | Arrow feathers | Zigzag protection patterns |
| Uroko | Fish scales | Overlapping curved triangles |
Sashiko Stitching Technique Tips
Perfect your sashiko stitching with these traditional methods that ensure even, beautiful results every time.
- Master the Running Stitch – Keep front stitches longer than back stitches. Aim for a 3:1 or 4:1 ratio between front and back stitch lengths.
- Load Multiple Stitches – Take several stitches onto your needle before pulling through. This traditional method speeds up work and creates even tension.
- Maintain Consistent Spacing – Keep equal distances between stitches and rows. Use your template markings as guides for uniform appearance throughout your project.
- Don’t Tie Knots – Secure thread by stitching over previous stitches at start and end. This traditional method keeps the back neat and prevents bulky knots
Conclusion
Learning sashiko has changed how I look at every piece of fabric in my home. What once seemed like irreparable damage now feels like an invitation to create something more beautiful than before. This ancient Japanese technique proves that the most meaningful art often comes from necessity, not luxury.
The simple running stitch you’ve learned today connects you to generations of resourceful hands who understood that repair and beauty aren’t opposites they’re partners. Each stitch you make reduces waste while adding character and story to your belongings.
Your sashiko skills will only improve with practice. Start with something small a worn tea towel or favorite shirt with a hole. Share your first project in the comments below; I’d love to see how you’re bringing this timeless craft into your modern life.
Ready to mend something beautiful?