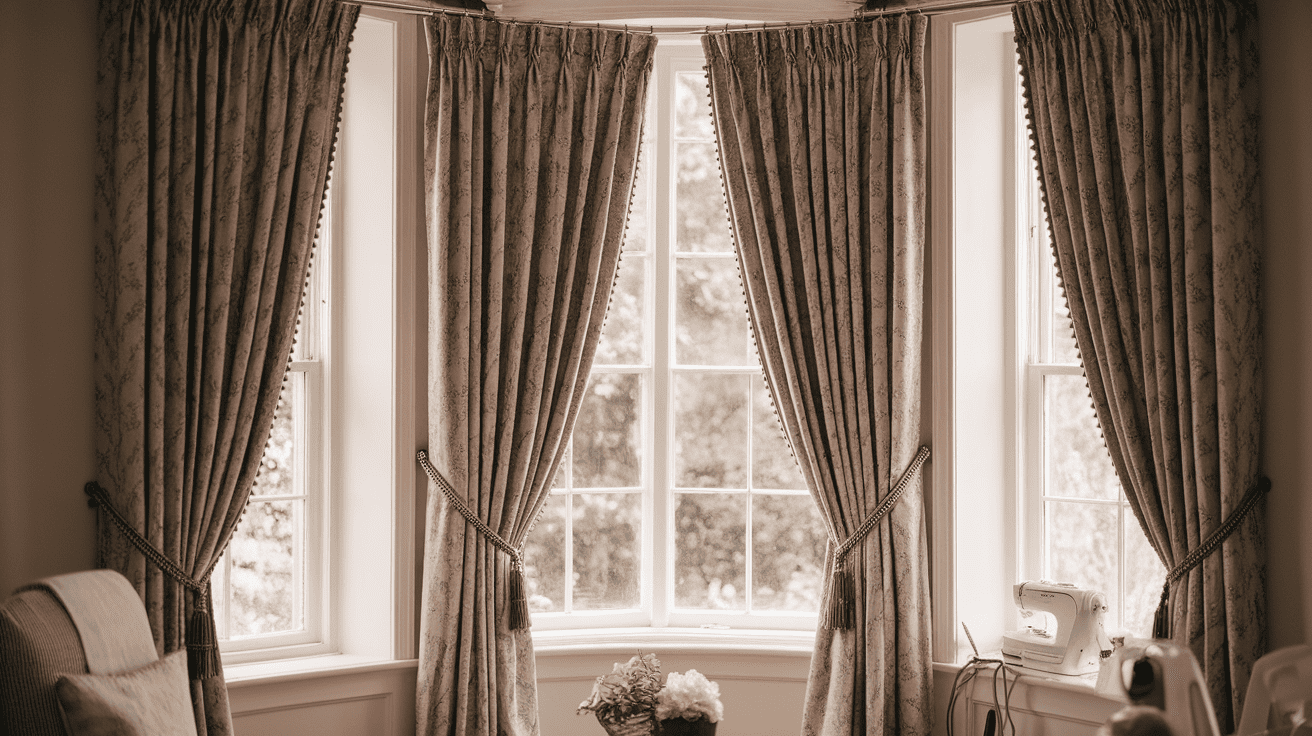

Seen those stunning home décor photos that make you wish for a style update? Those structured pinch pleat curtains might seem like a luxury only professionals can create, but here’s what you should know: you can make them yourself!
After four years with simple drop cloth curtains, I wanted something more refined for my spring living room update.
When I found beautiful pinch pleat curtains at a home décor store, I was shocked by the high price. But why pay extra when you can DIY?
With just basic sewing skills and some affordable materials, you can make your windows stand out.
Want to create custom, high-quality DIY pinch pleat curtains that will have friends asking who did your decorating?
Before starting any sewing project, proper preparation is key. For an insightful guide on creating custom curtains, refer to our Step-by-Step Guide to Making Your Own Curtains.
9 Steps to DIY Pinch Pleat Curtains
Materials You’ll Need:
| Material | Description |
|---|---|
| Linen or Linen-Cotton Blend Fabric | Fabric used for the curtains (50/50 blend) |
| Pleater Tape | Used to create the pleats in the fabric |
| Pleating Hooks | Hooks to secure pleats in place |
| Sewing Machine | For stitching the fabric and pleater tape |
| Thread | Matches the fabric color for sewing |
| Iron and Ironing Board | To press and set the pleats neatly |
| Straight Pins | For holding fabric in place during sewing |
| Scissors or Fabric Shears | To cut the fabric and the pleater tape |
| Measuring Tape | For accurate measurements of fabric size |
| Needle and Thread (Hand Stitching) | For finishing and securing pleats by hand |
Step 1: Prepare The Fabric

Proper preparation is key before starting any sewing project. If you’re using linen or a linen blend fabric, check whether it’s been pre-washed. If not, wash and dry (or hang dry) it first to stop shrinkage after your curtains are hung. Once dry, iron your fabric to remove wrinkles.
For your project, you should choose a nice 50/50 linen-cotton blend. Since you might not find fabric wide enough for your tall ceilings, you may need to join two panels together to get the width you want.
Step 2: Cut Your Fabric to Size

Measure your windows carefully and cut your fabric to the desired length, adding extra inches for hemming at the bottom and creating a header at the top.
Remember that pinch pleat curtains will “shrink” in width once the pleats are formed – you’ll find your panels shrink by about half their original width once pleated.
Step 3: Join Panels if Needed

If you need wider curtains:
Place two panels side by side with the right sides facing each other. Pin along the edge where you want to join them. Sew a straight seam. Iron the seam flat.
Pro tip: Try to position this seam so it will be hidden within a pleat later for a more polished look.
Step 4: Hem the Sides

For a clean finish on the sides of your curtains:
Fold each side edge over about 1/4 inch and press with an iron. Fold over again (about 1/2 inch) and press. Pin in place. Sew a straight line along the edge.
Pro Tip: Taking time to iron before pinning and sewing helps keep everything perfectly straight!
Step 5: Create the Top Header

The top header needs to be substantial enough to support the pleater tape:
Fold the top edge over about 1/4 inch and press. Fold over again, this time about 4 inches, and press thoroughly. Pin in place. Sew along the bottom edge of this fold.
Step 6: Attach the Pleater Tape

This is where the good stuff happens – pleater tape is what creates those beautiful, structured pinch pleats:
Position the pleater tape along the inside of your top header. Make sure the openings/tabs for the hooks face downward. Pin in place following the guide on the tape. Sew along the dotted lines shown on the tape.
Step 7: Insert the Pleating Hooks

Now it’s time to reshape your flat panel into gorgeous pinch pleat curtains:
Turn your curtain panel so the top header is facing you. Start a couple of inches from the edge. Insert a hook through the second slot in the pleater tape.
Gather the fabric by inserting the remaining prongs through the next slots (gather four slots for each pleat). Continue along the panel, spacing your pleats evenly (count five slots between each hook).
Step 8: Hand Stitch the Pleats

For a more polished, professional look:
Hang your curtains temporarily to see how the pleats fall. Pin each pleat where you want to tack it (measure about 6.5 inches from the top). Hand stitch each pleat to secure it in position. This extra step makes a huge difference in the final appearance!
Step 9: Hem the Bottom

For the perfect floor-skimming finish:
Hang your curtains to determine the ideal length. Pin the bottom hem at your desired height (opt for a 4-inch hem that just barely dusts the floor).
Take the curtains down. Iron the hem for a crisp edge. Sew the hem – you can find a stitch on your machine that creates a nearly invisible seam on the right side of the fabric.
I’d like to give credit to Fletcher Creek Cottage for their informative video, which served as a reference for this guide.
Helpful Tips for DIY Pinch Pleat Curtains
Fabric Selection Tips
- Choose medium-weight fabrics – too light won’t hold pleats well, too heavy may be hard to work with.
- Natural fibers like linen, cotton, or blends work best for crisp pleats.
- Always buy extra fabric to account for pleating (width will reduce by 40-50%).
- Pre-wash your fabric to avoid shrinkage after hanging.
Measuring Tips
- Add 8-12 inches to your desired finished width for each panel before pleating.
- For floor-length curtains, measure from the rod to the floor and add 3-4 inches for hemming.
- Mark all measurements with pins or fabric chalk before cutting.
- Double-check all measurements – this small step saves lots of frustration!
Sewing Tips
- Use a heavy-duty needle for thicker fabrics.
- Test your stitch length on scrap fabric first.
- Press all seams and folds thoroughly before sewing for clean lines.
- Pin generously to keep everything aligned.
5 Common Mistakes to Avoid
1. Not Planning for Width Reduction: Many first-timers forget that pleating significantly reduces width. A 100-inch panel might end up only 50-60 inches wide after pleating. Always start with panels much wider than your window.
2. Skipping the Pre-Wash Step: Failing to pre-wash linen or cotton fabric can lead to shrinkage after your curtains are hung. This might leave your perfectly hemmed curtains suddenly too short!
3. Inconsistent Pleat Spacing: Uneven spacing between pleats creates a messy look. Use a measuring tape to mark consistent intervals before inserting hooks.
4. Rushing Through Pressing: Skipping thorough pressing between steps results in unprofessional, wrinkled curtains. Take time with your iron – it makes all the difference.
5. Making Uneven Hems: Crooked hems are instantly noticeable. Measure carefully from the floor up, and pin thoroughly before sewing.
Conclusion
There you have it—making your own pinch pleat curtains isn’t just doable, it’s actually quite simple! With basic sewing skills and some patience, you can learn how to turn simple fabric into structured window treatments that truly improve your space.
The real skill shows in the small things: pressing your pleats carefully, taking time to hand stitch them, and checking your measurements twice. These steps make the difference between homemade and professionally crafted.
Want to try this project soon? Start with just one window to build your skills. Take photos before and after—you’ll notice how these well-made curtains quickly change the mood of your room. Need help with any part? You can get guidance on creating that high-end look right from your home!
Frequently Asked Questions
How Do I Choose the Right Fabric for Pinch Pleat Curtains?
Pinch pleat curtains work well with medium to heavy fabrics like linen, cotton, and polyester mixes. These materials keep pleats in shape and offer a neat, nice look.
Can I Make Pinch Pleat Curtains without Pleater Tape?
Yes, you can, but pleater tape makes the job simpler by giving a uniform, well-built look. Without pleater tape, you’d need to hand-sew pleats and add hooks, which takes more time.
What Type of Sewing Machine Stitch Should I Use for Making Curtains?
A plain stitch works best for most curtain parts, like side hems and seams. For the pleats, a loose stitch helps gather fabric at first before you secure it with a final stitch.