Building a porch can feel like a daunting task that requires expert help, right?
I thought the same thing until I learned that most homeowners can build their porch with basic tools and some planning. You don’t need years of construction experience or fancy equipment.
Consider having your own covered outdoor space where you can relax, entertain guests, or enjoy your morning coffee. A porch adds value to your home while providing the perfect spot that bridges the gap between indoors and outdoors.
I’ll show you the step-by-step process I used to build my porch, from setting up the posts to installing the final roof panels.
Let’s turn that space into your new favorite spot.
What Is Porch Construction?
Porch construction involves building a covered or partially enclosed outdoor structure attached to a house, typically at the front, back, or side. It serves as a transitional space between the indoors and outdoors, often used for relaxation, socializing, or enjoying the surroundings.
Porch designs can vary, ranging from simple open platforms to elaborate structures with roofs, railings, and screens. They are constructed using materials such as wood, concrete, brick, or composite materials, depending on the budget and local climate.
The construction process begins with planning and design, taking into account factors such as size, location, and local building codes and regulations.
A porch can change your home’s functionality and charm, blending indoor comfort with outdoor freedom.
Types of Porch
Open Porch: An uncovered or partially covered structure, perfect for open-air relaxation with minimal weather protection. Ideal for mild climates, enhancing curb appeal.
Screened Porch: Enclosed with mesh screens, offering bug-free outdoor enjoyment with good airflow. Great for year-round use and privacy.
Wraparound Porch: Extends along multiple sides of the house, providing expansive space and views. Boosts charm, ideal for large homes.
Back Porch: A private, covered rear porch for cozy gatherings or relaxation.Suits intimate settings with moderate weather protection.
Veranda: A large, elegant porch with a roof, designed for socializing and shade. Enhances sophistication in warm climates.
Step-by-Step Guide to Rebuilding a Porch
Tools Required:
| Tool | Purpose |
|---|---|
| Post Level | Measures the level of two faces of a post simultaneously to ensure it is plumb. |
| Four-Foot or Six-Foot Level | Checks plumb and level on posts or surfaces for alignment; an alternative to a post level. |
| Circular Saw | Cuts rafters, purlins, and fascia boards quickly; handles rough cuts, including bird’s mouth. |
| Jigsaw | Finishes bird’s mouth cuts on rafters for clean, 90-degree corners and strong connections. |
| Clamps | Holds posts in place during leveling; secures them temporarily before fastening. |
| Ladders and Scaffolding | Provides safe access to elevated areas for the installation of structural components. |
| Speed Square or Straight Edge | Aligns fascia boards to maintain a straight roofline and prevent structural issues. |
| Tape Measure | Measures lengths for cutting and placement of posts and rafters accurately. |
| Drill or Screw Gun | Drives screws into structural elements for secure and durable attachment. |
| Tractor | Lifts heavy roofing panels to roof level, reducing manual effort. |
Materials Required:
| Material | Purpose |
|---|---|
| Giant White Oak Posts | Reused from old porch; provide strong, durable vertical supports for the structure. |
| Beams | Form the deck’s foundation to offer solid footing for the posts, ensuring stability. |
| Braces | Temporarily hold posts plumb during setup; later reinforce the structure for added strength. |
| Screws | Securely fasten braces, rafters, and roofing panels for long-term durability. |
| Headers | Connect and stabilize the posts at the top; distribute the weight and support the rafters. |
| Rafters | Form the roof’s framework by cutting to sit securely on headers using a bird’s mouth and back cuts. |
| 2×6 Boards | Used as fascia to cap rafter ends, protect and finish the roofline. |
| Blocking | Fits between rafters to prevent rolling and close gaps, deterring pests. |
| 1x Boards (Purlins) | Tie the rafters together; provide support for attaching roofing panels, thereby enhancing the roof’s strength. |
| Standard Metal Roofing Panels | Cover the roof; offer durable, weather-resistant protection. |
| Rubber Washer Screws | Secure roofing panels; washers seal holes to prevent leaks and provide a neat finish. |
| Paint, Soffit Lights, and Plants | Add a finishing touch, paint for protection, lights for illumination, and plants for visual appeal. |
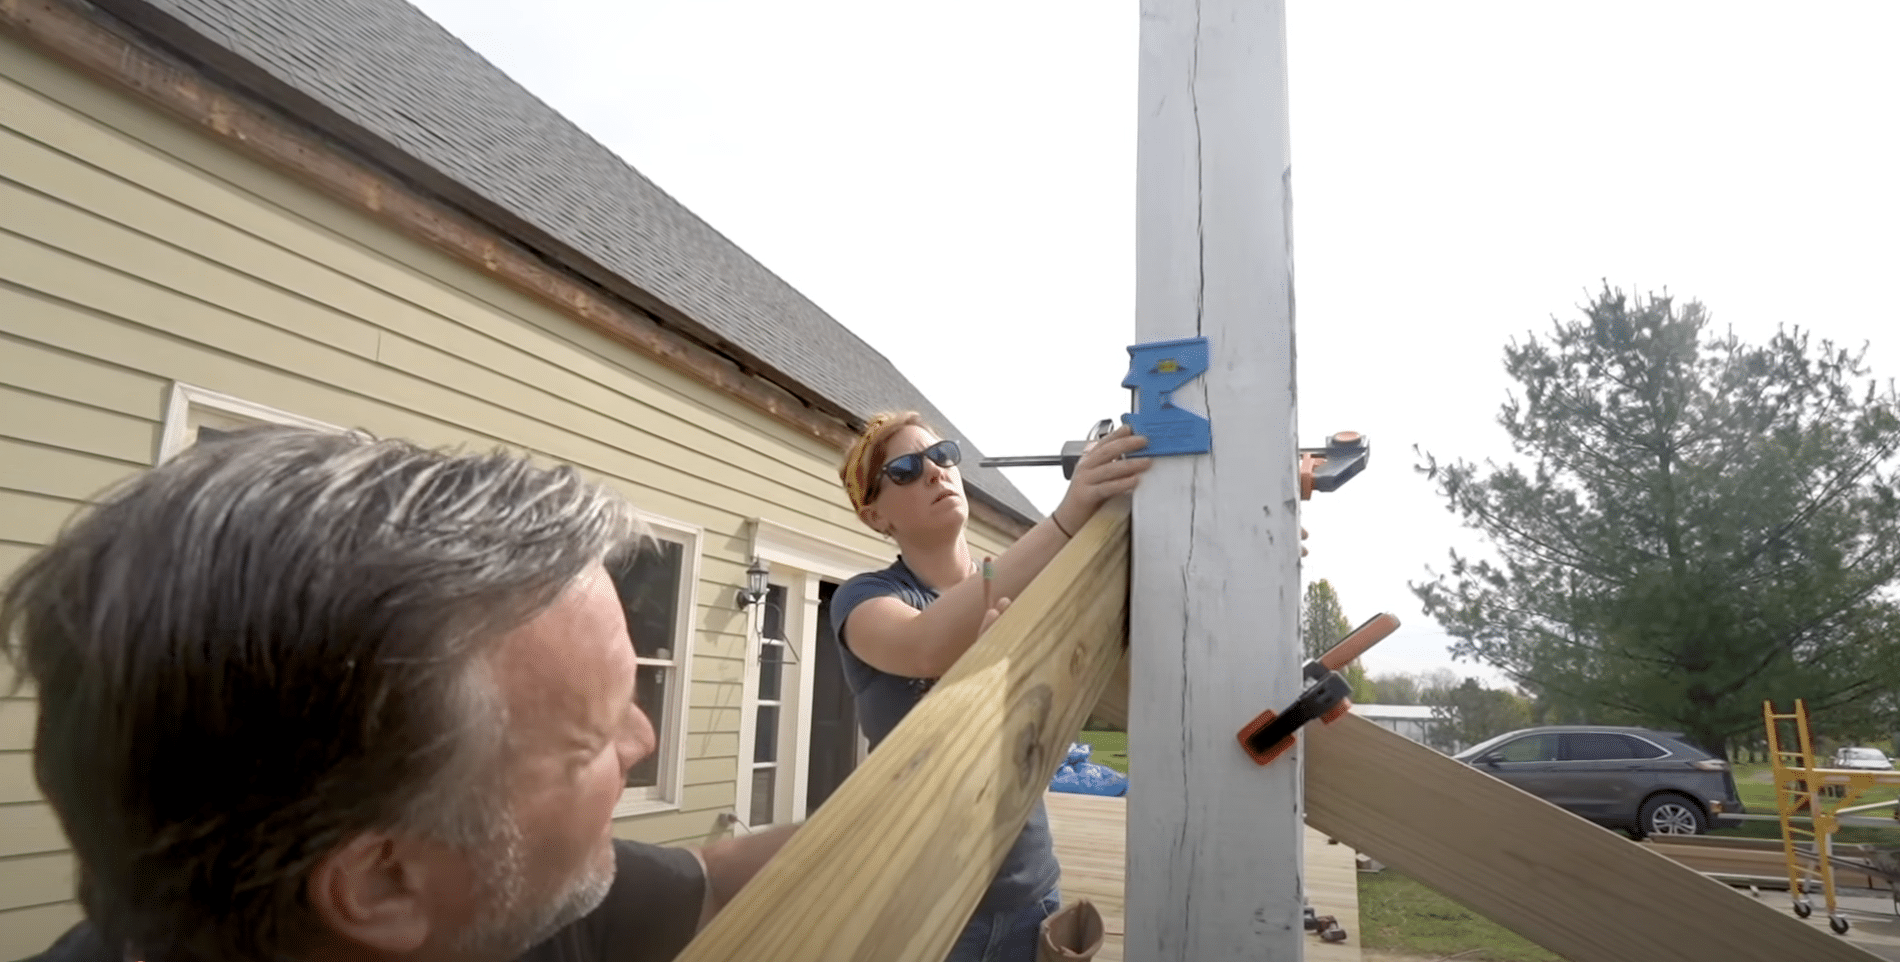
Step 1: Setting Up the Posts
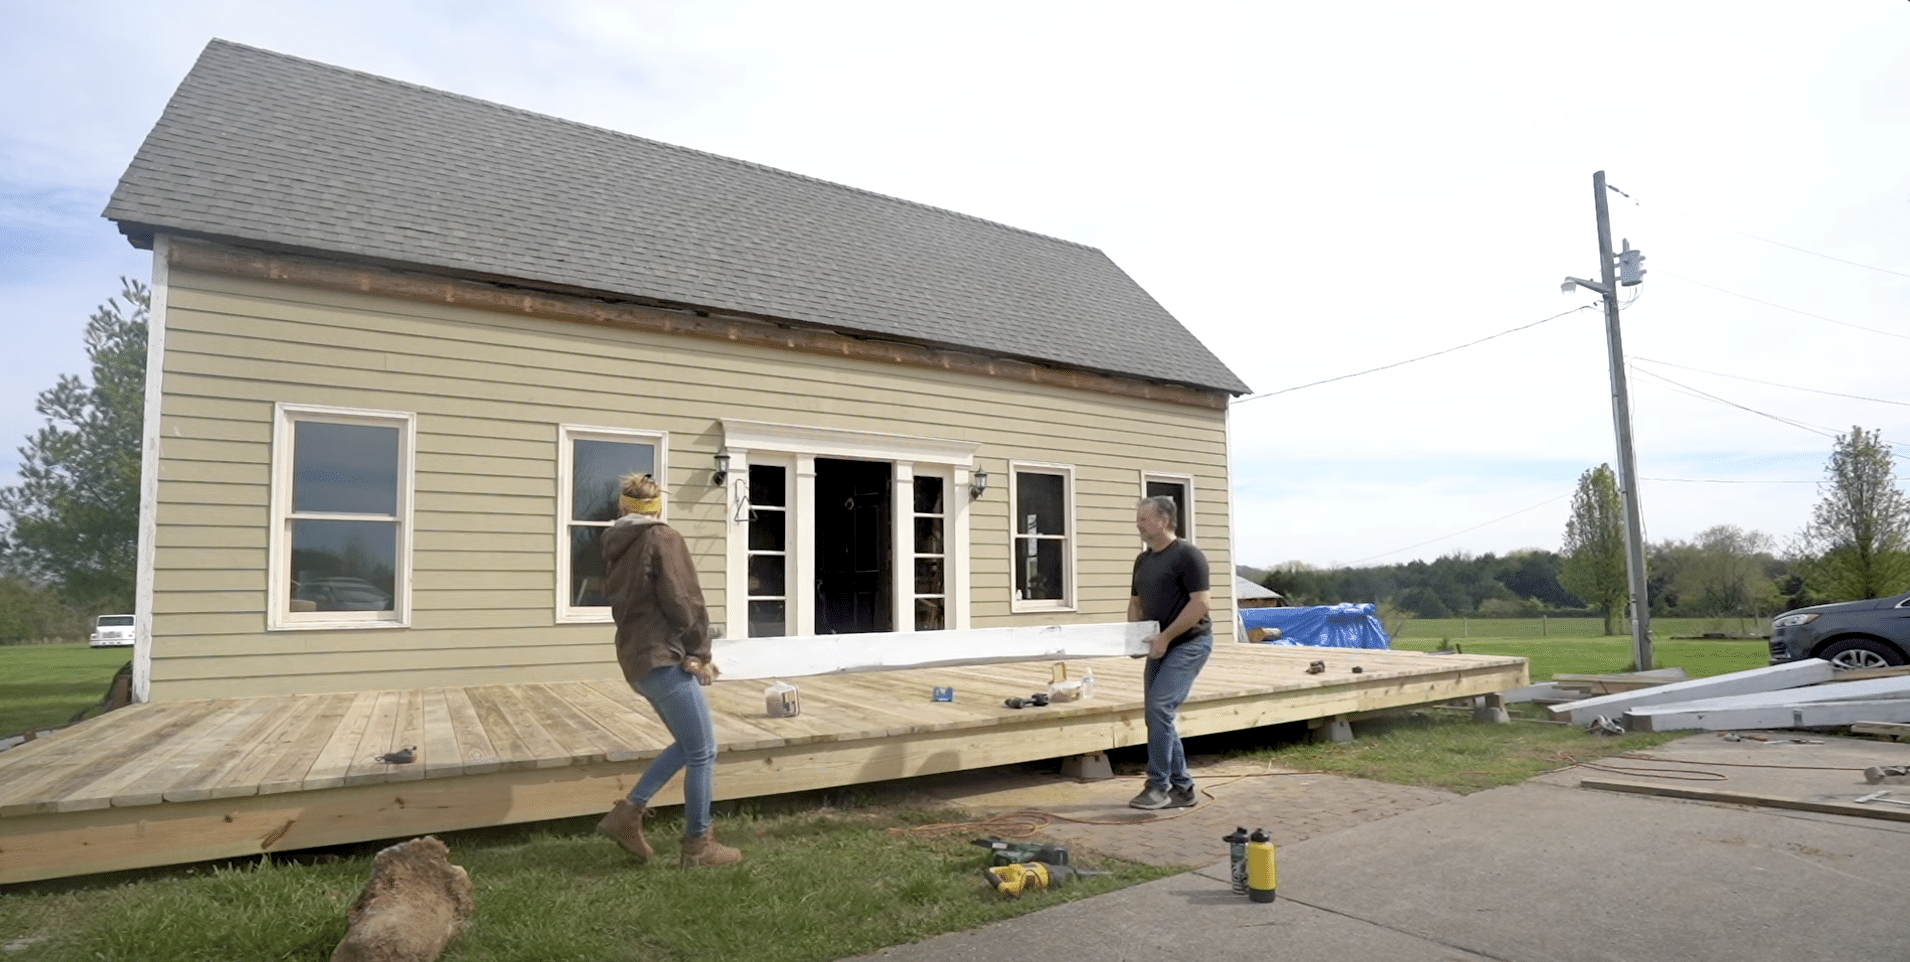
Start by saving the strong parts from the old porch, such as the large white oak posts. Place each post on the deck’s beams so they have a solid base. Ensure the post is straight up and down by using a post level, which checks both sides simultaneously.
One person reads the level while the other tightens clamps to hold the post still. Recheck it, then screw braces to keep it in place work from left to right, setting one post at a time for a steady start.
Unique Point: Strong posts are the backbone of your porch, keeping it safe and sturdy for years!
Step 2: Adding the Header and Planning Rafters
Once two posts are set, add a header on top to connect them. Measure and cut the header to fit, then screw it tight to hold the posts steady. Next, determine the cuts for the rafters, which are the supports for the roof. Test one rafter by placing it on the header and the shop wall.
Mark and cut the ends and a notch (bird’s mouth) to fit snugly. Use a circular saw for big cuts and a jigsaw for clean edges. This rafter becomes your guide for the rest.
Unique Point: A header ties everything together, making your porch strong enough to handle storms!
Step 3: Cutting and Placing Rafters
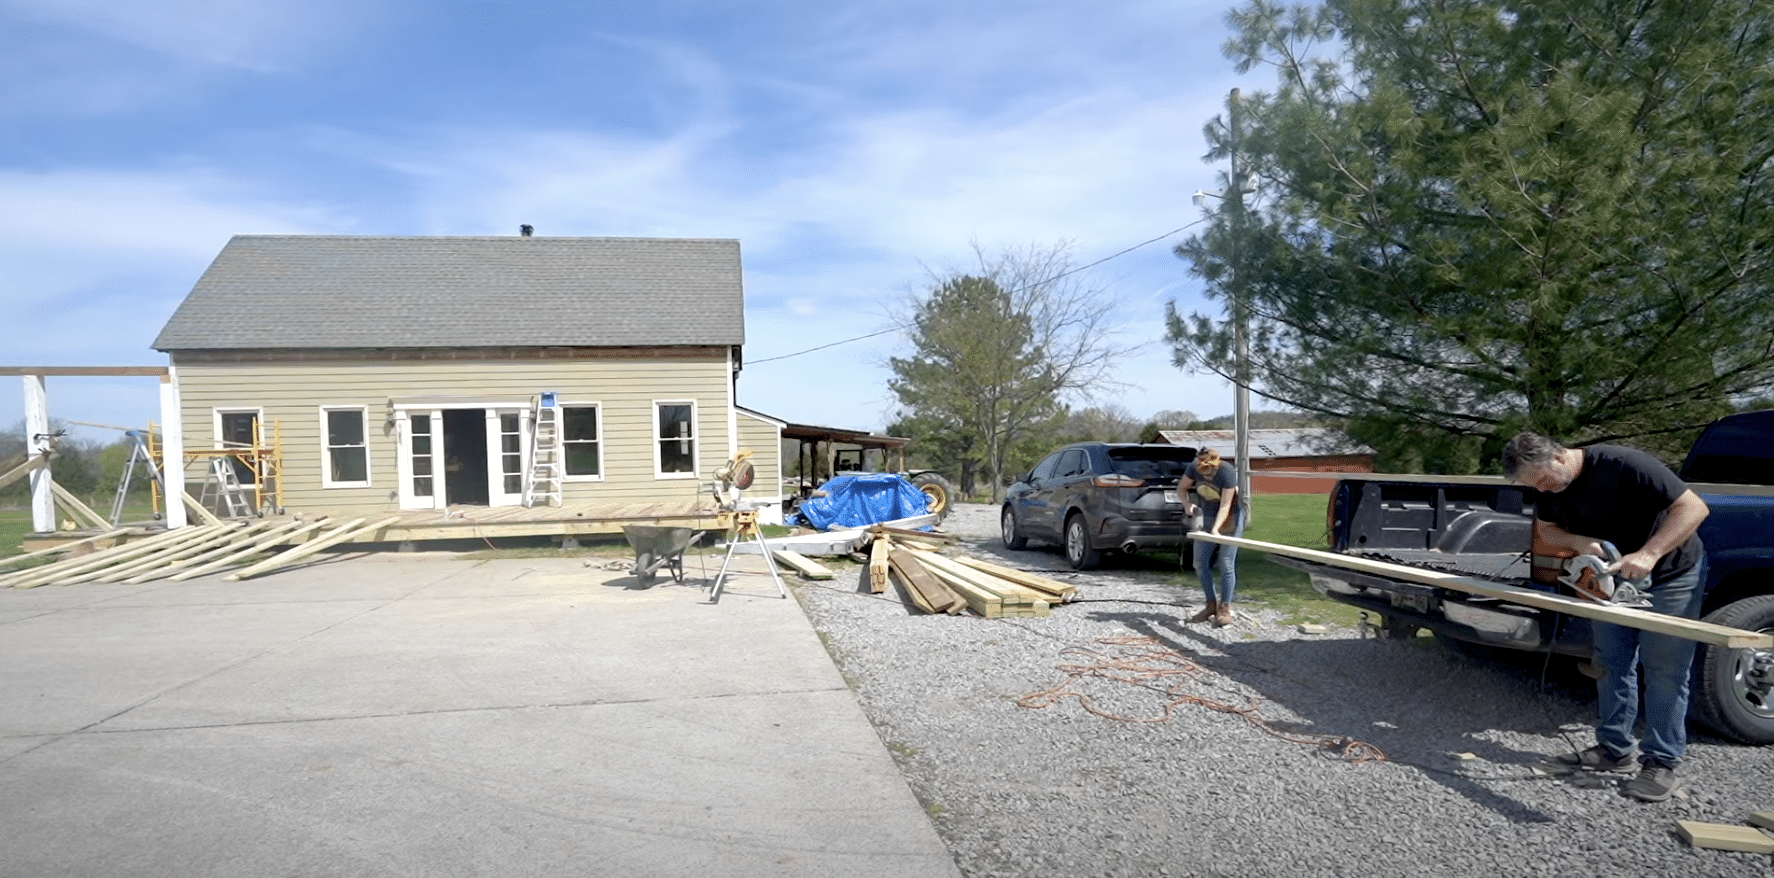
Work as a team: one person grabs a new board and lays it on a tailgate or table. Line up the guide rafter, mark it, and cut the end and notch with a circular saw. Finish the notch with a jigsaw for a neat fit.
Take the finished rafter to the porch and set it on the header. Screw it in place, using a spacer to keep each one even. Add blocks between rafters to stop wobbling and keep birds out. Keep going, section by section.
Unique Point: Teamwork speeds things up, changing a big job into a fun and fast project!
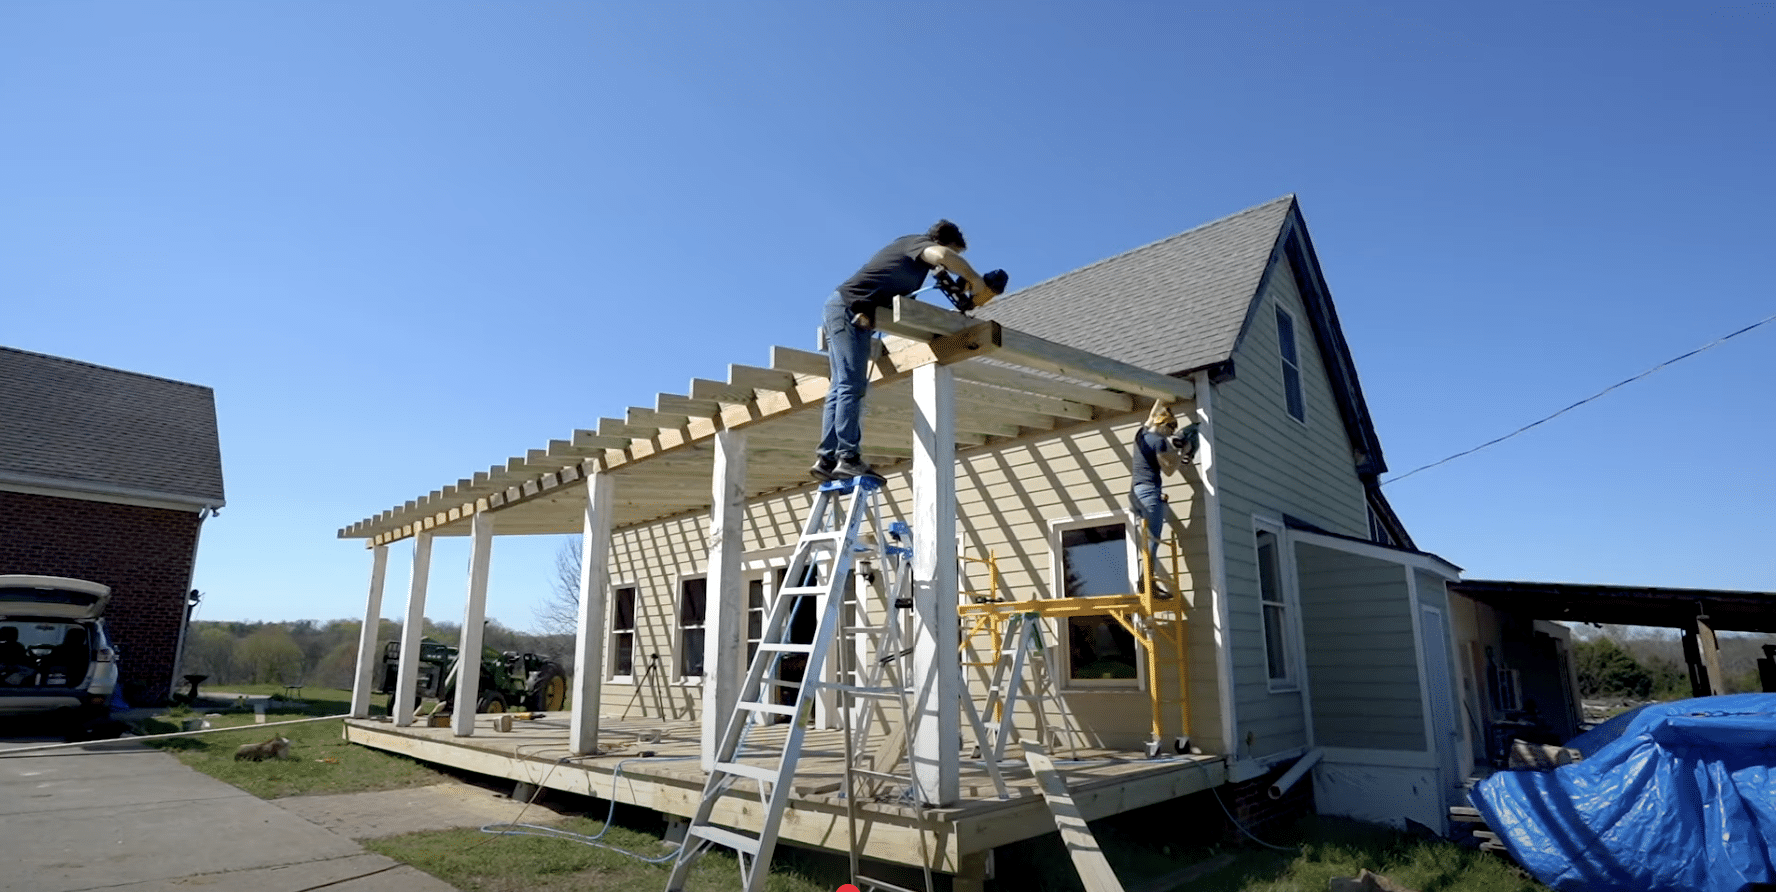
Step 4: Capping and Strengthening the Roof

Measure and cut a 2×6 board to cover the rafter ends, also known as the fascia. Use a speed square to keep it straight, then nail it to the rafter ends with screws. Next, add purlins, small 1x boards, every two feet across the rafters.
Nail them down to connect the rafters and give a spot for the roof panels. Let purlins stick out at the sides, then trim them flush with a circular saw. The porch should feel stronger now as you build.
Unique Point: Purlins make your roof solid so that it won’t budge even in strong winds!
Step 5: Putting on the Roof and Finishing Up
Use a tractor or help to lift metal roofing panels to the roof. Lay one panel down and screw it to the purlins using special screws that have rubber washers to prevent leaks. Overlap the next panel a little and screw it down too.
Continue until the roof is completely covered. Add braces between posts and headers for extra strength. Finish with paint, lights under the roof, and plants for beauty. Sit under your new shade and enjoy!
Unique Point: Building your shade feels amazing, like creating your cozy shelter!
As a final touch, consider one of these exposed rafter porch ceiling ideas to give your porch a polished, architectural look.
I want to acknowledge April Wilkerson for the insightful video, which served as a key reference in compiling this guide.
Benefits of Porch Construction
1. Enhanced Curb Appeal: A well-designed porch enhances a home’s exterior aesthetics, increasing its visual appeal and potentially increasing its property value.
2. Additional Living Space: Porches provide a versatile area for relaxation, dining, or entertaining, extending usable square footage without major renovations.
3. Protection from Elements: Covered porches shield against rain, sun, or wind, allowing year-round outdoor enjoyment while protecting furniture and decor.
4. Energy Efficiency: By shading windows and doors, porches can reduce indoor heat gain, lowering cooling costs in warmer climates.
5. Social and Functional Space: Porches foster community interaction, offering a welcoming spot for gatherings or quiet retreats for reading and relaxation.
6. Low-Maintenance Options: Modern materials, such as composite decking or vinyl railings, reduce upkeep, making porches a practical long-term investment.
Conclusion
Remember how building a porch seemed impossible at the start?
You now have all the steps needed for porch construction, from setting posts to installing roofing panels. Each phase builds on the last, making what felt complex surprisingly manageable.
This isn’t just about adding outdoor space. You’re creating a space that brings family together, increases your home’s value, and provides the perfect place to unwind after long days. Your porch becomes an extension of your living space, where memories are made.
Ready to start your project?
Gather your tools, pick up the necessary materials, and tackle each step at a time. Do you have questions about any part of the process? Drop a comment below and I’ll help you work through it!
Frequently Asked Questions
Do You Need Foundations to Build a Porch?
Yes, porches need foundations for stability and code compliance. Use concrete footings, piers, or a full foundation depending on size and local requirements.
What Is the Cheapest Way to Build a Porch?
Build a simple open porch using pressure-treated lumber, concrete piers, and basic roofing materials. Skip screens, railings, and fancy finishes to save money.
How Deep Do Footings Have to Be for A Porch?
Footings must go below the frost line, typically 2-4 feet deep, depending on your climate. Check local building codes for exact requirements.