Looking for a simple way to update your walls without committing to permanent changes?
Picture ledges offer the perfect solution for displaying art, photos, and treasured items with complete freedom to change your style whenever you want.
Many homeowners feel stuck with traditional hanging methods that leave countless holes in their walls.
But here’s something different: picture ledges let you adjust, rearrange, and refresh your displays without any damage to your walls.
Want to know how to make the most of these versatile shelves?
From creating attractive living room displays to organizing your home office, picture ledges can work in every room of your house.
Ready to start planning your wall displays?
Let’s explore creative ways to use picture ledges that will help you show off your personal style.
Types of Picture Ledges
1. Single-Row Designs
Single-row picture ledges provide a tidy look for small spaces, spanning wall widths to create a horizontal line that attracts the eye.
Perfect for hallways or above sofas and beds, they allow for layering of various frame sizes while maintaining a clean appearance.
To enhance visual interest, vary the heights of displayed items.
2. Multi-Tier Layouts
Multi-tier picture ledges feature two or more vertically stacked shelves, enhancing wall space and showcasing larger art collections.
Adequate spacing between tiers helps each row stand out and accommodates taller pieces.
This style is ideal for rooms with high ceilings or expansive wall areas.
3. Built-in Solutions
Picture ledges enhance your home’s architecture, typically as part of wainscoting or window frames.
They combine style with functionality, offering hidden storage or built-in lighting for practical and decorative use in mudrooms, home offices, and bedrooms.
Creative Ways to Use Picture Ledges
1. Living Room Applications
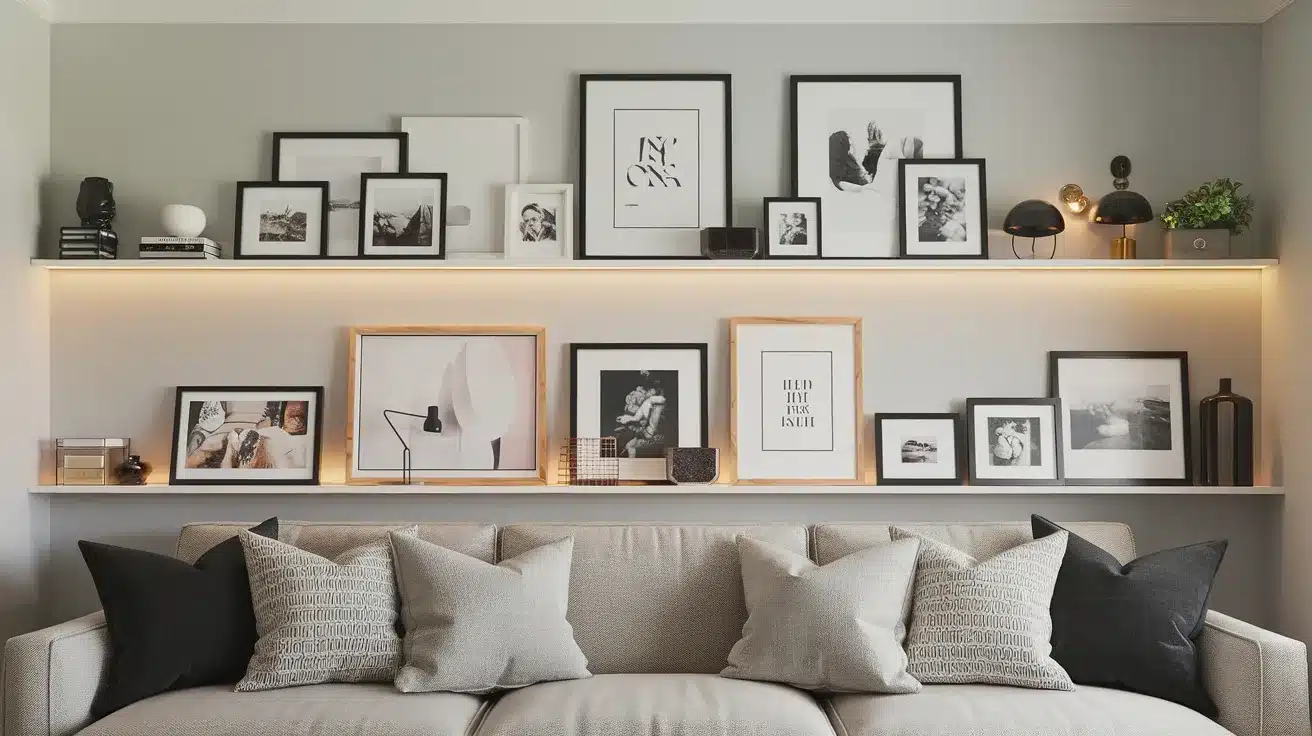
- Install ledges 8-10 inches above your sofa for a balanced focal point wall display
- Mix art prints and family photos in various sizes for visual interest
- Place smaller artwork around your TV to create a unified wall arrangement
- Use frames in the same color family to maintain a clean, coordinated look
- Layer frames of different sizes to add depth to your display
2. Bedroom Possibilities

- Mount a long ledge above your bed as an alternative to traditional headboards
- Position small ledges at arm’s length from your bed for nighttime essentials
- Create a book display in your reading corner with easy-to-reach ledges
- Show off small collectibles and treasured items near your dressing area
- Use ledges of varying lengths to follow the lines of sloped bedroom ceilings
3. Kitchen and Dining Areas

- Display favorite cookbooks within easy reach of your prep area
- Mix decorative plates with framed art for a personalized kitchen gallery
- Add small potted herbs to combine function with style
- Showcase special serving pieces when not in use
- Create seasonal displays that can be updated throughout the year
4. Home Office Options

- Position short ledges near your desk for frequently-used documents
- Store supplies in clear containers for easy access and clean look
- Combine practical storage with inspiring artwork
- Use corner ledges to maximize office wall space
- Create a paper organization system with multiple short ledges
5. Bathroom Ideas

- Install small ledges for art prints to add character
- Store everyday items in attractive containers on ledges
- Add moisture-loving plants like pothos to bring in natural elements
- Display rolled towels for a spa-like feel
- Use ledges above toilets to maximize unused wall space
Style Tips and Techniques
Color Coordination Strategies
When planning your picture ledge displays, choose a color theme that complements your room’s palette.
Use frames and objects with two or three main colors for a cohesive look.
For example, mix white and natural wood frames with small blue accents in a room with blue walls.
Limit brighter colors to 20% of the display for balance.
Pull colors from your largest art piece and repeat them in smaller items on the ledge.
Size and Scale Guidelines
Match your picture ledge arrangement to your wall’s proportions.
Use ledges that span at least two-thirds of the width for walls wider than six feet.
Vary heights of displayed items in a 1-2-3 ratio (tall, medium, short).
Place heavier items at the bottom and ensure no piece occupies more than 40% of the ledge to maintain harmony.
Spacing and Arrangement Tips
Leave 2-3 inches between ledge items.
Arrange similar items in odd numbers (3 or 5) for visual appeal.
Layer frames are slightly overlapping but ensure visibility from your main viewing angle.
Position eye-catching pieces at eye level (57-60 inches).
In multi-ledge setups, maintain 12-16 inches between shelves for ample space.
Installation and Maintenance of your picture ledge
Mounting Guidelines
Use a stud finder for support. If studs are absent, use anchors rated for 1.5 times your weight.
Mark points with a level.
Add center support for ledges over 36 inches to prevent sagging, maintaining 12-inch vertical spacing.
Check wall material, as drywall, plaster, and brick require specific hardware.
Weight Considerations
Each picture ledges have specific weight limits; stick to 75% for safety. Distribute weight evenly across the ledge.
Consider both frame weight and extra items. For glass or valuable pieces, use small clear bumpers or museum putty to prevent sliding.
Metal ledges usually support more weight than wooden ones of the same size, but always check the product ratings.
Care Instructions
Clean your picture ledges weekly with a soft, dry cloth to prevent dust buildup.
For wooden ledges, avoid harsh cleaning products that might damage the finish – a slightly damp microfiber cloth works best.
Check the tightness of mounting screws every six months, especially if you frequently change your displays.
Inspect items on your ledges regularly to ensure they remain stable and haven’t shifted position.
If you notice any signs of sagging or pulling away from the wall, remove items immediately and check the mounting hardware.
Common Mistakes to Avoid
1. Placement Errors
Many rush to install picture ledges without planning.
Mounting too high makes items hard to see; placing them too low risks bumps.
Another common mistake is ignoring natural light, which can fade artwork over time.
Some put ledges in high-traffic areas or behind doors that could hit displayed items. Test different heights and locations with paper templates before mounting permanently.
2. Style Missteps
Overcrowding is the most common style mistake, diminishing the impact of each item.
Sticking to one frame size creates a monotonous display.
Using ledges that are too narrow leads to instability.
Mixing unrelated styles or colors results in a messy look. Empty space is essential for an appealing arrangement.
3. Safety Concerns
Ignoring weight limits is a major safety mistake.
People often overload shelves or place heavy items at the edges, making them unstable.
Using incorrect mounting hardware can cause dangerous situations.
Another issue is not securing items that may tip over, particularly in homes with kids or pets.
Homeowners sometimes neglect regular checks of their mounting hardware and wall anchors, missing early warning signs. Prioritize proper installation and routine maintenance to prevent accidents.
Conclusion
Picture ledges offer a flexible and practical way to personalize your walls while keeping your options open for future changes.
From creating eye-catching displays in your living room to organizing your home office essentials, these versatile shelves can work in any space of your home.
Remember to plan your displays thoughtfully, consider proper installation techniques, and maintain regular safety checks to ensure your picture ledges stay secure and beautiful for years to come.
Ready to start your own picture ledge project?
Begin by choosing one wall in your home that needs a refresh.
Measure your space, gather your favorite artwork and photos, and try out different arrangements on the floor before mounting your ledge.