Installing a shelf behind your washer and dryer can be frustrating and intimidating when doing it alone.
I know firsthand how confusing it gets when everyone warns about hitting electrical lines and plumbing while trying to find studs, leaving you uncertain about how to proceed safely.
I’ve solved this problem by creating a simple, sturdy shelf design that doesn’t require complex wall mounting. I’ll show you how to build and install a functional laundry room shelf that sits perfectly behind your appliances using basic materials and tools.
In this tutorial, I’ll walk you through each step of my process – from selecting the right materials to final assembly with the exact measurements and techniques I used to create an attractive, level storage solution without damaging any hidden wall components.
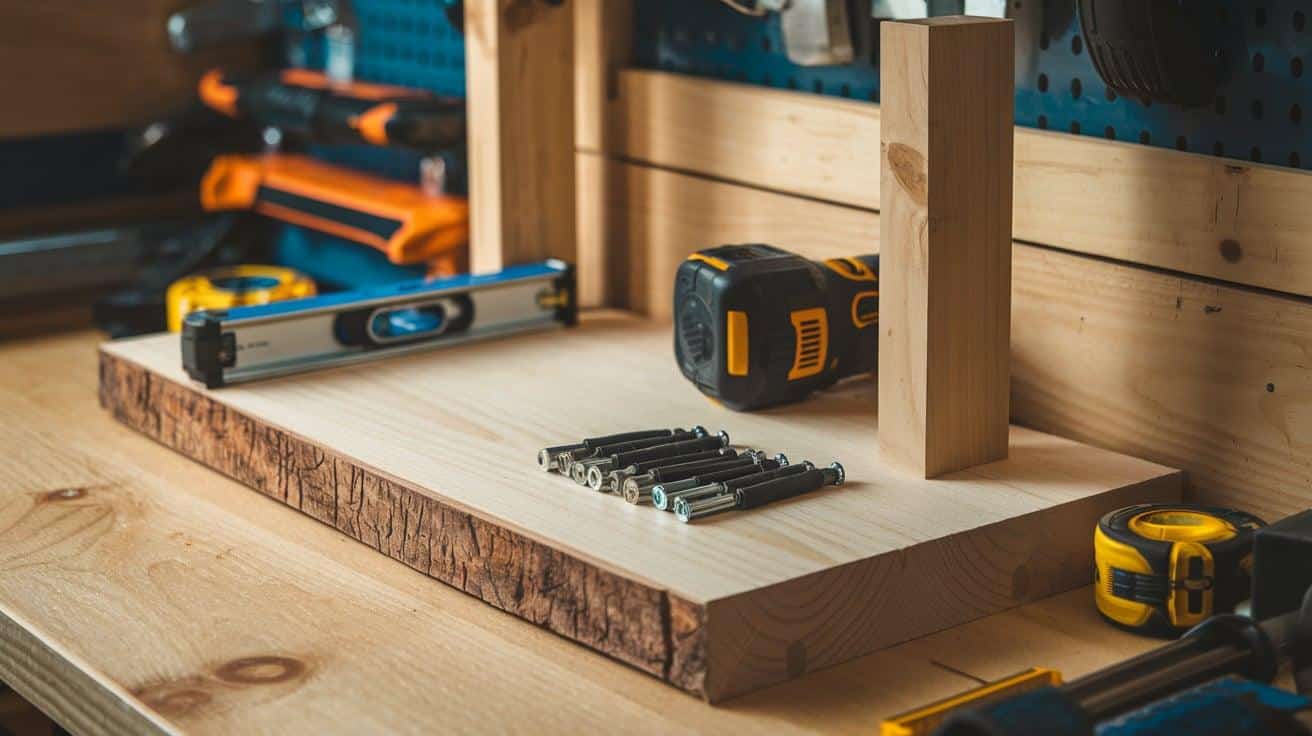
Tools Required
| Tool | Purpose | Quantity |
|---|---|---|
| Drill | To make pilot holes and secure screws | 1 |
| Level | To ensure the shelf is installed evenly | 1 |
| Measuring Tape | To measure dimensions accurately | 1 |
| Stud Finder | To locate wall studs for secure mounting | 1 |
| Screwdriver | To tighten screws if needed | 1 |
Materials Required
| Material | Purpose | Quantity |
|---|---|---|
| Wood Planks | To create the floating shelf | As per shelf size |
| Screws | To secure the shelf to the wall | 8-12 (depending on shelf length) |
| Wall Anchors | To reinforce mounting if no studs are available | 4-6 (if needed) |
| Wood Stain/Paint | To enhance the appearance and protect the wood | As required |
| Brackets (if needed) | To add extra support if necessary | 2-3 (if required) |
Step-by-Step Guidance for Installing a Shelf Behind Your Washer and Drye
Step 1: Plan Your Shelf Dimensions

Measure the space behind your washer and dryer carefully. Decide on the height of your shelf, keeping it level with or slightly above your appliances to conceal plumbing fixtures while maintaining accessibility.
Step 2: Gather Materials
Purchase thick wood planks for durability – one horizontal piece for the shelf surface and two vertical supports. Select appropriate screws that will secure the structure firmly. Have your drill, level, and measuring tools ready.
Step 3: Cut the Wood to Size

Measure and mark your cuts precisely on the wood planks. The horizontal shelf piece should fit the width of your space, while the vertical supports should reach from the floor to the desired shelf height.
Step 4: Pre-assemble if Possible

Create a test assembly of your shelf components to check fit. If the structure is too heavy or bulky to move once assembled, plan to complete the final assembly in place behind the appliances.
Step 5: Prepare the Installation Area

Carefully move your washer and dryer forward to create a working space, being mindful not to disturb water or electrical connections. Clear the area of dust and debris.
Step 6: Position Vertical Supports

Place the vertical support pieces against the wall, where they’ll provide maximum stability. Use your level to ensure they’re perfectly straight before securing them.
Step 7: Attach the Shelf Top

Position the horizontal shelf piece on top of the vertical supports. You may need to angle it in if space is tight. Check with your level again to ensure the surface is perfectly horizontal before securing with screws.
Step 8: Secure All Components

Use your drill to attach all pieces firmly. Double-check that everything is level and stable. Tighten all screws fully to prevent any wobbling or movement.
Step 9: Add Storage Solutions

Add bins, baskets, or organizational cubes to maximize your new shelf space. Arrange items logically with frequently used supplies easily accessible and seasonal items toward the back.
Checkout this YouTube video for detailed step-by-step guidance on Installing a Shelf Behind Your Washer and Dryer
Tips and Tricks
- Before drilling, consider what’s behind your walls (plumbing, electrical, vents).
- Consider keeping some space open on shelves if you need to hang things to dry nearby.
- If your measurements are precise, you may need to angle large pieces to get them into position.
- Even if your cuts aren’t perfect, small gaps or uneven areas can be hidden or aren’t noticeable once the shelf is in use.
- Plan your project with the understanding that worst-case scenario, wood can be scrapped and hardware reused
Best Practices for Care
- Regular Cleaning: Dust your shelf frequently with a microfiber cloth to prevent buildup. This helps maintain its appearance and keeps allergens at bay.
- Hardware Check: Every few months, inspect the screws and tighten them if necessary. Washers and dryers create vibrations that can gradually loosen the hardware, leading to instability.
- Moisture Protection: If you notice any warping due to humidity, apply a water-resistant sealant or paint to protect the wood. This helps extend the shelf’s lifespan in a moisture-prone environment.
- Weight Distribution: Avoid placing extremely heavy items on the shelf, especially toward the front edge. Uneven weight distribution can strain the structure and lead to sagging or breakage.
- Long-Term Care: Resealing or refinishing wooden shelves every 1-2 years helps maintain their appearance and shields them from damage caused by humidity.
New Ways to Think About It
- Adjustable Shelving: If flexibility is a priority, install adjustable bracket shelving. This allows you to change the height and arrangement as your storage needs evolve.
- Metal Wire Shelving: Consider metal wire shelves for better airflow and moisture resistance. They are ideal for laundry rooms where humidity is a concern.
- Cabinet-Style Storage: To keep your laundry room tidy, opt for cabinets with doors that hide detergents, cleaning supplies, and other essentials.
- Shelf + Hanging Rod Combo: If you need a drying space, install a shelf with an integrated hanging rod. This setup lets you store items while providing space for air-drying delicate clothes.
- Pull-Out Drawers: For small essentials like dryer sheets and stain removers, install pull-out drawers beneath the shelf for easy access and organization.
- Corner Shelving: Maximize awkward spaces by adding corner shelves. This uses underutilized areas while providing extra storage.
Top Blunders to Watch Out For
- Skipping a Stud Finder: Always use a stud finder to locate solid mounting points before drilling. Pipes and electrical wiring can sometimes be misidentified as studs, leading to dangerous mistakes.
- Underestimating Weight Capacity: Many DIYers don’t account for the weight their shelves will hold, resulting in sagging or collapse. Build your shelf stronger than you think is necessary.
- Inaccurate Measurements: Measure multiple times to avoid errors. Wall unevenness can also impact shelf placement, so double-check your dimensions before drilling.
- Poor Placement Near Appliances: Installing shelves too close to washers and dryers can interfere with their operation and block maintenance access. Leave enough clearance for easy servicing.
- Mounting at the Wrong Height: Shelves placed too high make it difficult to reach items, while those set too low can obstruct your workspace. Position them at a comfortable, accessible height.
- Using Weak or Short Screws: Short screws or improper hardware compromise stability. Ensure you use long, sturdy screws that penetrate deep into the wall studs.
Conclusion
After completing this project, you’ll have transformed your laundry room with a practical storage solution that maximizes previously unused space. The beauty of this shelf design lies in its simplicity; no specialized skills are required, just basic tools and materials.
Even if your measurements aren’t perfect or you encounter unexpected challenges, remember that small imperfections are rarely noticeable once the shelf is in use.
The extra storage will help keep your laundry essentials organized and accessible. This project represents just one step toward creating a more functional laundry space.
Whether you’re storing detergent, organizing cleaning supplies, or displaying decorative items, your new shelf serves both practical and aesthetic purposes. It is proof that even small improvements can make everyday tasks more enjoyable.