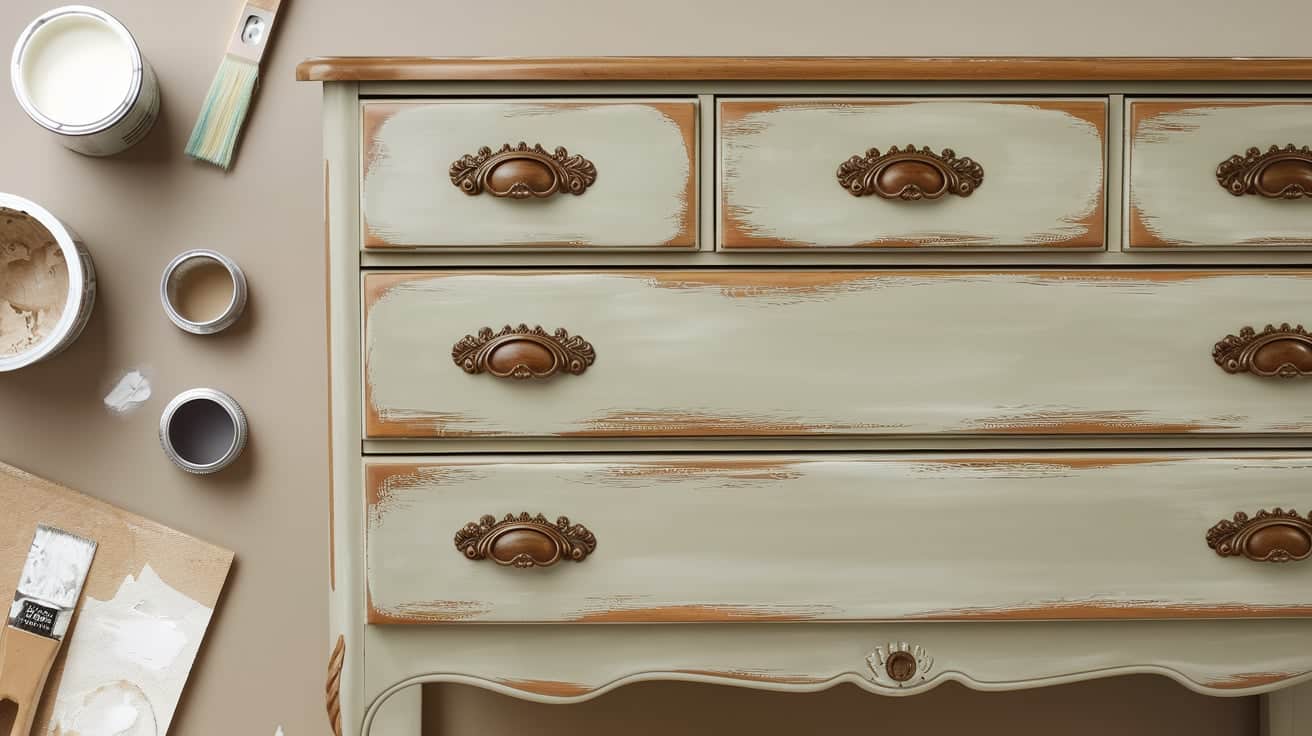
Want to give old furniture a fresh look with a hint of history? Milk paint might be your answer. This powder-based paint turns into something special when mixed with water.
It’s not like the paints you find in most stores. Milk paint has been used for hundreds of years, long before modern paints existed.
It sticks well to raw wood and can create either smooth, modern finishes or aged, textured looks – you decide. The best part? It’s simple to use once you know the steps.
This guide shows you exactly how to turn a tired nightstand into a standout piece with milk paint.
No special skills are needed – follow along, and you’ll create something that looks both timeless and new.
Tools and Materials Needed
| Item | Details / Notes |
|---|---|
| Milk paint powder | Lily Moon Moon Dust or a similar brand |
| Bonding agent | Gravity by Lily Moon or a similar |
| Warm water | For mixing paint and bonding agent |
| Measuring cups | For accurate mixing |
| Small whisk or mixing tool | To blend paint smoothly |
| Brush | Palm-sized brush recommended |
| Fine sandpaper or sanding pads | For prepping and smoothing surfaces |
| Protective topcoat | Water-based preferred |
| Small nightstand or furniture piece | The item to be painted |
| Primer (optional) | For repairing or sealing damaged areas |
| Plastic container for mixing | To prepare the paint blend |
| Clean cloth | For wiping surfaces clean before painting |
Step-By-Step Guide for Milk Paint Furniture
Step 1: Prepare Your Workspace and Furniture
Clear a well-ventilated area for your project. Remove hardware from your furniture and set aside. Smoothly sand any deep scratches.
Apply primer to areas sanded to bare wood for an even surface. Wipe the entire piece to remove dust and grease.
Step 2: Measure and Mix the Milk Paint
Measure equal parts milk paint powder and warm water into a mixing container. Mix thoroughly with a small whisk until the powder dissolves.
Let the mixture sit for 10 minutes to allow all pigments to dissolve fully.
Step 3: Add Bonding Agent
After the rest period, mix your paint again. Add bonding agent using a 2:1 ratio (milk paint to bonding agent).
For six ounces of milk paint, add three ounces of bonding agent. Mix thoroughly. This helps the paint stick to finished surfaces while controlling natural chipping.
Step 4: Apply the First Coat
Apply the first coat of milk paint with your brush. Work in sections using long, smooth strokes. The paint will look thinner than regular paint.
If bubbles form, go back over these areas with light brush strokes. Let the first coat dry completely.
Step 5: Apply the Second Coat
Mix your paint again if it has settled. Apply the second coat using the same techniques. This coat will provide full coverage and a uniform appearance.
Work methodically, maintaining a wet edge to avoid lap marks. Most pieces need only two coats. Let dry fully.
Step 6: Apply a Protective Topcoat
Choose your topcoat based on your desired finish: hemp oil for a natural look, furniture balm for soft luster, or water-based topcoats for more protection.
Apply according to manufacturer instructions. This final layer protects your work from daily wear and spills.
Check out this YouTube video by Born in a Barn Boutique for Step-by-step guidance:
Tips for Maintenance and Care
Cleaning Your Milk-Painted Furniture
For daily care, use a soft, slightly damp cloth to wipe away dust and minor spills. Avoid harsh cleaners that might damage the finish.
For stubborn spots, use mild soap diluted in water, testing in a hidden area first. Dry immediately after cleaning.
Check for worn spots in high-use areas like edges and handles every few months. Clean the entire piece thoroughly.
If the finish looks dull, you may need to refresh the topcoat. For hemp oil finishes, reapply lightly every 6-12 months.
Handling Surface Damage
For minor scratches, try buffing with a soft cloth. If the scratch goes through the paint, touch it up with your original milk paint mixture.
Keep a small jar of mixed paint for touch-ups. Apply with a fine brush just to the damaged area, then seal with a topcoat.
For major damage, sand the damaged section back to a clean edge. Mix a small batch of matching paint.
Apply two coats, feathering the edges to blend. When dry, apply a top coat over the entire section, slightly overlapping the original finish.
Protecting Against Environmental Factors
To prevent fading, keep painted furniture away from direct sunlight, especially with darker colors.
Use window treatments to filter UV rays when needed. Rotate decorative items to prevent uneven fading patterns.
Monitor humidity levels around your furniture. Dry conditions can cause paint cracking, while high humidity affects the topcoat.
Keep pieces away from heating vents, air conditioners, and humidifiers. These steps help extend the life of your paint job.
Tips and Tricks
Perfect Your Mixing Technique
Store your milk paint powder in a cool, dry place. Shake the bag before opening it to distribute pigments.
When mixing, start with powder first, then add water gradually while stirring. This prevents clumps. If you do get clumps, strain the paint through a fine mesh sieve before using it.
Control the Finish Look
For a smooth, modern finish, sand between every coat with fine-grit paper. For an aged look, sand only in spots where natural wear would occur—edges, corners, and high-touch areas.
You can also use a damp cloth on nearly-dry paint to create subtle color variations.
Create Custom Colors
Milk paint powders can be mixed to create custom colors. Mix dry powders first, then add water.
Test on scrap wood before applying it to your project. Keep notes on your mixtures so you can recreate them for touch-ups later.
Application Secrets
Use a foam roller for large, flat surfaces and a brush for edges and details. This creates a smoother finish in less time.
For very detailed areas, try a small artist’s brush. To prevent brush marks, don’t overwork the paint—apply it and move on.
Quick Distressing Methods
Want an instant-aged look? While your final coat is still slightly damp, rub a clean cloth over areas where natural wear would occur.
The paint will thin in these spots, creating subtle distressing. Another option is to apply candle wax to certain areas before your final coat, then sand lightly after drying.
Things to Avoid
| Action to Avoid | Potential Consequence | Better Alternative |
|---|---|---|
| Using cold water to mix | The powder may not dissolve properly | Use warm water for better dissolution |
| Skipping the rest period | Unmixed pigments create uneven color | Allow 10 minutes between mixing and using |
| Forgetting bonding agent on finished surfaces | Excessive, uncontrolled chipping | Add bonding agent for better adhesion |
| Applying thick coats | Cracking and longer dry times | Apply thin, even coats |
| Rushing between coats | Poor adhesion and peeling | Allow full drying time between coats |
| Using harsh cleaners | Damage to finish and color | Clean with mild soap and water only |
| Placing hot items directly on the surface | Heat damage to topcoat | Use trivets and protective pads |
| Skipping the topcoat | Reduced durability and staining | Always seal with the appropriate topcoat |
Conclusion
Imagine running your hands across a surface that tells a story through texture and color. That’s the magic of milk paint. Unlike factory-made finishes, milk paint ages with grace and character.
Each brush stroke holds possibility. Your furniture becomes a canvas where old meets new, where history and fresh ideas merge.
The simple powder-to-masterpiece process offers satisfaction that clicks with both beginners and skilled crafters.
When friends ask about your striking nightstand or bookshelf, you’ll smile, knowing you created that look yourself.
The finish will change subtly through seasons and years—not fading, but maturing like fine wine. Your milk-painted pieces won’t just fill space; they’ll capture attention and start conversations. This isn’t just furniture anymore; it’s your mark on the world.


