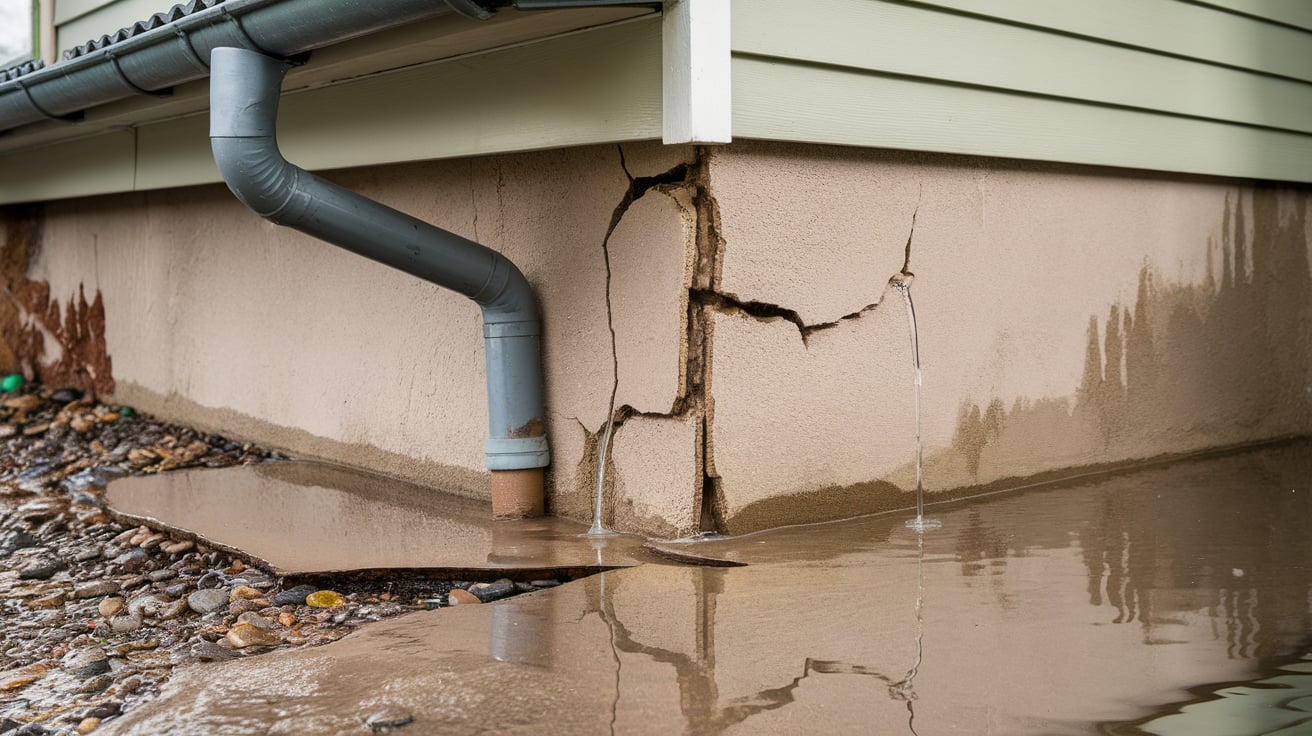

Does water pour into your basement every time it rains? You’re not alone. Thousands of homeowners watch helplessly as foundation cracks turn their basements into swimming pools.
Most people think foundation crack repair requires expensive contractors and complex equipment. Here’s the truth: you can fix most foundation leaks yourself using professional-grade injection techniques.
This guide reveals exactly how to seal foundation cracks permanently using polyurethane foam injection. You’ll learn to identify leak sources, choose materials, and complete lasting repairs.
You’ll have the skills to stop water leaks, protect your foundation, and save thousands.
Ready to reclaim your basement?
The Truth About Foundation Cracks
Foundation crack leaking water refers to water seepage through cracks in concrete foundation walls, typically occurring during heavy rain or when groundwater levels rise.
These cracks develop due to soil movement, poor drainage, construction defects, or external pressure from tree roots and settling. When water penetrates these cracks, it creates moisture problems, mold growth, and structural damage that worsens over time if left untreated.
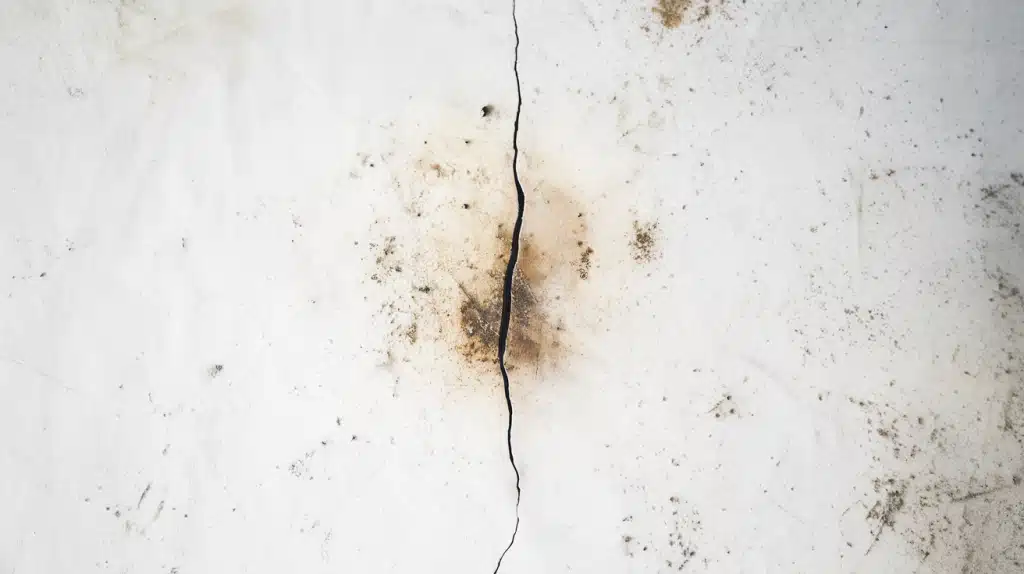
Types of Foundation Cracks and Leak Severity
| Crack Type | Direction | Leak Risk | Structural Risk | What to Do |
|---|---|---|---|---|
| Hairline | Vertical | Low–Medium | Low | Seal with waterproof filler |
| Vertical | Up–Down | Medium | Low | Monitor or DIY repair |
| Horizontal | Side-to-Side | High | High | Call a pro immediately |
| Diagonal | Angled (30–75°) | Medium–High | Medium | Watch for growth, get advice |
| Stair-Step | Zigzag in blocks | High | High | Reinforce & waterproof |
Signs Your Foundation Crack is Leaking
Identifying foundation crack leaks early prevents extensive water damage and costly repairs. Watch for these clear warning signs that indicate water is entering through cracks in your foundation walls.
- Water stains: Dark or discolored patches appear on walls near cracks, indicating water penetration and drying cycles.
- Moldy smell: Musty odors develop in basement areas due to moisture buildup from ongoing water seepage.
- Efflorescence: White chalky deposits form on concrete surfaces where water evaporates and leaves mineral residue behind.
- Pooling water: Standing water collects on basement floors near foundation walls after rain or during wet seasons.
- Seasonal patterns: Leaks worsen after heavy rain, snowmelt, or during the spring thaw, when groundwater levels rise significantly.
How to Repair Foundation Cracks: Step-by-Step Guide
Learn how to identify, assess, and fix foundation cracks effectively, whether you’re tackling minor leaks yourself or know when to call a pro.
Tools and Materials Needed
| Item | Purpose |
|---|---|
| Foundation crack repair kit | Complete repair system with ports, epoxy, and polyurethane foam |
| Angle grinder with 80-grit disc | Remove old repair material and prepare the crack surface |
| Steel wire brush | Clean debris from the inside of the crack opening |
| Dust mask or respirator | Protect lungs from concrete dust during grinding |
| Vinyl gloves | Keep your hands clean and protect them from chemicals |
| Safety glasses | Shield your eyes from flying debris and dust |
| Caulk gun | Apply polyurethane foam through injection ports |
| Small squeeze bottle | Test the water flow through the crack system |
| Mixing sticks | Combine the two-part epoxy paste properly |
| Scraper tool | Remove excess foam after the curing process |
Step 1: Clean and Prepare the Crack Surface
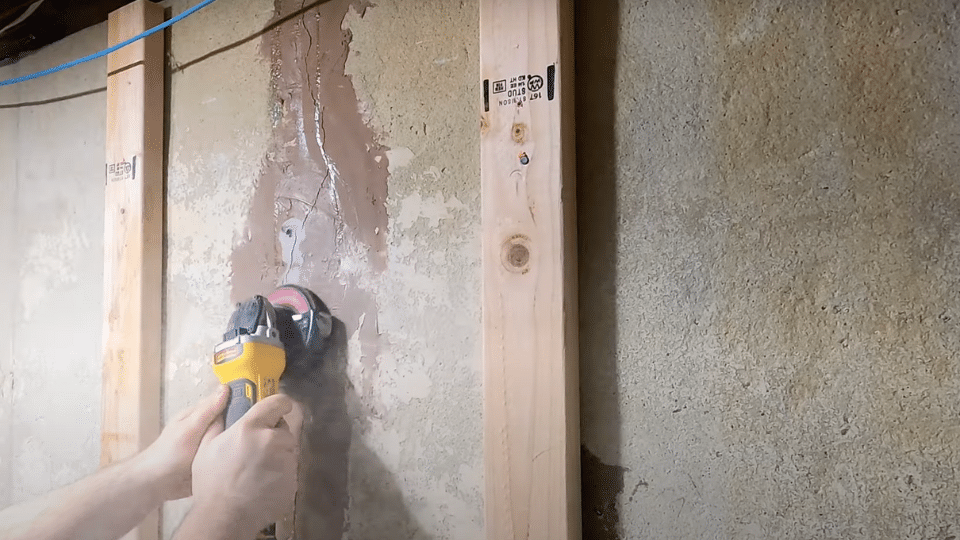
Remove old repair material using the angle grinder with an 80-grit disc. Clean inside the crack with the steel wire brush to remove all loose debris and concrete pieces.
Instructions:
- Sand away old repair material completely
- Brush out all loose debris from the crack
- Ensure the crack is clean and visible
Materials needed in this step: Angle grinder with 80-grit disc, steel wire brush, dust mask, and safety glasses
Step 2: Mark Port Locations and Mix Epoxy
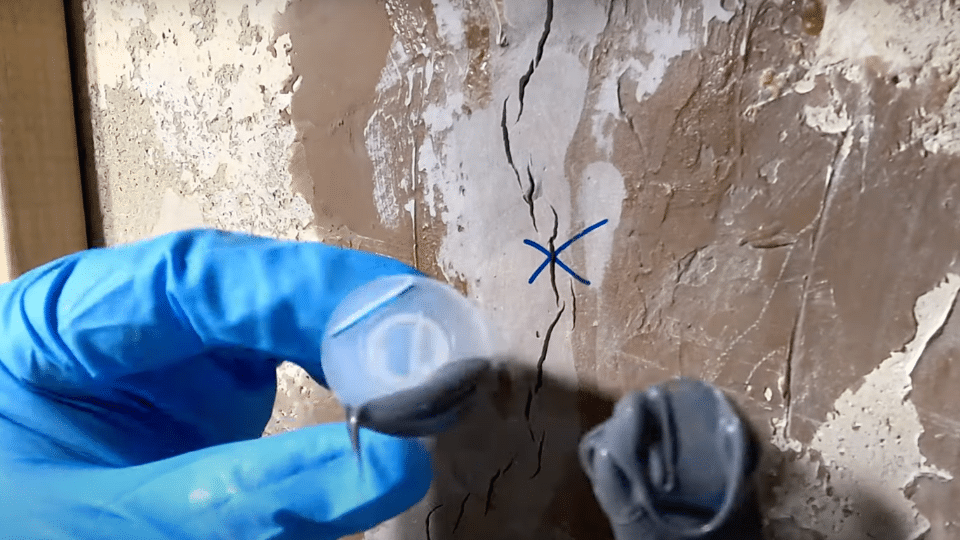
Mark the crack every 6 to 8 inches for port placement. Mix equal parts of black and white epoxy paste to create a gray sealing compound.
Instructions:
- Mark port locations every 6-8 inches
- Mix equal parts black and white epoxy
- Work quickly before the epoxy begins curing
Materials needed in this step: Surface ports from repair kit, two-part epoxy paste, and mixing sticks
Step 3: Install Ports and Seal the Crack
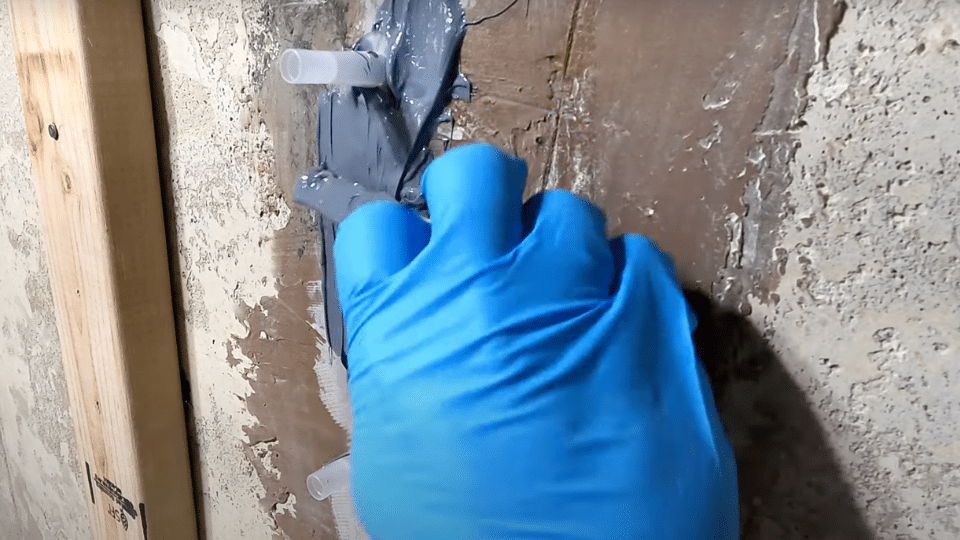
Apply a thin layer of epoxy to the port bottoms and press it onto the marked locations. Cover the entire crack with additional epoxy while keeping the port openings clear.
Instructions:
- Apply epoxy to the port bottoms before installation
- Press the ports firmly onto the cracked surface
- Seal the entire crack with an epoxy layer
Materials needed in this step: Mixed epoxy paste, injection ports, and additional epoxy for crack sealing
Step 4: Test Water Flow and Inject Polyurethane
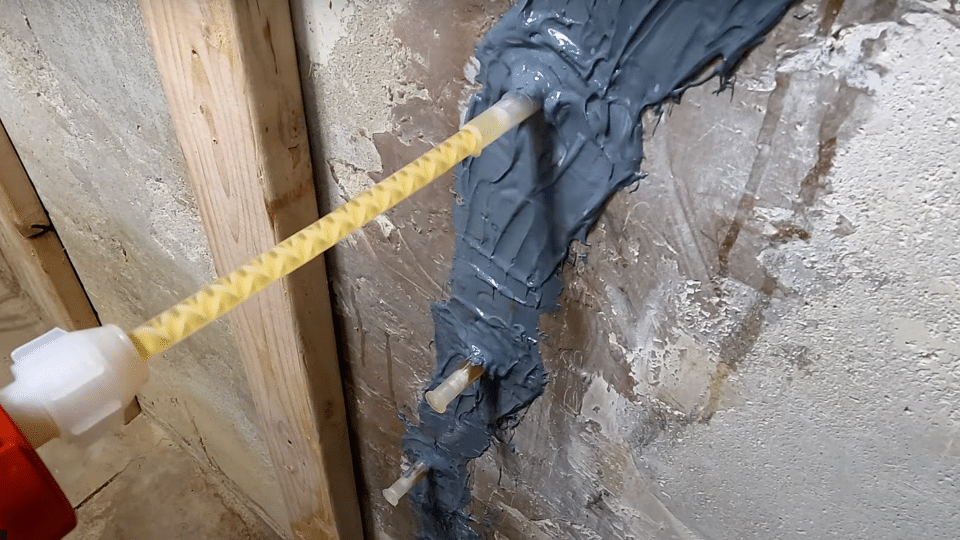
Test the water flow from the top to the bottom ports using a squeeze bottle. Start polyurethane injection at the lowest port until foam appears at the next higher port.
Instructions:
- Test the water flow from top to bottom
- Start the injection at the lowest port
- Continue until foam appears at the next port
Materials needed in this step: Squeeze bottle with water, caulk gun, polyurethane foam tubes, and port plugs
Step 5: Complete Injection and Final Cleanup
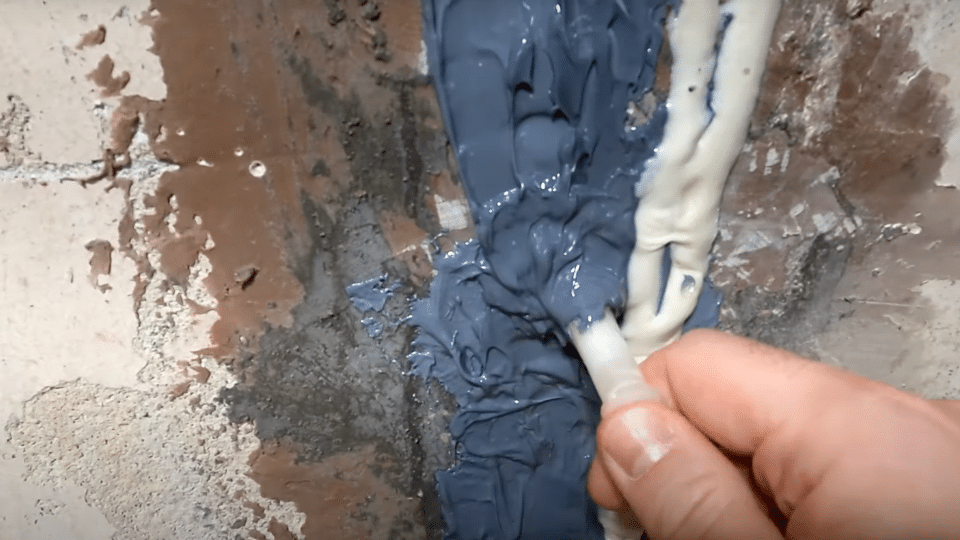
Continue the injection process for all remaining ports, starting from the bottom and working your way up. Allow 24 hours for full curing, then scrape off any excess foam as needed.
Instructions:
- Complete all port injections systematically
- Allow 24 hours for full curing
- Clean up excess foam if desired
Materials needed in this step: Remaining polyurethane foam, port plugs, and scraper tool for cleanup
Video Tutorial
Special thanks to Polar Beaver Woodworking for providing valuable insights in their video, which I referenced while creating this guide.
Causes of Foundation Cracks and Water Leaks
Understanding what causes foundation cracks helps you prevent future problems and address underlying issues.
1. Soil Movement and Moisture Fluctuations
Clay soil expands when wet and shrinks when dry, creating constant pressure changes against foundation walls. This repeated expansion and contraction cycle gradually weakens concrete, creating stress fractures.
Extreme weather patterns cause rapid changes in soil moisture that stress foundation walls. These cycles create the perfect conditions for crack development and water penetration.
2. Poor Drainage and Grading
Land that slopes toward the house directs water straight to the foundation walls instead of away from them. Poor grading allows water to pool around the foundation, creating constant moisture pressure against the concrete.
Blocked gutters overflow and dump water directly next to foundation walls. Short downspouts that end too close to the house concentrate large amounts of roof water near foundations.
3. Construction and Material Issues
Inadequately compacted backfill soil around foundations settles over time, creating voids and uneven support. This uneven settling puts stress on foundation walls and creates weak points where cracks develop.
Cheap concrete mixes or rushed curing processes can create weaker foundations that are prone to cracking. Poor quality control during construction often results in inconsistent concrete strength throughout the foundation.
4. External Factors
Underground pipe leaks saturate soil around foundations, creating constant moisture pressure and soil instability. These leaks often go undetected for months or years, gradually weakening foundation walls.
Large tree roots grow toward foundation walls, seeking moisture, and can create significant pressure against the concrete.
Heavy construction equipment or repeated heavy truck traffic near foundations creates vibrations that stress concrete.
Avoid These Costly Errors in Foundation Crack Repair
| Mistake | Solution |
|---|---|
| Rushing the injection process | Allow 5 minutes per port minimum for proper foam expansion |
| Using too much epoxy on ports | Apply a thin layer and keep the injection openings completely clear |
| Skipping surface preparation | Clean thoroughly with a grinder and a wire brush before starting |
| Starting the injection from the top | Always begin from the bottom port to ensure complete filling |
| Not testing the water flow first | Test the flow between ports before beginning foam injection |
| Working without safety gear | Wear a mask, gloves, and eye protection throughout the entire process |
When to Call a Professional
Some foundation crack situations require professional assessment and repair. If you notice multiple cracks, horizontal cracks, or cracks wider than 1/4 inch, contact a structural engineer.
These conditions may indicate serious foundation problems beyond simple crack sealing.
Large cracks or those accompanied by foundation movement need specialized repair techniques. Professional contractors have the necessary equipment for significant repairs and can assess whether additional structural work is required.
If your repair attempt fails repeatedly or water continues to leak after proper application, professional help ensures the problem is solved permanently.
Final Thoughts
Foundation crack repair doesn’t have to be complicated or expensive when you use the right approach and materials.
The polyurethane foam injection method we’ve covered provides professional-quality results that last for years.
Remember to take your time with each step, especially during the injection process, to ensure complete crack sealing. Monitor your repair through several rain cycles to confirm its effectiveness.
The money you save by doing this repair yourself can be significant, often $500 to $1,000 compared to hiring professionals.
Most importantly, you’ve protected your home’s foundation from further water damage and created a healthier living environment.
With proper maintenance and attention to drainage issues, your foundation will stay dry and stable for years to come.
Ready for a refresh? Explore more home improvement to upgrade your space.
Frequently Asked Questions
How Do you Stop a Cracked Foundation from Leaking?
Use polyurethane foam injection through surface ports to seal the entire crack from inside the wall structure.
How to Tell if a Foundation Crack Is Severe?
Cracks wider than 1/4 inch, horizontal cracks, or cracks with structural movement require immediate professional assessment.
How Do you Fix Water Seeping Under the Foundation?
Install proper drainage, fix grading issues, and seal foundation cracks using injection repair methods from inside the basement.
How Much Does It Cost to Repair a Leaking Foundation?
DIY repairs cost $50-$ 150 with repair kits, while professional repairs range from $300 to $ 800, depending on the crack size and complexity.