Oil paintings get dusty and dirty. Many collectors worry about ruining their artwork when trying to clean it. I’ve seen too many valuable pieces damaged by well-meaning owners using harsh cleaning methods.
Want to know a secret? Most oil painting damage happens during cleaning. Using the wrong technique can strip paint, create cracks, or leave permanent marks on your treasured artwork.
To clean oil paintings properly, you don’t need fancy products or expert skills. What you need is the right method.
In this guide, I’ll show you how to clean your oil paintings safely at home. You’ll learn which tools work best, which methods protect your art, and when to call a professional.
Let’s start with the basics.
What Makes Oil Paintings Delicate?
Oil paintings consist of thin paint layers on canvas or wood that crack over time. Varnish protects artwork but yellows with age. Heat, light, and moisture warp surfaces and fade colors. Different paint layers dry at varying rates, creating internal stress and brittleness. Several factors contribute to their fragility:
- Material aging – Canvas expands with humidity changes, while chemical reactions between pigments continue for decades
- Binding deterioration – The binding medium becomes increasingly fragile, making even gentle pressure potentially harmful
- Dirt bonding – Accumulated dirt chemically bonds with aged varnish, complicating safe removal
Previous restoration efforts may have introduced incompatible materials that react unpredictably with cleaning agents. Historic pigments contain metals or compounds that change color when exposed to certain chemicals. Additional vulnerabilities include:
- Temperature stress – Fluctuations cause materials to expand and contract at different rates, weakening bonds between layers
- Physical damage – Frame stress and building vibrations create invisible micro-fractures that provide entry points for moisture and cleaning agents
- Technique variations – The artist’s original method affects how the painting responds to cleaning decades later
This complex, aging structure makes cleaning extremely challenging without causing permanent damage.
Common Causes of Dirt and Grime on Oil Paintings
1. Dust
Household dust settles continuously on painting surfaces from daily activities like walking, cleaning, and air circulation.
This fine particulate matter accumulates in layers over time, creating a dull film that obscures colors and details. Regular dusting helps prevent heavy buildup that becomes increasingly difficult to remove safely.
2. Smoke
Smoke from candles, fireplaces, cigarettes, and cooking creates sticky, oily residues that adhere strongly to painting surfaces.
These deposits contain tar-like substances that yellow over time and attract additional dirt particles. The sticky nature of smoke residue makes it particularly challenging to remove without proper cleaning techniques.
3. Cooking oils
Airborne cooking oils and grease particles float through the house and gradually settle on painting surfaces. These oils create an invisible sticky layer that acts like a magnet for dust and other contaminants.
Kitchen paintings are especially susceptible to damage, requiring more frequent cleaning to prevent the accumulation of heavy oil.
Methods to Clean an Oil Painting
| Method | Tools | Technique | Best For | Precautions |
|---|---|---|---|---|
| Soft Brush | Natural-hair brush | Light strokes top to bottom, barely touch the surface | Routine dust removal | Gentle pressure only |
| Dry Sponge | Dry cleaning sponge | Press gently, lift straight up | Soot and surface grime | Test the corner first |
| Water & Swabs | Distilled water, cotton swabs | Barely moist swab, dry immediately | Water-soluble dirt | No water on flaking paint |
| Soap Solution | Mild soap, water, swabs | Weak solution, test first, follow with water, then dry | Oily dirt, fingerprints | Varnished paintings only |
Step-by-Step Guide to Cleaning Oil Paintings
This comprehensive process encompasses product selection, safety testing, and proper cleaning techniques to ensure the safe restoration of your artwork.
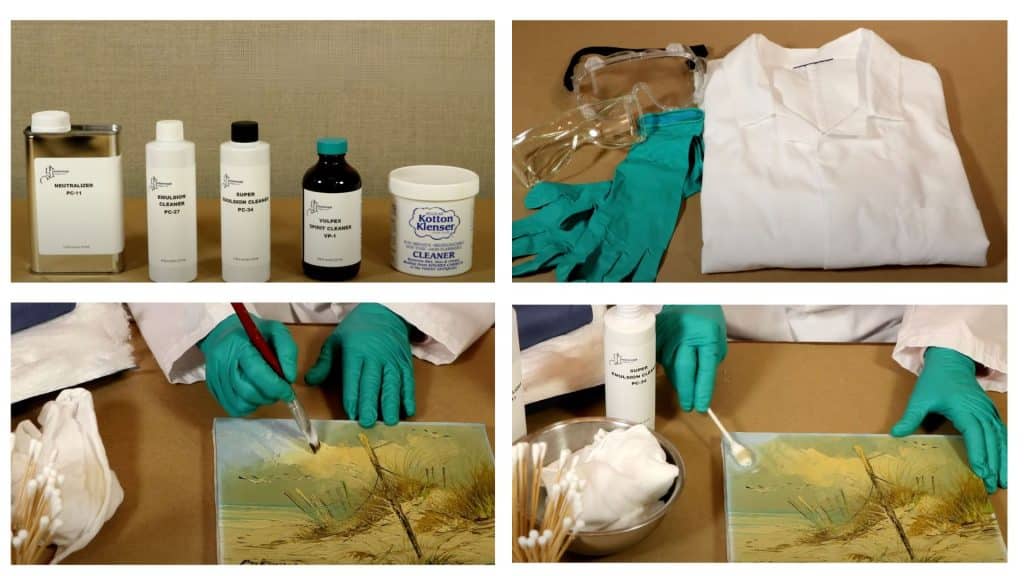
Oil Painting Cleaning Tools and Materials
| Item | Purpose | Notes |
|---|---|---|
| Neutralizer | Stops cleaner action | Use after every step |
| Emulsion Cleaner | Medium strength cleaning | First choice |
| Super Emulsion Cleaner | Stronger cleaning | For stubborn dirt |
| Varnish Spirit Cleaner | Gentle cleaning | For fragile paintings |
| Cotton Cleanser | Heavy-duty cleaning | High risk, last resort |
| Cotton Swabs | Apply cleaners | Change frequently |
| Cotton Pads | Apply neutralizer | Fresh for each section |
| Magnifying Glass | Detail work | Better visibility |
| Labels/Markers | Mark bottles | Avoid mix-ups |
| Camera | Test documentation | Before/after photos |
| Gloves | Hand protection | Prevent oil transfer |
| Good Lighting | Visibility | Essential for safety |
Step 1 – Start with a Safety Test
Find an inconspicuous corner or edge area. Apply a tiny dot of neutralizer with a clean swab, pressing gently without rubbing.
Check your swab for any color transfer – paint on the swab signals danger and means you should stop immediately. Wait several minutes to observe if the test spot changes color or texture.
This preliminary test prevents widespread damage across your entire painting by identifying potential problems early in the process.
Pro Tip: Take clear before and after photos to better detect subtle changes indicating potential damage.
Step 2 – Test Your Cleaner
After neutralizer testing passes safely, try the emulsion cleaner on another hidden spot. Roll a small swab with minimal product over an area approximately one inch wide, using gentle pressure.
Look carefully for any color transfer to the swab or surface changes on the painting. Always apply neutralizer immediately after this test. Remember that different colors and painting techniques may react differently across the canvas, so comprehensive testing is essential for safety.
Pro Tip: Test each color area separately, especially reds and blues, which contain more sensitive pigments.
Step 3 – Apply the Cleaner Properly
Load a small amount of cleaner on your swab – less is always more effective. Roll the swab in one direction across the surface, never scrub back and forth. Visualize lifting dirt off rather than pushing it around the surface.
Work in manageable three-inch square sections, changing swabs frequently as they collect dirt. Excessive pressure or scrubbing motions risk removing original paint along with accumulated dirt and grime.
Pro Tip: Hold your swab like a pencil for superior control, resting your pinky on the frame for stability.
Step 4 – Follow with Neutralizer
After cleaning each small section, apply neutralizer immediately without delay. This crucial step stops the cleaner’s chemical action and removes any remaining residue from the surface.
Use a fresh cotton pad or swab with neutralizer, following the same gentle rolling motion. Skipping this essential step risks ongoing chemical action that could damage your painting. The neutralizer also picks up loosened dirt that the initial cleaner may have left behind.
Pro Tip: Keep neutralizer within easy reach – minimize time between cleaning and neutralizing steps.
Video Tutorial
I’d like to acknowledge Gainsborough Products for the insightful video, which was a key reference in putting this guide together.
Safety Tips
1. Work environment: Use good lighting and ventilation. Keep the room temperature 65-75°F. Secure the painting on a stable surface—never hold it while cleaning.
2. Personal protection: Wear nitrile gloves and safety glasses. Keep a first aid kit nearby. Protect the workspace with plastic sheeting.
3. Chemical safety: Read all labels first. Never mix products. Store in original containers. Dispose of used materials properly.
4. Stop immediately if Paint comes off on swabs, colors change, surface texture changes, or the paint feels sticky after neutralizing.
5. EmergenciesSpills: Apply neutralizer immediately, blot gently. Eye contact: Flush 15 minutes, seek medical help. Keep professional conservator contacts handy.
Key rule: When in doubt, consult a professional – some damage cannot be reversed.
Conclusion
Taking care of your oil paintings starts with gentle cleaning. The right method makes all the difference between keeping your art beautiful and causing harm. Remember to start with the least risky dry methods, like soft brushing, before trying wet techniques.
Testing in a hidden spot is not optional—it’s a must for safe oil painting cleaning. The right tools matter too: cotton swabs, proper cleaners, and neutralizers can help you remove dirt without removing paint.
When in doubt, stop and ask a professional. Not every painting needs a full cleaning, and some should only be handled by experts.
What about your paintings at home? Have you checked them lately for dust or grime? Please take five minutes today to inspect your art future; you will thank yourself for it.
Frequently Asked Questions
What Is the Best Cleaner for Oil Painting?
The best cleaner for oil paintings is a soft brush for dust. For tougher dirt, use a professional emulsion cleaner with neutralizer.
What Liquid Cleans Oil Paintings?
Distilled water is used for light cleaning, professional emulsion cleaners for tougher dirt, and a neutralizer to stop the cleaning action. Avoid household cleaners.
Can I Clean an Oil Painting on My Own?
Yes, you can clean dust with a soft brush. However, to avoid damage to valuable paintings or serious dirt, it is best to consult a professional.