How to Effectively Lighten Dark Stained Wood Surfaces
Do you have a dark wood table or cabinet that no longer fits your style? I know how frustrating it can be when that deep, dark stain won’t budge—no matter how much you sand or scrub.
I promise there are effective ways to convert that dark wood into a beautiful light finish. With the right tools and techniques, you can give your furniture a fresh, natural look without buying something new.
In this guide, I’ll show you several methods to lighten dark wood, from simple sanding to using household bleach.
I’ll also cover common mistakes to avoid and how to maintain your newly lightened wood surfaces for years to come.
The Science Behind Wood Lightning
Ever wonder why wood darkens in the first place? Wood contains compounds called tannins that react with oxygen over time, causing natural darkening. When you apply bleach to wood, you’re breaking down these tannins at a chemical level.
Different wood types respond differently to the effects of lightning. Oak and mahogany have high tannin content, making them harder to lighten, while maple and pine are much more responsive.
The sun is also a natural lightener. Leaving wood in direct sunlight for a few days can begin the lightning process before you apply any chemicals.
Step-by-Step Guide To Lighten Stained Wood
Learn how to effectively lighten stained wood with this simple step-by-step guide, restoring its natural beauty.
Tools Required:
| Tool | Quantity | Purpose |
|---|---|---|
| Citrus Strip (furniture stripper) | 1 can | To remove old finish from furniture |
| Stronger furniture stripper | 1 can | To tackle stubborn or tough finishes |
| Steel wool | 1 pack | To scrub and clean surfaces after stripping |
| Orbital sander | 1 unit | For sanding down surfaces to a smooth finish |
| Gator sanding block | 1 block | To sand edges or delicate areas |
| Sandpaper (220 grit) | 1 or more sheets | To smooth the wood surface before applying finish |
| Straight pick (or toothpicks) | 1 set | To clean out small cracks or crevices in the furniture |
Materials Required:
| Material | Quantity | Purpose |
|---|---|---|
| Mineral spirits | 1 can | To clean off residues and prep the wood |
| Household bleach | 1 bottle | To lighten and clean wood before finishing |
| Danish oil (natural finish) | 1 bottle | To finish and protect the wood with a natural look |
| White wax | 1 can | To add a protective layer and enhance the wood’s appearance |
| Optional: “Flat Out Flat” water-based top coat | 1 can | To provide a matte, protective finish for the surface |
Step 1: Applying Citrus Stripper for Effective Finish Removal

Start with citrus stripper on your wood furniture. The mild formula works well for most finishes. Apply with a brush in an even layer. Try wrapping the area with plastic wrap to slow drying.
This helps the stripper stay wet longer and breaks down the finish better. Keep the room well-aired during this process. The citrus smell is nicer than the chemical options.
Step 2: Using a Stronger Stripper for Stubborn Finishes

Sometimes the first pass with citrus stripper won’t fully remove tough finishes. In these cases, try a stronger chemical stripper. Apply to small sections at a time using a brush.
Allow it to sit for about 20 minutes. You’ll see the finish bubble up when it’s working. Wear gloves and eye protection. Keep windows open for good air flow.
Step 3: Scrubbing with Steel Wool for Detailed Areas

Take fine steel wool (#0000 grade) and gently scrub the areas where the stripper was applied. This method works well in carved or detailed sections where scrapers can’t reach.
Move with the wood grain when possible. The steel wool helps lift away softened finish from small grooves and corners. Wipe away loosened finish often with clean rags.
Step 4: Cleaning Residue with Steel Wool and Mineral Spirits

Pour some mineral spirits onto fresh steel wool. Use this to clean any leftover stripper residue. This step removes chemicals that might affect later steps. Work in small areas, wiping with clean cloths as you go.
The mineral spirits help break down sticky residue without harming the wood. This step creates a clean surface for sanding.
Step 5: Sanding for a Smooth Finish

Sand the furniture using an orbital sander on flat surfaces. Start with 120-grit sandpaper, then move to 150-grit. Use a sanding block for corners and details. Always sand with the grain to prevent scratches.
Wear a dust mask. This step removes any remaining finish and evens out the wood tone. Wipe all dust away with a tack cloth.
Step 6: Cleaning Nooks and Crannies with a Straight Pick

Wood dust often gets trapped in tight spaces after sanding. Use a straight pick or toothpick to gently remove these particles from small crevices, corners, and decorative areas.
This careful cleaning ensures that no particles remain that might affect your final finish. Check your work in bright light to spot any missed areas.
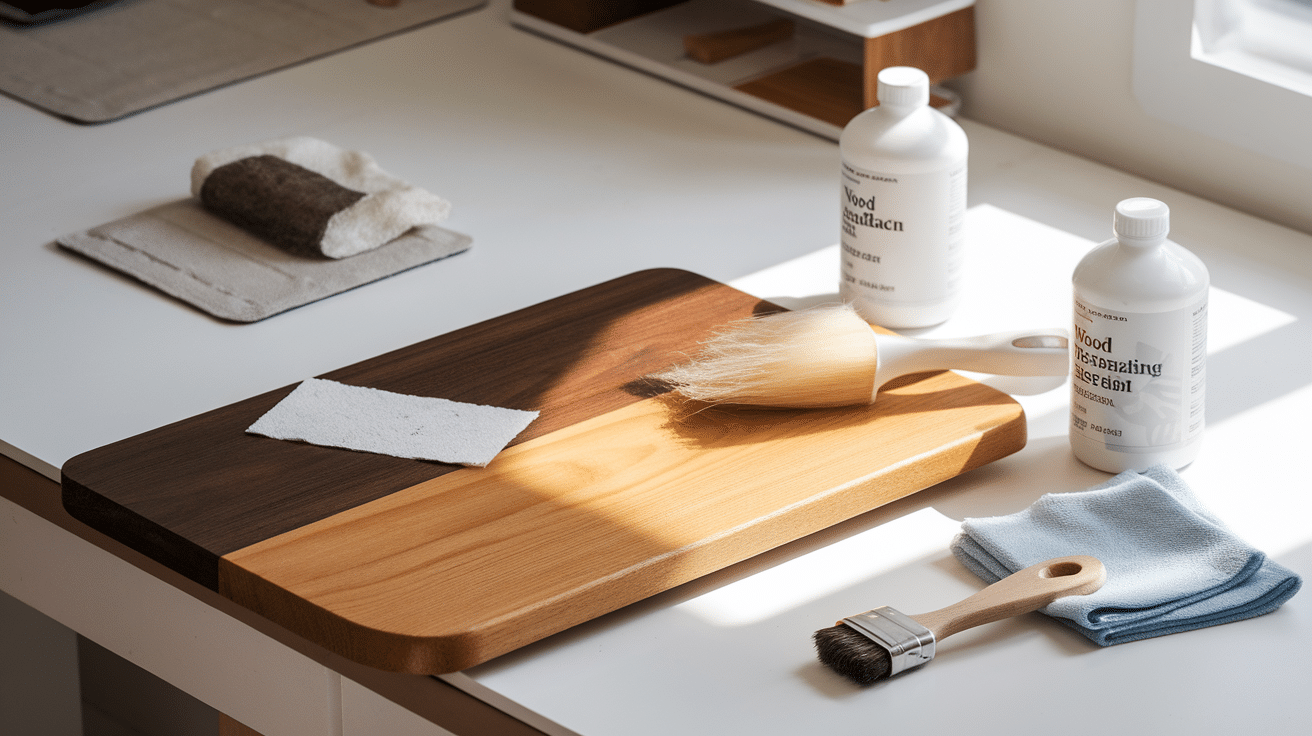
Step 7: Lightening the Wood with Household Bleach

Apply regular household bleach to the wood using a sponge or brush. Work in small sections for even coverage. The bleach breaks down color compounds in the wood. You may need several applications for darker woods.
Let each application dry fully before reapplying. This step lightens the natural wood color without hiding the grain.
Step 8: Sanding After Bleach for a Smooth Surface

Once the bleach has dried fully, sand the surface again with 220-grit sandpaper. This fine grit creates a smooth base for finishing. The sanding removes any wood fibers raised by the bleach and evens out the color.
Go slowly and check your work often. Clean all dust with a tack cloth before moving to the next step.
Step 9: Applying Danish Oil for a Natural Finish

Apply Danish oil in natural color as your base coat. Use a clean, lint-free cloth to rub the oil into the wood. Danish oil brings out the wood grain while adding slight protection.
Let it soak in for 15 minutes, then wipe off any excess. Allow 24 hours of drying time. This oil enhances the wood’s natural beauty.
Step 10: Finishing with White Wax for a Soft, Natural Look

As the final step, apply white wax with a clean cloth. The wax softens the look while keeping the natural wood visible. Apply in small circles, then buff with a clean cloth.
The wax adds protection and a subtle sheen. It helps maintain the lighter color you’ve worked to achieve through these steps.
Video Tutorial
Check out this YouTube video tutorial for detailed step-by-step guidance for lightening the stained wood.
Expert Tips and Techniques for Lightening Stained Wood
- Work in small sections when stripping furniture to avoid frustration.
- For intricate details, use steel wool instead of a scraper to remove the stripper.
- An orbital sander works great for flat areas, while a sanding block helps get into corners and detailed spots.
- When applying bleach, work carefully in small areas for better control.
- If you want to maintain the exact color of the wood after sanding, consider using “Flat Out Flat” water-based topcoat instead of Danish oil.
- White wax helps soften the appearance while keeping the natural wood look.
- Remember that stripping furniture to its natural wood is time-consuming but worthwhile.
- Take breaks when needed to avoid frustration with difficult projects.
Alternate Ideas To Lighten Stained Wood
If bleach and stripping aren’t your preferred methods, try these other approaches. Sanding alone can often remove dark stains, especially if they haven’t soaked deep into the wood.
- Coarse Sandpaper: Start with coarse sandpaper and work toward finer grits.
- Oxalic acid wood bleach: It offers a gentler option than household bleach for removing stains. Mix it according to package instructions and apply with a brush.
- Two-part wood bleach systems (sodium hydroxide and hydrogen peroxide): These provide strong stain removal for stubborn cases.
- White Vinegar: Some people find success with white vinegar. They apply it to the wood and let it sit before wiping it clean. Each method works differently depending on the wood type and stain depth.
Wood Maintenance Practices for Longevity and Beauty
Keeping your lightened wood looking fresh requires some care. Apply a UV-protective finish to prevent darkening from sunlight exposure. Clean surfaces with mild soap and water, avoiding harsh chemicals that may cause discoloration.
Dust regularly with a soft cloth to prevent dirt buildup that can make wood appear darker over time. Touch-up scratches quickly, as damaged areas can absorb dirt and darken faster.
Reapply your chosen protective finish (wax, oil, or sealer) according to the product’s recommended timeline. Check for water stains or stains and address them promptly.
In high-humidity areas, use a dehumidifier to prevent moisture damage that can affect wood color.
Common Errors in the Wood Lightning Process
- Rushing the Stripping Process: Many folks don’t give stripping products enough time to work. Patience is key – rushing leads to patchy results and extra work later.
- Using the Wrong Stripper: Not all strippers work the same on all woods. Using the wrong product can damage your wood or fail to remove the stain properly.
- Skipping Sandpaper Grits: Jumping from coarse to fine sandpaper creates scratches. Work through the grits in order for a smooth finish.
- Applying Bleach Too Heavily: Less is more with bleach. Heavy application can raise wood fibers too much and create uneven lightening.
- Forgetting to Test First: Always test products on a hidden spot first. This simple step prevents major disappointments.
- Skipping Safety Gear: No mask? No gloves? That’s a big mistake. Proper protection keeps you safe and helps you focus on doing good work.
Conclusion
So what’s the bottom line on lightening dark wood? The process takes time and patience, but the results are worth it. With careful stripping, sanding, bleaching, and finishing, you can completely change how your furniture looks in your home.
Why does this matter? Because giving new life to old pieces saves money and reduces waste. It lets you keep items with good bones while updating their style.
What next? Start small with a test spot on your project. Make sure you have all your supplies ready before you begin. Take photos of each step so you can see your progress.
Have you tried lightening wood before? Let me know about your projects in the comments below.
I’d love to see your before and after photos!
Frequently Asked Questions
1. Does Wood Stain Lighten as it Dries?
Yes, wood stain can lighten as it dries. The drying process causes the solvents to evaporate, resulting in a less saturated color. It’s important to test before the final application.
2. Can You Stain Wood Darker without Sanding?
Yes, you can darken wood without sanding by applying multiple coats of stain. Ensure each coat dries before applying the next. Using a darker stain or adding a gel stain helps, too.
3. Does Heat Help Wood Stain Dry Faster?
Heat can help wood stain dry faster, but too much heat may cause uneven drying or damage the finish. It’s best to apply mild heat, such as using a fan or warm room.