Easy Steps to Draw a Tulip? Guide for Beginners
Have you ever admired tulips in spring gardens but thought drawing them was beyond your artistic abilities? Think again! Drawing these refined flowers is simpler than you might imagine, requiring just a few basic shapes and techniques.
Tulips are perfect for beginners because of their distinct yet uncomplicated form. With their smooth petals and graceful stems, they create a striking image without demanding complex details or shading.
Imagine displaying your own hand-drawn tulip artwork on your wall or gifting it to someone special. The satisfaction of creating something beautiful with your own hands is truly rewarding.
In this step-by-step guide, I’ll walk you through drawing a tulip that looks impressively realistic while keeping the process fun and frustration-free. Grab your pencil—let’s begin!
Understanding the Basic Shape of a Tulip
A tulip’s structure is beautifully simple: a straight, slender stem supports the flower, while a few elongated leaves emerge from the base. The distinctive cup-shaped bloom consists of overlapping petals that gently flare outward at the top.
- Look for the tulip’s cup-like silhouette formed by 6 petals
- Notice how leaves typically curve slightly away from the stem
- Observe that the stem is usually straight but may have a subtle bend
When studying tulips—either real specimens or photos—focus on the graceful curves of the petals and how they connect to form the flower’s iconic shape.
Notice that tulips aren’t perfectly symmetrical; these natural variations give your drawing character.
Understanding this basic structure is your first step toward creating a recognizable, appealing tulip drawing without getting overwhelmed by unnecessary details.
Step-by-Step Guide to Drawing a Tulip
Tools Required:
| Tool | Purpose |
|---|---|
| Pencil | For initial sketching and outlines |
| Eraser | To correct mistakes |
| Paper | Drawing surface |
| Colored pencils/markers (optional) | For adding color to your tulip drawing |
| Reference image | To guide your drawing process |
Materials Required:
| Material | Description |
|---|---|
| Drawing paper | Medium or heavy weight paper works best |
| Colored paper (optional) | For a decorative background |
| Mounting materials (optional) | If you wish to display your finished drawing |
| Fixative spray (optional) | To preserve your finished drawing |
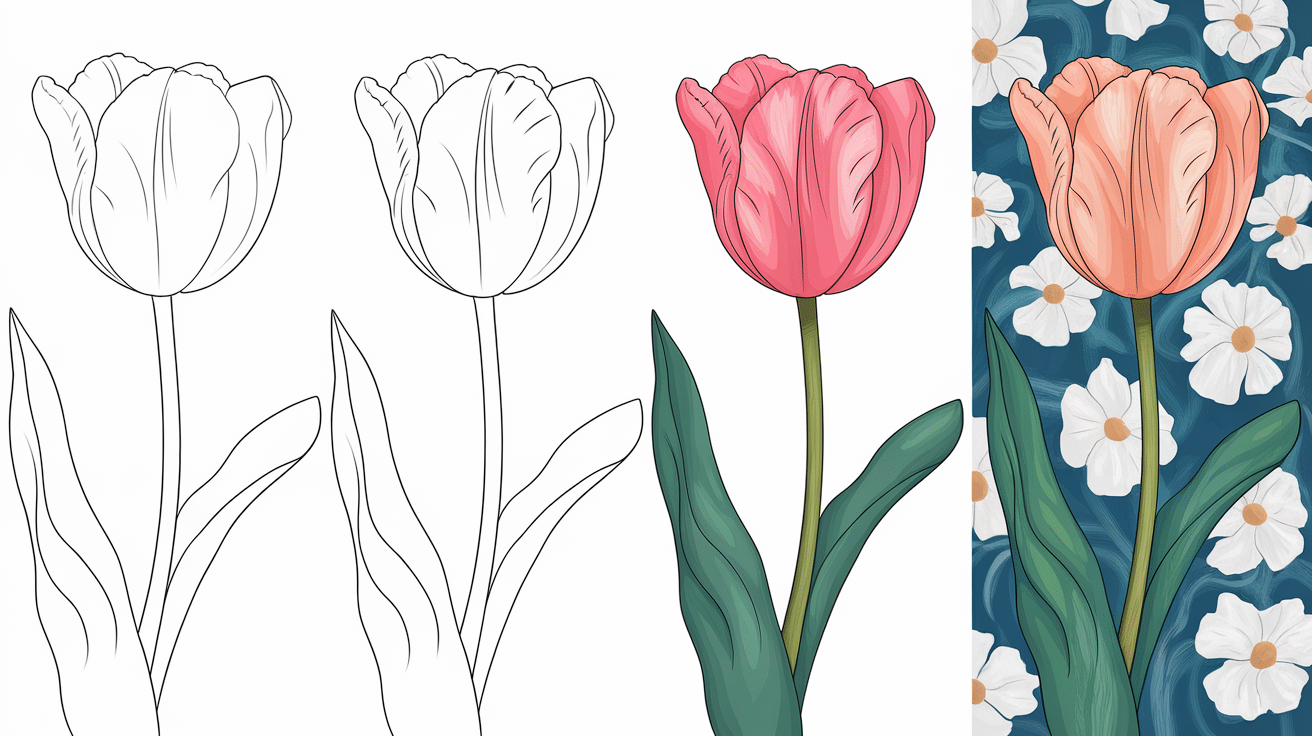
Step 1: Start with the Basic Outline

Begin by drawing a gentle U-shaped curve that will form the base of your tulip flower. This curve doesn’t need to be perfectly symmetrical – slight irregularities will make your tulip look more natural. From this base, lightly mark a center point which will serve as your reference for placing the petals.
- Draw a U-shaped curve for the tulip’s base
- Mark a center point at the bottom of the U-shape
- Keep your pencil strokes light for easy corrections
Keep in mind: The basic outline should be subtle – you’re creating a framework that will be refined as you add details, not defining the final shape.
Step 2: Add the First Layer of Petals

Working from the center point you marked, begin adding the first layer of petals. Draw curved lines that start from the center and extend upward, staying close to your initial U-shape outline.
These lines represent the inner petals of the tulip and should be slightly closer together than the outer petals you’ll add later.
- Draw curved lines from the center point
- Keep these lines fairly close to your initial outline
- Make sure both sides have similar but not identical curves
Keep in mind: Tulip petals aren’t perfectly even – adding slight variations in your lines will create a more realistic flower.
Step 3: Create Individual Petals

Now, enhance your tulip by creating distinct petals. From the center, draw curved lines that extend outward with slight wobbles to add texture.
Bring each line to a subtle point and then back down to connect with your base outline. Each petal should have a slightly different height, with the center petal typically being the tallest.
- Add slight wobbles to your petal lines for realism
- Vary the height of each petal slightly
- Connect each petal back to the base outline
Keep in mind: The subtle irregularities in your petals’ edges will make your tulip look natural rather than artificially perfect.
Step 4: Draw the Stem and Leaves

Draw a long, slightly curved line from the bottom of your flower to represent the stem. Tulips have strong stems that typically bend very gently. Add two elongated leaves that emerge from the lower part of the stem, curving outward and then tapering to points. Make the leaves thicker at the base and narrower at the tips.
- Create a gently curved line for the stem
- Draw leaves that widen from the stem and then taper
- Position leaves at different heights for visual interest
Keep in mind: Tulip stems are relatively thick and sturdy compared to many other flowers, so don’t draw your stem too thin.
Step 5: Refine Your Drawing

Review your drawing and refine the details. Smooth out any rough edges, adjust the curves of your petals, and ensure the proportions look natural. Erase unnecessary guidelines and strengthen the final outlines. Add subtle details like slight indentations at the tips of petals or light veining on the leaves to enhance realism.
- Smooth out rough edges and strengthen final lines
- Add subtle texture details to petals and leaves
- Ensure all parts of the flower have proper proportions
Keep in mind: Less is often more when refining your drawing—focus on clean lines rather than adding too many details that might clutter your tulip’s elegant simplicity.
For a visual tutorial, refer to this video by Draw So Cute
7 Common Mistakes and How to Avoid Them
1. Symmetrical Petals
Problem: Drawing perfectly symmetrical petals that make the tulip look artificial and stiff.
Solution: Intentionally vary the size, height, and curve of each petal slightly. Nature isn’t perfectly symmetrical, so introduce small irregularities to create a more lifelike appearance.
2. Rigid Stem Lines
Problem: Drawing the stem as completely straight lines that make the tulip look unnatural.
Solution: Add a subtle curve to your stem line. Tulip stems have a gentle, natural bend—usually leaning slightly in one direction. This simple adjustment adds life and movement to your drawing.
3. Floating Flower
Problem: Disconnecting the flower from the stem or creating an awkward junction point.
Solution: Ensure the flower base tapers naturally into the stem with smooth transition lines. Draw the bottom of the petals slightly overlapping the top of the stem to create a convincing connection.
4. Uniform Petal Thickness
Problem: Drawing all petals with the same thickness throughout, missing the natural variation.
Solution: Make petals slightly thicker at the base and thinner toward the tips. This gradual tapering mirrors how real tulip petals grow and adds dimension to your drawing.
5. Oversized Leaves
Problem: Drawing leaves that are disproportionately large compared to the flower.
Solution: Keep leaves in proportion—typically, tulip leaves should be roughly the same length as or slightly longer than the flower itself, but not dramatically larger. Study reference photos to understand natural proportions.
6. Missing Petal Overlap
Problem: Drawing petals that appear to float independently rather than forming a cohesive flower.
Solution: Show how petals overlap at their bases. When drawing adjacent petals, include subtle lines that indicate how one petal tucks behind or in front of another, creating depth.
7. Heavy-Handed Outlining
Problem: Creating harsh, heavy outlines around all parts of the tulip.
Solution: Vary your line weight, using lighter lines for the delicate edges of petals and slightly heavier lines for the stem and leaves. This technique adds depth and focuses attention on the flower’s graceful form rather than its outlines.
Conclusion
Congratulations! You’ve now mastered the basics of drawing a beautiful tulip that captures the essence of this beloved spring flower. By focusing on simple shapes and natural variations, you’ve created artwork that’s both recognizable and uniquely yours.
Remember, practice makes progress. Each tulip you draw will build your confidence and refine your technique. Don’t worry about perfection—even professional artists embrace the small imperfections that give drawings character.
Why not try drawing tulips in different positions—perhaps slightly bent or viewed from another angle? Or experiment with adding color using your preferred medium?
Display your tulip drawing proudly or share it with loved ones. Your artistic journey is just beginning, and this simple flower is an excellent foundation for exploring more complex botanical illustrations.
Happy drawing!