Adding a bathroom to your basement can feel like solving a puzzle with missing pieces.
I know the feeling—limited space, tricky plumbing, and budget worries made my own basement bathroom project seem impossible at first.
But I’m here to tell you that with the right planning and a few smart moves, you can create a basement bathroom that’s both functional and good-looking without breaking the bank.
In this guide, I’ll walk you through the key steps of a DIY basement bathroom project – from planning your layout and tackling the plumbing to choosing cost-effective fixtures and adding those final design touches that make all the difference.
Why Are Basement Bathrooms Trending?
Basement bathrooms have surged in popularity, and for good reason. I’ve noticed more homeowners making this smart investment, and the benefits go beyond just adding convenience.
First, the work-from-home shift has transformed basements into offices, gyms, and guest suites, making a bathroom downstairs practically essential. No more running upstairs during Zoom calls or workout sessions!
The real estate market is another driving factor. A finished basement with a bathroom can boost your home value by 10-25%, making it one of the most cost-effective renovations. In today’s competitive housing market, this extra bathroom gives you a serious edge.
Multigenerational living arrangements are becoming more common, too. Adding a basement bathroom creates semi-private living spaces for adult children, aging parents, or long-term guests while maintaining household harmony.
And let’s be honest – having a bathroom where you entertain makes sense. Whether your basement hosts movie nights, game days, or a home bar setup, your guests will appreciate not having to trek upstairs.
From Slab to Shower: Building Your Basement Bathroom
Convert your basement from bare concrete to a fully functional, stylish bathroom with these essential DIY steps.
Step 1: Planning & Permits: Start With Smart Preparation
Check if your basement already has rough-in plumbing. Research local building codes and permit requirements before starting. A pump system may be needed for basements below the sewer line.
Create a realistic budget with “must-haves” and potential “splurges.” Submit all required permits and work with licensed professionals when needed, especially for plumbing and electrical work that requires certification. Proper planning prevents costly mistakes and ensures your bathroom meets safety standards.
Step 2: Construction Roadmap: Plumbing & Waterproofing
Locate your main sewer stack and determine if gravity drainage works or if you need a pump. Consider hiring a plumber for underslab work, which involves breaking concrete. Install backflow prevention valves to prevent sewage backup.
Ensure proper basement waterproofing with either interior drain tiles that connect to a sump pump or an exterior French drain that directs water away from your foundation. Addressing waterproofing issues before building to prevent future moisture problems.
Step 3: Construction Roadmap: Framing & Wall Construction
Use pressure-treated lumber for bottom plates that touch concrete and standard lumber for studs placed 16 inches on center. Frame around existing obstacles, such as support beams, columns, and ductwork, with custom measurements.
Build California corners where walls meet to provide better insulation and solid backing for drywall attachment. Make sure walls are perfectly plumb before anchoring to the floor with concrete fasteners and to ceiling joists above.
Step 4: Construction Roadmap: Floor Prep & Self-Leveling Concrete
Thoroughly clean your concrete subfloor and remove all dust and debris. Apply primer according to manufacturer instructions, usually diluted and rolled on evenly. Mix self-leveling concrete to a pancake batter consistency and pour over uneven areas.
The product will naturally seek a level surface. Let it dry completely per manufacturer specifications before installing finished flooring. This creates a perfectly flat base for your luxury vinyl plank installation.
Step 5: Construction Roadmap: LVP Flooring Installation
Install luxury vinyl plank as a floating floor with small spacers around the perimeter for expansion. Stagger end joints by at least 6 inches between rows. Use a tapping block to secure planks together and a pull bar for tight fits in corners and edges.
For toilet penetrations, carefully measure, mark, and cut with a jigsaw. For difficult cuts around door jambs or irregular shapes, make templates before cutting to ensure accuracy.
Step 6: Fixtures, Vanity & Shower Install: Vanity Setup
Choose between prefabricated vanities for budget savings or custom cabinetry for exact specifications. Upgrade standard hardware with designer pulls for a custom look without the price tag. Install the faucet and drain assembly according to the manufacturer’s instructions.
Connect supply lines with adequate shut-off valves. Add a backsplash with silicone caulk to prevent water damage. Check all connections for leaks before finishing the installation.
Step 7: Fixtures, Vanity & Shower Install: Toilet Installation
Secure the toilet flange to the concrete floor using tapcon concrete screws. Install either a traditional wax ring or a wax-free seal on the flange. Carefully place the toilet over the bolts and press down firmly to create a proper seal. Add washers and nuts to secure without overtightening.
Use plastic shims if needed to prevent rocking. Caulk around the base, leaving a small gap in the back to detect potential leaks.
Step 8: Fixtures, Vanity & Shower Install: Shower Details
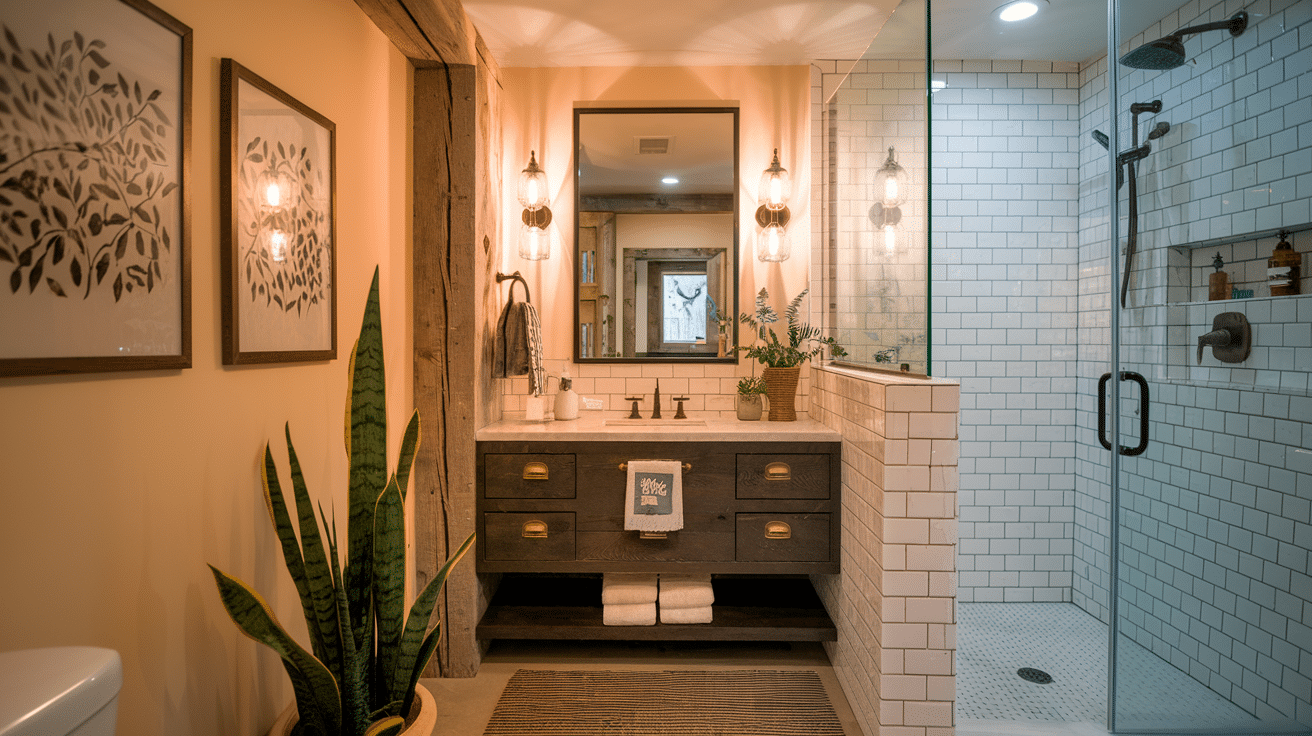
Install classic white subway tile for walls with budget-friendly appeal and timeless style. Add luxury with small marble hexagon tiles for the shower floor.
Build a recessed niche in the shower walls for storage of bath products. Choose a frameless glass panel instead of a full enclosure to make the bathroom feel larger and more open. Use quality silicone caulk at all seams and transitions to prevent water damage.
Step 9: Electrical, Lighting & Finishing Touches
Install a dedicated 20-amp circuit with GFCI protection for bathroom outlets. Add layered lighting with vanity sconces and recessed ceiling fixtures for bright, shadow-free illumination. Install an LED mirror with integrated lighting and connect it to the main light switch.
Properly vent moisture with an exhaust fan ducted to the exterior, not into the basement ceiling. Follow the electrical code for the proper placement of outlets and switches in relation to water sources.
Step 10: Ceiling & Final Styling
Install a drop ceiling with PVC panels for moisture resistance and easy access to plumbing and electrical above. Mix metals like brass fixtures with matte black accents for designer appeal.
Use space-saving doors like accordion or barn-door styles in tight spaces. Add personal touches with framed art, small plants, and a statement mirror. Choose accessories that complement your overall design while maximizing function in the limited space.
Video Tutorial
I want to give credit to Andrew Thron Improvements for their informative video, which served as a valuable reference for this guide.
Avoid These Basement Bathroom Errors
- Skipping permits: Proceeding without proper permits can lead to costly fines, failed inspections, and complications when selling your home. Always check local requirements and obtain necessary approvals.
- Ignoring moisture issues: Failing to address existing water problems or inadequate waterproofing before building can result in mold, mildew, and structural damage. Proper basement waterproofing is essential.
- Using improper flooring: Installing standard hardwood or carpet in basement bathrooms invites disaster. Choose moisture-resistant options like luxury vinyl plank, tile, or engineered products specifically rated for bathroom use.
- Overdesigning in small spaces: Cramming too many features or large fixtures into a tight basement bathroom makes the space feel cluttered and uncomfortable. Prioritize function and choose space-saving fixtures.
11 Basement Bathroom Ideas to Inspire Your Next Remodel
Convert your basement bathroom with these creative ideas that blend style, function, and smart design.
1. Industrial-Modern Basement Bathroom
The industrial look works perfectly in basement bathrooms, where structural elements can be showcased rather than hidden. Try painting existing pipes matte black, leaving some concrete exposed, or adding faux brick panels for texture.
Pair these raw materials with sleek glass shower doors and modern fixtures for an appealing contrast that feels intentional rather than unfinished.
Best For: Urban homes, lofts, or modern farmhouse basements.
2. Spa-Inspired Basement Wet Room
Waterproof the entire basement bathroom and install a curbless shower without doors to transform it into a full wet room.
This design not only makes small basements feel bigger but creates a luxury spa feel. Add a rainfall showerhead, a built-in bench, and pebble flooring for a truly resort-like experience right at home.
Best For: Small bathrooms, wellness lovers, luxury rental units.
3. Moody Dark Academia Basement Bathroom
Embrace basement spaces’ natural dimness with deep, rich colors like forest green, navy, or even black on walls. Add vintage-inspired light fixtures in antique brass, frame botanical prints in dark wood frames, and display vintage books on floating shelves.
This moody, scholarly look turns the basement’s lack of natural light into a design advantage.
Best For: Historic homes, book lovers, and dramatic style fans.
4. Japandi-Style Basement Bathroom
Combine Japanese minimalism with Scandinavian coziness for a perfectly balanced basement bathroom. Install a wall-mounted oak vanity with clean lines, a simple vessel sink, and natural stone tiles.
Keep the color palette limited to soft neutrals while incorporating natural elements like bamboo accessories or a small indoor plant to bring life to the space.
Best For: Calm, clutter-free spaces.
5. Rustic Farmhouse Basement Bathroom
Create warmth in your basement with reclaimed wood, galvanized metal, and vintage-inspired fixtures. A vanity made from an old dresser, open pipe shelving, and Mason jar light fixtures add instant character without breaking the bank.
This style works especially well in older homes and can be largely achieved through DIY projects and thrift store finds.
Best For: DIY lovers, farmhouse or cottage-style homes.
6. Coastal Nautical-Themed Basement Bathroom
Lighten up your basement with crisp whites, sandy beiges, and pops of ocean blue. Install shiplap on one wall, hang a rope-framed mirror, and use pebble tile for the shower floor to mimic shoreline textures.
Add touches like glass bottles filled with sand or shells to complete the seaside retreat feeling, perfect for making a basement bathroom feel airy and open.
Best For: Lake houses, vacation homes, and relaxed family spaces.
7. Retro Mid-Century Modern Basement Bathroom
Channel the 1950s and 60s with walnut or teak furniture-style vanities and bold geometric tiles. Choose fixtures with clean lines and add pops of mustard yellow, teal, or burnt orange through accessories and towels.
This style offers a playful yet sophisticated look that’s coming back in a big way, especially appealing in mid-century homes looking to preserve period-appropriate charm.
Best For: Mid-century homes, vintage decor fans.
8. Scandinavian Minimalist Basement Bathroom
Combat basement darkness with bright white walls, light wood elements, and strategic lighting. A floating vanity creates a sense of space, while simple black fixtures add definition without heaviness.
Keep accessories minimal, with just a few plants or natural wood elements for warmth, and focus instead on maximizing light reflection throughout the space.
Best For: Small or dark basements needing light & space.
9. Luxury Hotel-Inspired Basement Bathroom
Recreate the luxury hotel bathroom experience with high-end looking materials like porcelain marble-look tiles (more affordable than real marble). Add a frameless glass shower, a wall-mounted toilet, and champagne bronze fixtures for instant elegance.
Splurge on quality towels, a heated towel rack, and hotel-style amenity dispensers to complete the upscale feeling.
Best For: Guest suites, upscale rental units.
10. Eclectic Boho Basement Bathroom
Let your personality shine with a mix of patterns, textures, and global influences. Install colorful Moroccan-inspired floor tiles, hang macramé plant holders from the ceiling, and display collected art and objects on open shelving. This free-spirited style thrives on personal touches and can evolve over time as you add new treasures, making it perfect for creative homeowners.
Best For: Artistic homes, free-spirited decor.
11. Smart Tech Basement Bathroom
Future-proof your basement bathroom with technology that enhances comfort and efficiency. Install programmable heated floors that warm up before your morning shower, motion-sensor faucets that conserve water, and smart mirrors with built-in lighting and defoggers.
Add waterproof Bluetooth speakers and color-changing LED lights for a truly customizable experience every time.
Best For: New builds, tech-savvy homeowners.
Conclusion
So what’s the bottom line on DIY basement bathrooms? It’s all about smart choices. Whether you’ve fallen in love with the industrial-modern look or dream of a tech-filled spa retreat, your basement offers the perfect canvas for creating something truly yours.
Remember to address moisture issues first, get those permits, and don’t skimp on lighting. The effort you put in now will pay off every time you or your guests enjoy that extra bathroom space.
Ready to take the plunge? Start with your must-haves, add a few personal touches, and watch your basement transform from a forgotten space to a favorite place.
Your home’s value will thank you, and so will everyone who no longer needs to climb the stairs when nature calls!
Frequently Asked Questions
1. Is It Legal to Have a Bathroom in A Basement?
Yes, basement bathrooms are legal when built to code with proper permits, plumbing, ventilation, and egress considerations.
2. Does the Basement Bathroom Need a Window?
Not necessarily. While ideal, basement bathrooms without windows can be code-compliant with proper ventilation fans and adequate lighting.


