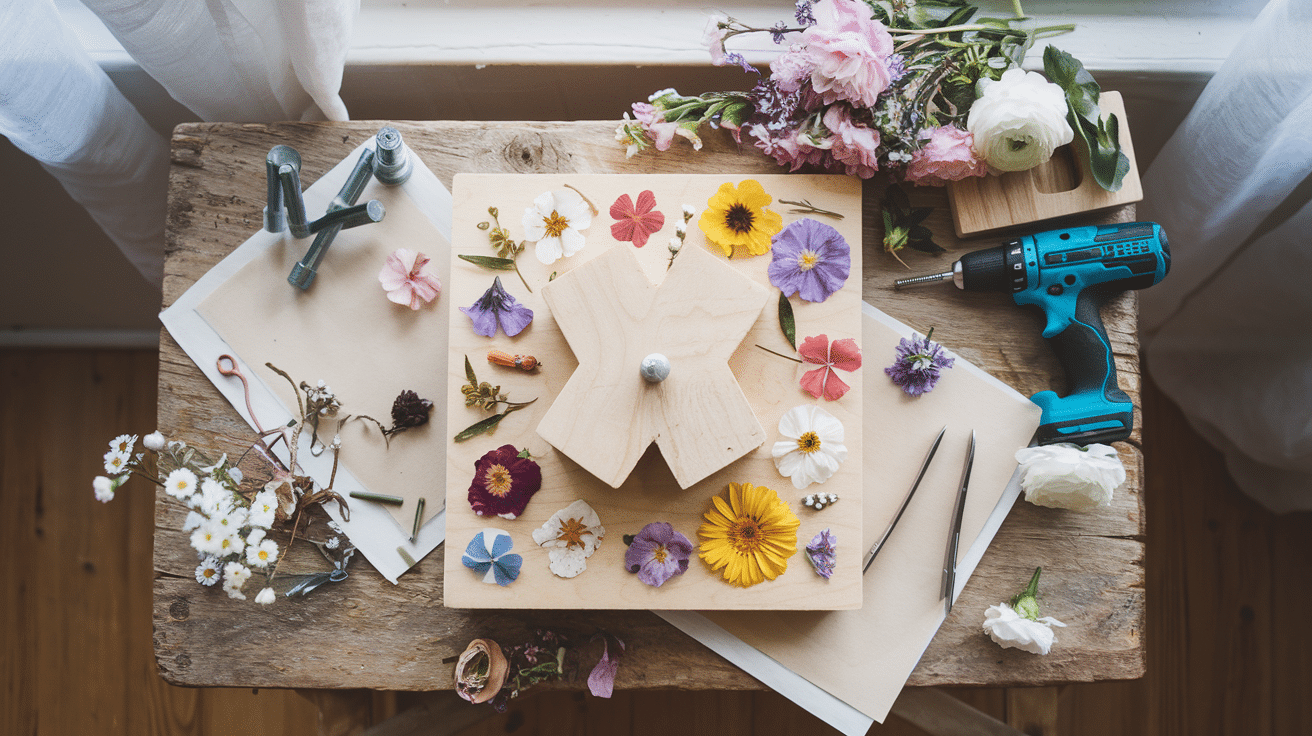
Making pressed flowers at home can seem hard. I’ve tried using heavy books and other methods, but my flowers often came out wrinkled or moldy.
This left me feeling stuck, with no way to save the beautiful blooms from my garden. I found that a simple DIY flower press completely solves these problems.
With basic materials and about 30 minutes of work, I built a press that creates perfectly flat, preserved flowers every time. In this guide, I’ll share exactly how to build your own flower press step by step.
You’ll learn which materials work best, how to put everything together, and the right way to press flowers for beautiful results.
No special skills are needed – just follow along!
The Magic of Flower Pressing: More Than Just a Craft
Flower pressing turns fresh blooms into flat, dried specimens that keep their shape and much of their color. The process is simple, but it feels like a small magic every time.
When flowers are pressed, the moisture leaves the plant cells while the structure stays intact. This works because plants have cell walls made of cellulose, which hold their form even when dried.
The result? Paper-thin flowers that look like colored shadows of their fresh selves. There was a daisy from her wedding day and violets from the year my father was born. These pressed flowers told stories that words alone couldn’t.
DIY Flower Press: Step-by-Step Guide
Preserve your favorite blooms with ease—this step-by-step guide will walk you through everything you need to create your DIY flower press at home.
Tools and Materials for Your DIY Flower Press
Tools:
| Tool | Quantity | Purpose |
|---|---|---|
| Power Drill | 1 | To drill holes through the plywood for bolts |
| Clamps | 2 | To hold the wood steady while drilling |
| Tweezers | 1 (optional) | To delicately place or remove flowers |
| Ruler/Measuring Tape | 1 | To ensure even spacing for holes and accurate cuts |
| Pencil | 1 | For marking drill spots on plywood |
Materials:
| Material | Quantity | Purpose |
|---|---|---|
| Plywood Sheets | 2 (approx.. 8″x12″) | Acts as the base and top of the flower press |
| Screw Bolts | 4 | To fasten the press together securely |
| Washers | 4 | To evenly distribute pressure from wing nuts |
| Wing Nuts | 4 | To tighten and loosen the press easily |
| Cardboard | 3–5 sheets | Used between layers to provide structure |
| Blotting Paper | 6–10 sheets | To absorb moisture from flowers during the pressing process |
| Dried Flowers | As needed | The main item being pressed |
Step 1. Marking and Drilling
Mark X’s about one inch from each corner of your plywood. Place a scrap piece of wood underneath to prevent splintering. Clamp both pieces of plywood together, then drill through all four corners at once.
Step 2. Inserting Hardware
Insert bolts through the holes to smooth them. Leave space between the plywood pieces so you can slide cardboard and paper in and out easily.
Step 3. Preparing Layers
Start with one layer of cardboard, then place a sheet of blotting paper on top. Arrange flowers on the blotting paper, keeping similar flower types together on the same sheet.
Step 4. Creating a Sandwich
Once the flowers are arranged, place another sheet of blotting paper on top, followed by cardboard. Continue layering (cardboard, blotting paper, flowers, blotting paper, cardboard) for multiple sets of flowers.
Step 5. Completing the Press
After adding all the layers, place the top plywood piece over everything. Put washers on the bolts, then add wing nuts and tighten them just enough to press the layers together.
Step 6. Drying Process
Wait 1-2 weeks, then check if the flowers are completely dried. They should feel dry to the touch and be paper-thin. Patience is key here – rushing the process by opening the press too early may undo all your hard work and cause the flowers to curl or warp.
Step 7. Removing Pressed Flowers
Carefully slide out the cardboard and blotting paper layers. If flowers stick to the paper, flip it over and gently use tweezers or your fingertips to peel them away.
Video Tutorial
I’d like to give credit to First Day of Home for their informative video, which served as a reference for this guide.
Insider Tricks to Make Your Flower Press Last
- Insider Tricks to Make Your Flower Press LastUse a clamp and scrap wood when drilling to prevent splintering
- Group similar flower types together on the same sheet
- You can choose to keep or remove stems depending on your craft plans
- The blotting paper can be reused several times
- Expect slight color changes in some flowers after pressing
- Pressed flowers work well for various crafts like stickers, bookmarks, and wedding decor
- Don’t overtighten the wing nuts – just enough pressure to press the layers is sufficient
- Be very gentle when removing dried flowers, as they become very fragile
Other Ways to Preserve Flowers at Home
- Book Press Method: Place flowers between wax paper sheets inside heavy books. Stack more books on top for extra weight.
- Iron Method: Position flowers between two sheets of parchment paper and press with a warm iron (no steam) for quick results.
- Microwave Press: Layer flowers between paper towels and microwave-safe plates. Heat in short 30-second bursts until dry.
- Cookie Sheet Press: Arrange flowers between paper towels, place between cookie sheets, and add weight with bricks or heavy objects.
- Glass Frame Method: Place flowers directly in a glass clip frame for pressing and display in one step.
- Clay Flower Press: Use air-dry clay to create custom-sized press molds for unique flower shapes.
Flower Pressing Fails You Can Easily Avoid
1. Using Flowers That Are Too Wet
Picking flowers after rainfall or morning dew leads to trouble. Extra moisture takes longer to dry out and often causes mold to form on your specimens.
The colors might bleed, and your flowers can turn brown instead of keeping their true colors. I always pick my flowers at midday when they’re fully dry. This small change makes a huge difference in the final results.
2. Overcrowding the Press
Stuffing too many flowers into your press is tempting but harmful. When flowers touch or overlap, they stick together and create uneven drying.
I once ruined a batch of violets this way – they came out with weird flat spots and distorted shapes. Keep flowers at least half an inch apart, and you’ll get clean, well-defined specimens every time.
3. Insufficient Drying Time
Opening your press too early ruins weeks of waiting. I’ve made this mistake more than once, thinking my flowers were dry when they weren’t. The half-dried flowers curled up and turned brown within hours.
Most flowers need at least two weeks to dry fully. Thick or moist flowers might need a month. The rule I follow: when in doubt, wait another week.
4. Applying Too Much Pressure
Tightening wing nuts with all your strength seems right, but it isn’t. Too much pressure crushes delicate petals and stems, breaking cell walls and causing discoloration. I ruined a perfect batch of cosmos flowers this way.
Gentle, even pressure works much better than force. Tighten just enough so papers don’t shift when you move the press.
5. Poor Flower Selection
Not every flower presses well. Thick, water-filled flowers like succulents and full roses often turn mushy or brown. My first attempts with hydrangeas were total failures. Thin, naturally flat flowers work best for beginners.
Look for flowers with simple petal structures and avoid very thick or fuzzy specimens until you gain more experience with the process.
Conclusion
So there you have it—making your own flower press isn’t just simple; it’s also fun! With a few basic tools and materials, you’ve now got everything you need to start preserving the beauty of your garden.
Why does this matter? Pressed flowers let you hold onto memories that would otherwise fade away. That special birthday bouquet or the wildflowers from a hike can now become lasting keepsakes.
What’s next? Take those newly pressed flowers and try using them on greeting cards, in picture frames, or even as bookmarks. The options are nearly endless!
I’d love to hear how your flower pressing turns out. Have you tried any of the alternative methods?
Did you find any flowers that worked particularly well? Share your experiences in the comments below!
Frequently Asked Questions
1. How Often Should I Change the Paper When Pressing Flowers?
You should change the blotting paper after the first 3-4 days, then again every week until the flowers are fully dry.
2. How Do You Make Pressed Flowers Last Forever?
Store pressed flowers in acid-free paper, keep them away from direct sunlight and moisture, and seal finished projects with UV-resistant spray or lamination.
3. Should I Hairspray My Pressed Flowers?
A light coat of hairspray can help preserve pressed flowers, but use it carefully. Choose an unscented, non-aerosol option and spray from a distance to avoid soaking the delicate petals.


