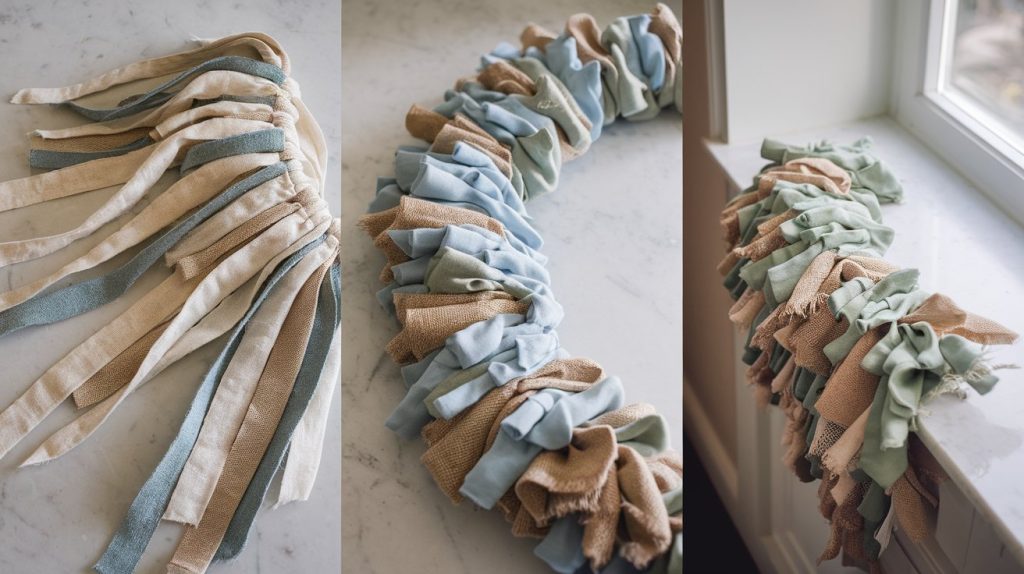
Making a rag garland brings warmth and style to any space without spending much money. These simple fabric strips, tied together in soft layers, add texture and color wherever you hang them.
I know many people think creating decorations needs special skills or lots of money – but that’s not true with rag garlands.
Perfect for every celebration, rag garlands work beautifully at weddings, baby showers, birthdays, or just to brighten up your living room. You can make them in any color combination and size you want.
I’ll show you which fabrics work best, how to cut and tie the strips properly, and share my tested tips for hanging your garland.
You’ll also learn my favorite ways to mix colors and patterns for the best results. I’ve made dozens of these garlands for my home and events, and I’ll share every step clearly.
Even if you’ve never tried crafting before, you’ll finish this project feeling confident and happy with your creation.
Step-by-Step Guide to Making a Rag Garland
Materials Needed to Make a Rag Garland
| Material | Description | Estimated Cost (₹) |
|---|---|---|
| Fabric Scraps | Old pillowcases, cushion covers, or thrifted fabric; mix patterns and colors for variety. | 100–300 (or free if using old materials) |
| String or Rope | Medium-thick string or rope for tying the fabric strips; ensure durability. | 50–100 |
| Scissors | Sharp scissors for cutting fabric into strips. | 100–200 |
| Optional Decorations | Lace, ribbons, beads, or small ornaments for embellishments. | 50–150 |
Step-by-Step Instructions
Step 1 Gather Your Materials
- Collect scraps of fabric, preferably in different colors or patterns.
- Make sure you have a piece of string or rope long enough for the desired garland length.
Step 2 Prepare the Fabric
- Cut the fabric into thin strips, approximately 8 cm in length.
- If you prefer a “shabby chic” look, you can rip the fabric instead of cutting it precisely.
Step 3 Set Up Your String
- Measure the string to the desired length, adding a bit extra for loops on each end.
- Create a loop on both ends of the string by folding and tying a knot. This will make it easier to hang.
Step 4 Add Fabric Strips
- Start by tying fabric strips around the string with a simple knot.
- For better placement, divide the string into sections using fabric markers. For example, tie a strip in the center, then at equal intervals along the string.
Step 5 Layer the Fabric
- Add more fabric strips, alternating colors and patterns as desired.
- Push the knots close together for a fuller garland.
Step 6 Final Touches
- Check for any gaps and fill them with additional fabric strips.
- Add optional decorations like lace, beads, or ornaments for extra charm.
Tips for Success
- Fabric Variety: Mix solid colors with patterns to create depth and visual interest.
- No-Sew Project: This craft is perfect for beginners as it doesn’t require any sewing or glue.
- Upcycling: Use old fabrics or visit thrift shops for inexpensive materials.
- Adjustable Length: Cut the string or rope according to the space where you’ll hang the garland.
Tips for a Professional Finish

I find that choosing three to four colors that work well together makes the biggest difference in how your garland looks. Think about where you’ll hang it – if it’s for a baby’s room, soft pastels blend nicely. For a party, you might want brighter shades that match your other decorations.
Make your garland fuller by tying the fabric strips closer together. I usually leave about half an inch between each tie. When the strips are too far apart, the garland can look thin and sparse. A good rule is to use more fabric than you think you need.
Here’s what works for me: Start with a test section using different fabrics. Mix cotton with linen or burlap – the different textures catch the light in interesting ways. Try cutting some strips with zigzag edges while keeping others straight. This small change adds visual interest.
My favorite trick: Cut your strips in varying widths. I use mostly 1-inch strips but mix in some 1.5-inch pieces. This simple change makes the garland look more interesting and natural.
Want to test if your colors work together? Lay out all your fabric pieces on the floor before you start. This helps you spot any shades that don’t quite fit, and you can adjust before tying everything together.
Remember: Simple patterns usually look better than busy ones. When I use patterned fabric, I pair it with solid colors to keep things balanced.
Creative Ways to Display Your Rag Garland

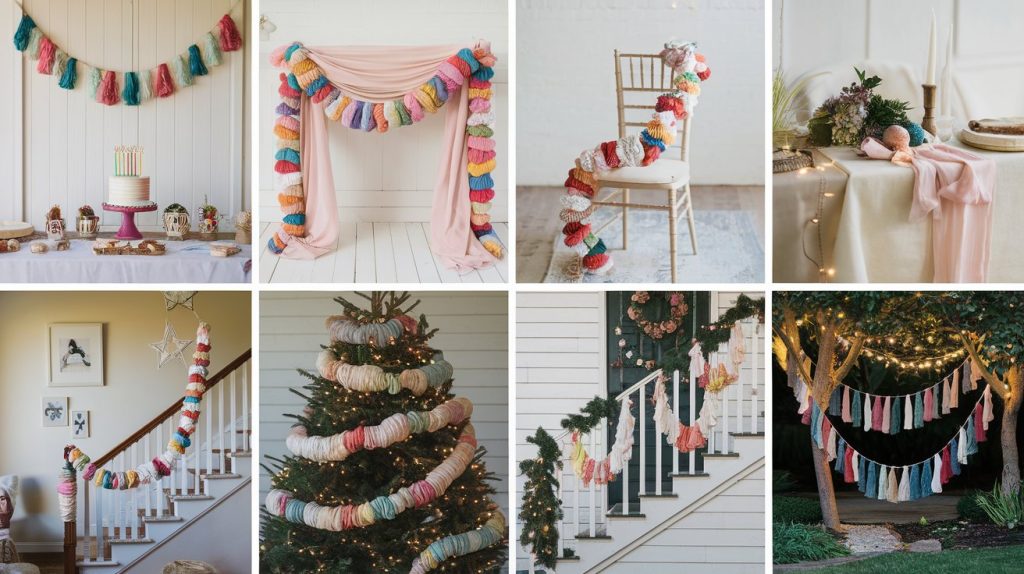
I love how rag garlands fit into any setting. For birthday parties, I hang them on the wall behind the cake table – they make wonderful backgrounds for photos.
At weddings, try draping them along the backs of chairs or across the gift table. During holidays, I wrap them around my Christmas tree or string them across my front porch.
- Perfect party placement: For your next celebration, try hanging the garland in waves rather than straight lines. This creates a softer look that fills more space. I’ve found that two shorter garlands often work better than one long piece, especially when decorating large areas.
- Indoor spots I recommend: Put them above your bed instead of a headboard. String them across your living room windows. Add them to a child’s reading nook. Wrap them around stair railings. Each spot needs a different length, so measure twice before you start making your garland.
- Outdoor ideas that work: These garlands hold up well outside if you use the right fabric. I hang them between porch posts or across fence sections. For garden parties, try stringing them between trees. Just remember to bring them inside if rain is coming.
- Mix and match with other decor: String lights look great woven through the fabric strips. Small paper flowers tucked into the garland add extra charm. I often use plain white fairy lights with colored fabric – the combination creates a warm glow at night.
The best part? You can change these garlands with the seasons. I keep several in different colors, switching them out as the months change. They store easily too – just roll them up and keep them in a drawer until your next event.
Common Mistakes to Avoid
- Wrong spacing: Keep strips half an inch apart. Too close makes it bulky. Too far looks empty.
- Bad fabric picks: Skip stretchy stuff – it sags. Cotton and linen work best. No sheer fabrics.
- Skipping prep work: Iron first. Use sharp scissors. Plan your layout. Quick starts make messy garlands.
- Uneven cutting: Measure strips before cutting. Uneven lengths make the garland look sloppy. Use a ruler.
- Weak base string: Thin string breaks easily. Use strong cord or twine. Test it by pulling firmly.
- Mixed-up measurements: Measure twice, cut once. Check total length needed. Add extra for draping.
- Poor knot tying: Loose knots mean falling strips. Double-tie each piece. Pull to test.
- Wrong strip length: Too short looks tiny. Too long gets tangled. Stick to 6-8 inches.
- Forgetting to count: Running out of strips halfway is frustrating. Count what you need before starting.
- Messy storage: Roll garlands carefully. Don’t stuff them in bags. Store flat or rolled to prevent tangles.
Wrapping It Up
Making a rag garland is more than just a simple craft project – it’s a way to add your personal touch to any space or celebration.
As we’ve seen, you don’t need fancy tools or special skills to create something beautiful. With basic materials and careful attention to spacing and fabric choice, you can make a decoration that looks professionally made.
I hope these tips have shown you how easy and fun this project can be. Start with a small garland, try different fabrics, and build your confidence.
Remember, there’s no single “right way” to make your garland – the joy is in creating something that fits your style.
Have you made a rag garland before? Share your photos in the comments below! I’d love to see your color combinations and hear about where you plan to display your creation.
