Want to add a touch of warmth to your home without spending too much?
Many homeowners struggle to find simple, budget-friendly ways to display their blankets and throws. A DIY blanket ladder offers a practical solution that costs less than store-bought options.
Making your own farmhouse-style blanket ladder lets you customize the size, finish, and look to match your home’s style. The best part? You can build it in just a few hours with basic tools and materials.
This guide will show you step-by-step how to create a sturdy, good-looking blanket ladder for your home. We’ll cover everything from selecting the right wood to applying the final touches, so you can start showing off your favorite throws today.
Tools and Materials Required
Tools Required
| Tool | Purpose |
|---|---|
| Miter Saw | For cutting lumber and dowels to size |
| Hammer | For assembly work |
| Drill | For making holes for the dowels |
| Square | For ensuring straight angles |
| Clamps | For holding pieces in place while working |
| Sandpaper | For smoothing rough edges |
| Mallet Hammer | For gentle tapping during assembly |
Materials Required
| Material | Specification | Quantity |
|---|---|---|
| Lumber | 2×3 boards, 8 feet long | 2 |
| Dowel Rods | 1¼ inch round wood dowels, 18½ inches long | 4 |
| Wood Glue | Standard wood adhesive | 1 bottle |
| Tape | Masking Tape or Painter’s Tape | 1 roll |
| Drill Bit | 1¼ Inch Spade Bit | 1 |
Step-By-Step Process on Making Farmhouse Diy Blanket Ladder
Step 1: Cut the Lumber

Start by cutting two pieces of 2×3 lumber to 76 inches long. This will form the main sides of your ladder. Make sure to cut the bottom of each piece at a 10-degree angle.
This angle allows the ladder to lean properly against the wall without sliding. Next, take your round wood dowels and cut them into four pieces, each measuring 18½ inches long.
These dowels will serve as the rungs of your ladder where you’ll hang your blankets.
Step 2: Mark the Drill Holes

Precise measurements are key to a well-built ladder. Begin by measuring 13⅝ inches from the top of one 2×3 side piece and mark a line.
Then, measure 1¼ inches from the side of the 2×3 to create a center point for the hole. From this first hole mark, measure 14¼ inches down and mark a second hole center point.
Continue this process two more times until you have four marks, with each hole spaced 13 inches apart. To ensure your ladder is even, repeat these exact markings on the second side piece.
Step 3: Drill the Holes
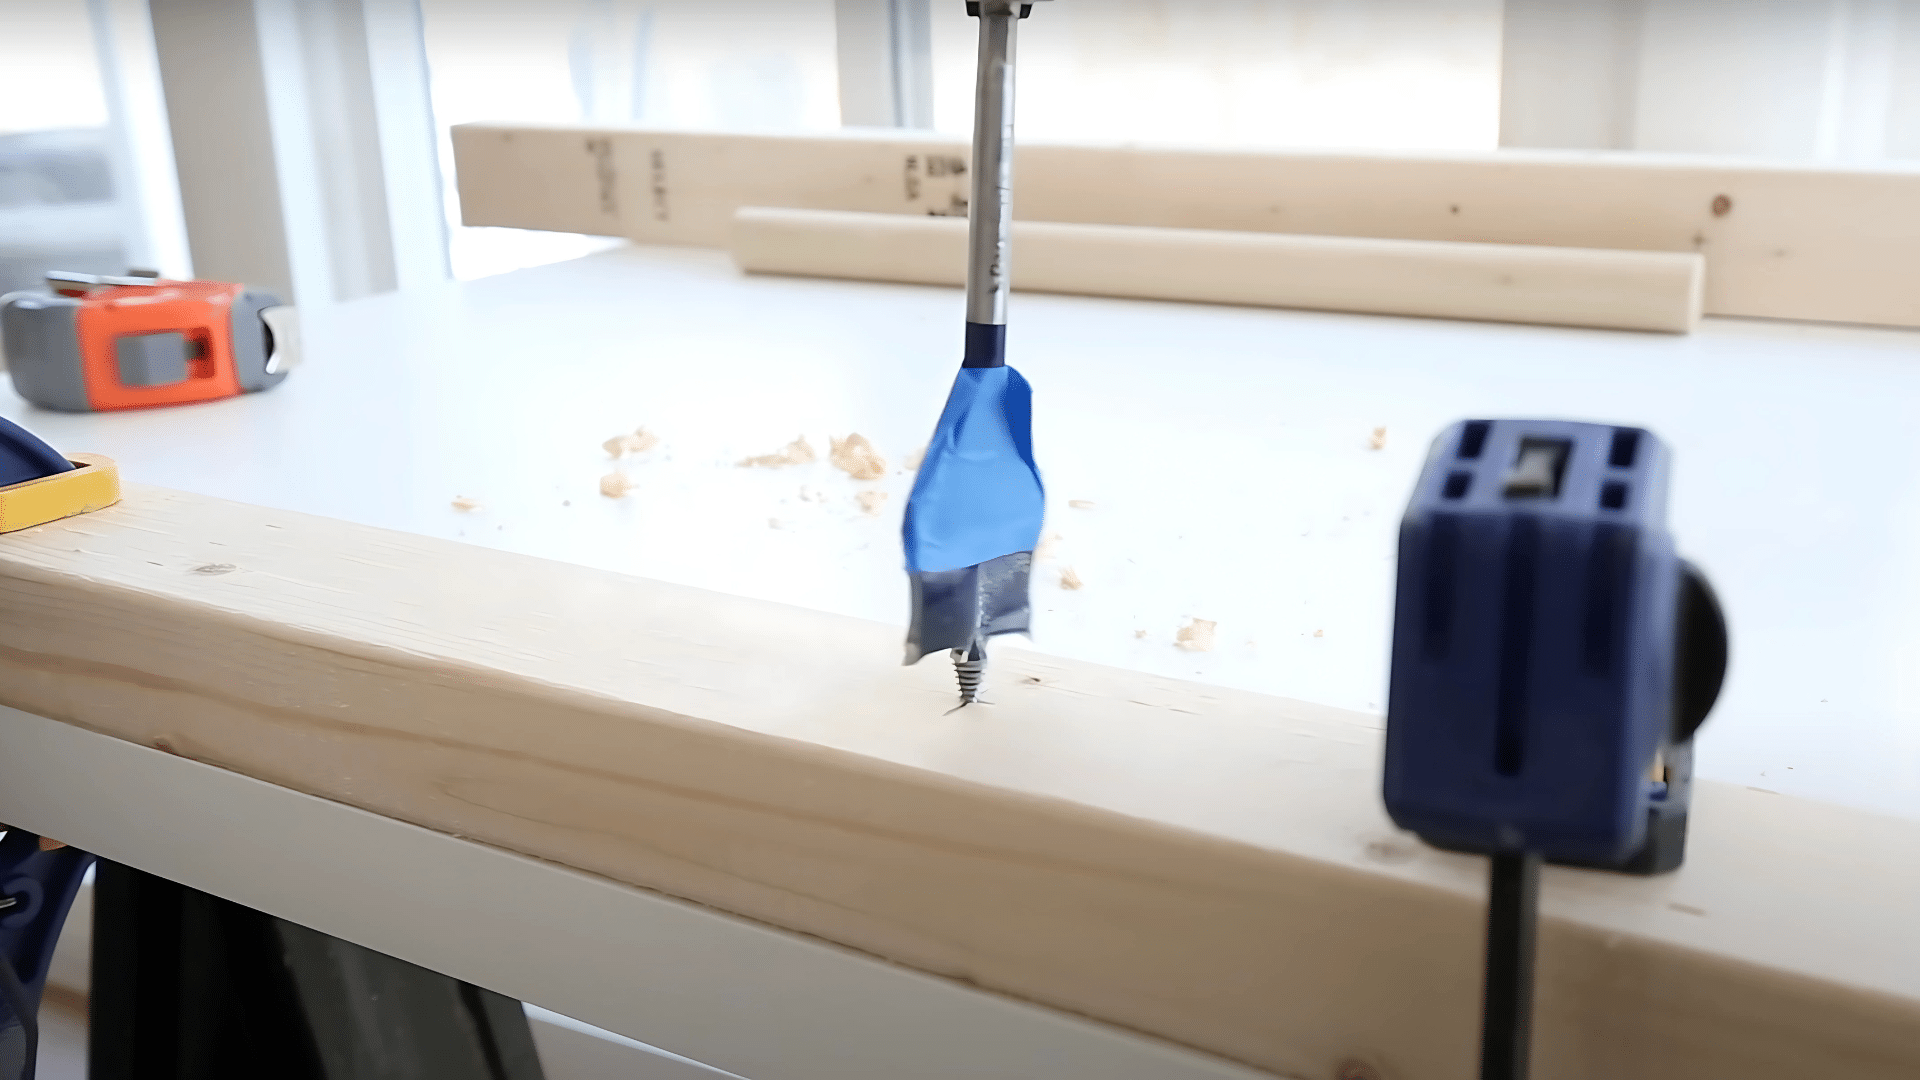
Before drilling, wrap painters tape or masking tape around the spade drill bit, placing it ¾ inches from the bottom. This tape acts as a depth guide, helping you control how deep you drill.
Next, secure the 2×3 pieces with clamps to prevent movement during drilling. Carefully align the spade drill bit with each center point mark and drill down until the tape reaches the wood surface.
After drilling all eight holes, sand the 2×3 pieces to remove any rough edges or splinters.
Step 4: Attach the Dowel Rods

Now it’s time to start putting the ladder together. Apply wood glue inside the drilled holes on one of the 2×3 side pieces.
Then, apply wood glue to one end of each dowel rod.
Insert the dowel rods into the holes and use a mallet hammer or a regular hammer with gentle taps to secure them in place. Make sure the dowels sit firmly in the holes and are straight.
Step 5: Assemble the Ladder

To complete the ladder structure, apply wood glue to the other ends of the dowel rods and to the holes of the second 2×3 side piece.
Carefully attach the second side piece by lining up the holes with the dowel ends. Tap it into place with your hammer, working slowly to ensure everything aligns correctly.
Check that your ladder is square and adjust as needed before the glue sets.
Step 6: Finish the Ladder

Allow the glue to dry completely according to the manufacturer’s instructions, typically 24 hours for full strength.
Once dry, sand the entire ladder to create a smooth finish, paying extra attention to any rough spots or edges. After sanding, you can apply stain, paint, or a weathered wood finish to match your home’s style.
Allow the finish to dry fully before using your new ladder to display your favorite blankets and throws.
For a visual tutorial, refer to this video by Angela Marie Made
Common Mistakes to Avoid
- Not measuring twice before cutting, resulting in uneven ladder sides
- Forgetting to cut the 10-degree angle at the bottom, causing the ladder to sit flat against the wall
- Drilling holes at inconsistent depths, making the rungs sit unevenly
- Using too little wood glue, which can lead to loose rungs over time
- Rushing the assembly before checking that both sides are parallel
- Skipping the sanding step, leaving rough edges that can snag blankets
- Not allowing enough drying time between gluing and using the ladder
- Using dowels that are too thin to support the weight of multiple blankets
Maintenance Tips Your Diy Blanket Ladder
1. Regular Dusting: Wipe your ladder with a soft, dry cloth weekly. This prevents dust buildup in corners and on rungs where blankets rest.
2. Check for Loose Rungs: Every few months, gently test each rung for stability. If any feel loose, apply a small amount of wood glue to fix them.
3. Refresh the Finish: Once a year, inspect the finish for wear. Apply a thin coat of the same stain or paint to spots that look faded or worn.
4. Avoid Moisture Damage: Keep your ladder away from humid areas like bathrooms. Excess moisture can warp the wood and weaken the glue joints.
5. Prevent Sun Fading: If possible, position your ladder away from direct sunlight. UV rays can fade the finish over time.
6. Clean Spills Promptly: If anything spills on your ladder, wipe it clean right away with a slightly damp cloth and dry thoroughly.
7. Handle with Care: When moving your ladder, lift it instead of dragging to avoid damage to the base and prevent stress on the joints.
Conclusion
Making your own blanket ladder offers both style and function to your home. With simple tools and a few hours of work, you created a piece that shows your craftsmanship and solves storage needs.
We walked through each step from cutting lumber to applying the final finish. The process taught valuable woodworking skills while saving you money compared to store-bought options.
Your ladder now provides a practical way to display throws and blankets while adding visual interest to any room. The farmhouse style fits well with many decor choices, making it a versatile addition.
Remember to check rungs periodically and dust regularly to keep your ladder looking its best. With proper care, this project will serve your home for years to come.