Are you staring at that empty wall space above your console table, wondering exactly where to hang your artwork? You’re not alone.
This common decorating dilemma leaves many homeowners second-guessing their placement, resulting in crooked pictures and awkward gaps that disrupt the entire room’s balance.
Getting the height wrong can make your beautiful console table look disconnected from your wall art, creating visual chaos instead of harmony.
Too high, and your artwork floats awkwardly. Too low, and everything feels cramped and cluttered.
There’s a simple formula interior designers use for balanced, professional displays. This guide covers measurements, spacing, and styling to turn any console table into a focal point. Ready to master placement? Let’s dive in.
Why Hanging Art Properly Matters?
Art serves as the soul of interior design, transforming blank walls into captivating focal points that reflect your personality and elevate your space from ordinary to extraordinary. When artwork is hung at the correct height above your console table, it creates a cohesive visual relationship that draws the eye naturally through the room.
- Visual Balance: Proper placement creates harmony between your artwork and console table, making them work as one unified design element
- Room Flow: Correct height ensures natural eye movement through the space, preventing awkward visual interruptions
- Professional Appearance: Well-positioned art makes your entire room feel intentionally designed rather than haphazardly decorated
Improper placement can disrupt harmony, making the art appear disconnected and creating an unfinished look, which affects the room’s balance.
Proper hanging height ensures artwork and console table work together, creating visual weight and a professionally styled, inviting room.
General Guidelines for Hanging Art Above a Console Table
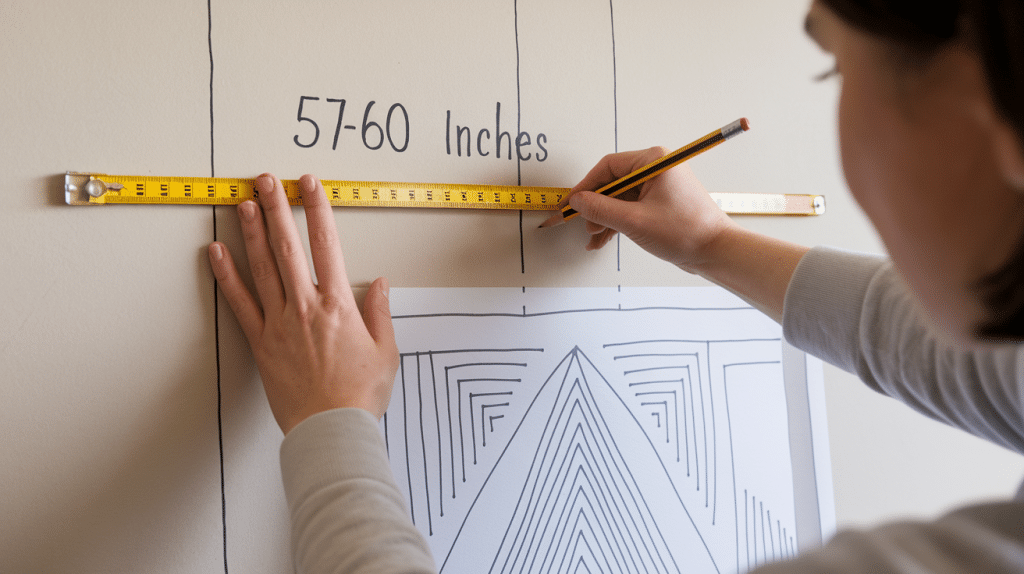
The 57-60 inch rule recommends centering artwork at eye level for optimal viewing, aligning with the sightlines of most adults to prevent strain. Above a console table, it creates a cohesive visual flow between furniture and art.
| Measurement | Standard Range | Purpose | Visual Impact |
|---|---|---|---|
| Center Height from Floor | 57-60 inches | Aligns with the average eye level | Creates a comfortable viewing angle |
| Distance from Console Top | 6-8 inches | Maintains visual connection | Prevents a floating or cramped appearance |
| Artwork Width | 2/3 of the console width | Proportional balance | Ensures proper scale relationship |
| Multiple Pieces Spacing | 2-3 inches apart | Maintains unity | Creates a cohesive gallery effect |
| Room Ceiling Height | Adjust +/- 2 inches | Accommodates space proportions | Optimizes visual balance for room size |
This systematic approach ensures your artwork enhances rather than overwhelms your console table arrangement.
Step-by-Step Guide to Hanging Art Above a Console Table
Follow these four essential steps to achieve perfectly positioned artwork that transforms your console table area into a professionally styled focal point.
Tools Required
| Tool | Purpose |
|---|---|
| Measuring Tape | Measure wall heights and distances |
| Spirit Level | Ensure the artwork hangs straight |
| Pencil | Mark the wall positions |
| Stud Finder | Locate wall studs for heavy artwork |
| Drill | Create holes for anchors and screws |
| Hammer | Install picture hooks and small nails |
| Screwdriver Set | Tighten screws and install hardware |
| Step Ladder | Reach the proper hanging height safely |
Materials Required
| Material | Purpose |
|---|---|
| Picture Hooks | Hang lightweight artwork |
| Drywall Anchors | Support medium-weight art |
| Wall Screws | Secure anchors and hooks |
| Picture Wire | Hang artwork with wire backing |
| D-Ring Hangers | Heavy artwork mounting |
| Toggle Anchors | Heavy artwork in hollow walls |
| Adhesive Strips | Damage-free hanging option |
| Painter’s Tape | Create templates and protect walls |
Step 1: Measure and Mark the Wall
Taking precise measurements before making any holes ensures your artwork will be positioned exactly where you want it.
Start by measuring 57-60 inches from the floor to mark where the center of your artwork should sit, then use a pencil to make light marks that can be easily erased later.
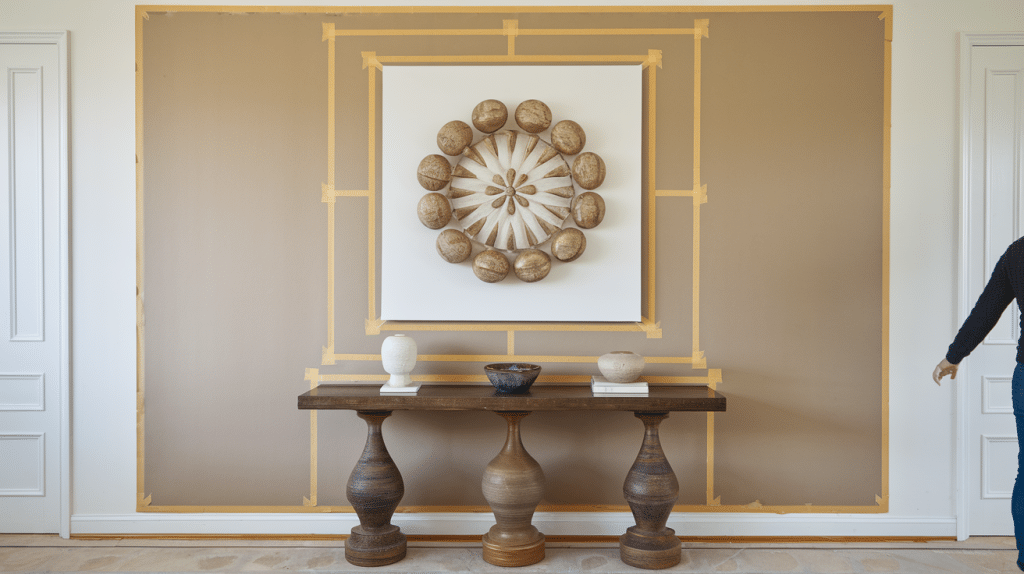
Pro Tip: Tape a paper template of your artwork to the wall first to visualize the placement before making any permanent marks.
Step 2: Find the Perfect Spot Above the Console
The distance between your console table and wall art should feel intentional and well-planned.
Most designers recommend leaving 4-8 inches of space to create proper visual breathing room.
- Vertical spacing: Keep 4-8 inches between the console surface and the artwork’s bottom edge.
- Horizontal alignment: Position the art’s center point directly above the console’s center.
- Decorative considerations: Adjust placement slightly when console accessories create visual weight on one side.
Pro Tip: Use painter’s tape to outline your artwork’s dimensions on the wall – this lets you step back and assess the placement from different angles before committing.
Step 3: Choosing the Right Hanging Method

The weight and size of your artwork determine the best hanging method, with options ranging from simple picture hooks to heavy-duty wall anchors.
Picture wire works best for heavier pieces but must be pulled taut to prevent sagging, while adhesive strips offer a damage-free solution for lighter artwork in rental spaces.
- Lightweight art (under 5 lbs): Use picture hooks or adhesive strips for easy installation.
- Medium weight (5-20 lbs): Install picture wire with appropriate wall anchors for secure mounting.
- Heavy pieces (over 20 lbs): Use D-rings with wall studs or heavy-duty anchors for maximum support.
Pro Tip: Always test your hanging method on a scrap piece of drywall first to ensure it can support your artwork’s weight without pulling out.
Step 4: Leveling Your Art
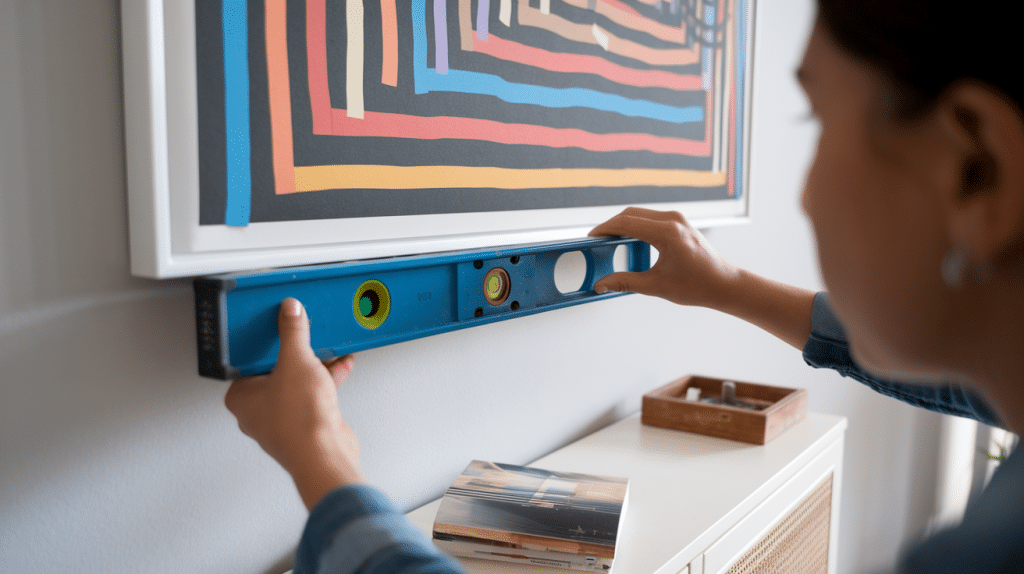
Even perfectly measured artwork can appear crooked once hung, making this final step crucial for achieving a professional look.
A spirit level or smartphone app can help you make micro-adjustments to ensure your artwork sits perfectly straight and enhances, rather than detracts from, your console table display.
Pro Tip: Place a small piece of adhesive putty behind the lower corners of lightweight frames to prevent them from shifting over time due to vibrations or air movement.
Practical Tips for Perfect Placement
These expert techniques will help you achieve flawless art placement while avoiding costly mistakes and ensuring your console table display looks professionally curated.
1. Create Paper Templates: Cut paper to match your artwork’s exact dimensions and tape it to the wall to preview placement – this allows you to experiment with different heights and positions without making holes, and helps you visualize how multiple pieces will work together.
2. Align with Room Focal Points: Position your artwork to complement existing focal points like fireplaces, architectural features, or statement furniture pieces – if your console table sits opposite a fireplace, ensure the art center aligns with the fireplace mantel for balanced sight lines.
3. Use the Triangle Rule: When styling your console table with decorative objects, create visual triangles between your artwork and table accessories – this technique ensures your wall art feels integrated with the overall vignette rather than floating independently.
4. Install Adjustable Hanging Systems: Consider picture rail systems or adjustable wire tracks that allow you to easily swap artwork without creating new holes – perfect for renters or those who frequently rotate their art collection while maintaining consistent placement guidelines.
5. Test from Multiple Angles: Walk around your room and view the artwork from different seating areas and entry points to ensure it looks balanced from every perspective – what appears perfect from directly in front may look off-center from your sofa or dining area.
Master these placement techniques and you’ll transform any console table area into a stunning focal point that looks effortlessly sleek.
Conclusion
Mastering artwork placement above your console table transforms ordinary spaces into extraordinary ones. By following the 57-60 inch rule, maintaining proper spacing, and using correct hanging methods, you create visual harmony that elevates your room’s appeal.
Perfect placement combines proven techniques with personal style for professional results. Measure twice, use templates, and check levels for flawless finishing. Your console table and artwork should work as one unified focal point.
With these guidelines, you’re ready to create stunning displays that showcase your collection beautifully and make your home feel thoughtfully designed.
What’s your biggest challenge when hanging artwork? Share your experiences and questions in the comments below.