Foundation cracks staring back at you from your basement wall? You’re not alone – thousands of homeowners face this scary sight every year.
Most people panic and call expensive contractors right away, spending thousands on repairs they could handle themselves.
But here’s what most homeowners don’t know: fixing foundation cracks from the outside is simpler than you think and creates stronger, longer-lasting repairs than inside patches.
Outside repairs stop water before it enters your home, preventing costly flooding and mold problems that can destroy your property value.
You can save thousands and protect your home’s foundation with basic tools and the right technique. This guide shows you exactly how to fix foundation cracks from the outside using six simple steps that create permanent repairs.
Ready to stop those cracks for good? Let’s get started.
Why You Shouldn’t Ignore Foundation Cracks
Foundation cracks are serious problems that need quick attention. Your home’s foundation supports the entire structure, and when cracks appear, they can lead to costly repairs if left untreated.
Fixing foundation cracks from the outside protects your home’s value and safety. Small cracks can become big problems fast, so the sooner you fix them, the less damage they cause.
Water damage tops the list of problems from untreated foundation cracks. Water seeps through cracks and creates basement flooding, mold growth, structural weakness, and insect infestations.
Structural damage happens when cracks spread, causing uneven floors, doors, and windows that stick, walls that bow or lean, and expensive foundation replacement.
Common Causes of Foundation Cracks
Several factors contribute to foundation cracks, with some being more common than others.
| Cause | How It Happens | Timeline |
|---|---|---|
| Soil Movement | Clay soil expands when wet and shrinks when dry. This constant movement puts pressure on your foundation. | Ongoing seasonal changes |
| House Settling | Your home adjusts to its foundation over time. New homes often develop small cracks in the first year. | First year for new homes, ongoing for older homes |
| Moisture Problems | Poor drainage lets water pool near the foundation. This water softens concrete and creates weak spots. | Develops over months to years |
| Tree Roots | Large trees planted too close push against foundations as they grow. | Years to decades as trees mature |
Foundation cracks fall into three main categories that indicate different severity levels:
- Vertical cracks run straight up and down and are usually the least serious type that’s easy to repair.
- Horizontal cracks run side to side across your foundation and signal serious problems that need immediate attention.
- Stair-step cracks look like steps going up a wall and often mean the foundation is shifting or settling unevenly.
Step-by-Step Guide to Fixing Foundation Cracks
Follow these six proven steps to create strong, permanent repairs that stop water damage and protect your home’s foundation.
Tools and Materials You’ll Need
Before starting your repair, gather these essential tools and materials for fixing foundation cracks from the outside:
| Item | Purpose | Notes |
|---|---|---|
| Cold chisel (5/8 inch) | Opening and widening cracks | Works best for breaking out masonry |
| Hammer | Used with a cold chisel | For chiseling work |
| Trowel | Applying mortar mix | The main tool for mortar application |
| Small rectangular trowel | Smoothing surfaces | For finishing work |
| Drill | Mixing mortar | Makes mixing easier |
| Bucket | Holding mortar mix | For mixing and storage |
| Sponge | Adding texture | Should be damp, not too wet |
| Mortar mix | Main repair material | Choose a quality mix for your foundation |
| Triple expanding foam | Filling voids in hollow blocks | Expands to fill empty spaces |
| Acrylic bonding agent | Helps the mortar stick better | Mix with mortar for stronger repairs |
Complete your foundation crack repair with these straightforward steps:
Step 1: Fill Blocks with Expanding Foam

Before applying mortar, you need to fill the empty spaces inside hollow blocks. This creates a solid backing that prevents mortar from falling through the block.
The foam expands quickly, so work carefully to avoid overfilling. If you put too much foam in, it will expand out of the joints, and you’ll need to chisel it out to make room for mortar.
Common Mistake: Overfilling the void, causing foam to expand out of joints and create more work when you have to chisel it out.
Step 2: Open Up the Crack
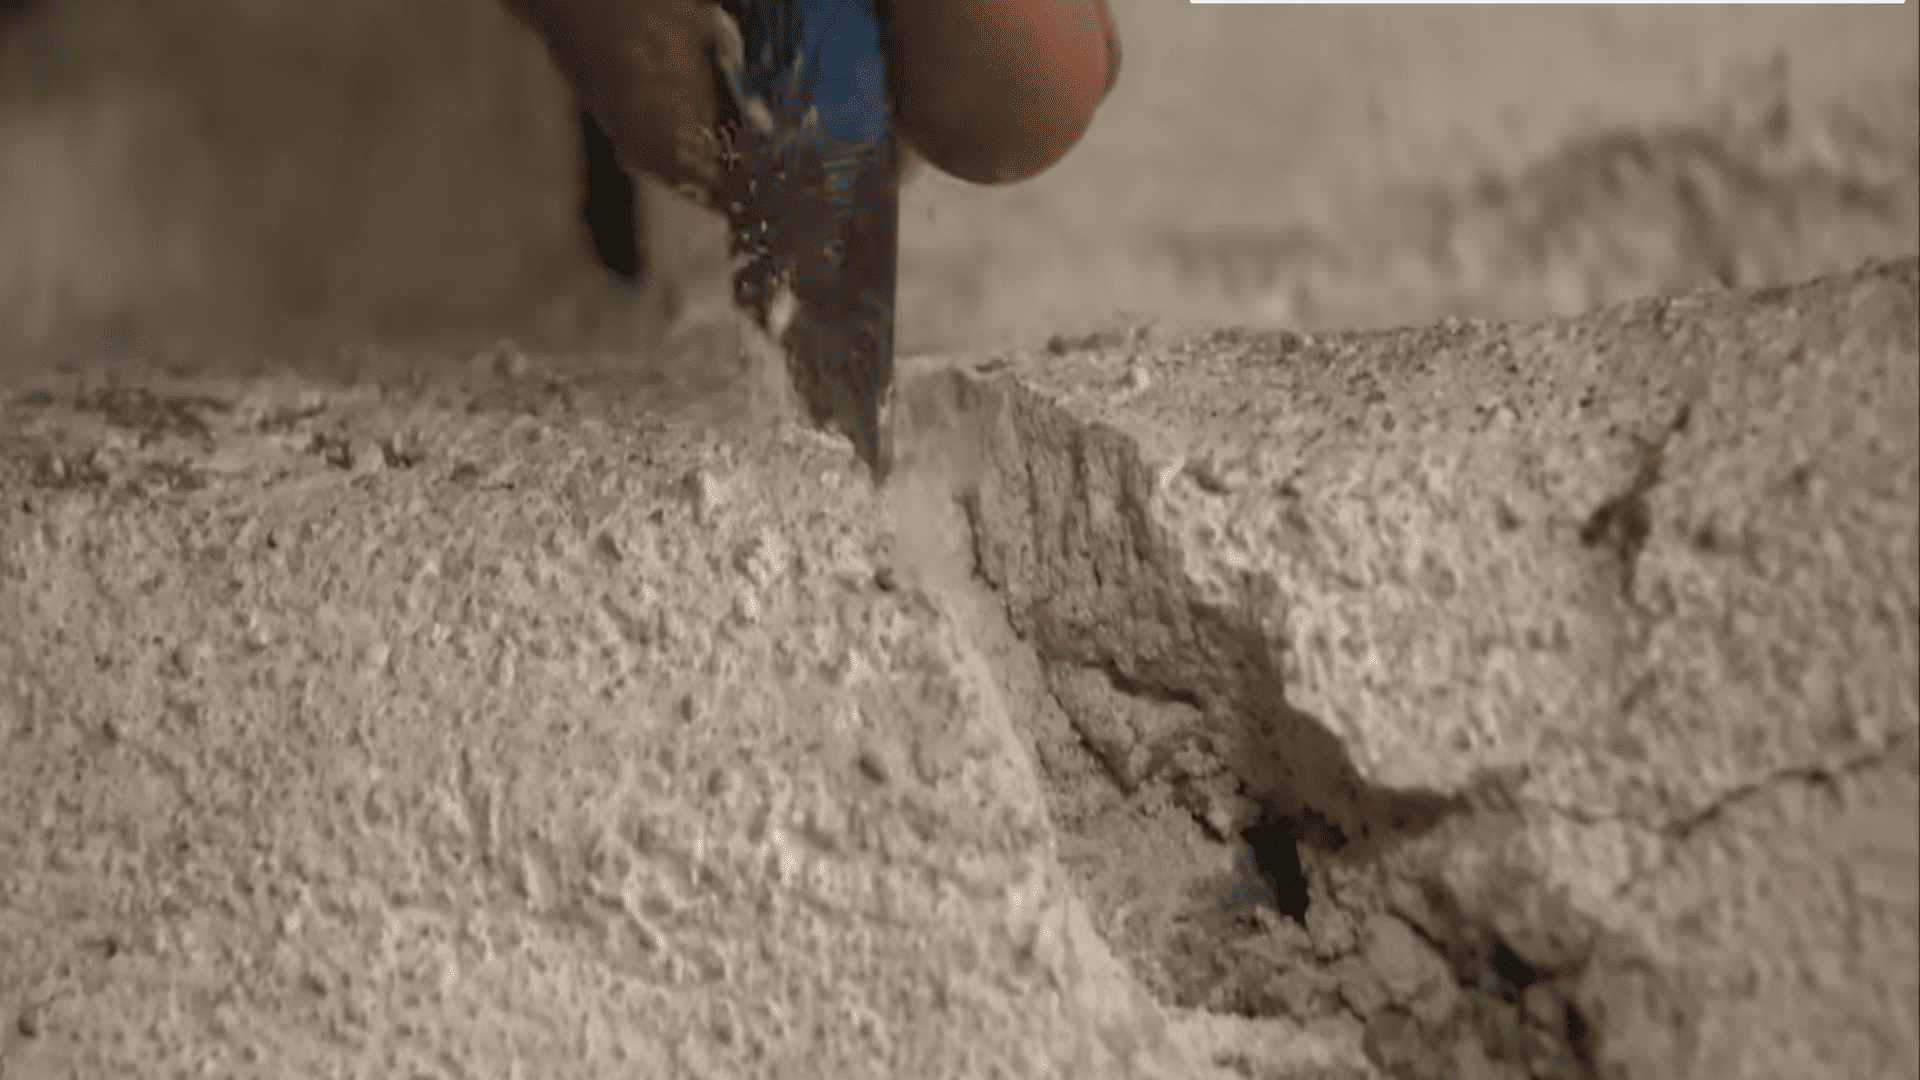
Cracks need to be wider than they appear to hold mortar properly. Small cracks won’t grip the mortar, causing repairs to fail. Opening the crack creates space for mortar to lock in place and form a strong bond.
Use a cold chisel to widen the crack, but don’t go too deep – you want to create enough space for the mortar to grab onto both sides.
Common Mistake: Not making the crack wide enough, which causes mortar to fall out or creates a weak repair that fails quickly.
Step 3: Mix the Mortar
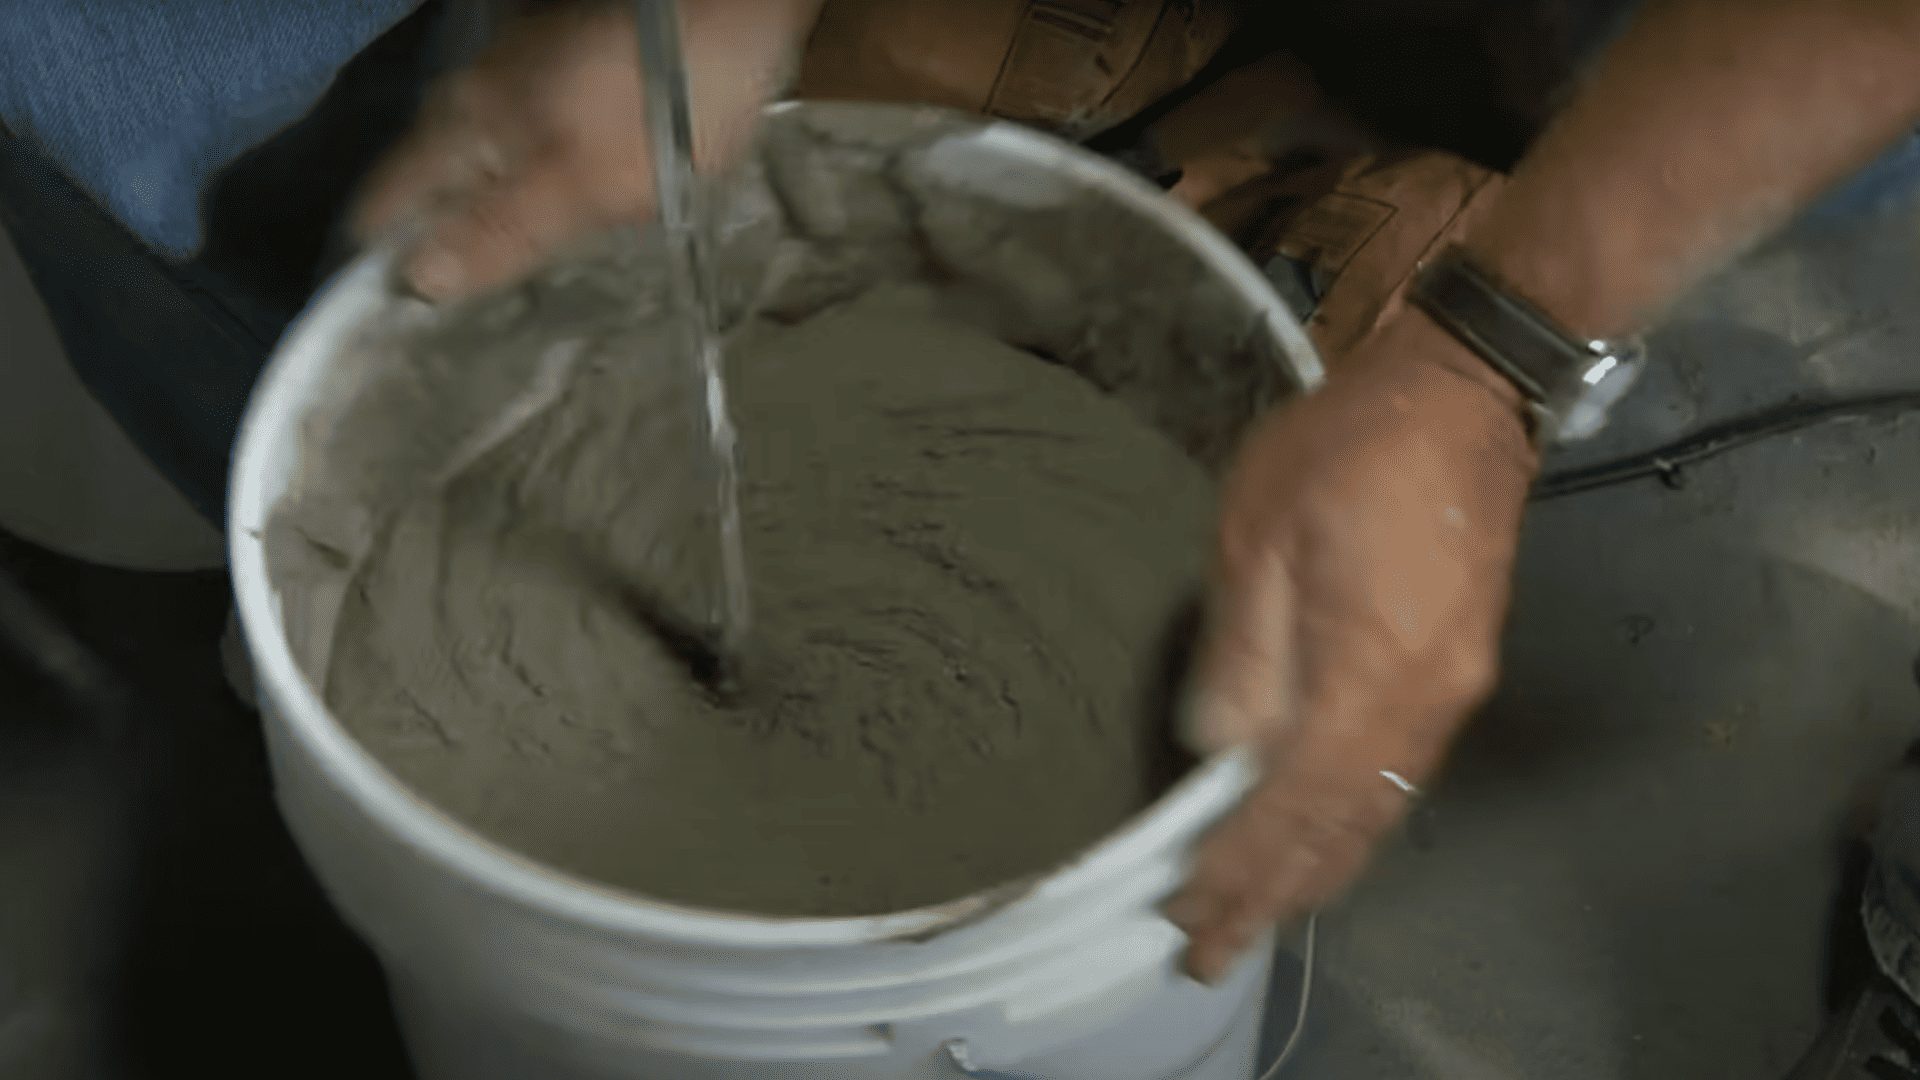
Proper mixing creates strong mortar that bonds well to your foundation. The bonding agent is key for adhesion and helps the mortar stick to existing walls much better than plain mortar.
Let the mixture rest briefly so all ingredients blend completely before use. This resting time allows the bonding agent to activate properly.
Common Mistake: Skipping the acrylic bonding agent or not letting the mixture rest, resulting in mortar that doesn’t stick properly to the wall.
Step 4: Apply the Mortar

Dry walls will pull moisture from the mortar too quickly, causing weak repairs that crack and fail. Wetting the surface first keeps the mortar workable longer and prevents it from drying out too fast.
Push mortar firmly into cracks to eliminate air gaps that weaken the repair. Make sure to fill the crack completely from both inside and outside if possible.
Common Mistake: Applying mortar to a dry surface, which causes the wall to suck moisture out too quickly and leads to cracking.
Step 5: Finish the Surface
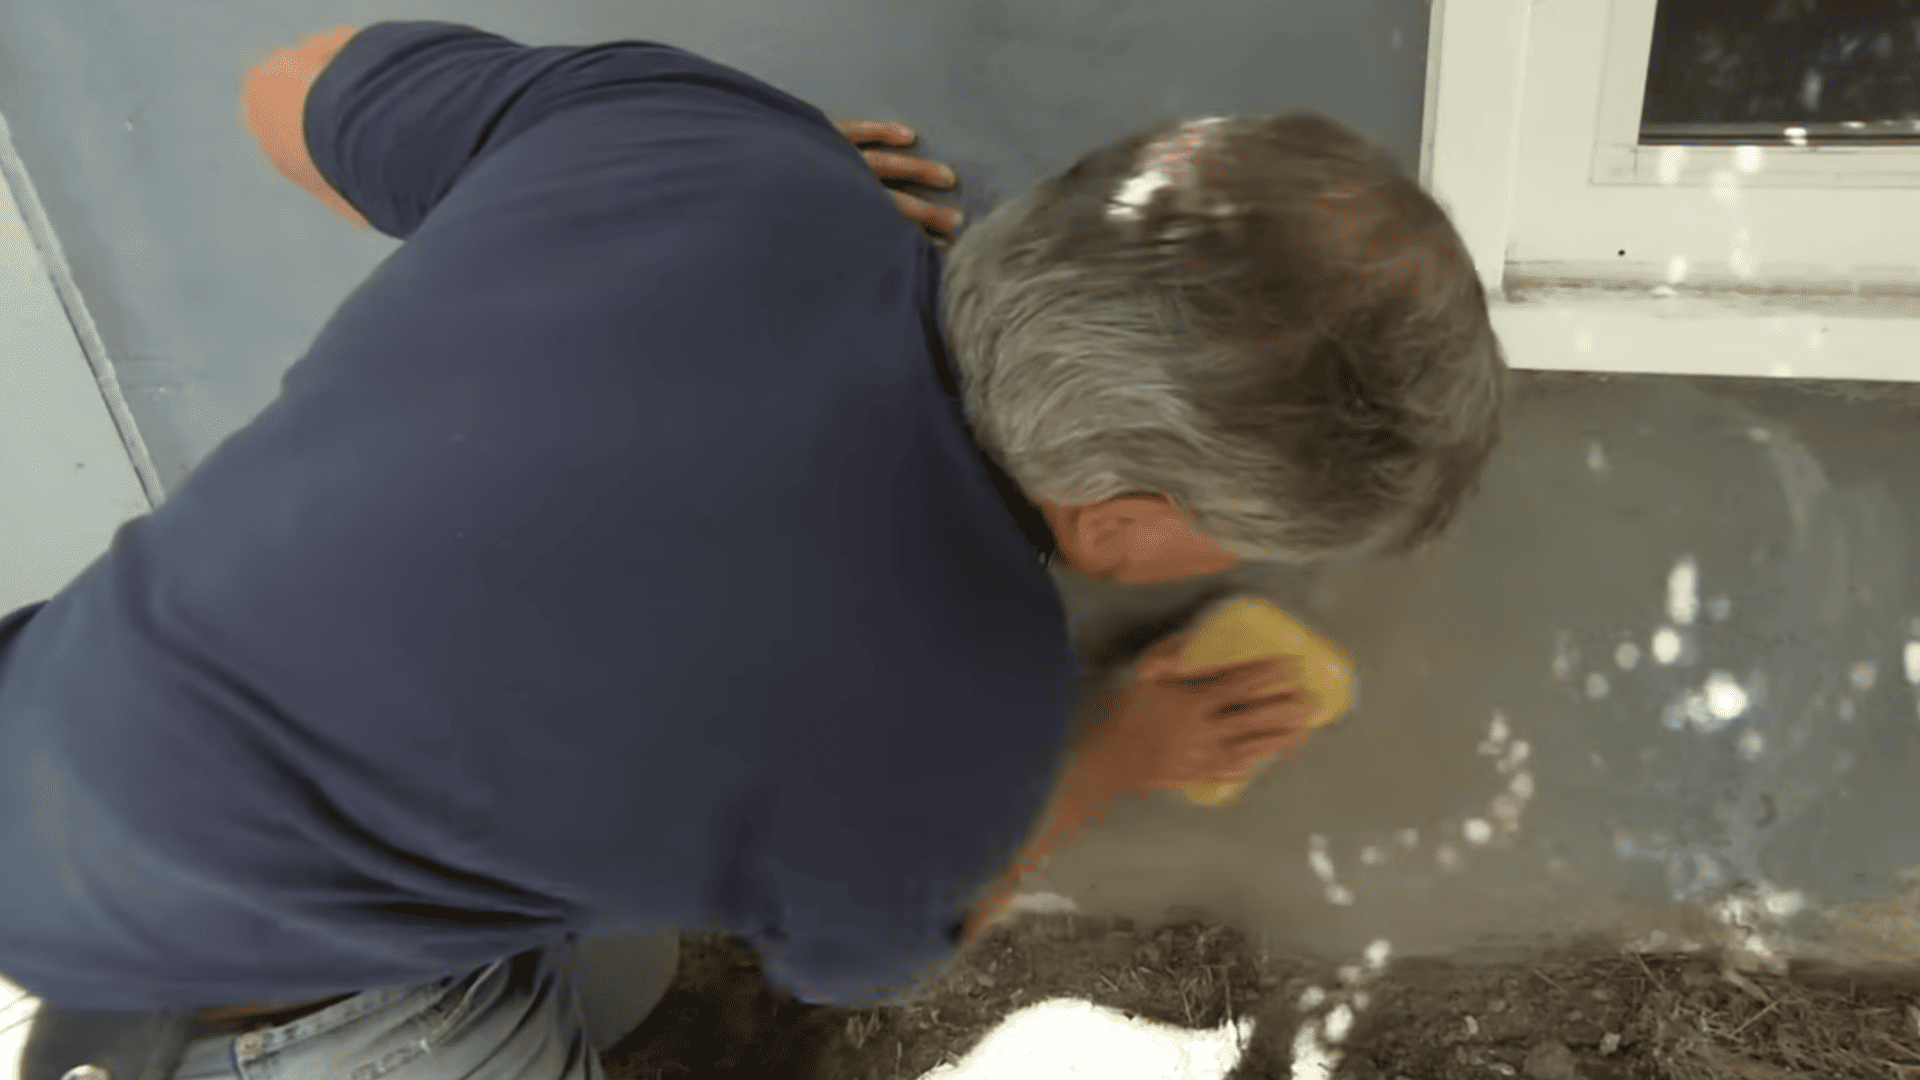
Smooth finishing makes repairs look professional and blend with existing walls. Adding texture helps hide repair work and makes it less noticeable.
The sponge technique brings aggregate to the surface, matching the original wall texture. Work while the mortar is still slightly soft but firm enough to hold its shape.
Common Mistake: Using a soaking wet sponge for texturing, which removes too much mortar and weakens the repair surface.
Step 6: Let It Cure

Mortar needs time to reach full strength before painting or sealing. Rushing this step can weaken your repair and cause problems later.
Two weeks allow complete curing for maximum durability and proper paint adhesion. Don’t apply any coatings or paint until the mortar has fully cured.
Common Mistake: Painting or sealing the repair too early, which traps moisture and weakens the mortar before it’s fully cured.
Video Tutorial
I’d like to give credit to This Old House for their informative video as a reference for this guide.
When to Call a Professional
Large cracks wider than 1/4 inch, horizontal cracks, multiple cracks appearing at once, or bowing walls all require professional attention as they indicate serious structural problems.
If water infiltrates through cracks during every rain or you notice the foundation settling, don’t attempt DIY repairs. Professional contractors use specialized equipment, such as structural evaluation tools, foundation lifting tools, waterproofing systems, and excavation equipment, to access foundation walls completely.
They also guarantee their work for several years, giving you peace of mind that problems will be fixed properly the first time.
Final Thoughts
Fixing foundation cracks from the outside is a smart investment that protects your home’s value and prevents costly water damage.
By following these six simple steps, you’ve learned how to create permanent repairs using basic tools and materials. Remember to fill hollow blocks with foam, widen cracks properly, mix mortar with bonding agent, wet surfaces before application, add matching texture, and allow proper curing time.
Don’t ignore foundation problems or put off repairs. Small cracks today become major structural issues tomorrow. Take action now while the repair is still manageable and affordable.
Ready to tackle those foundation cracks? Gather your tools and get started. Your home will thank you for the attention, and you’ll sleep better knowing your foundation is solid and secure.
Frequently Asked Questions
Is It Better to Fix Foundation Cracks from Inside or Outside?
Outside repairs are better. They stop the water before it enters your home and create more permanent fixes than inside patches.
Are Exterior Foundation Cracks Normal?
Small vertical cracks are normal from settling. Large cracks, horizontal cracks, or multiple cracks signal serious problems needing immediate attention.
How to Tell if A Foundation Crack Is Serious?
Cracks wider than 1/4 inch, horizontal cracks, or cracks that grow quickly are serious. Call a professional for these problems.