Wooden boxes collect dust in homes. Many people want to fix them up, but don’t know where to start. I’ve seen countless folks try to paint wooden boxes only to end up with a messy finish that peels off within weeks.
Good news: painting wooden boxes isn’t hard when you know the right steps. With proper prep work and the right tools, you can turn an old wooden box into something fresh and useful for your home.
In this guide, I’ll show you how to prep, prime, and paint wooden boxes like a pro. My tips will help you avoid common mistakes and get results that last for years.
Are you ready to learn how to make your wooden boxes look brand new?
Let’s get started.
Why Paint a Wooden Box?
Painted wooden boxes serve both practical and visual purposes in homes, making them incredibly versatile additions to any space.
They store small items like jewelry, craft supplies, or keepsakes while adding color and personality to rooms. Painted boxes work well as gift containers, centerpieces, or shelf accents that complement your décor.
Many people use them to organize desk items or bathroom essentials, changing clutter into stylish storage solutions. With the right colors, wooden boxes can match any room style or stand out as focal points that draw the eye and spark conversation.
Key Benefits include:
- Protection – paint shields wooden boxes from moisture, scratches, and daily wear that can damage bare wood
- Preservation – seals the wood, preventing warping and cracking over time
- Aesthetic improvement – hides flaws, knots, and imperfections in cheaper woods
- Design flexibility – unlike stain, paint offers endless color options to fit any home style
- Easy maintenance – painted surfaces wipe clean more easily than bare wood
- Longevity – a good paint job can extend the life of wooden boxes by many years
The change from plain wood to a painted masterpiece not only enhances functionality but also creates personalized storage that reflects your unique style and creativity.
Step-By-Step Guide to Painting a Wooden Box
This guide breaks down the complete process for turning a plain wooden box into a beautiful painted piece.
Materials Used:
| Material | Purpose |
|---|---|
| Wooden box | Base item to paint and decorate |
| Clear glaze medium | Seals wood, turns paint into stain |
| Wood stain (golden oak) | Color box interior with warm tone |
| Blue paint (various shades) | Creates a gradient effect, shows wood grain |
| Posca paint markers | Better coverage for detailed work |
| Gloss varnish | Final coat for vibrant colors and protection |
| Glitter | Adds sparkly accents |
| Decorative washi tape | Creates patterns without painting |
| Paper for inserts | Decorative interior inserts |
| Craft glue | Attaches paper inserts |
Tools Used:
| Tool | Purpose |
|---|---|
| Paintbrushes | Apply paint, stain, and glaze |
| Washi/masking tape | Creates clean lines between colors |
| Design knife | Cuts precise tape shapes |
| Small scissors | Cuts materials to size |
| Paper towels | Clean up spills, control paint |
| Water container | Cleans brushes, thins paint |
| Pencil | Marks design placement |
| Paper palette | Holds paint for detailed work |
| Fine sandpaper | Smooths between coats (optional) |
1. Preparing Your Box

Start with a clear glaze medium as a light sealer for the wood. This creates a good base for paint to stick. Apply the glaze using a soft brush in even strokes. Allow the box to dry fully before moving to the next step.
Mark off different sections of the box using masking tape or washi tape. This helps create clean lines between colors or designs. Press the tape firmly to prevent paint from bleeding underneath.
Pro Tip: sand the Box with Fine-Grit Sandpaper Before Sealing to Remove Any Rough Spots and Help the Glaze Adhere More Evenly to The Surface.
2. Staining Techniques
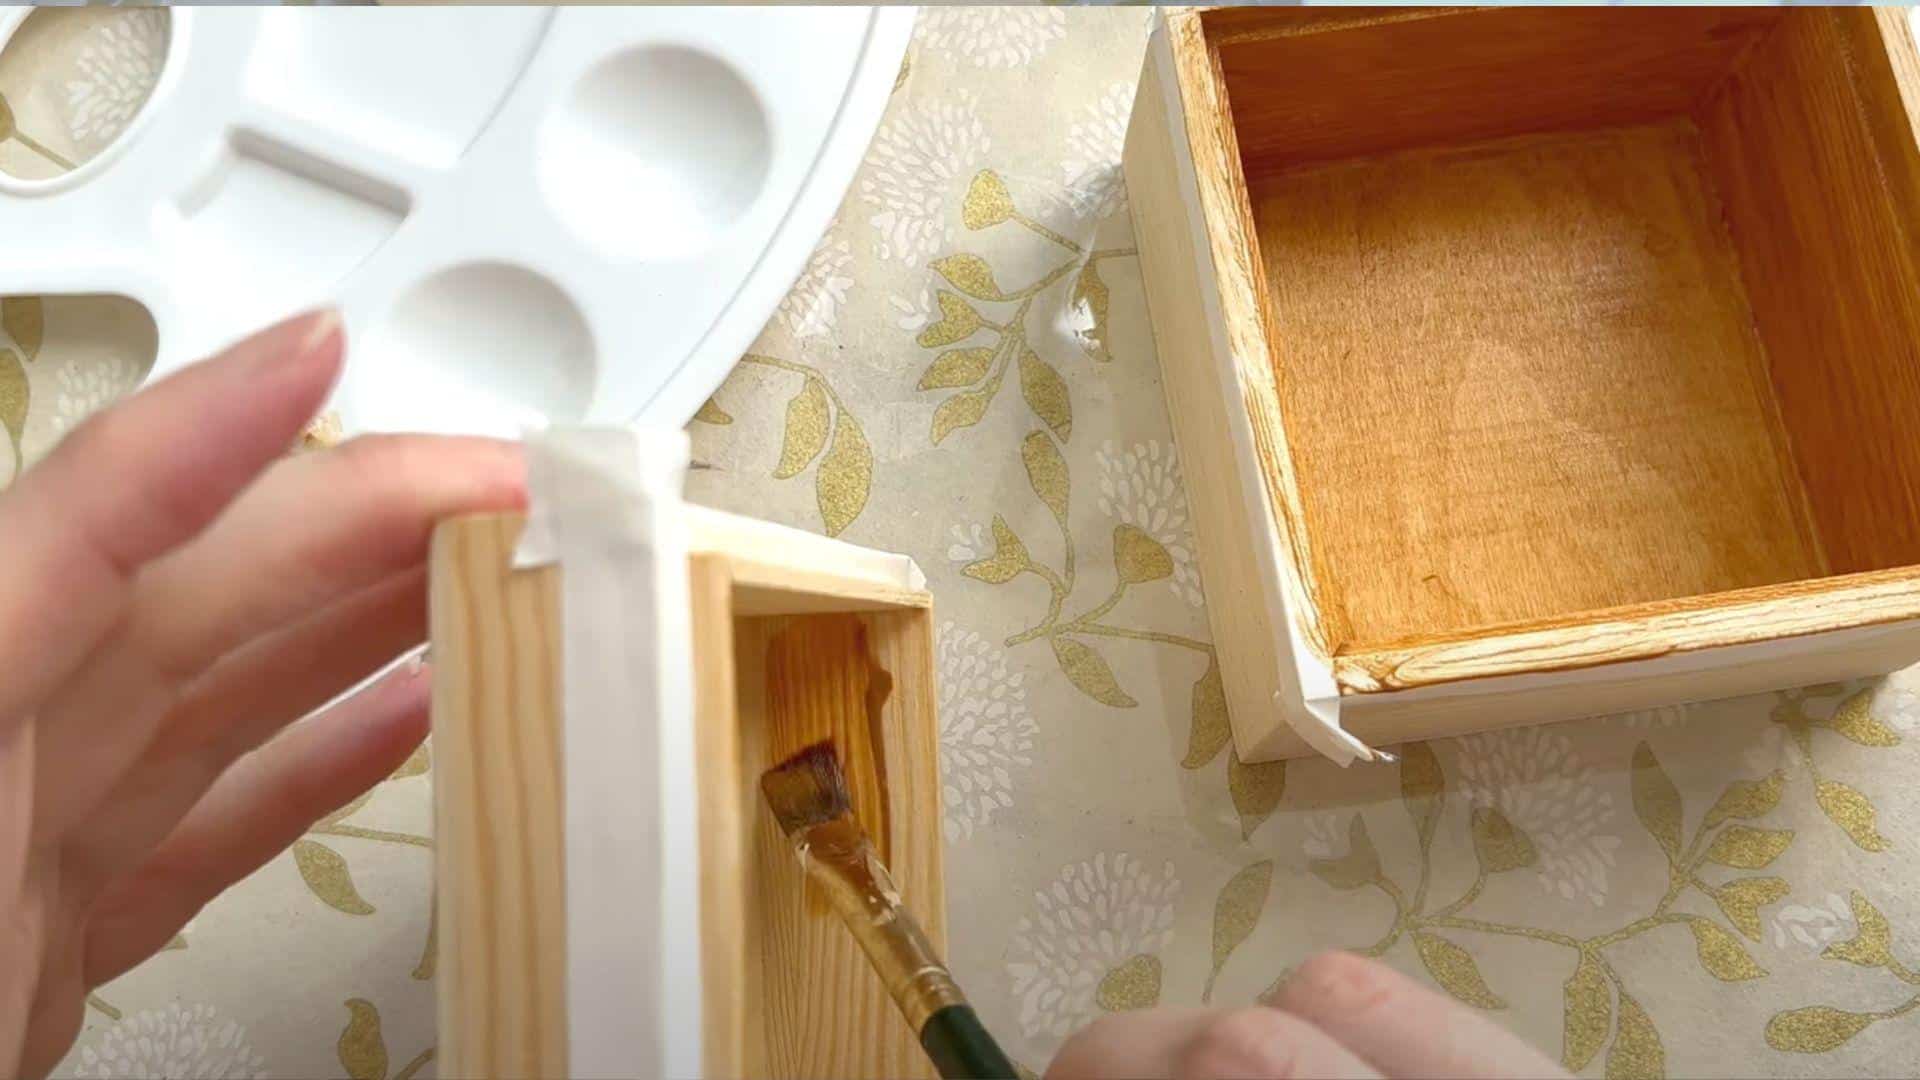
Stain the inside of the box with golden oak color for warmth. Mix clear glaze with blue paint to create a semi-transparent stain effect. This allows the wood grain to show through the color.
Gradually build up darker shades of blue for depth. Start light and add darker tones in layers. Let each layer dry before adding the next shade. Once satisfied with the color, add another layer of clear glaze as a barrier coat.
-
Pro Tip: test Your Stain and Glaze Mixtures on Scrap Wood First to Perfect the Transparency and Color Before Applying to Your Box.
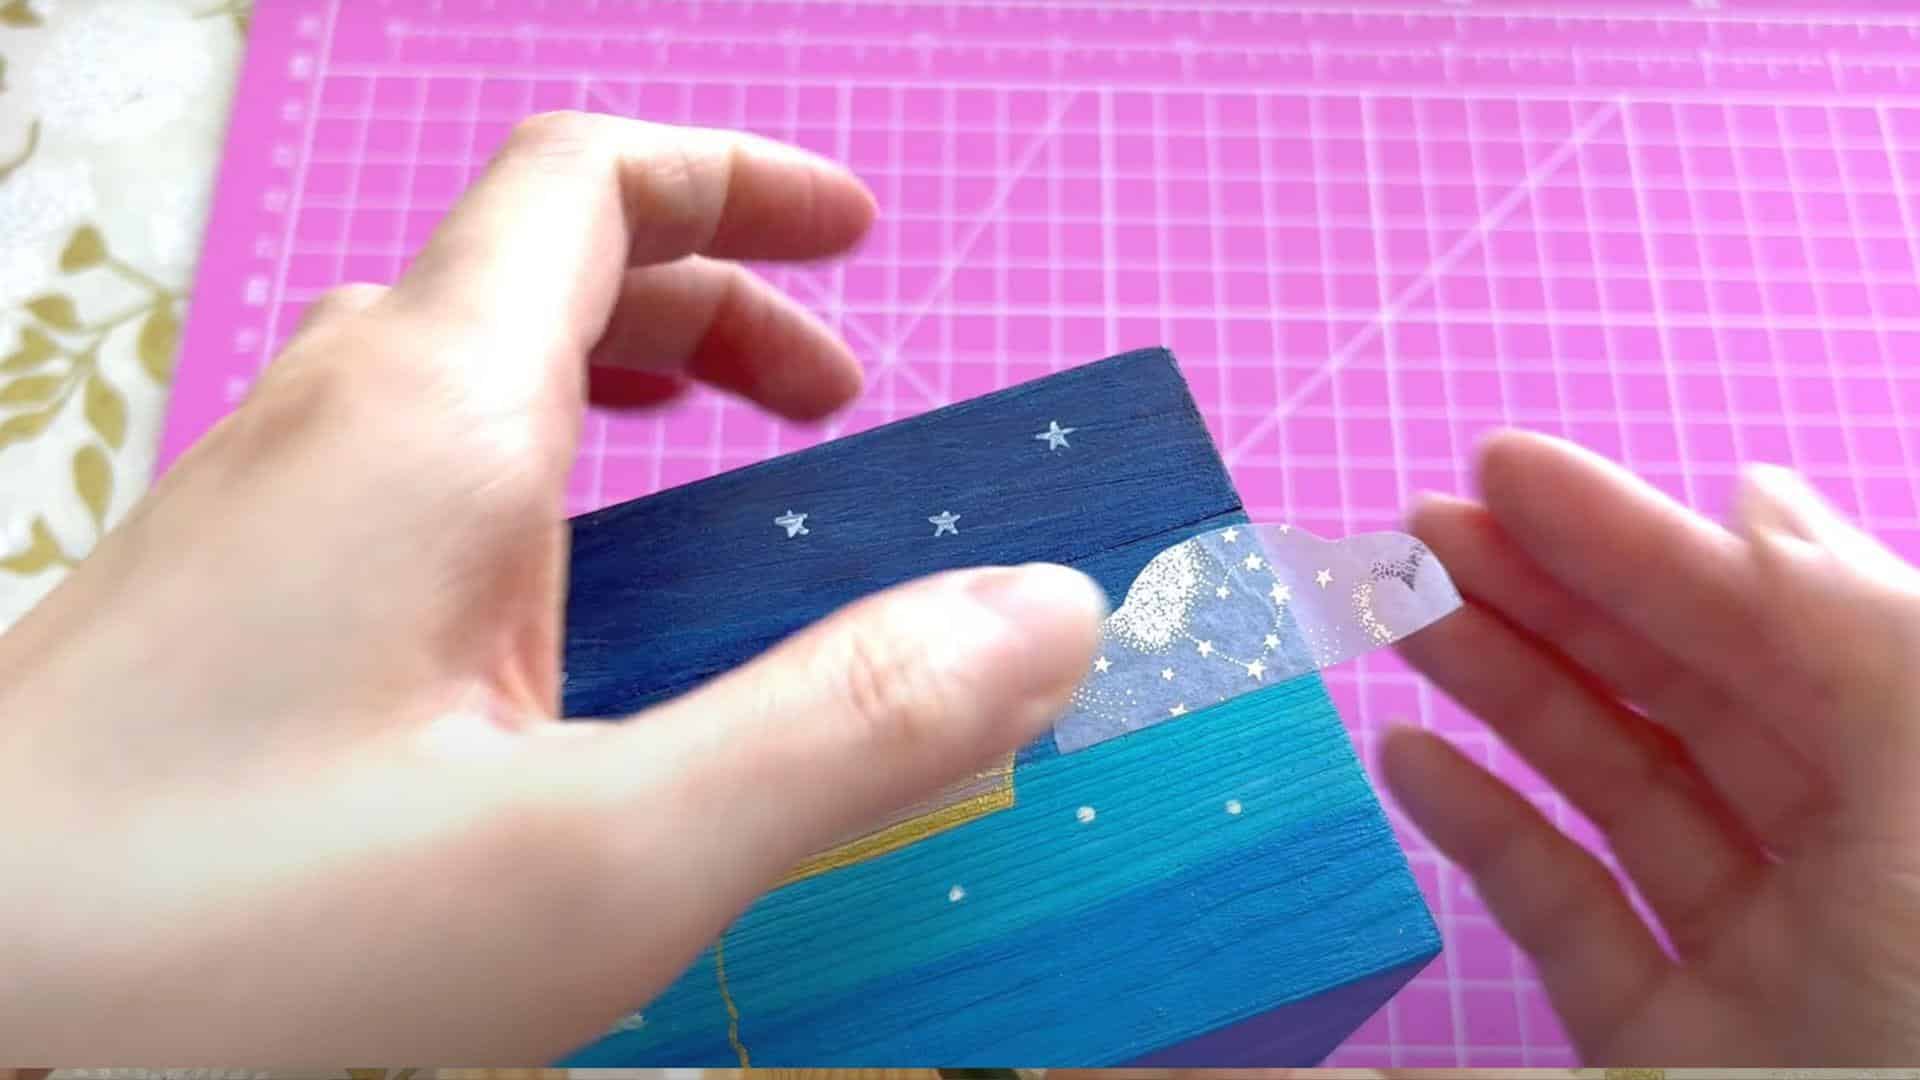
3. Creating the Scene

Plan different views of the same scene for each side of the box. Use Posca markers instead of paint for better coverage on detailed work. These markers work well for small details and precise lines.
Cut shapes from washi tape using a design knife for added patterns. Apply gentle pressure when cutting to avoid damaging the wood beneath. Add small amounts of glitter for special accents in specific areas.
-
Pro Tip: draw Your Scene Design Lightly with A Pencil First, Which Can Be Easily Covered by Paint but Gives You a Helpful Guide for Marker Work.
4. Finishing Touches
Create decorative inserts with washi tape patterns for the top and bottom. Glue these inserts inside the box for a finished look. Apply a final layer of clear glaze before the varnishing stage.
Fix any small details or touch-up areas that need attention. Use gloss varnish as the final coat to make colors look more vibrant. Apply varnish in thin, even coats for best results.
-
Pro Tip: Wait 24 hours between varnish coats and lightly sand with 600-grit sandpaper between layers for a smooth, professional finish.
I’d like to give credit to Azukibean Hobbies for their informative video, which served as a reference for this guide.
Common Mistakes to Avoid When Painting a Wooden Box
The biggest wooden box painting mistakes involve skipping surface preparation and rushing between coats. Use quality tools, proper technique, and patience for a professional finish that lasts.
| Mistake | Solution |
|---|---|
| Skipping surface prep | Sand and clean before painting |
| No primer | Apply primer on raw/varnished wood |
| Overloading brush | Dip the brush tip only, wipe excess |
| Heavy spray coating | Apply multiple light coats |
| Rushing between coats | Wait 2-4+ hours between coats |
| Overworking wet paint | Don’t brush over drying paint |
| Not removing hardware | Remove hinges/clasps first |
| Using cheap tools | Invest in quality brushes |
| Ignoring weather | Paint in ideal conditions |
| Not mixing paint | Stir paint thoroughly before use |
| Wrong paint type | Use quality wood paint |
| Paint in screw holes | Clear holes with a toothpick |
| No surface protection | Cover surrounding areas |
| Poor storage | Store paint in a stable temperature |
Conclusion
Now, you have all the steps to turn an old wooden box into something special. the process might seem like a lot at first, but each step builds on the last one.
When you take your time with prep work, use the right materials, and add your own creative touch, the results speak for themselves.
Why does this matter? A well-painted wooden box not only looks good but lasts longer, too. Your painted box can solve storage needs while adding a personal touch to your space.
What now? Grab that dusty wooden box from your shelf and give it new life with paint. Start with a small box first if you’re new to this. Share your finished boxes in the comments below! What will you store in your freshly painted wooden box?
Frequently Asked Questions
What Paint Is Best for Wood?
Acrylic paint works best for most wooden boxes. It dries fast, comes in many colors, sticks well to wood, and cleans up with water.
Do I Really Need to Prime Wood Before Painting?
Yes, you should prime wood before painting. Primer helps paint stick better, covers stains, and makes your color look brighter with fewer coats.
What Happens if You Don’t Seal Wood Before Painting?
Without sealing, paint peels faster, wood soaks up too much paint, stains bleed through, and you’ll need more coats. The finish won’t last long.