27 Diy Wall Décor that Convert Any Room
Updating your walls with simple DIY projects is a wonderful way to refresh your home’s look without incurring significant expenses.
Whether you’re aiming to add color, texture, or a personal touch, creating your own wall decor can bring warmth and character to any room.
From framed fabric panels to creative photo displays, these ideas use everyday items and easy techniques that anyone can try.
The process offers more than just style; it’s also fun and rewarding, allowing you to enjoy the charm of handmade art while being mindful of your budget.
Let these simple projects inspire you to bring personality and creativity to your walls, tailored to your unique space.
Why Choose DIY Wall Decor?
DIY wall decor allows you to create a space that truly feels like your own, reflecting your unique style and cherished memories.
Creating decor by hand is often more budget-friendly than purchasing ready-made art, allowing you to save money without sacrificing charm.
It also brings a special sense of joy and accomplishment, knowing you made something with your hands. Using found or recycled materials is an added plus, helping the planet by reducing waste.
27 Handmade Wall Decor Ideas for a Personal Touch
Find inspiration with these 27 handmade wall decor ideas. Each project offers a simple, creative way to add meaning, color, and style to your home, making your space feel truly personal and inviting.
1. Framed Fabric Panels
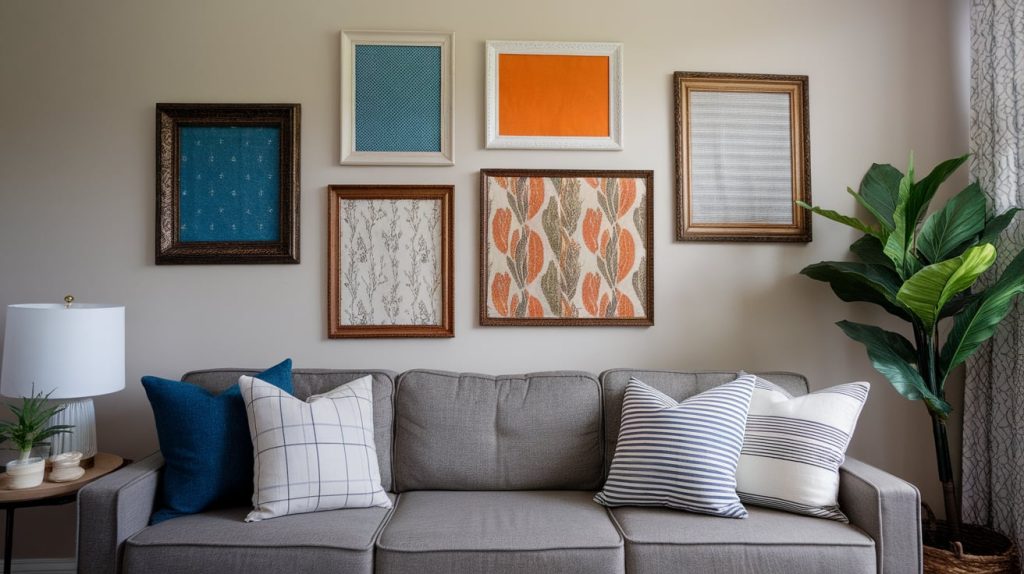
Brighten any wall quickly by repurposing leftover fabric into frames. This is perfect for showcasing bold prints, soft colors, or meaningful textile scraps, and creating a wall that feels uniquely yours.
This approach works in living rooms, hallways, and even bedrooms for a cozy, custom look that’s easy to change up whenever you want.
How to Make:
- Choose patterns or colors that fit your space.
- Cut the fabric to frame size, and iron for neatness.
- Place the fabric in the frame, securing it tightly with tape or the frame’s back.
- Hang solo or group several together for a bigger impact.
2. Pressed Flowers in Glass Frames
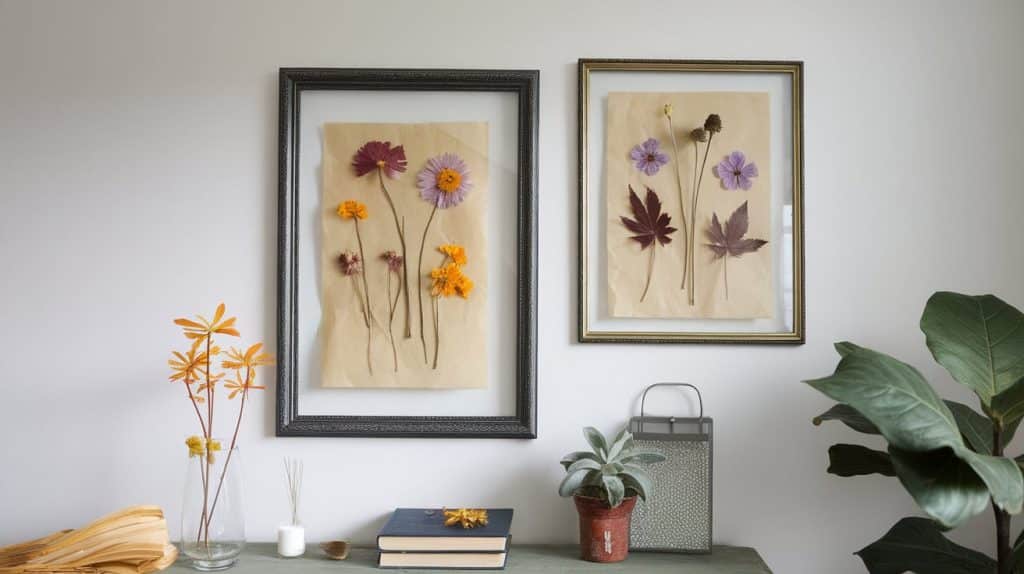
Pressed flowers or leaves add gentle color and the feeling of bringing a bit of the outside in. Each piece works as a memory from a garden walk or a special bouquet, creating wall art that feels timeless and calming in any room.
How to Make:
- Press your chosen flowers or leaves between two pieces of parchment paper in a heavy book for 1–2 weeks.
- Once dry, arrange them inside a glass or floating frame.
- Hang away from direct sunlight to preserve the true colors.
3. Paper Cutout Silhouettes
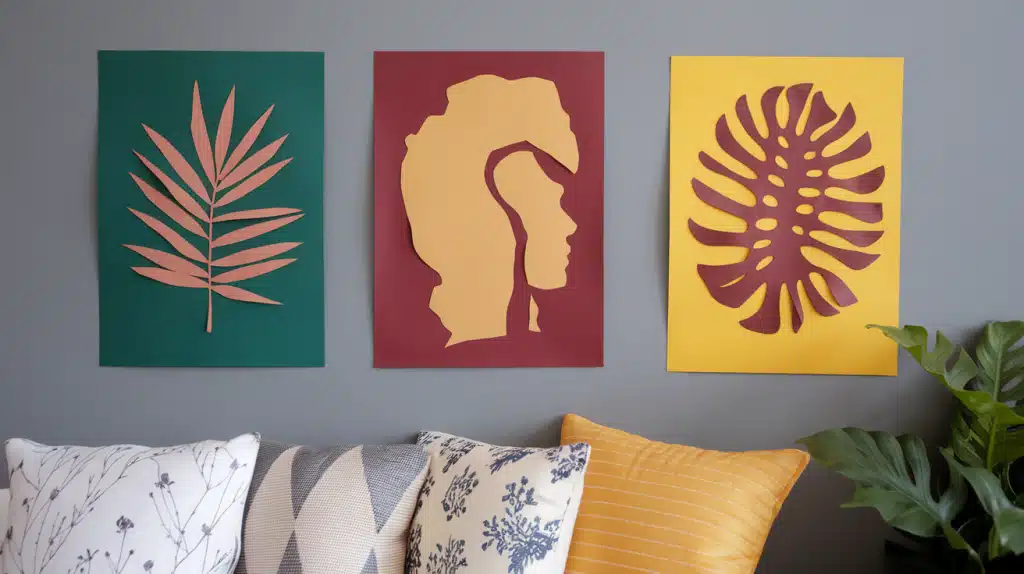
Add graphic flair using handmade paper silhouettes, with shapes like plants, faces, or wildlife—these stand out on walls, catch the eye, and are very easy to switch up as tastes change.
How to Make:
- Trace shapes onto colored paper and cut out with sharp scissors.
- Mount cutouts on contrasting backgrounds.
- Frame or stick them directly to the wall for your desired look.
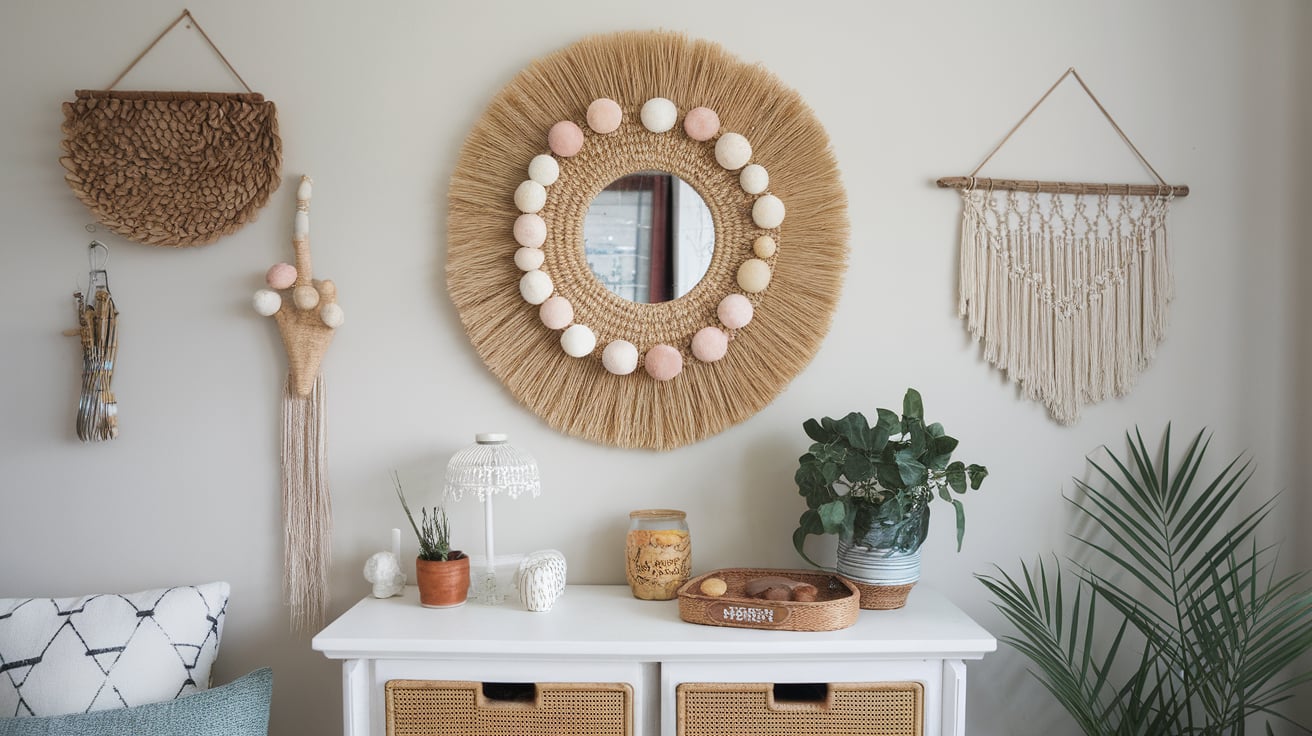
4. Macrame Wall Hanging
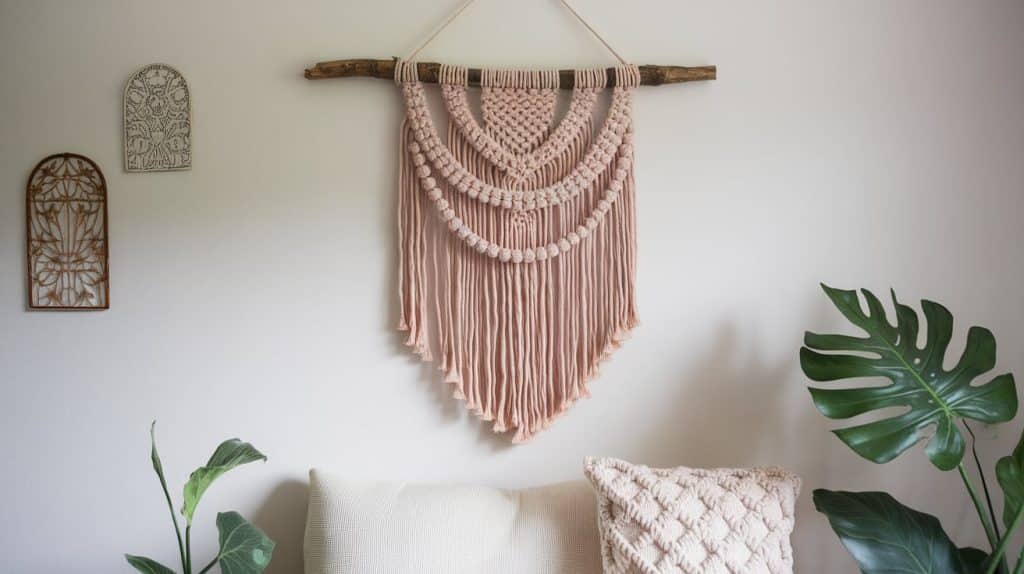
Macrame adds texture and a cozy feel to your space, blending vintage charm with contemporary style. These pieces add softness above beds, on entry walls, or in cozy nooks—all while letting you experiment with knots and color.
How to Make:
- Gather a cotton cord and a stick or dowel.
- Learn a couple of basic knots (square, half hitch) from tutorials.
- Knot cords in rows for patterns, add beads if you like.
- Hang with care using sturdy hooks.
5. Yarn Tassel Garland
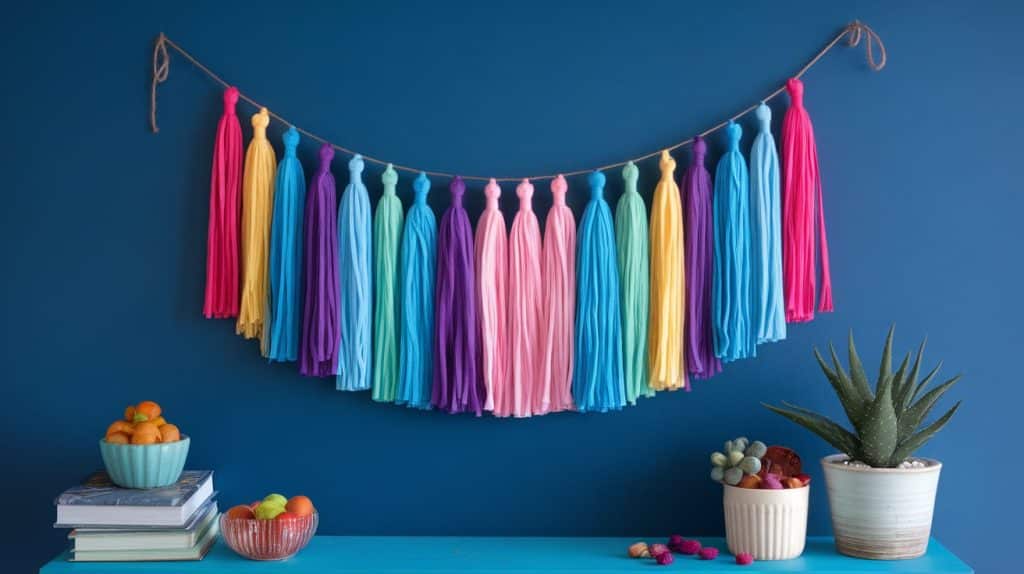
Bring playful movement and pops of color with a yarn garland, great for decorating shelves, doorways, or party spaces, and easily refresh it by changing the yarn shades with the seasons.
How to Make:
- Wrap the yarn around the cardboard, then knot it at the top and cut the bottom loops.
- Trim for even tassels.
- String all onto twine or ribbon and display as a garland.
6. Woven Paper Wall Art
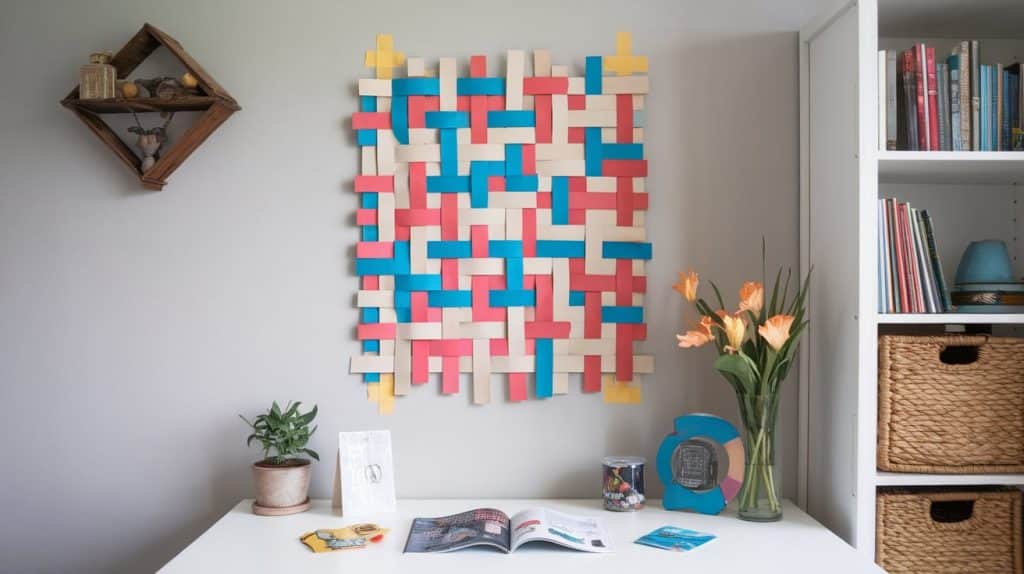
Turn scraps or old magazines into wall art that feels crafty yet modern. The woven texture adds depth, and you can mix colors for a unique touch in home offices, kid zones, or by reading chairs.
How to Make:
- Cut recycled or colorful paper into equal strips.
- Tape vertical strips to a table, then weave others horizontally, one over the next.
- Secure, trim, and frame or mount your new piece.
7. Hanging Wooden Shelves
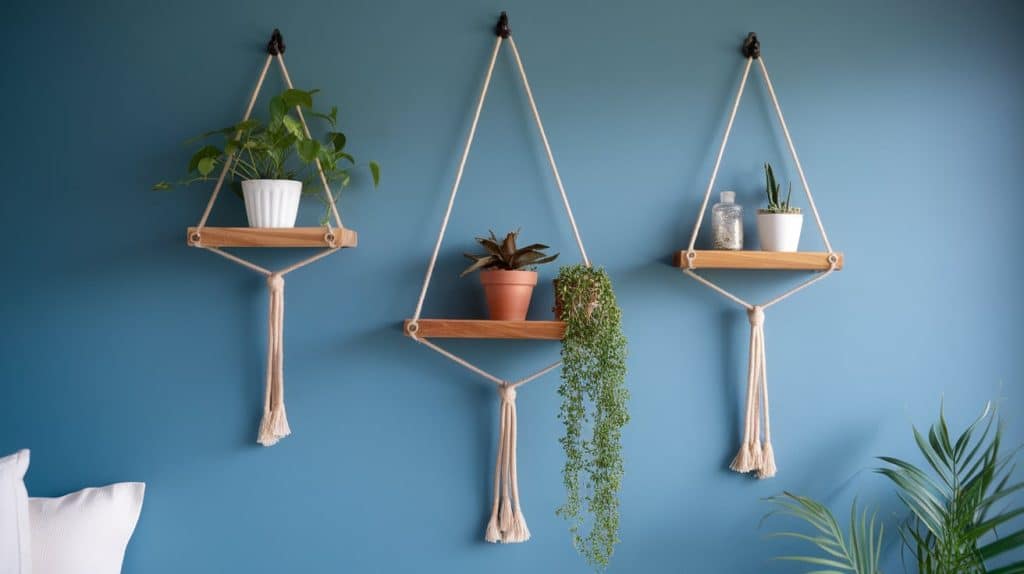
Floating wood shelves bring both function and style, providing a spot for plants, books, or collectibles. These fit anywhere, beside beds, in kitchens, or as a way to fill blank walls with items you love.
How to Make:
- Drill holes in each shelf corner, thread rope through, and knot underneath.
- Hang from wall hooks and check they are level.
- Place small, lightweight decor on top.
8. Pegboard Organizer
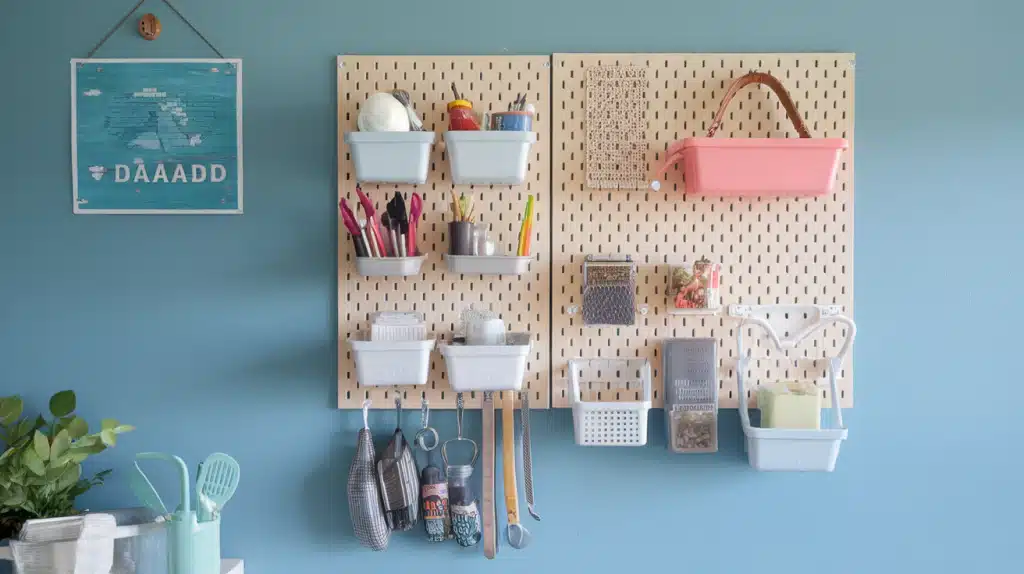
Keep supplies close and add a pop of color with a pegboard as wall art. It’s simple, flexible, and perfect for craft rooms, kitchens, or any other space where clutter tends to accumulate.
How to Make:
- Paint a pegboard in your favorite color.
- Mount it to the wall with screws (preferably in studs).
- Add and rearrange hooks, baskets, and bins as needed.
9. Tray Turned Wall Shelf
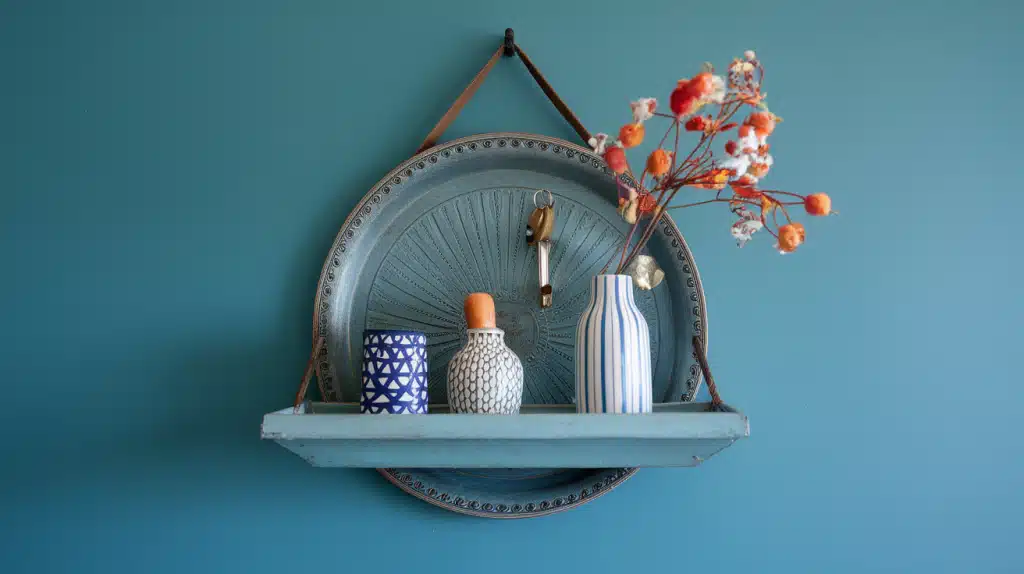
A tray on the wall becomes a cool shelf, perfect for little vases, keys, or small mementos. This idea gives ordinary objects a stylish spot to stand out.
How to Make:
- Find a sturdy tray (wood, metal, or thick plastic).
- Attach securely using heavy-duty adhesive or screws.
- Arrange your favorite objects and check stability before hanging heavier items.
10. Painter’s Tape Mural
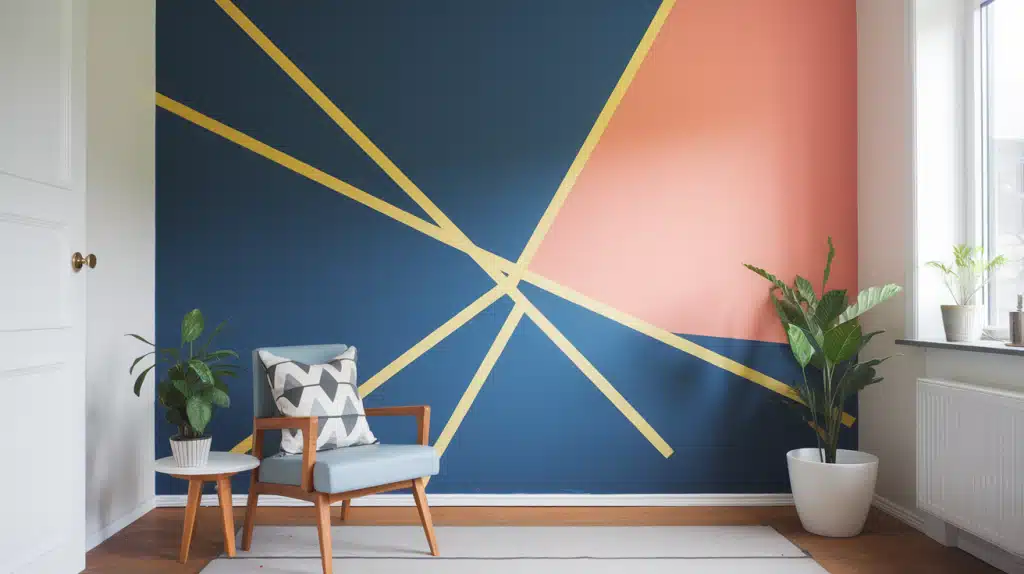
Make a big impression with geometric or playful tape murals. Your wall becomes a canvas for creativity, with endless options based on your chosen shapes and colors.
How to Make:
- Place painter’s tape to mark off lines and patterns.
- Paint inside the lines, let dry, and remove tape slowly.
- Touch up edges for sharp, pro-looking results.
11. Ombre Accent Wall
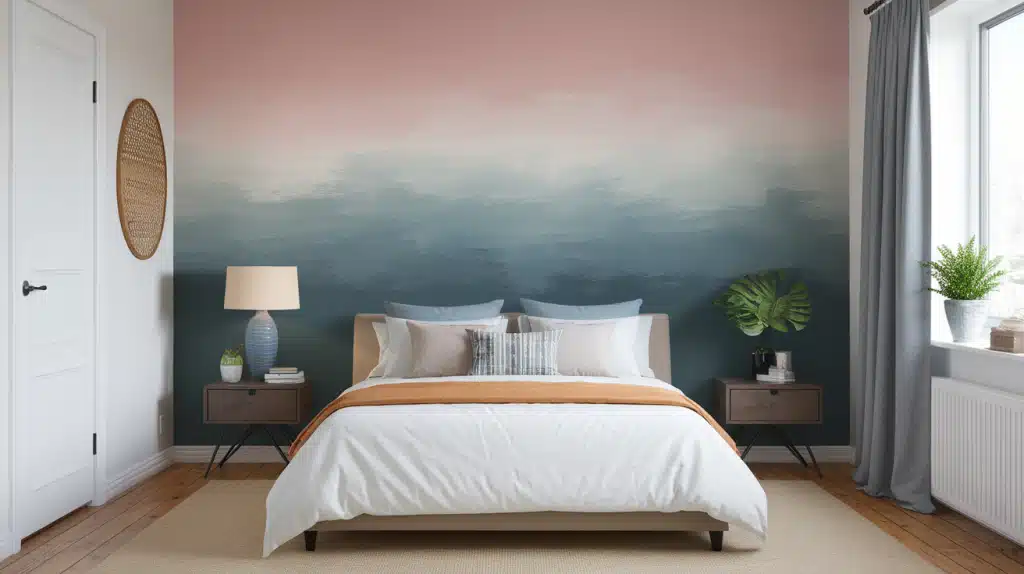
A wall with soft, blended colors brings a soothing atmosphere and helps a room feel bigger or more restful. It’s especially great for bedrooms or reading spaces.
How to Make:
- Choose several shades of one color.
- Paint the darkest at the bottom, blending upward with a sponge or large brush as you move toward lighter colors.
- Keep wet edges for the smoothest transitions.
12. Hand-Painted Quotes
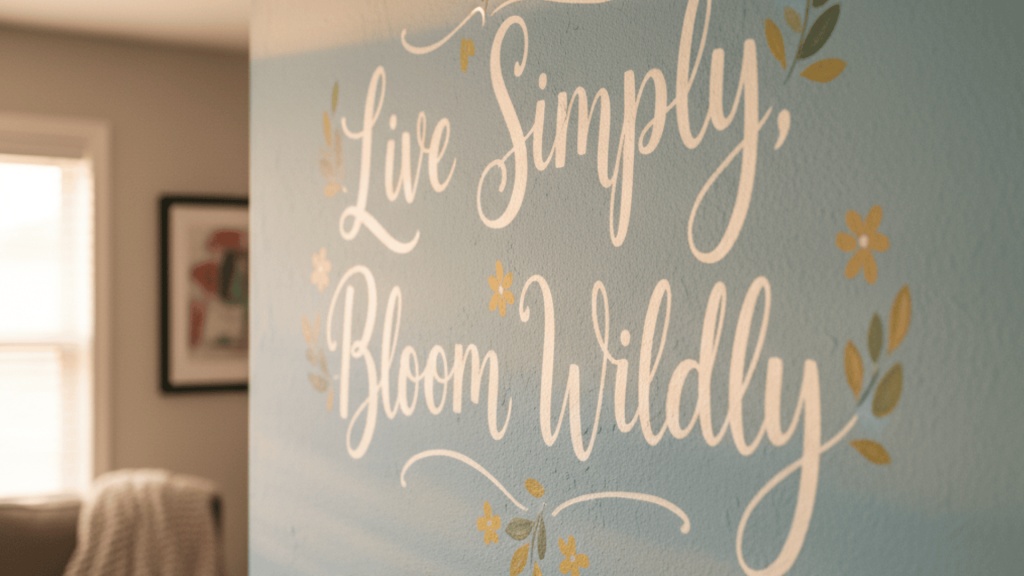
Painted quotes add heart and character to your home, offering encouragement or personality wherever you spot them.
How to Make:
- Sketch your words lightly in pencil on a clean wall.
- Paint over with a steady hand, using brushes or paint pens.
- Add simple details or borders to draw attention.
13. Old Window Frame Photo Display
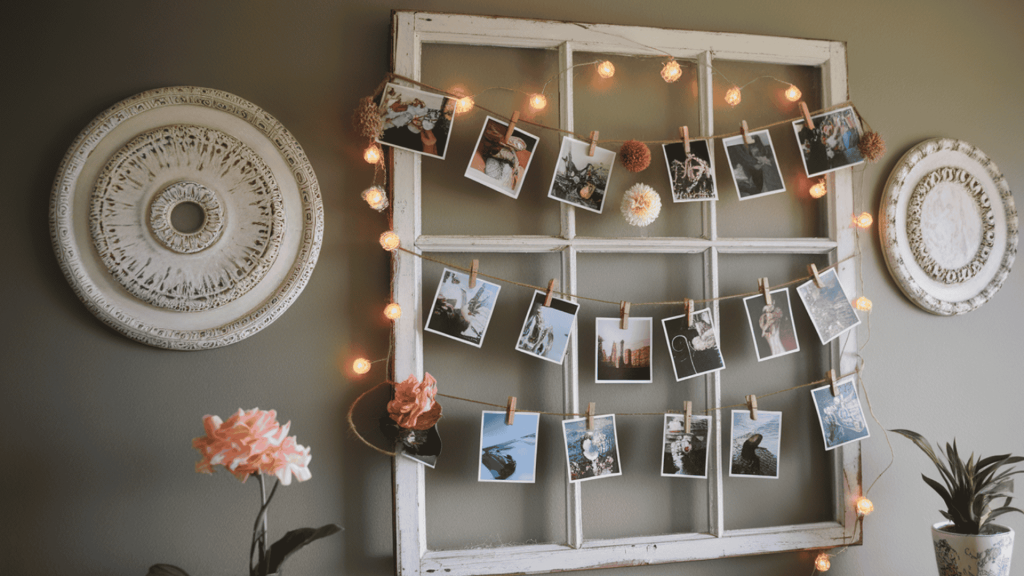
An old window becomes a gallery for photos and keepsakes, adding nostalgia and texture to your space, especially charming in hallways or bedrooms.
How to Make:
- Sand and clean your window frame.
- Stretch twine across each pane and attach with staples or glue.
- Clip or pin photos along each row; consider adding fairy lights or flowers.
14. Vintage Plates Wall Display
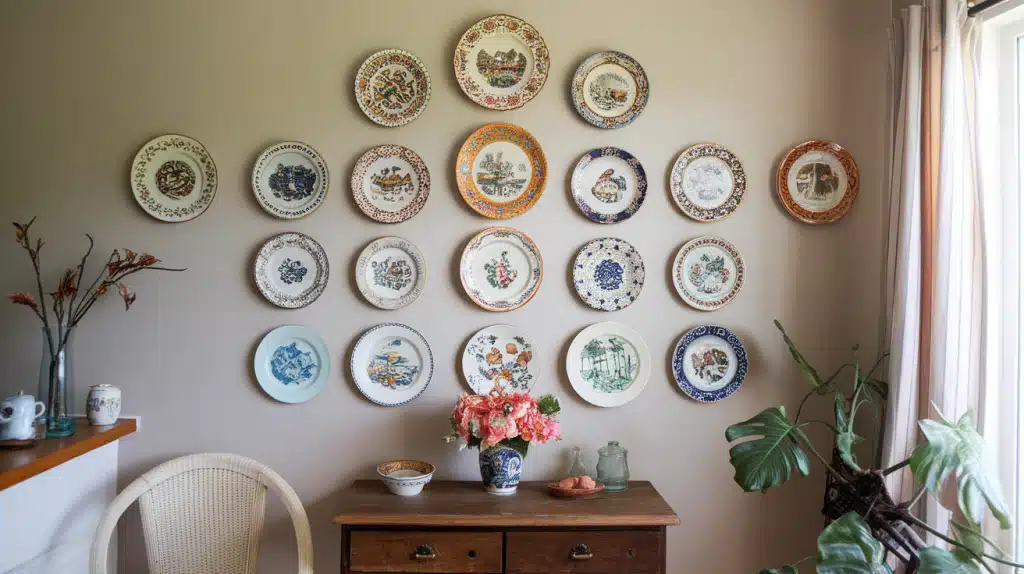
Display pretty plates to add color and history to any room, especially kitchens or dining areas. Mixing patterns and sizes creates interest and warmth.
How to Make:
- Plan your design by arranging plates on the floor first.
- Hang plates with plate discs or wire hangers.
- Layer big and small plates for variety, swapping some for fun as seasons change.
15. CD Mosaic Wall Art
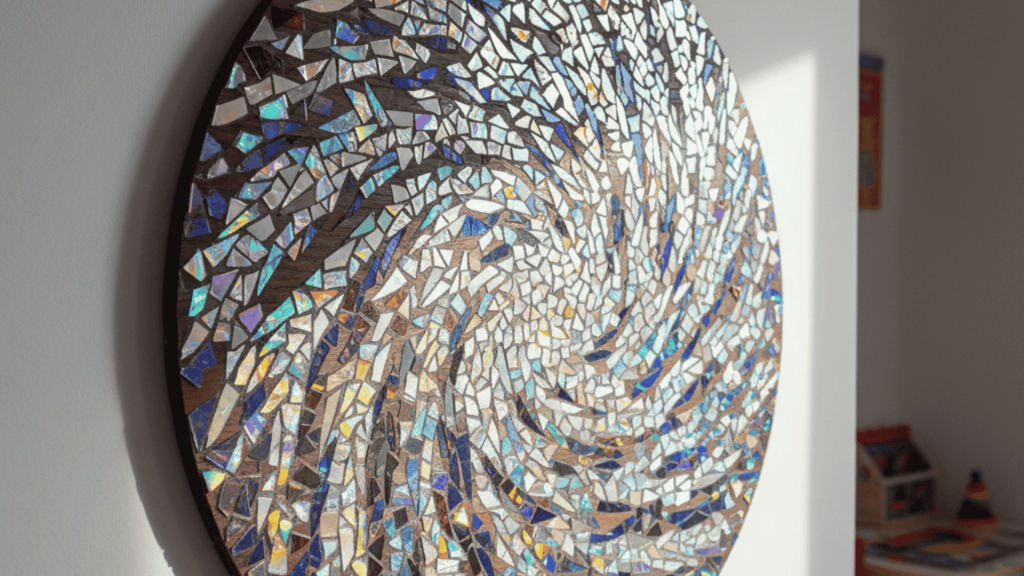
Old CDs, cut and reimagined, become shiny mosaic tiles that bounce light and color—an easy, green way to make art for bedrooms or playrooms.
How to Make:
- Cut CDs into bits with sharp scissors (wear gloves).
- Arrange on a board and glue in a pattern you like.
- Wipe off glue smudges before they set.
16. Driftwood Sculpture
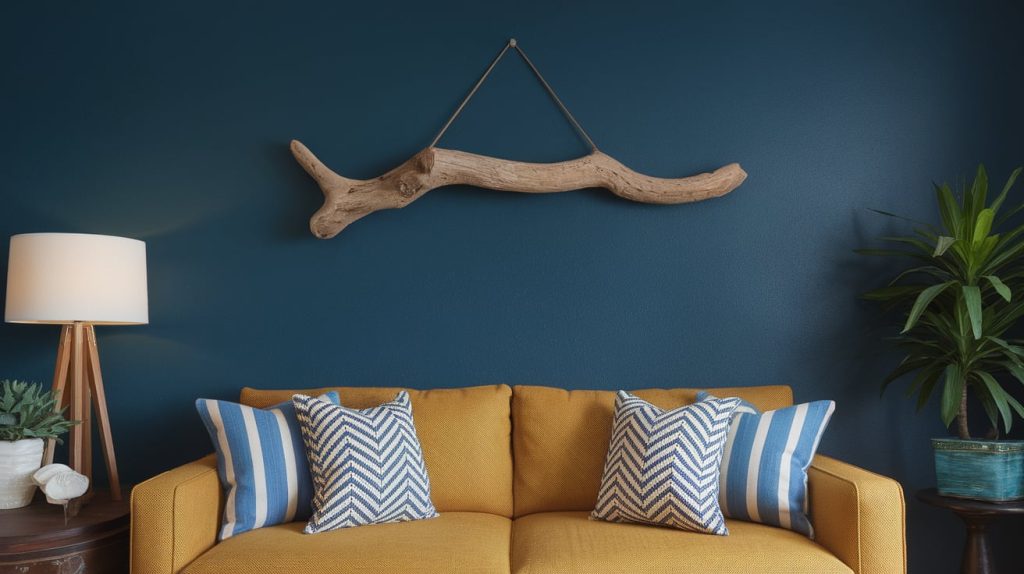
Each piece of driftwood brings nature’s shapes indoors. Hanging or mounting driftwood adds a touch of earthiness to walls, completely changing the vibe.
How to Make:
- Clean and dry driftwood completely.
- Arrange on a backing, glue down, or hang with hooks.
- Add shells or stones for an extra coastal touch.
17. Branch with String Lights

Wrap a branch in string lights, and you give a gentle, cozy glow to your space, ideal for bedside or quiet nooks.
How to Make:
- Select a sturdy, dry branch and wrap fairy lights around it.
- Attach to the wall with hooks, letting lights drape loosely.
- Hide the battery pack or cord for a neat look.
18. Hanging Plant Grid

Bring greenery off the floor with a grid of small pots, ideal for kitchens or apartments, adding color and fresh air with almost no clutter.
How to Make:
- Mount a grid or trellis on your wall.
- Use S-hooks or strong string to hang small, light pots.
- Plant easy-care varieties, such as succulents or herbs.
19. Polaroid Fairy Light Wall
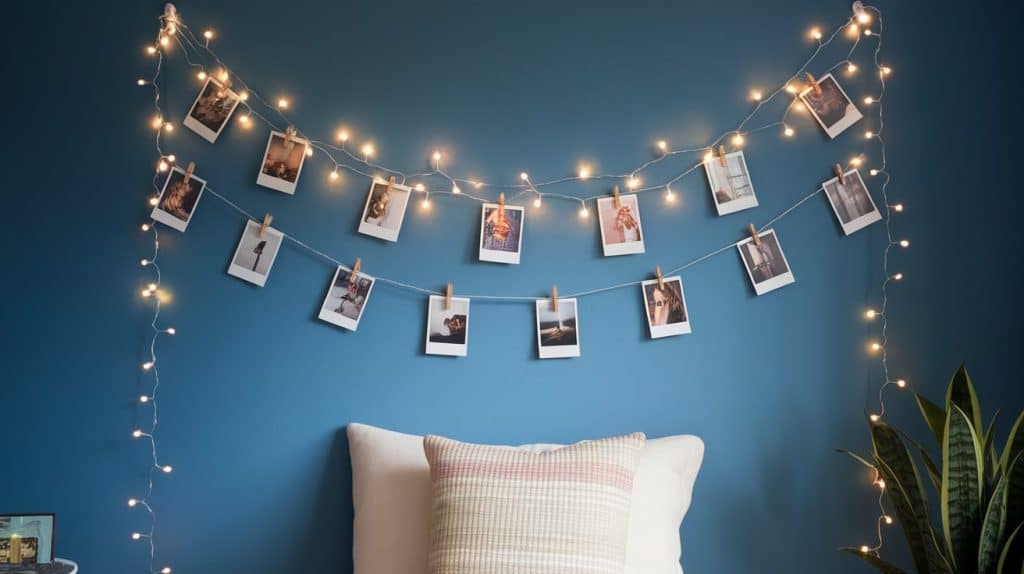
Showcase your favorite faces and moments, along with a soft glow, with an easy-to-assemble fairy-light photo wall. It’s perfect for bedrooms or creative spaces.
How to Make:
- Hang fairy lights in lines or waves on the wall.
- Use clips or small clothespins to attach Polaroids to the string.
- Swap out photos whenever you fancy a change.
20. DIY Clip Frame from Hangers
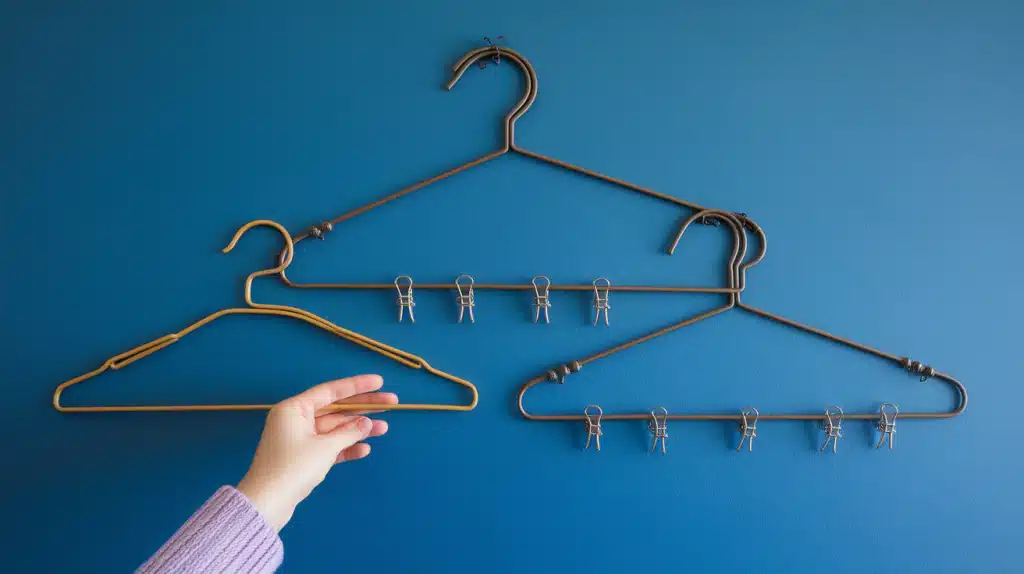
Turn wire hangers into quirky frames for art and photos. This project allows you to switch your wall display at any time for a fresh story.
How to Make:
- Bend hangers into flat or fun shapes.
- Attach small clips or pegs along the bottom bar.
- Hang and fill with rotating photos or notes.
21. Photo Collage Canvas
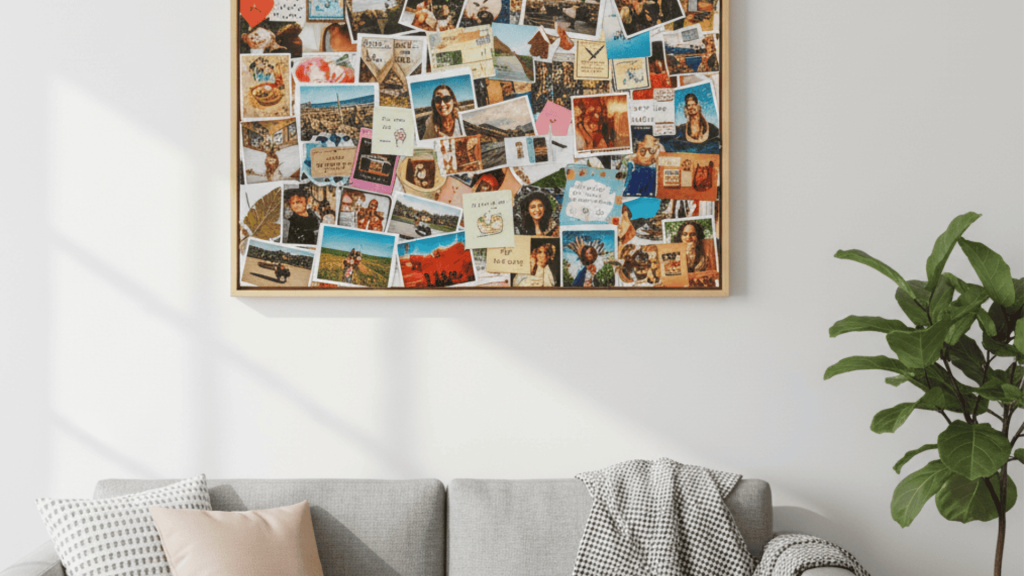
Collect memories and bring them together in a canvas display, a personal touch for halls, entryways, or above the couch.
How to Make:
- Lay out printed photos in your chosen arrangement.
- Glue down, overlapping edges.
- Add extras like ticket stubs or little notes and coat with Mod Podge for a smooth finish.
22. Chalkboard Paint Wall Section
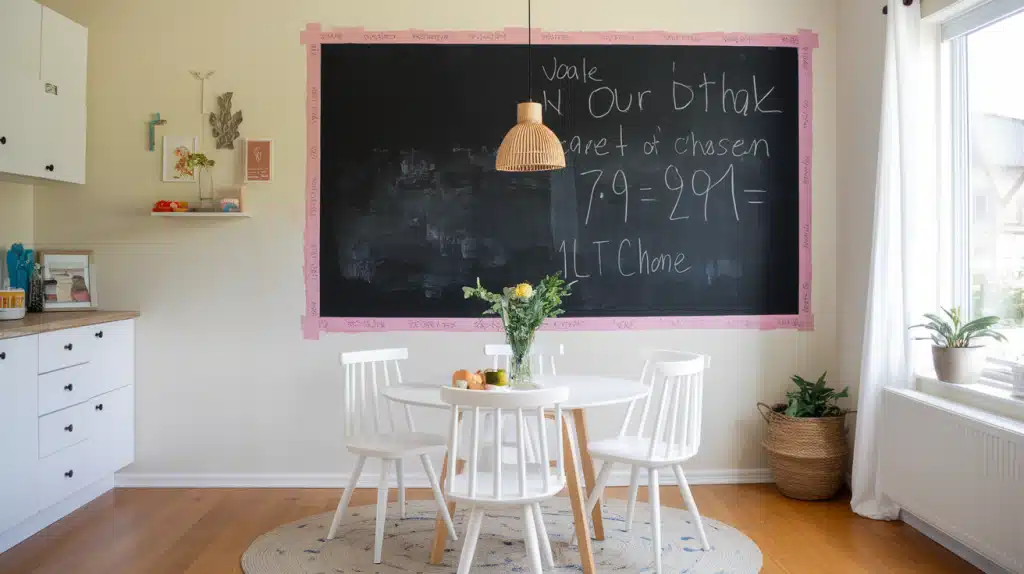
A chalkboard section keeps creativity or to-do lists front and center, and it works for all ages—great for kitchens, playrooms, or command centers.
How to Make:
- Tape off your chosen section and paint with chalkboard paint.
- Let dry, then “season” with chalk by fully covering and wiping clean.
- Write or draw with chalk, cleaning as needed.
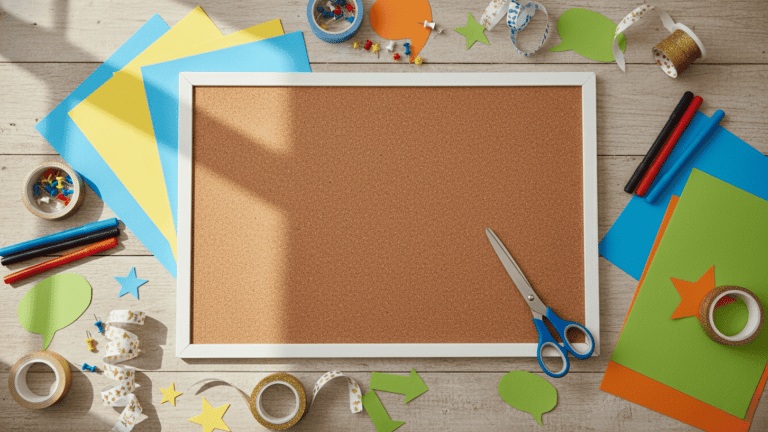
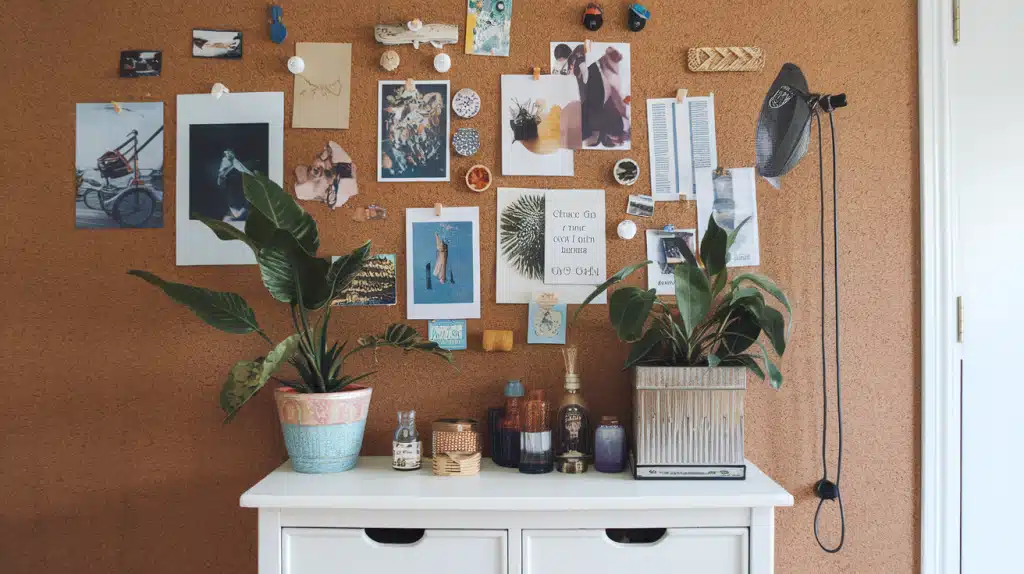
23. Corkboard Art Wall

Change up your mood board, pin inspiration, or organize reminders with a cork wall that’s as flexible as life itself.
How to Make:
- Attach cork tiles or a roll to your wall with strong adhesive.
- Paint or cover with fabric for more style.
- Pin new photos, lists, or cards at any time.
24. Paper Plate Animal Art
Kids craft colorful animal faces from paper plates, making wall art for bedrooms, playrooms, or classrooms that’s as cheerful as it gets.
How to Make:
- Paint plates in animal colors.
- Cut and glue on ears, noses, and features from paper or felt.
- Hang with a string or attach directly to the wall for a playful collection.
25. Sunburst Mirror with Skewers
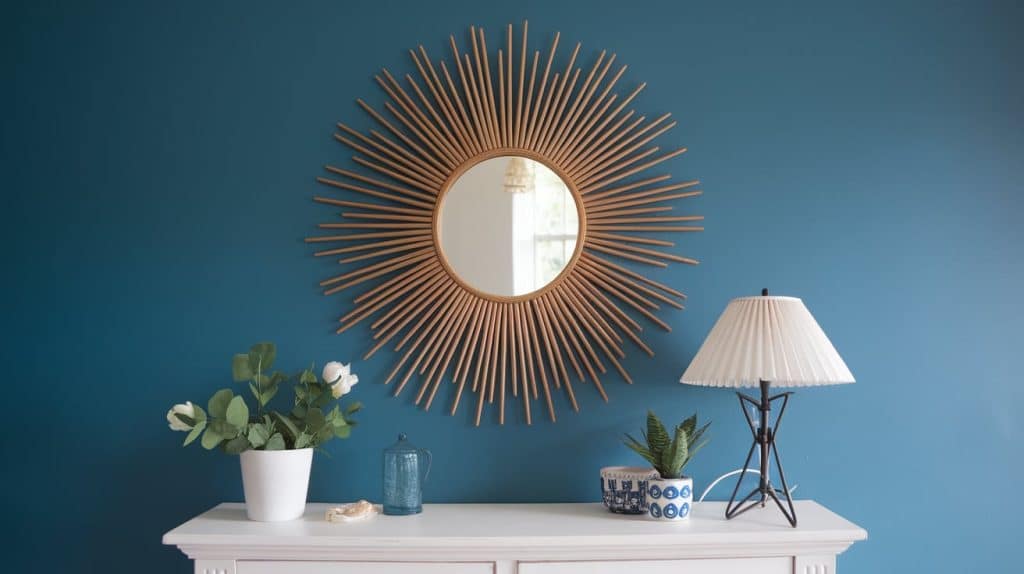
A sunburst mirror adds vintage flair and brightness to any room, especially when placed over a mantel or dresser.
How to Make:
- Paint wood skewers in your favorite shade or gold.
- Apply glue around the edge of a small mirror to create a sunburst effect.
- Attach a wall hook and hang it where it will catch natural or lamp light.
26. Large-Scale Splatter Art
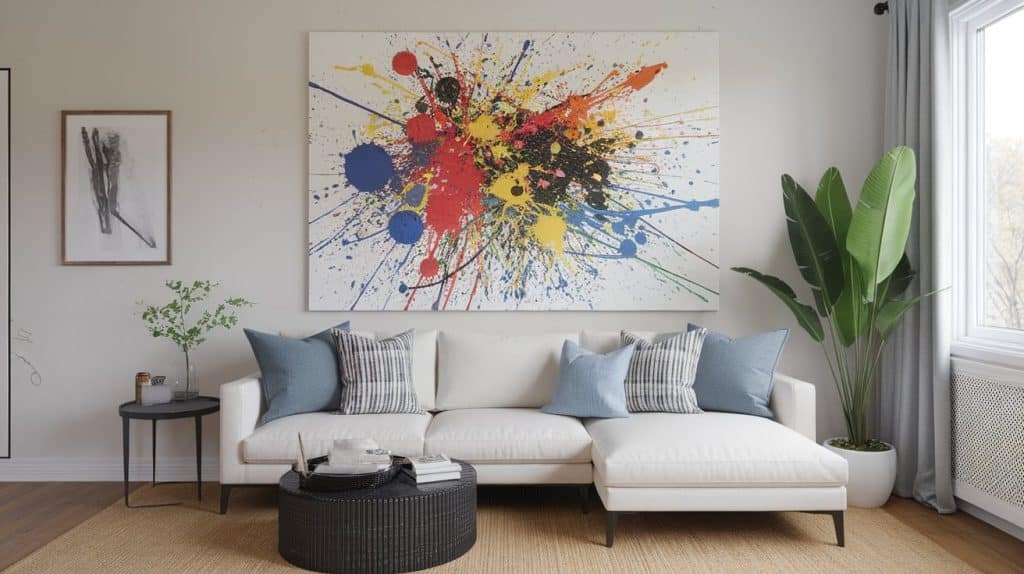
Make a statement with big, bold splatter art that fills any empty wall with energy, color, and your own personality, no art skills needed.
How to Make:
- Lay a tarp to catch drips, and place your canvas flat.
- Dip brushes or sponges into paint and fling or flick them onto the canvas.
- Let it dry fully and mount the canvas where it stands out.
27. DIY Neon-Effect Sign with EL Wire
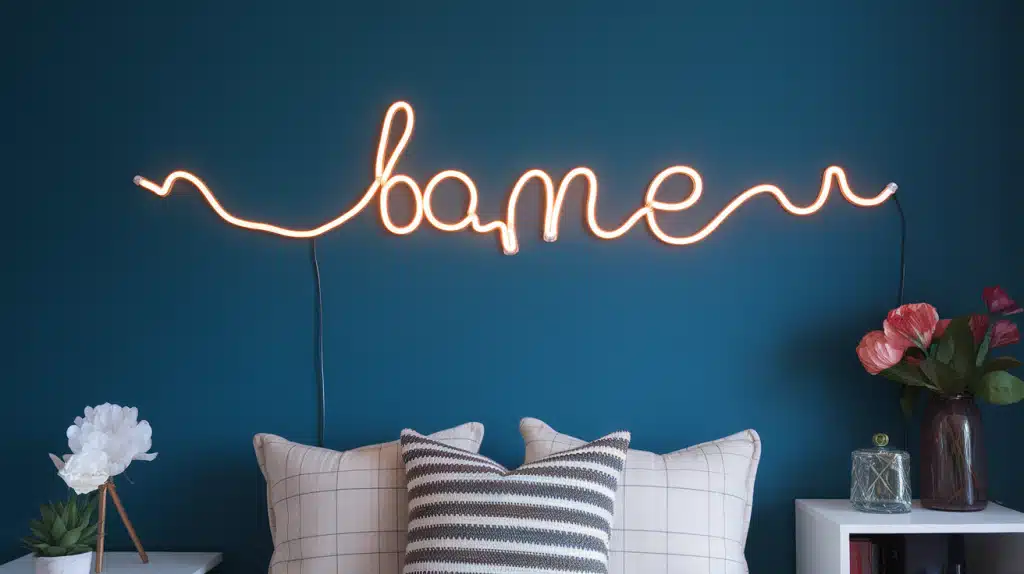
Create glowing words or shapes for a fun, modern wall feature, perfect for bedrooms, parties, or any space that needs a touch of light and fun.
How to Make:
- Draw your design or message on a board.
- Bend EL wire to match, securing with glue or in small notches.
- Hide the battery pack and switch on for instant light.
- Update or reshape the wire whenever you’re ready for a new look.
Matching DIY Wall Decor with Your Home
To match your DIY wall decor with your home’s style, use colors that complement what’s already in your space, and select shades from your furniture or favorite accents.
Try mixing different textures, like pairing soft textiles with simple wooden or metal pieces, to create more balance and keep things interesting.
It also helps to blend new handmade items with older finds, so your walls tell a story that feels lively and unique, without clashing or looking out of place.
Conclusion
Creating DIY wall decor is a perfect way to add personality, color, and warmth to your home without breaking the bank.
These budget-friendly projects use simple materials and straightforward steps that anyone can master, making it enjoyable to experiment and personalize your living space.
Remember, DIY decor is about enjoying the creative process and adding your own unique touch—perfection isn’t the goal. Start with small projects to discover the joy and personal style that handmade art brings to your walls.
Ready to refresh and transform your space? Pick one of these creative ideas and get started today. Don’t forget to share your finished creations on social media to inspire others in their home decorating journey!