DIY Mudjacking: Lift Sunken Concrete Step by Step
Is your driveway creating dangerous trip hazards with uneven concrete slabs? You’re not alone; millions of homeowners face this frustrating problem when soil settles beneath their concrete surfaces.
This method can solve the issue without costly replacement or contractor fees.
It offers a practical solution that saves you thousands of dollars while restoring your concrete to its original level.
With the right tools and step-by-step guidance, you can tackle this project over a weekend. Through every aspect of it, from identifying suitable repair areas to completing the final cleanup.
You’ll learn when this method works best, what tools you need, and how to avoid common mistakes.
What is Mudjacking?
Mudjacking is a concrete repair method that lifts sunken slabs back to their original position. This process involves pumping a mixture of water, soil, and cement under the concrete through small holes.
The technique works by filling empty spaces beneath concrete slabs that have settled or washed away.
DIY mudjacking solves this problem by drilling holes, mixing the slurry, and pumping it under pressure until the concrete lifts to the right level.
This method costs much less than replacing entire concrete sections and provides a permanent repair solution.
Why Choose DIY Mudjacking?
DIY mudjacking offers several benefits over hiring professional contractors or replacing concrete entirely. Cost savings rank as the top reason homeowners choose this approach.
It offers significant cost savings compared to professional services that charge $300-$600 per section. DIY costs only $50-$150 for materials and equipment rental, saving you 70-80% on repair costs.
The repair process takes 2-4 hours for most projects, with concrete ready to use within 24 hours.
This beats concrete replacement, which takes weeks and costs thousands.
The basic technique is simple to master, and repairs last 8-10 years when done correctly.
Tools & Materials You’ll Need
Having the right tools and materials ensures the project runs smoothly and safely.
| Category | Items Needed |
|---|---|
| Essential Tools | Hammer drill, masonry bits (1.5″), grout pump, level, measuring tape, bucket |
| Slurry Materials | Portland cement, sand, water, and optional soil or clay for filler |
| Safety Gear | Work gloves, safety goggles, dust mask, durable work boots |
Reminder: Call 811 before drilling to locate underground utilities. Always wear protective gear throughout the project.
Step-by-Step of the DIY Mudjacking Process
Follow these steps to complete it safely and effectively. Each step builds on the previous one to ensure proper concrete lifting.
Take your time and follow safety guidelines throughout the process.
1. Inspect and Plan
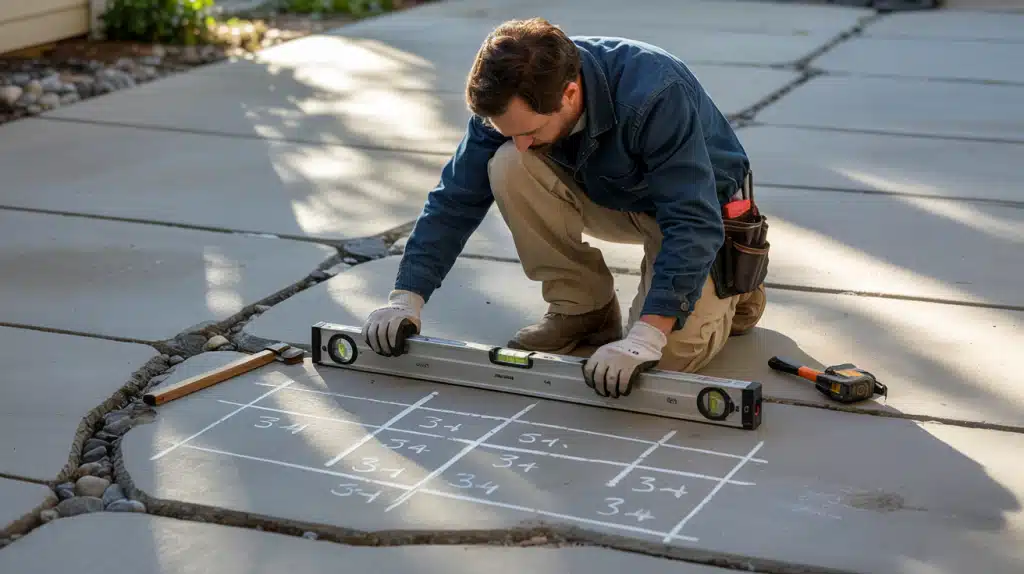
Start by carefully examining the slab for cracks, hollow sounds, and visible sinking. Walk across it with a level or straight edge to spot low points.
Once you’ve mapped out the problem areas, mark where you’ll drill in a grid pattern spaced 3-4 feet apart.
Check the weather forecast to ensure dry conditions for at least 24 hours after completion.
Take photos of the problem areas to track your progress during the repair process.
Pro Tip: Use chalk or painter’s tape to mark your drill spots for easy adjustments.
2. Drill Access Holes
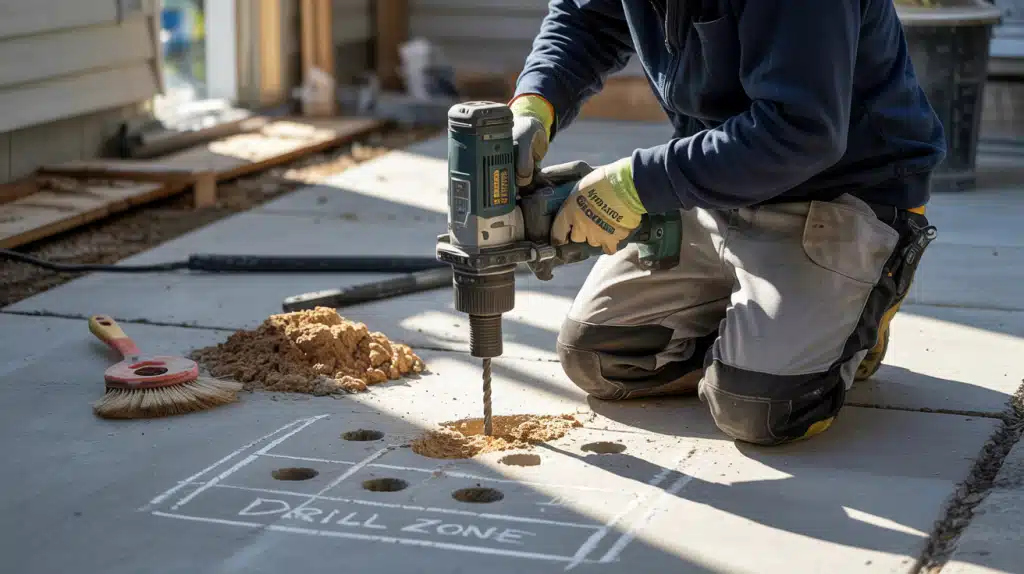
Drill clean holes through the slab at the marked points using a hammer drill and 1.5″ masonry bit. Keep the drill steady and perpendicular to avoid chipping the edges.
Make sure to clear out dust and debris from each hole to prevent clogging when you pump the slurry.
Start with the lowest areas first to establish your baseline for lifting.
Double-check that each hole goes completely through the slab but doesn’t damage any underlying materials.
Pro Tip: Work in short bursts when drilling to keep your bit cooler and cut faster.
3. Prepare the Mudjacking Slurry
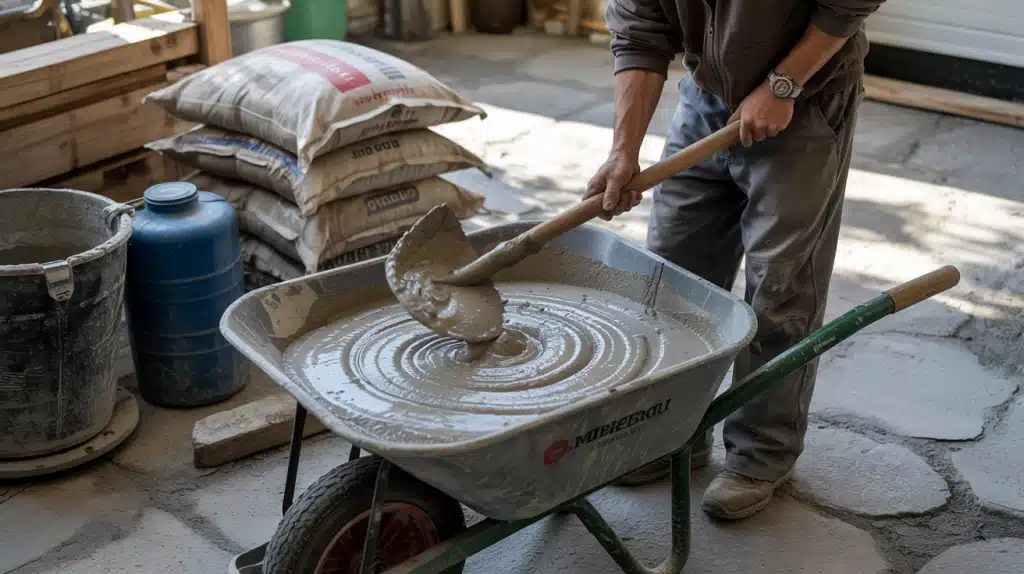
Mix a blend of 1 part Portland cement, 4 parts sand, and just enough water to create a thick, pancake-batter consistency. You can also use a commercial mudjacking mix if available.
Mix in small batches so it doesn’t start setting before you’re ready to pump.
Test the consistency by lifting some with a stick; it should hold together without being too thick or too thin.
Have extra materials ready since you may need more slurry than initially estimated.
Pro Tip: Add water slowly to avoid ending up with a mix that’s too runny.
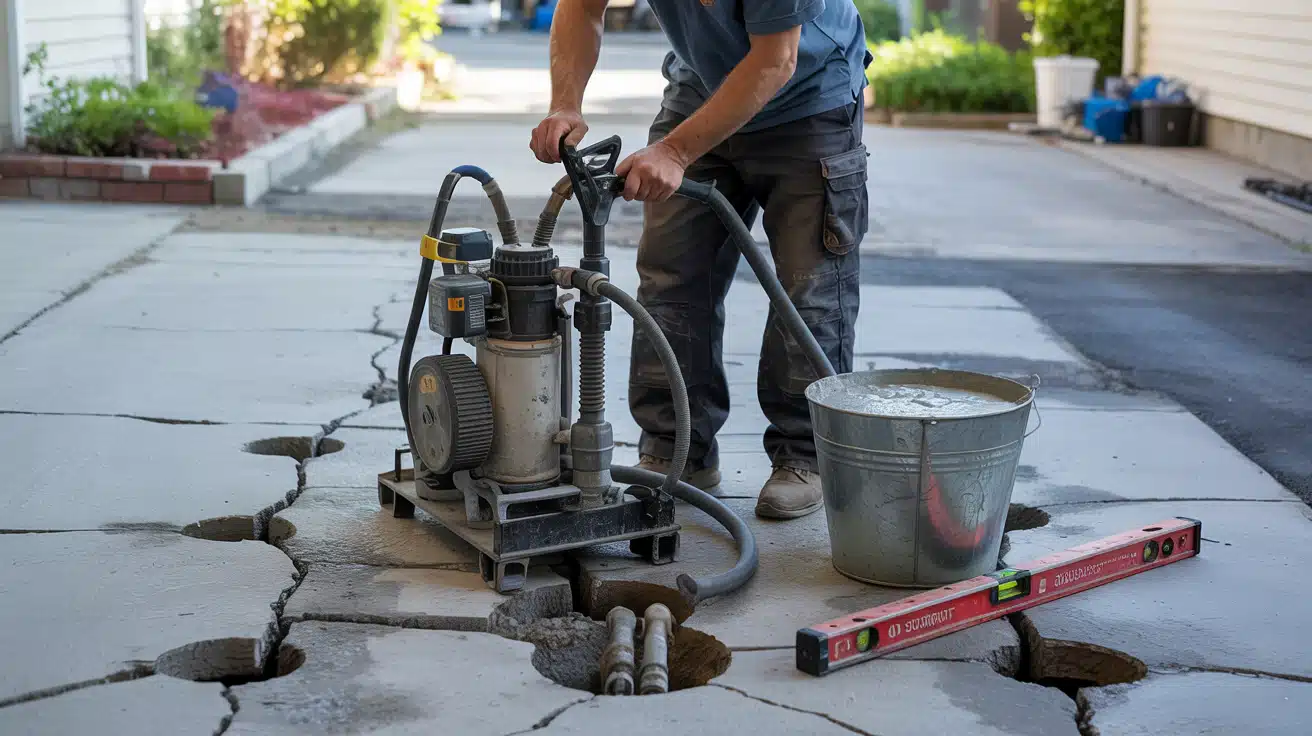
4. Pump the Slurry
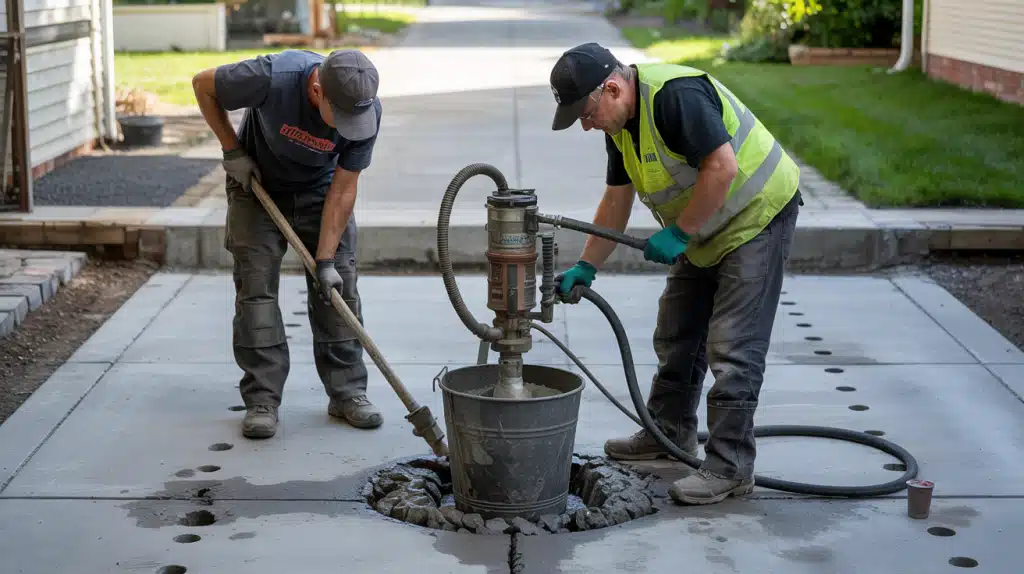
Set up your pump and insert the nozzle into the first hole at the lowest point. Pump the slurry slowly so the slab lifts gradually and evenly.
Work your way across the grid, filling holes as needed, and pause frequently to check the slab height.
Listen for changes in pump pressure that indicate the void is filling up. Stop immediately if you notice any cracking or unusual movement in the concrete slab.
Pro Tip: Have one person pump while another monitors the level for better results.
5. Check Level and Adjust
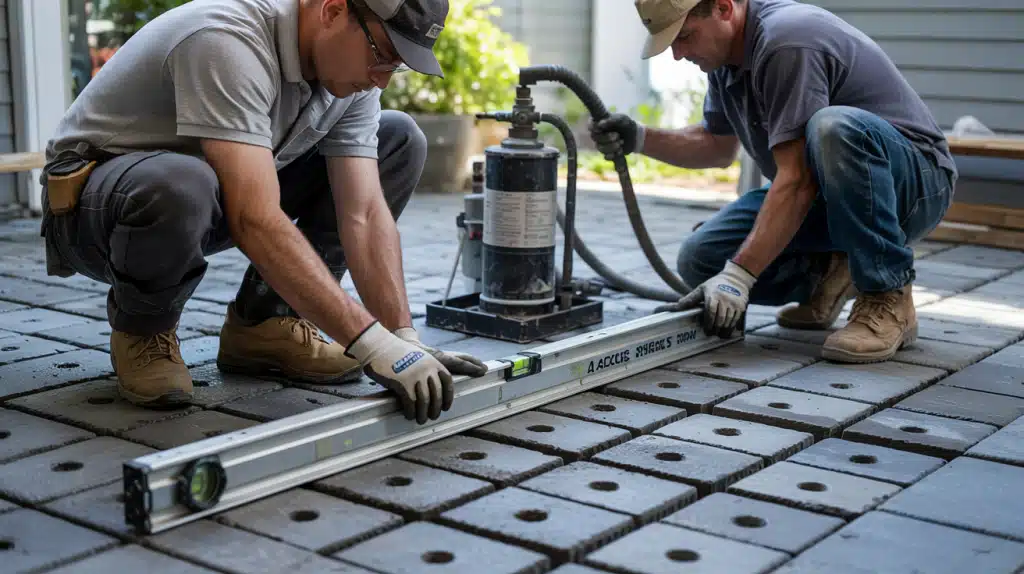
As you pump, stop frequently to check the slab height using a long level or laser level. The goal is to lift slowly, inch by inch. If you see one side rising faster, move to a different hole to balance it out.
Allow the slurry to settle for a few minutes between pumping sessions to prevent over-lifting.
Mark your progress on each section to keep track of which areas need more attention.
Pro Tip: It’s better to under-lift and come back for a second round than to overdo it.
6. Patch and Clean
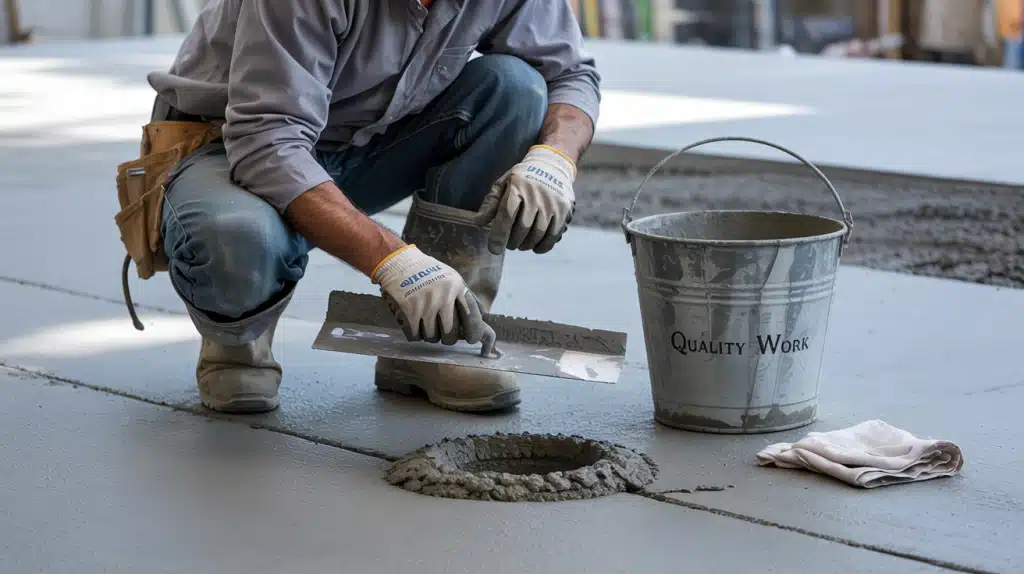
Once the slab is level, fill the drill holes with concrete patch and smooth them out. Clean up any spilled slurry right away before it hardens.
Finally, give the slab a close inspection to confirm it’s solid and even.
Allow the patched holes to cure for at least 24 hours before heavy use. Keep the area moist during the first few hours to ensure proper curing of both the slurry and patch material.
Pro Tip: Lightly mist the patched holes with water after a few hours to help prevent cracking.
When to Consider Hiring a Pro
Some situations require professional expertise rather than DIY mudjacking. Recognizing these scenarios prevents costly mistakes and safety issues.
- Extensive Damage – Major cracks wider than 1/4 inch, settlement exceeding 4 inches
- Safety Concerns – Electrical hazards, structural load concerns, and soil instability
- Equipment Needs – High-pressure systems, specialized mixing equipment
- Access Issues – Tight spaces, underground utilities, and property line problems
Common Mistakes to Avoid
Taking shortcuts or overlooking small details during concrete leveling can lead to uneven results, wasted materials, or even damage to the slab.
With a little extra attention and steady pacing, you can avoid costly missteps and complete the job with confidence.
Key Mistakes to Watch For:
- Lifting the slab too fast can cause cracks or shifting
- Using a slurry mix that’s either too thin to support weight or too thick to pump
- Failing to fix poor drainage or soft soil, leading to future sinking
- Skipping frequent level checks while pumping
- Letting the mixed slurry sit too long causes it to harden before use
Conclusion
Fixing sunken concrete yourself is a budget-friendly way to handle minor settling when the slab is still in good shape. With a bit of planning and steady work, the results can be strong and long-lasting.
Just as important is what comes next: keeping water away from the area, checking for changes over time, and sealing small cracks before they grow.
These steps help maintain the repair and prevent future sinking.
If you’re ready to take it on, gather your tools, map out the problem areas, and follow each step with care. Your driveway or patio can be safe, even, and solid.