Tree roots in your front yard can be tricky to work with. They stick out, make mowing hard, and sometimes look messy. I know this struggle firsthand with the oak tree in my yard.
Good news! You don’t need to remove the tree. I’ve found simple ways to turn those exposed roots into eye-catching features of your yard.
In this post, I’ll share seven practical ideas for handling tree roots while making your front yard more beautiful.
From shade gardens and mulch solutions to rock gardens and lighting options, these tips will help you create an attractive yard that works with your trees, not against them.
7 Creative Front Yard Landscaping Ideas Around Tree Roots
1. Create a Beautiful Shade Garden

Those large tree roots in your front yard offer a perfect spot for a shade garden. The area under trees often gets less sun, making it ideal for plants that thrive in cooler, shadier spots.
Pick the Right Plants: Shade-loving plants work best around tree roots. Hostas grow well with their broad, textured leaves in various colors. Ferns add a soft, feathery look with their arching fronds. Coral bells bring bright leaf colors from purple to lime green. Other good choices include astilbe, bleeding heart, and woodland wildflowers.
Create Layers for Visual Appeal: Plant in layers to add depth to your garden:
- Tall plants at the back or center
- Medium-height plants in the middle areas
- Low-growing plants or ground covers near the edges
This layering creates a more natural, forest-like feel in your yard.
Add a Simple Path: A path through your shade garden makes it easier to enjoy and maintain:
- Use stepping stones for a casual look
- Try gravel or wood chips for a natural feel
- Place flat stones that fit between roots
The path helps protect plant roots and gives your garden a finished planned look.
When planting, be gentle with tree roots. Use small plants that need less digging, and add a thin layer of good soil on top rather than digging deep holes that might hurt the tree.
2. Use Mulch for a Neat and Natural Appearance

Mulch offers a simple yet effective way to handle exposed tree roots in your front yard. It creates a clean look while helping both your tree and the plants around it stay healthy.
How Mulch Helps Your Trees: A good layer of mulch keeps moisture in the soil during hot days. This means less watering for you and happier plants. Mulch also shields tree roots from lawn mower damage and foot traffic. Plus, it stops weeds from growing and competing with your tree for water and food.
Choose the Right Mulch Type: Two main mulch types work well around trees:
Organic Mulch:
- Wood chips or bark – breaks down slowly and adds nutrients
- Pine straw – light and easy to spread around roots
- Shredded leaves – free if you have deciduous trees
Inorganic Mulch:
- River rock or pebbles – stay in place during heavy rain
- Rubber mulch – lasts for years without needing replacement
- Lava rock – comes in various colors for different looks
Most garden experts suggest organic mulch since it improves soil quality as it breaks down.
Apply Mulch the Right Way: Spread mulch 2-4 inches thick around your tree. Keep the mulch at least 3-6 inches away from the trunk to prevent rot and pest problems. Think of making a donut shape, not a volcano. Too much mulch piled against the trunk can cause bark decay and invite insects.
Could you refresh your mulch once a year to keep it looking good and working well?
3. Build a Decorative Rock Garden

A rock garden around tree roots creates a striking focal point in your front yard. This approach works well when you want a low-effort solution that looks good year-round.
Rocks as a Smart Solution: Stone gardens need almost no upkeep once set up. They stop soil erosion around exposed roots and protect the tree’s base from water runoff. Unlike mulch, rocks don’t need yearly replacement, saving you time and money. They also help keep the soil cool and moist during hot summers.
Create a Natural Look with Stone Variety: Mix different rocks for a more natural feel:
- Large stones (6-12 inches) to create visual anchors
- Medium rocks (2-5 inches) for the main coverage
- Small pebbles to fill gaps between larger rocks
Try combining colors like tan, gray, and white stones, or stick with similar shades for a more uniform look. Flat stones can serve as small steps between roots, while round river rocks add smooth texture.
Add Drought-Tough Plants: Complete your rock garden with plants that need little water:
- Succulents like sedums and hens and chicks
- Ornamental grasses that grow in clumps
- Small flowering plants like creeping thyme or dianthus
These plants fit well between rocks and don’t need deep soil, making them perfect for planting near tree roots without harming them.
When laying out your rock garden, please work with the tree’s natural root pattern instead of against it. This creates a more cohesive look that makes the tree feel like it belongs in your yard.
4. Building a Retaining Wall for Structure

A small retaining wall around tree roots adds structure and prevents soil erosion. It works well in sloped yards or areas where soil washes away.
How Walls Protect Roots and Add Appeal?
- Shields roots from foot traffic and lawn equipment.
- Holds soil in place, preventing erosion.
- Creates a neat, defined garden feature around the tree.
Best Materials for Root-Friendly Walls:
- Natural Stone Blocks – Blend with the outdoor setting.
- Clay Bricks – Offer a timeless, classic look.
- Concrete Pavers – Available in various colors and shapes.
- Wood Timbers – Add a warm, rustic feel.
- Gabion Baskets – Metal cages filled with rocks for a modern touch.
Height Guide:
- Small trees: 8-12 inches
- Larger trees: 18-24 inches
Proper Spacing to Keep Roots Healthy:
- Keep the wall at least 12 inches from the trunk.
- Build in sections to allow for root growth.
- Leave small gaps for water drainage.
- Extend beyond the main roots for stability.
- Use a curved design instead of a tight circle.
5. Add a Seating Area for Relaxation

The shady area under a tree makes a perfect spot to sit and rest. With some planning, you can turn this space into your favorite place in the yard.
Choose the Right Seating Option: Pick seating that fits your style and the tree’s size:
- A wooden bench is placed against the trunk for a classic look
- A hanging swing attached to a strong branch for gentle movement
- A hammock strung between your tree and a post for afternoon naps
- Simple garden stools for casual seating that’s easy to move
Make sure any hanging items are secured to branches thick enough to hold weight safely.
Make It Cozy with Extra Touches: Small details turn a basic seating area into a special retreat:
- A small table for drinks or books
- Weather-proof cushions and pillows in bright colors
- A birdbath to attract feathered friends
- A small fountain for peaceful water sounds
- Potted plants in containers that won’t harm tree roots
These extras make the space feel planned and cared for rather than just a bench under a tree.
Creating a Solid Base: Tree roots can make the ground bumpy, so add a stable surface:
- Flat pavers placed carefully between major roots
- Pea gravel or crushed stone for good drainage
- Decomposed granite for a firm yet water-permeable surface
This base prevents trip hazards and keeps the area usable even after rain. Leave small gaps around roots to allow for growth and water flow.
A well-designed seating area encourages you to enjoy your trees more often while adding value to your front yard.
6. Install Landscape Lighting for Ambiance

Good lighting can make your tree and its roots look stunning at night. The right lights turn what might be seen as a problem area into a beautiful nighttime feature.
Try Different Lighting Methods: Various lighting techniques create different moods:
- Up-lighting: Place lights at the base pointing up to show off the tree’s shape
- Down-lighting: Mount fixtures in branches to cast gentle shadows below
- Path lights: Line walkways around roots for safety and style
- String lights: Wrap branches with tiny bulbs for a magical feel
Each method creates a unique look. Up-lighting shows texture in bark while down-lighting mimics moonlight filtering through leaves.
Choose Practical Light Options: Several types of lights work well in outdoor settings:
- Solar lights that charge during the day and turn on at dusk
- LED fixtures that use little power and last for years
- Low-voltage systems that are safe and easy to install
- Warm white bulbs (2700K-3000K) that look more natural than cool white
Place Lights for Maximum Effect: Good placement makes all the difference:
- Hide fixtures behind plants or rocks during daytime
- Focus on 2-3 main features rather than lighting everything
- Light pathways for safety and to outline the area
- Use fewer, well-placed lights rather than too many.
7. Define the Space with Edging

Edging around your tree creates a neat border that sets it apart from the rest of your yard. A well-defined edge makes your front yard look tidy and planned.
Use Natural Borders: Different materials offer various looks and benefits:
- Stone edging: Natural look that blends with the landscape
- Brick edging: Classic appearance that works with many home styles
- Metal edging: Clean lines for a modern look
- Concrete curbing: Smooth, continuous border that’s very durable
- Plastic edging: Budget-friendly and easy to install
Could you look at how your choice matches other features in your yard? Materials that echo elements from your house often look most fitting.
Prevents Grass Spread: Proper edging does more than look nice:
- Stops mulch from spilling onto your lawn
- Keeps lawnmowers from hitting tree roots or trunk
- Holds soil in place during heavy rain
- Makes a clear boundary for plants around the tree
Boosts Curb Appeal: Try these ideas to make your edging stand out:
- Curved lines instead of perfect circles
- Scalloped patterns with brick or stone
- Raised edging that doubles as a small retaining wall
- Mixed materials like stone with metal accents
- Varied heights to add visual interest
Understanding the Challenges of Landscaping Around Tree Roots
Tree roots can affect the look and growth of your front yard plants. Knowing why they appear and how to work around them ensures a healthier tree and a more attractive yard.
Why Tree Roots Become Exposed?
Several factors cause roots to rise above the ground:
- Soil Erosion – Wind and rain wash away dirt.
- Aging Trees – Roots naturally thicken over time.
- Compacted Soil – Hard soil forces roots to spread near the surface.
- Tree Species – Some trees naturally develop shallow roots.
- Oxygen Needs – In poorly drained soil, roots grow upward for air.
Shallow roots are normal, but they can create obstacles when designing your landscape.
How to Protect Tree Health While Landscaping?
When improving the area around tree roots, follow these key tips:
- Limit Added Soil – No more than 1-2 inches over roots.
- Avoid Cutting Large Roots – Roots thicker than your thumb help anchor the tree.
- Keep the Base Clear – Leave 3-4 feet around the trunk free of heavy objects.
- Use Hand Tools – Power tools can damage roots.
- Choose Shallow-Rooted Plants – These won’t compete for nutrients.
Blending Functionality with Visually Pleasing
Your tree’s surroundings can be both useful and beautiful. Thoughtful design creates a space that’s inviting, practical, and welcoming to local wildlife.
Incorporating Seating Without Damaging Roots

Add seating without harming the tree:
- Use Movable Seats – Lightweight chairs won’t press on roots.
- Try a Curved Bench – Follows the natural shape of the roots.
- Build a Floating Deck – Support posts placed away from main roots.
- Use a Log Bench – Made from fallen branches for a rustic touch.
- Place Flat Stones – Casual seating spots between root areas.
Making the Space Inviting for Wildlife
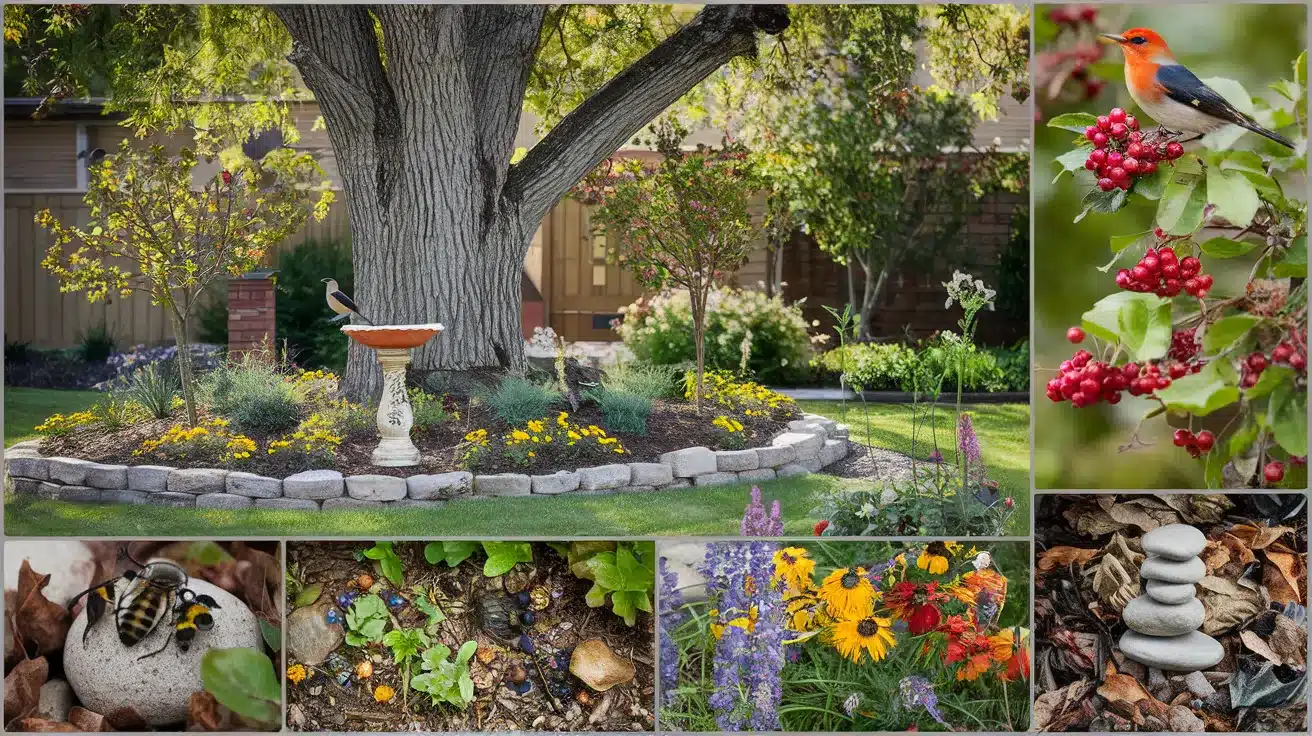
Attract beneficial animals with simple touches:
- Add a Birdbath – A shallow one on a stand works best.
- Grow Berry-Producing Plants – Provides food for local birds.
- Include Pollinator-Friendly Flowers – Helps bees and butterflies.
- Stack Small Rocks – Creates shelter for helpful insects.
- Leave a Leaf Pile – A natural home for tiny creatures.
Conclusion
Trees and their roots don’t need to be yard problems. With the right approach, they can become beautiful features. The ideas we’ve explored, from shade gardens and mulch to rock arrangements and lighting, show how exposed roots can enhance rather than detract from your yard.
The key is working with your tree, not against it. Each solution protects the tree’s health while improving your yard’s appearance. Small changes like adding edging or placing a simple bench can transform a tricky spot into your yard’s highlight.
Remember that trees add value, character, and life to your property. By treating roots as design opportunities rather than obstacles, you create a front yard that stands out for its thoughtful planning and natural beauty.