Are you looking for ways to refresh your workspace without buying a brand-new desk? I get it your desk might be functional, but it’s starting to look tired or no longer matches your style. A desk update can completely change how you feel about your work area.
I’ve gathered 16 clever desk makeover ideas that can turn that boring workspace into something you’ll love. These projects range from simple afternoon tasks to weekend projects, with options for every skill level and budget.
This post walks you through creative solutions like two-tone paint jobs, contact paper modifications, hardware swaps, and lighting upgrades, all designed to give your desk a second life without breaking the bank.
The best part? Most of these ideas cost a fraction of what you’d spend on a new desk. I’ve tested many of these techniques myself, so I know they work in real homes.
Working with a vintage hand-me-down or a basic flat-pack desk, these makeover tips can add personality and function to your workspace.
16 Stunning Desk Makeovers to Match Any Style
1. Paint It Fresh

A fresh coat of paint works magic on tired desks! I recently transformed my old oak desk with navy blue paint and was amazed at the difference.
Remember to sand lightly first, use furniture-specific paint, and apply 2-3 thin coats for professional results. This weekend project costs under $30 but looks like a complete replacement.
2.Boho-Inspired Desk

A boho-inspired desk combines colorful fabrics, woven macramé decorations, and distinctive accessories to create a relaxed, creative workspace.
To achieve this look, add patterned cloths or runners, hang macramé plant holders or wall decorations nearby, and include personal items with character, like handmade pottery, crystals, or artisanal desk organizers.
The goal is a warm, casual space that feels artistic and unconventional rather than formal or minimalist.
3. Add a Contact Paper Top

My favorite low-commitment makeover! I applied marble contact paper to my desk surface last year, and it still looks perfect despite daily use.
The trick is cleaning the surface thoroughly and using a credit card to smooth bubbles as you go. For under $20, you’ll get a waterproof, stylish surface that peels off when you’re ready for something new.
4. Install a Pegboard Wall

Transform the wall space behind your desk into an organizational powerhouse! My pegboard holds everything from scissors to small plants, keeping my desktop clear while displaying items I love.
Paint the pegboard to match your decor, then add hooks, small shelves, and bins. The vertical storage instantly makes your workspace feel more intentional and put-together.
5.Create a Two-Tone Look

This designer trick instantly modernizes boring desks! I painted my desk legs white while keeping the top natural wood, creating a custom piece that looks straight from a catalog.
The contrast between colors creates visual interest, while the wood top maintains warmth. Tape off sections carefully for crisp lines that resemble high-end furniture.
6. Apply Wood Stain

Revealing the natural beauty hiding beneath old finishes is surprisingly satisfying! I rescued a faded pine desk by sanding it down and applying a rich walnut stain, transforming it into a statement piece.
The key is patient sanding (start with 80 grit, finish with 220) and applying stain with a cloth in the direction of the grain. This technique celebrates wood’s character while giving it fresh life perfect for creating that cozy, authentic feel.
7. Add Floating Shelves Above

Expand your workspace upward with floating shelves that create a cohesive desk station! When I added two oak shelves above my desk, it instantly felt like a purposeful nook rather than just furniture against a wall.
Keep heavier items on lower shelves, style with a mix of practical and decorative objects, and consider LED strip lighting underneath for extra functionality. The vertical dimension makes even small desks feel more substantial.
8. Use Leather Accents

Leather details add that subtle sophistication that makes people wonder if you hired a designer. I wrapped plain drawer pulls with cognac leather strips secured with brass tacks, and the rich texture instantly elevated my basic desk.
A simple leather desk pad also protects your surface while adding warmth. The natural material develops a beautiful patina over time, making your desk look increasingly custom as you use it.
9. Chalkboard Paint Surface

Turn your desk into an interactive creativity zone! I painted the side panel of my desk with chalkboard paint, creating a vertical surface for to-do lists, inspirational quotes, and quick sketches.
After 24 hours of drying, condition it by rubbing chalk over the entire surface and wiping it clean. This practical feature becomes a playful design element that adapts to whatever you need that day, from meal planning to brainstorming.
10. Add LED Strip Lights

Transform your desk’s atmosphere with this 30-minute lighting upgrade. I installed adhesive LED strips under my desk edge, creating a subtle glow that makes late-night work sessions more enjoyable.
Many kits include remote controls for changing colors and brightness or even syncing with music. Beyond looking impressive, this practical addition reduces eye strain during evening hours while making your setup look intentionally designed.
11. Built-in Cable Management
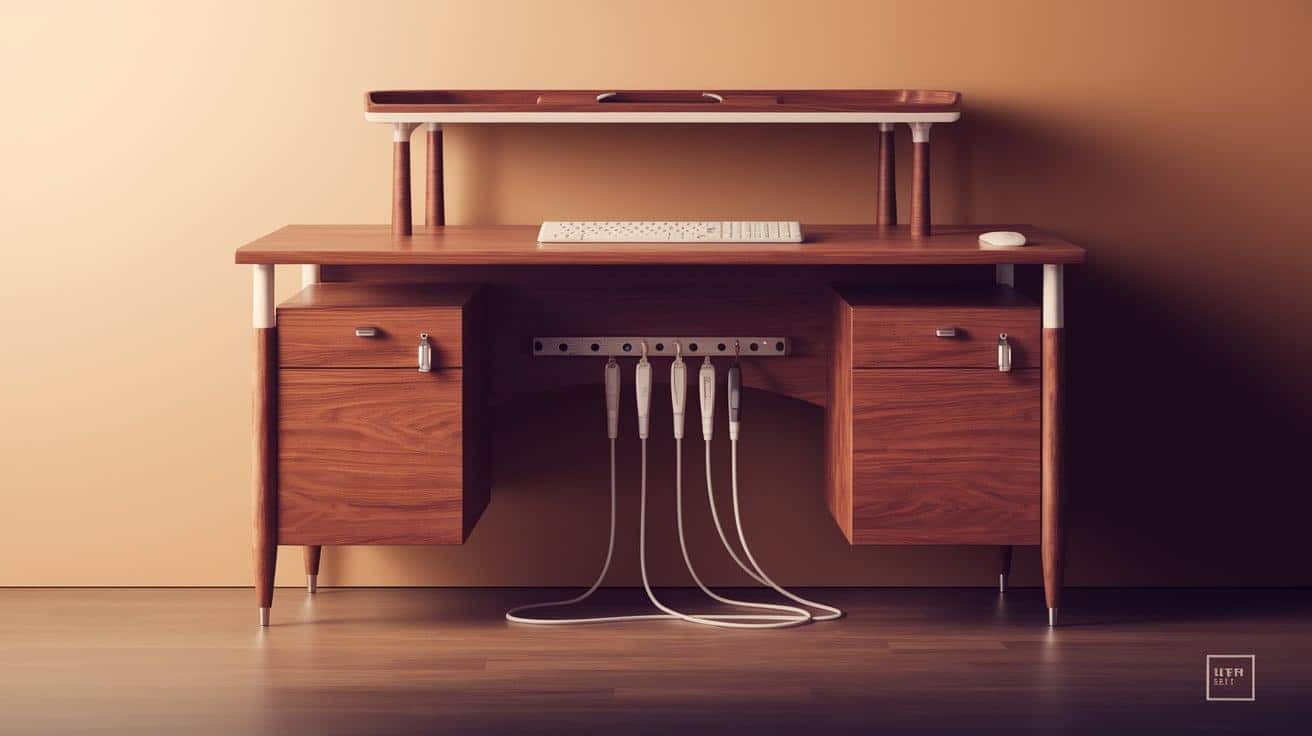
Tackle the visual chaos of cords for a workspace that looks intentionally minimalist! I drilled a 2-inch hole in the back corner of my desk and added a $5 plastic grommet, instantly hiding the tangle of chargers and cables.
For a more comprehensive solution, attach a mesh basket underneath to corral power strips and excess cord length. This small improvement dramatically improves your desk’s appearance while making cleaning easier.
12. Upgrade with Glass or Acrylic Topper

This practical upgrade instantly adds sophistication to any desk! I placed a ¼-inch glass sheet over my wooden desk surface, protecting it from coffee rings while creating a modern, reflective finish.
Local glass shops can cut custom sizes with polished edges for around $75-100, or try acrylic for a more budget-friendly option. The clear top maintains your desk’s original beauty while giving it that sleek, executive look—plus, it’s incredibly easy to clean with just glass cleaner.
13. Wallpaper the Drawer Interiors

Create delightful little surprises that make opening your desk drawers a mood-boosting experience. I lined my drawer interiors with vibrant floral wallpaper, and that unexpected pop of color makes me smile every time I reach for a pen.
Measure carefully, use wallpaper paste or double-sided tape for security, and consider coordinating with other room accents. This hidden detail feels like a special secret just for you during the workday.
14. Add Hairpin Legs

With this afternoon swap, transform a heavy, dated desk into a light, architectural statement! I replaced my desk’s chunky wooden legs with sleek hairpin metal ones, instantly modernizing the entire piece.
Most sets come with pre-drilled mounting plates. Just flip your desk, unscrew the old legs, attach the new ones, and enjoy your newly floating workspace. This simple change creates visual space underneath, making small rooms feel significantly larger.
15. Create a Built-In Look

Get custom-looking built-ins without renovation costs! I positioned my desk between two matching bookcases and added a simple trim piece across the top, creating the illusion of expensive custom cabinetry.
The key is consistent height and color across all pieces. Paint everything the same shade for truly seamless results. This clever arrangement maximizes storage while giving your workspace that permanent, intentionally designed appearance.
16. Personalize with Art and Accessories

Bring your personality into your workspace with thoughtful styling that inspires productivity! I created a small gallery wall above my desk with motivational prints, family photos, and a vintage map that sparks my creativity.
Add a characterful desk lamp, a meaningful paperweight, or plants that thrive in your space’s light conditions. These finishing touches transform functional furniture into a deeply personal spot that genuinely feels like yours.
Wrapping It Up
A refreshed desk creates a workspace that actually motivates you to sit down and be productive. The beauty of these makeover ideas is that most can be completed in a single weekend without special skills or expensive tools.
Start small with quick wins like contact paper or new hardware, then gradually tackle bigger projects as your confidence grows. The key is choosing modifications that match both your style and how you actually use your desk day-to-day.
Remember, your workspace affects your mood and productivity more than you might realize. Even simple changes can make sitting down to work feel like a fresh start rather than a chore.
Which desk makeover idea will you try first? Take a before photo you’ll be amazed at the difference when you’re done!
Frequently Asked Questions
1. What Kind of Paint Do You Use on a Desk?
For desk painting, use chalk paint, milk paint, or latex paint with a primer. Chalk paint rarely needs sanding, while latex requires prep work but offers durability and many color options.
2. Can you Refinish Just the Top of a Desk?
Yes, you can definitely refinish just the top of a desk. Sand the surface, apply wood stripper if needed, and then add new stain or paint. Protect it with polyurethane or wax for lasting results.
3. Can you Paint Over a Stained Desk?
Yes, you can paint over a stained desk. First, clean it thoroughly, then lightly sand the surface, apply a good primer, and finish with 2-3 coats of paint.