Have you ever walked past the grape section at the grocery store and winced at the prices?
What if I told you that building your grape arbor at home is much simpler than most people think? You don’t need years of gardening experience or expensive equipment.
In just one weekend, you can create a beautiful structure that will give you fresh, homegrown grapes for years to come. Plus, you’ll add a stunning focal point to your garden while creating natural shade for those hot summer days.
The best part? This project costs a fraction of what you’d spend on store-bought grapes over just two seasons.
I’m going to walk you through every step of building your grape arbor, from gathering basic materials to planting your first vine.
What Is a Grape Arbor?
A grape arbor is a wooden garden structure specifically designed to support climbing grape vines throughout the growing season. It consists of vertical posts, horizontal beams, and wire mesh or lattice panels that vines can climb on.
This framework enables grapes to grow vertically, conserving valuable garden space while providing improved air circulation and increased sunlight access. Arbors also create natural shade and add visual appeal to your outdoor garden spaces.
Basic Structure and Design
A grape arbor typically consists of four main parts-
- Vertical Posts – Usually 4×4 wooden posts that form the corners and provide the main support structure.
- Top Framework – Horizontal beams that connect the posts and create the overhead canopy where grapes will hang.
- Climbing Surface – Wire mesh or lattice panels that give grape vines something to grip and climb on.
- Foundation – Posts are set deep in concrete to ensure the structure stays stable as vines grow heavy with fruit.
Step-by-Step Guide To Grape Arbor Plans
Follow these six simple steps to build a sturdy, stylish grape arbor from cutting and assembling panels to planting your vines with confidence.
Tools Needed:
| Tool | Purpose / Use |
|---|---|
| Band saw | Cut decorative template pieces |
| Jigsaw | Cut curved decorative ends on boards |
| Router with flush trim bit | Smooth out curved cuts |
| Drill | Make pilot holes and drive screws |
| Sandpaper | Smooth, rough wood surfaces |
| Stakes and string | Mark the post layout and check the alignment |
| Level | Ensure posts are straight and even |
| Hammer | Install wire staples for mesh attachment |
| Measuring tape | Measure lumber cuts and post spacing |
Materials Needed:
| Material | Purpose / Use |
|---|---|
| Four 8-foot 4×4 pressure-treated posts | Main vertical support structure |
| 2×6 pressure-treated boards | Top horizontal beams and angled supports |
| 2×4 pressure-treated lumber | Connect the front and back panels together |
| Deck screws | Attach horizontal boards to posts |
| Pocket screws | Connect angled support pieces |
| Wire mesh (remesh) | Climbing surface for a grape vine |
| Wire staples | Secure the mesh to the wooden frame |
| Black asphalt paint | Protect buried post ends from rot |
| Dry cement mix | Set posts firmly in the ground |
| Exterior paint | Final protective and decorative coating |
Step 1: Prepare and Assemble Panels

Cut your 2×6 boards to length and create curved decorative ends using a template and a jigsaw. Smooth the curves with a router and sandpaper.
Lay out your 4×4 posts and attach the curved 2×6 boards on top with 8-inch overhangs. Add angled 2×6 support pieces from each post to the top board using pocket screws to complete your front and back panels.
Pro Tip: Make your curve template from cardboard first to test the shape before cutting expensive lumber.
Step 2: Protect Posts from Ground Contact

Paint the bottom 12 inches of each post with black asphalt paint. Pressure-treated wood isn’t designed for direct ground contact, so this coating protects against water damage, insects, and rot.
Let the paint dry completely before installation. This simple step can add years to your arbor’s lifespan.
Pro Tip: Apply two thin coats rather than one thick coat for better protection and coverage.
Step 3: Mark Layout and Dig Post Holes
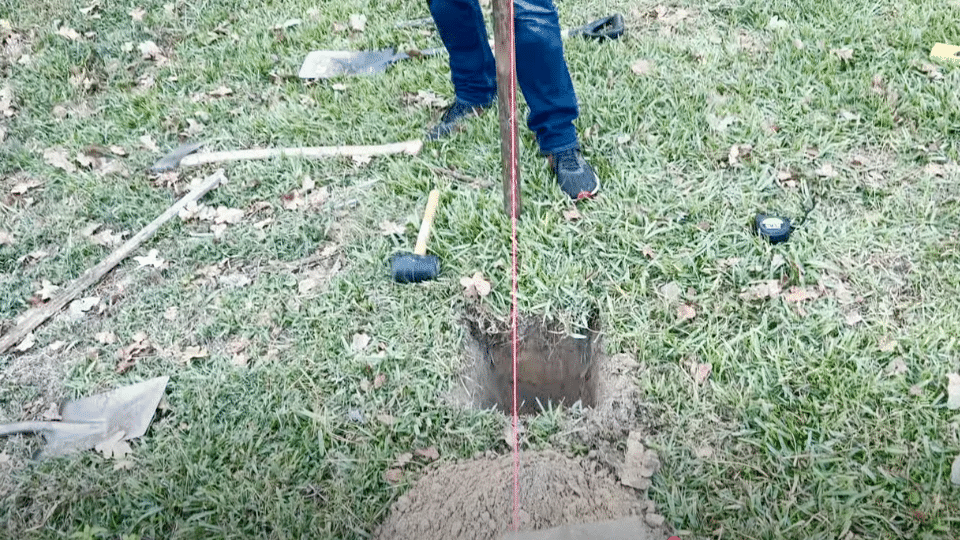
Use stakes and string to mark exactly where your posts will go. Check that everything is square and level before digging. Dig holes about 12 inches deep for each post.
Watch out for sprinkler pipes, electrical lines, or large roots that might require you to adjust your placement slightly.
Pro Tip: Call 811 before digging to mark underground utilities it’s free and prevents dangerous accidents.
Step 4: Set Posts in Concrete
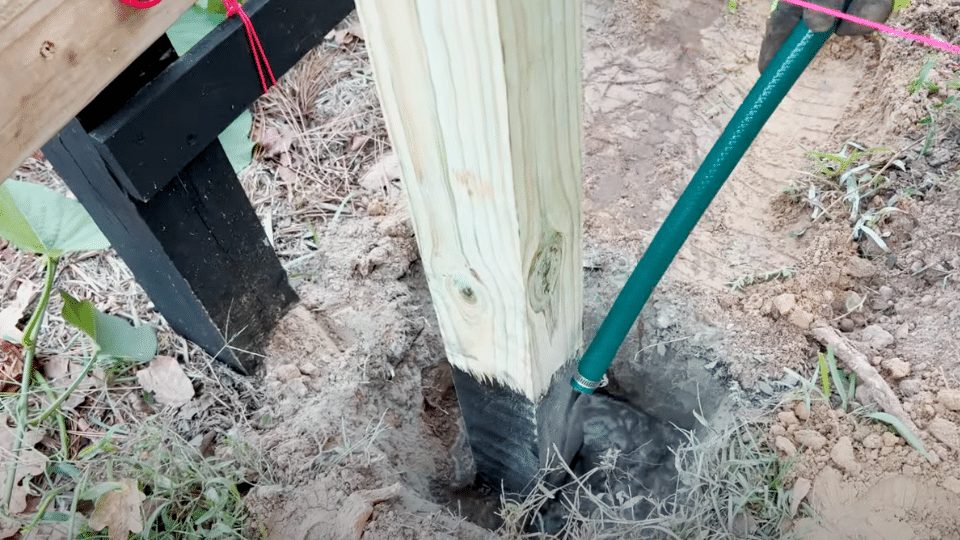
Place your assembled panels in the holes and check alignment with your string lines. Pour dry concrete mix around each post, then add water on top.
The concrete will absorb the water and set overnight. Continue to check that the posts remain level and spaced adequately as the concrete hardens.
Pro Tip: Use a level on multiple sides of each post to ensure they’re perfectly straight in all directions.
Step 5: Add Horizontal Supports and Wire Mesh
Once concrete is set, measure and cut 2×4 boards to connect the front and back panels. Install one across the top center and two along each side.
Cut wire mesh to a 3-foot width and attach it to the frame using wire staples. This creates the climbing surface for your grape vine.
Pro Tip: Leave mesh slightly loose rather than tight it needs room to flex under the weight of mature vines.
Step 6: Apply Final Paint and Plant
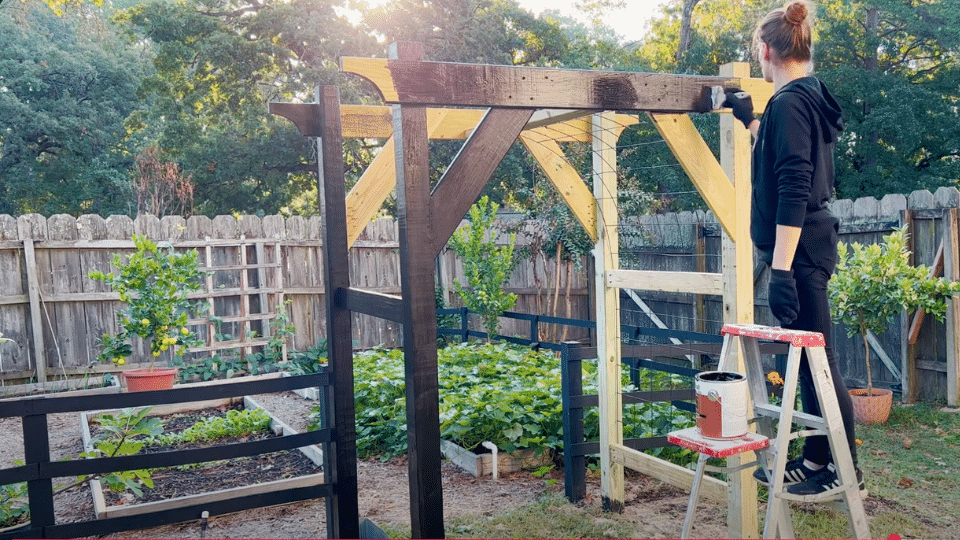
Paint the entire arbor with exterior paint to match your garden fence or desired color scheme. This protects the wood and gives a finished appearance.
Once the paint is dry, plant your grape vine at the base and gently guide initial growth toward the mesh water well after planting.
Pro Tip: Choose paint colors that complement your garden darker colors show less dirt but can get very hot in direct sun.
Video Tutorial
I’d like to acknowledge The Fruit Grove for the insightful video, which served as a key reference in compiling this guide.
Benefits of Building a Grape Arbor
A grape arbor isn’t just a decorative garden structure it serves practical gardening needs while enhancing your outdoor space. Below are the significant benefits explained clearly.
| Benefit | Description | Who It Helps Most |
|---|---|---|
| Supports Healthy Vine Growth | Provides structure for grapes to climb, improving sunlight exposure and airflow | Home gardeners, hobby farmers |
| Adds Visual Appeal | Frames your garden beautifully and acts as a focal point | Homeowners, landscape designers |
| Creates Natural Shade | Offers a cool spot beneath the arbor, especially in hot months | Families, outdoor entertainers |
| Maximizes Vertical Space | Utilizes upward space for growing grapes instead of spreading across the ground | Small-space gardeners, urban growers |
| Encourages Outdoor Living | Makes patios, paths, or seating areas more inviting and usable | Nature lovers, DIY decorators |
| Boosts Property Value | A well-built arbor can enhance property aesthetics and market appeal | Homeowners looking to sell |
In short, a grape arbor is a smart investment that seamlessly blends function with refinement, supporting healthy vine growth while transforming your garden into a more beautiful, livable, and productive space.
Conclusion
Building your grape arbor is one of the most rewarding DIY projects you can tackle. You now have all the knowledge needed to create a sturdy structure that will produce fresh grapes for decades.
Think about it: instead of cringing at grocery store prices, you’ll be walking into your backyard to harvest your own sweet, juicy grapes. Your garden will look more beautiful, you’ll have natural shade for summer gatherings, and your property value will get a nice boost, too.
The best part? Every grape you pick pays back your initial investment. Start gathering your materials this weekend and get that first post in the ground.
What grape variety will you choose for your new arbor?
Got a green thumb? Dig into more gardening tips, ideas, and plant-loving posts.
Frequently Asked Questions
What Month Do You Plant Grape Vines?
Plant grape vines in early spring (March-April) when they’re dormant. In warmer climates, you can also plant in late fall.
What Is the Best Fertilizer for Grapes?
Use balanced 10-10-10 fertilizer in early spring. Compost works great too. Avoid high nitrogen fertilizers that promote leaves over fruit production.
How Long Does a Grape Vine Take to Bear Fruit?
Grape vines typically produce their first small harvest in year two or three. Full production usually starts around year four.