Have you ever wanted to build a spooky Halloween fence but felt overwhelmed by the process? I’ve been there, searching for budget-friendly options while trying to create something that truly stands out.
Most people get stuck figuring out where to start or worry they lack the skills to build something decent.
I’m here to show you how to make an eye-catching Halloween fence without breaking the bank or needing fancy tools. My method creates a wall that looks store-bought but costs half as much.
In this guide, I’ll explain the materials you’ll need, share my step-by-step process, and offer tips for adding personal touches that will make your neighbors stop and stare.
Essential Supplies for Your DIY Halloween Fence
Before you start building, make sure you have all the necessary materials and tools ready. This will help ensure a smooth and efficient assembly process while achieving a spooky, aged fence effect. Below is a detailed breakdown of everything you’ll need.
Materials Required
Here’s what you’ll need to build a sturdy, spooky Halloween fence with a realistic aged effect.
| Material | Purpose | Quantity (Estimate per 8-ft section) |
|---|---|---|
| 2x2x8 furring strips | Wood for fence rails | 3 per section |
| 1/2-inch PVC pipe (10-foot sections) | Main vertical supports | 3 per section |
| Plastic finials (3/4-inch size) | Decorative fence toppers | 9 per section |
| Screws (1-inch or 3/4-inch) | For securing PVC to wood | 9–12 per section |
| Screws (2-1/2-inch) | For connecting wood frame | 6–8 per section |
| Black spray paint | Base coat for a wrought iron effect | 1 can per 3–4 sections |
| Gray acrylic paint (Pewter Gray) | For weathered look | Small bottle per project |
| Rust-colored acrylic paint (Nutmeg) | To create aged, rusted effect | Small bottle per project |
| Rebar | For ground installation | 2–3 pieces per section |
Tools Required
Here are the essential tools you’ll need to cut, assemble, and finish your Halloween fence with precision.
| Tool | Purpose | Quantity |
|---|---|---|
| Drill | For assembling fence | 1 |
| 7/8-inch spade bit | For drilling PVC pipe holes | 1 |
| Miter saw or other cutting tool | For cutting wood and PVC | 1 |
| Rubber mallet | For securing pieces together | 1 |
| Heat gun | To shape PVC and attach finials | 1 |
| Paintbrushes | For detailing rust and weathering effects | 2–3 |
| Level (optional) | To ensure even installation | 1 |
Step-By-Step Guidance for Installing a Halloween Fence
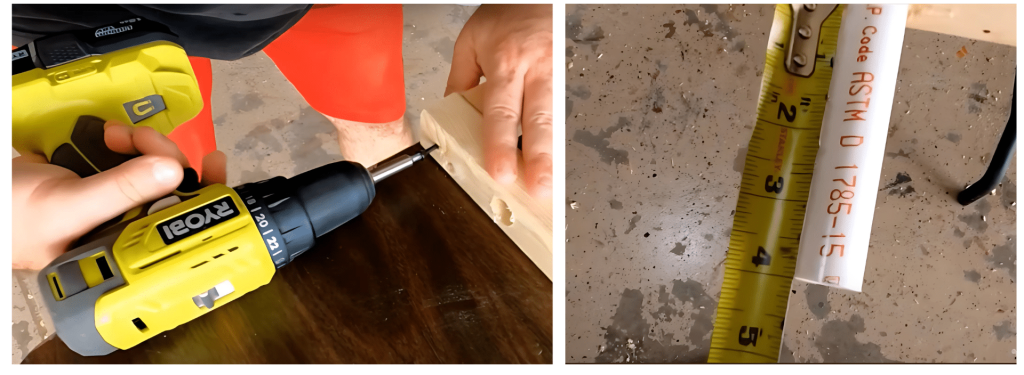
Step 1: Prepare the Furring Strips

Start by drilling 7/8-inch holes in the 2x2x8 furring strip. Make your first hole at 4 inches in, then continue drilling holes every 8 inches (at 12″, 20″, 28″, etc.) until you reach 92 inches. This will create the framework for your fence pickets.
Step 2: Create End Supports

Cut 29-inch pieces of 2×2 for your end supports. Pre-drill holes in these pieces to prevent the wood from splitting when you attach them.
Connect these end supports to your 8-foot furring strips using 2-1/2-inch screws at each corner for a sturdy frame.
Step 3: Cut and Insert PVC

Measure and cut your PVC pipe into 40-inch lengths using a miter saw or other cutting tool. Once cut, feed these PVC posts through the holes you drilled in the furring strips.
Position them so there’s approximately 4 inches of PVC extending from both the top and bottom of the frame.
Step 4: Secure the Structure
Measure 4 inches from the bottom of each PVC post to ensure consistency throughout your fence section. Add screws to secure the PVC in place, but leave the first and last posts without bottom screws.
Before securing the top, check that the upper furring strip is level for a professional look.
Step 5: Add Finials

Use a heat gun to melt the top of each PVC post for about 15-20 seconds until the plastic becomes pliable.
Quickly slide the finials onto the melted PVC tops and push down firmly to set them in place. Once cooled, secure each finial with a 3/4-inch screw to prevent them from falling off.
Step 6: Paint the Fence

Begin by applying black spray paint as your base coat over the entire fence section. After this layer dries completely, use a dry brush technique to lightly apply gray paint over the black, allowing some of the black to show through.
For an aged, weathered appearance, add a final layer of rust-colored paint using the same dry brush method.
Step 7: Installation

To set up your fence, drive pieces of rebar into the ground where you want your fence to stand. Then simply slide the first and last PVC posts (the ones without bottom screws) over the rebar to secure the fence in place.
Connect multiple sections by butting them together and running screws through the end supports.
For a visual walkthrough, check out the video by “Halloween at The Manor” to view the process in action!
Alternative Approaches for Your Halloween Cemetery Fence
- Use 1×2 lumber instead of 2×2 furring strips for a lighter, less expensive fence that’s easier to transport. The thinner wood reduces weight by nearly half while still providing adequate structure. This approach makes the fence more manageable for solo setup and reduces storage space requirements during the off-season.
- Create fence pickets from painted foam insulation boards for an ultra-lightweight option that’s easy to cut into decorative shapes. Foam boards can be easily carved with a utility knife to create gothic spires, decorative cutouts, or damaged/aged effects. When sealed and painted properly, these can withstand light weather conditions while being incredibly lightweight.
- Construct the fence from repurposed pallet wood for a zero-cost, weathered look that requires minimal painting. Pallets already have an aged appearance that’s perfect for cemetery aesthetics. Simply disassemble the pallets, arrange the slats vertically on horizontal supports, and add decorative tops if desired. The natural weathering means less painting work.
- Replace finials with dollar store plastic skulls or Halloween figurines for unique fence toppers that add character to your display. These can be attached using hot glue or by drilling holes in the bottoms. This approach allows for creative customization and can tie your fence design into your overall haunt theme.
- Create a fold-up accordion-style fence from connected garden lattice panels painted black for quick setup and storage. The panels can be hinged together with flexible connectors, allowing the entire fence to fold flat when not in use. This design eliminates the need for tools during setup and can be deployed in minutes.
- Use pre-made garden border fencing as a base and enhance with Halloween decorations for minimal construction. These ready-made sections can be found at garden centers and simply need to be pushed into the ground. Adding cobwebs, moss, small ravens, or other Halloween elements transforms them into spooky cemetery boundaries with almost no building required.
Maintenance Tips for Your Halloween Fence
- Store fence sections in a dry place to prevent warping and mold.
- Check and tighten loose finials or screws before storage.
- Touch up chipped paint annually to maintain the spooky look.
- Apply a clear protective spray to shield paint from weather damage.
- Replace cracked PVC posts individually instead of rebuilding.
- Inspect wood annually for rot or damage and replace compromised parts.
Common Mistakes to Avoid When Building a Halloween Fence
1. Choosing the Wrong Finial Size: Using finials that don’t match your PVC pipe diameter can lead to an improper fit, making them loose or difficult to attach. Always check measurements before purchasing.
2. Not Leaving Enough PVC at the Bottom for Stability: If the PVC pipes don’t extend far enough below the lowest rail, the fence may wobble or topple in windy conditions. Always allow enough length for a secure ground insertion.
3. Forgetting to Secure Finials with Screws: Simply attaching finials with heat isn’t enough, without screws, they can fall off over time. A small pan-head screw ensures they stay firmly in place.
4. Using the Wrong Type of Paint: Using interior paint instead of exterior paint will cause the finish to peel and fade quickly in outdoor conditions. Always choose weather-resistant exterior paint for longevity.
5. Placing Fence Posts Too Far Apart: Setting posts too far apart can make the fence weak and prone to leaning or collapsing. Keep spacing tight enough to maintain structure and durability.
Conclusion
With these techniques and alternatives in your Halloween arsenal, you’re ready to create the perfect boundary for your home haunt.
Whether you choose the classic PVC design or one of the alternative approaches, the right cemetery fence transforms an ordinary yard display into an immersive experience that will impress neighborhood trick-or-treaters and Halloween enthusiasts alike.
Remember that the most effective cemetery fences balance appearance with practicality, creating something that looks appropriately weathered and creepy while remaining sturdy enough for outdoor use and manageable for storage.
By investing a weekend into this project, you’ll create a Halloween decoration that not only enhances your display this year but can become a signature element of your home haunt for many Octobers to come.